[In Progress] This coop began the planning phase in August 2016 and began assembly in September 2016. It is designed for 6-7 laying hens to fit comfortably, with a safe place in the winter months of WV. We have a separate coop/run for other situations, non-layers of any sort.
I'll list literally everything here in case you need more information exactly.
Materials:
1 lb outdoor wood screws (some 1", some 3/4")
.5 lb 1 7/8" coated sinker nails
Tape measure
2 power drills
Hand saw and miter saw
Claw Hammer
Large Level, with vertical and diagonal
7 sheets of OSB/Plywood
1 2x6x16
15 2x6x10
52" of 4x4 for posts (free)
Large roll of hardware cloth
10 2x6x8
8 2x4x8
6 hurricane ties for the roof ($3)
1 locking gate latch
Lots of remaining scrap lumber rom cuts to build to be used for roosts, etc
One window frame (wood only) (free)
I'll list my prices and my unnecessary items annotation later when I've finished.
It started with a 3/4 in piece of plywood from the Habitat store. It had corners rounded down so I made it my base and went in. Everything here is slightly less than 4x8 at the base. Ended up more like 7ft 5"
And 3 ft 5" actual outside measurement.
We laid 2 side wall studs and 2 front/back studs to the floor piece and then the little 4x4 leg posts at the random measurement of 13" from the plywood. Don't ask why.
Then we added the center pieces, 3 of them, to stabilize the floor.

Then, we carried it up to it's location, debated on the leveling and settled for rocks to correct any issues because I have plenty of those handy.
We returned to the work area to start the two side walls, and I figured moving from 48" to 72" on the roof would be acceptable so we double cut each board at their height (4 boards total on each side), then we used a long piece of scrap to measure out an angle for the slope and cut the slope to fit the lay of our roof. Then, we put the top and bottom 2x4 on and the plywood interior was cut out for that shape. I left a 6" rear overhang and about 15" up front for the overhang. The plywood was fit to the interior only because I'll be insulating my coop and adding the exterior walls later.
We framed around a window and left a larger gap on the back wall for a later exterior access coop section.
The back was put up with more 2x4s and then plywood laid on the inside and nailed in.
The roof ends on the side walls were laid on the 4" side for stability. The following day I laid them long-ways, after having marked them out for correct spacing from the wall top down, so it would support the roof. I used 5 of them about 69" long matching the sides. I used hurricane straps to hold the back of the beams in place.
I framed up the bottom for the sweep door and measured out where I wanted my nests and my roosting bars.
Today we finished the interior front walls, added a few stabilization beams, laid the .5" plywood roof on (took 2 sheets, slick side down). We also cut the window out for the interior and I played with the bucket nest idea.
I added insulation, closed in the remaining exterior walls, laid some excess underlayment on the plywood for the roof and then laid two rows and some change of the roofing.
I've been thinking about how to arrange the interior as the exterior gets finished. I'm considering a shelf of bucket nests, along with a couple of lower boxes. I have room to make exterior nest boxes but I'm trying to finish 2 walls of siding first and get the door latched for safety.
In November I'll have to make a run for the chickens extending under the neighboring trampoline, and at this time I may have as many as 9 pullets.
----Update in November ----
Here are some progress pictures. Any questions just post!
Here's the building of the nest boxes that I wanted to put into the coop for more floor space availability
I put a latch on the door and hinge on the sweep/lower access door
I also put in 2 bucket boxes which my younger chicken likes to sleep in")
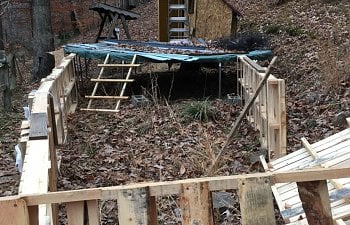
I then took 12 free pallets, 3 pieces of galvanized steel roofing and some wood planks to build an enclosure/run for winter prep. The run comes down in a hoop, masonry wire underneath in a semi circle, to the trampoline. That portion is 13' across, I rolled garden wire around it to the pallet start portion. This took me about 9 hours of total work.
It's 20ft long here and tapers from 9' ft across to 3.5'ft across.
I'll list literally everything here in case you need more information exactly.
Materials:
1 lb outdoor wood screws (some 1", some 3/4")
.5 lb 1 7/8" coated sinker nails
Tape measure
2 power drills
Hand saw and miter saw
Claw Hammer
Large Level, with vertical and diagonal
7 sheets of OSB/Plywood
1 2x6x16
15 2x6x10
52" of 4x4 for posts (free)
Large roll of hardware cloth
10 2x6x8
8 2x4x8
6 hurricane ties for the roof ($3)
1 locking gate latch
Lots of remaining scrap lumber rom cuts to build to be used for roosts, etc
One window frame (wood only) (free)
I'll list my prices and my unnecessary items annotation later when I've finished.
It started with a 3/4 in piece of plywood from the Habitat store. It had corners rounded down so I made it my base and went in. Everything here is slightly less than 4x8 at the base. Ended up more like 7ft 5"
And 3 ft 5" actual outside measurement.
We laid 2 side wall studs and 2 front/back studs to the floor piece and then the little 4x4 leg posts at the random measurement of 13" from the plywood. Don't ask why.
Then we added the center pieces, 3 of them, to stabilize the floor.


Then, we carried it up to it's location, debated on the leveling and settled for rocks to correct any issues because I have plenty of those handy.
We returned to the work area to start the two side walls, and I figured moving from 48" to 72" on the roof would be acceptable so we double cut each board at their height (4 boards total on each side), then we used a long piece of scrap to measure out an angle for the slope and cut the slope to fit the lay of our roof. Then, we put the top and bottom 2x4 on and the plywood interior was cut out for that shape. I left a 6" rear overhang and about 15" up front for the overhang. The plywood was fit to the interior only because I'll be insulating my coop and adding the exterior walls later.


We framed around a window and left a larger gap on the back wall for a later exterior access coop section.
The back was put up with more 2x4s and then plywood laid on the inside and nailed in.


The roof ends on the side walls were laid on the 4" side for stability. The following day I laid them long-ways, after having marked them out for correct spacing from the wall top down, so it would support the roof. I used 5 of them about 69" long matching the sides. I used hurricane straps to hold the back of the beams in place.
I framed up the bottom for the sweep door and measured out where I wanted my nests and my roosting bars.


Today we finished the interior front walls, added a few stabilization beams, laid the .5" plywood roof on (took 2 sheets, slick side down). We also cut the window out for the interior and I played with the bucket nest idea.
I added insulation, closed in the remaining exterior walls, laid some excess underlayment on the plywood for the roof and then laid two rows and some change of the roofing.


I've been thinking about how to arrange the interior as the exterior gets finished. I'm considering a shelf of bucket nests, along with a couple of lower boxes. I have room to make exterior nest boxes but I'm trying to finish 2 walls of siding first and get the door latched for safety.
In November I'll have to make a run for the chickens extending under the neighboring trampoline, and at this time I may have as many as 9 pullets.
----Update in November ----
Here are some progress pictures. Any questions just post!
Here's the building of the nest boxes that I wanted to put into the coop for more floor space availability


I put a latch on the door and hinge on the sweep/lower access door


I also put in 2 bucket boxes which my younger chicken likes to sleep in

I then took 12 free pallets, 3 pieces of galvanized steel roofing and some wood planks to build an enclosure/run for winter prep. The run comes down in a hoop, masonry wire underneath in a semi circle, to the trampoline. That portion is 13' across, I rolled garden wire around it to the pallet start portion. This took me about 9 hours of total work.


It's 20ft long here and tapers from 9' ft across to 3.5'ft across.