CASA DE POLLO" -- Beautiful & Functional Dream Chicken Coop with attached Run
Welcome to my chicken coop: "Casa De Pollo"!
This is a very beautiful and very functional chicken coop with attached run that my husband made for me (along with assistance from me and our teenage son) based on what I came up with for my "dream chicken coop".
"Our Story:"
Our chicken journey started in March of 2015 when the local feed stores had adorable little pullets for sale!
I just HAD to have chickens and of course needed a coop. But not just "any coop". I wanted a chicken coop that would be beautiful, not LOOK like a chicken coop, and that would survive our Colorado winters, rain, snow and wind, and also be extremely functional. I only wanted to do it once and to do it right!
We looked at prefab kits and none of the store-sold chicken coops fit my needs and didn't seem sturdy enough. Custom made large coops were very expensive and again, didn't meet all my needs and desires.
My husband said "I can make you one" -- so after much thought and shopping for the "perfect coop" which was no where to be found -- I told him that I had decided to let him make me my dream coop. Game on!
We purchased our little pullets -- put them in the brooder in the house-- and then the timeline was ON .... now we knew we needed a coop and it was time to start planning and building!
March 2015-- Planning the Coop
The very first step was to decide what I wanted which was:
* I wanted the coop to match my house
* I wanted the coop to NOT look like a chicken coop
* I wanted it to be Cute and Adorable and pleasant to look at (and not an eye-sore to the neighbors)
* I wanted it to be year-round weatherproof
* I wanted to to be predator proof
* I wanted it to be safe and functional
Our house is white and grey with a slate colored roof. So that is what we decided to do for the coop.
Style wise we wanted it to match the house in terms of colors (light grey with white trim and matching roof) and siding. I also wanted it to look like a play house or cottage.
I wanted it to be a full size walk-in coop with an "entry way" big enough for storing feed and supplies with a "screen door" to the part that the chickens were in.
I wanted to have the ability to collect eggs from inside (important on those snowy & inclement weather days).
I wanted a sturdy attached covered run that was big enough for an adult to walk around in -- and full size doors.
I wanted the run door in the run to be big enough to get a standard wheel barrow through the door also.
I wanted WINDOWS! Let the light in! Good ventilation!
Also: An automatic chicken coop door.
Hardware cloth above and below ground, and no way for predators (not even mice) to get in.
Window boxes for flowers (for looks).
Also wanted a "cleaning door" just for cleaning out the chicken part of the inside of the coop, that opened to the run, for ease in cleaning.
2 nesting boxes inside and an inside roost with a poop board beneath.
I drew up a sketch for my husband... and thus we began....
(this is his modified sketch)
Note: The "porch" in the front of the doorway was dropped during construction to make the roofline less challenging.
Otherwise this is pretty true to what we ended up doing!
April 2015-- Choosing the site for the coop!
So.... we picked a spot on the north side of our yard... about 25' from the house. Easy to get to and run a hose or electrical cord if needed, but far enough away. It gets sun in the morning / afternoons but also has trees to the west and east that provide some shade at varying times of the day. It's the perfect mix of sunshine and shade, and a lovely spot for the coop to sit.
Visible from my back yard or back porch yet not visible from the street when you look at the house from the front. The coop structure also does not deter our view from our back windows. We placed it on the north east side of the yard. We chose the site carefully, keeping in mind that our neighbors would be able to see the structure. I didn't want a coop that would be an eyesore and didn't want passersby to see it and even realize that it was a chicken coop. The site selected was perfect!
April 2015 -- Ground Breaking!
So...the site that we chose for the coop was not level. That part of the yard slopes from west to east and from south to north, draining water out of the yard and away from our house. We needed level ground for building our dream coop ... and thus the digging began!
My husband mapped out the spot, marked it with string and posts and began digging (manually).
We then paid a local guy $50 to dig out the base with his tractor... That did most of the hard dirt moving, and my husband and son dug the rest out by hand. Lots of hard work. Thank goodness for the guy with the tractor!
We then ordered 13 tons of roadbase mix and had that delivered. We chose the roadbase mix because it would not move once wet. Topsoil wasn't structurally sound enough. It was a little more expensive but worth every penny. We needed the site to be solid and level and withstand rain, snow, ice, freezes and more. A good solid foundation. My son and husband carted the roadbase mix from a giant pile in our driveway, down to the coop site, load by load, using a trailer behind our lawn tractor, and shovels. Again, lots of hard work and manual labor! The ground was not level so we had to level it for the coop. Just the cost of doing the site groundwork, in preparation for building the coop exceeded what my husband originally thought he could build a whole coop for. LOL It was just the start...
April/May2015--
Building the base/foundation for the coop & run.
We laid hardware cloth and outlined the base with 2 layers of concrete block; then put down the roadbase & dirt; my husband put in a drain (cut down later to ground level) also.
It felt so good to have progress under way!
May 2015--
So excited! Wood being delivered from Home Depot:
We stored the wood under a tarp on the driveway to help protect from rain.
https://www.backyardchickens.com/content/type/61/id/7449595/
And.... YAY!! CONSTRUCTION BEGINS!!!!!
5/24/2015--
Laying the Foundation & putting in the footings...
And the foundation is built! Yay!
Yay! Foundation is in!
Time to put up the walls!
Measure, measure and remeasure!
Getting ready to hang the door and windows.
Making sure everything is level:
May 25, 2015 --
Base and main structure are up! Looks so good!! I am excited!
05/30/2015--
Putting in the windows
Yay! Windows are in and door is up!
We used playhouse windows and an inside closet door to get the width we needed.
Our son watched the chickens in the yard while Dad worked on the coop.
Windows are in and framed! Yay!
Framing the door trim:
https://www.backyardchickens.com/content/type/61/id/7450292/
05/31/2015--
Putting the roof on!
May 31st, 2015--
Roof is on, windows are framed and in place, door frame is up and vent is in!
Getting ready to tile the roof...
Tiling the roof with asphalt shingles:
Yay! We have a roof!
Adding the run!
https://www.backyardchickens.com/content/type/61/id/7450447/
Whoohoo!! It is almost done!! Fully put together... excited!!
INSIDE PHOTOS -- Pics in process of being built:
Inside the coop... Cleaning door, automatic chicken door, and vinyl flooring.
Framing the screen door (for inside the coop):
Pictures of the inside:
Hanging the screen door inside:
June 30, 2015:
Chicken house is coming along!! The run is complete. Larry is working on siding and soffits..
August 16, 2015--
Getting ready to do trim paint! Yay!
August 16, 2015 --
Got most of the trim paint done.
Soffits and fuschia are complete!
Chicken coop is almost finished. So happy!
August 29th, 2015--
Worked some more on the chicken coop today and got the solar lights up.
Exterior paint is almost finished!

I found these neat wrought iron plant holders at a local boutique and found the hanging solar lights at Home Depot,
and put them together on the coop for unique and adorable evening outside lighting on my coop. (see above)
September 6, 2015--
Yay! We have eggs!!! First eggs! So excited. The two little cream ones were laid first.
So excited!
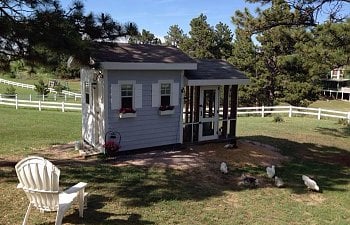
September 2016--
Coop and run are finished & flowers planted in the window boxes!
Love it! So happy!!
Run is screened in with 1/4" hardware cloth all the way around and 2x6 boards for heavy duty construction to withstand predators, snow, winds and bad weather.
When you walk inside there is an "entry way" where I keep feed and there are sliding doors into the two nesting boxes.
I wanted to be able to go inside when it was raining or snowy outside and visit the chickens and collect eggs without standing in the snow and wind.
This pic (above) shows the two sliding nest boxes. I did paint the inside but these pics are prior to painting the inside of the coop.
From the entryway inside the coop there is a tall people size screen door which leads into the "chicken's side of the building".
(above) View into the nesting box when the door is slid up.
These are Miller Mfg Nesting boxes and are hooked on with screws. They are easy to unhook, remove and clean.
I chose them over wooden nesting boxes due to less chance of them having lice or mites.
These doors to the nesting boxes slide up. My husband made the "tracks" from leftover roof flashing.
Above the nesting box doors is this screened area so I can look into the chicken's side from the entry way.
View of roof... open to soffits to allow air flow.
(sorry for the sideways pic above -- this is a pic of the roof in front with the vent near the top of the ceiling)
Door into the coop.Vinyl covering on floor.
We put in wood paneling with insulation behind it in the coop:
Lots of windows! These are "Playhouse Windows" and open up and lock closed. They have screens on them so when they are open, it lets air flow through nicely.
Automatic Door opener installed! It is WONDERFUL! Highly recommend!
Walls up inside the coop!
Temporary roosts and here are the nesting boxes from the inside of the coop. One is low so that my silkies can access it easily.
Cleaning door, leading out into the run.
Temporary Roost
Brooder box was temporarily in the coop while the chickens were in their grow-out teenage phase.
Inside the coop:
https://www.backyardchickens.com/content/type/61/id/7448421/
I painted the walls a soft yellow so it would be bright and cheerful and sunny.
We put up a poop board with vinyl tiles on it, for easy cleaning.
We used balcony railing with rounded edges for the roost and put them in holders so we could remove them if needed.
Everything was done to think of ease of use and easy cleaning and just being very functional!
The finished inside --- cleaning door to left, automatic chicken door, rounded roosts (safe for feet) and poop board with vinyl tiles for easy cleaning, and nesting boxes (easy to clean and very functional).
https://www.backyardchickens.com/content/type/61/id/7458649/
I think they like it:
Out in the run:
The finished inside --- cleaning door to left, automatic chicken door, rounded roosts (safe for feet) and poop board with vinyl tiles for easy cleaning, and nesting boxes (easy to clean and very functional).
Me, covered in paint after doing the trim paint on the coop!! (below)
Welcome to "Casa de Pollo", our Coop, established 2015.
")
This sign is inside our coop.
Our chickens are happy and love the coop and run!
https://www.backyardchickens.com/content/type/61/id/7446856/
https://www.backyardchickens.com/content/type/61/id/7446858/
https://www.backyardchickens.com/content/type/61/id/7446858/
September 2015--
The finished coop!
Next year we will do landscaping!!
Future plans on my to-do list include:
1) landscaping around the coop
(2) inside window sills/frames
(3) Curtains on the inside of the windows
(4) hardware cloth for the screens
(5) install inside ceiling and "attic storage"
These are all on my to-do list for this summer!
But in the meantime, I love it! This is my happy place!
It's functional and beautiful and I have happy safe chickens!
Thanks for viewing my coop!
I hope you love it! <3