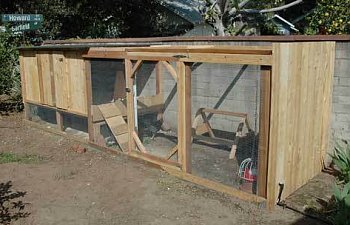
So, we got our first chicks ever this January, which meant we needed to build our first chicken coop. I did a lot of research here at BYC and learned a ton, and came up with a design that should be practical. A key point was easy access in spite of its low profile, so the roof and run cover are all hinged (in three sections) so it opens up for cleaning. Also we tried to build it extra-sturdy to keep out both our own dogs and the neighborhood raccoons. Here's the finished product:

First we selected the site, where our vegetable patch once was. Since it receives too much shade during the summer to grow much, I figured it would be a nice spot to build the coop. The overall site is about 4 1/2 feet wide and 16 feet long, and about 4 1/2 feet high, so our neighbor doesn't see it over our wall. I'm trying to be discreet so our neighbors don't complain.
We framed it all with redwood 2x4's we had "left over" from fencing our yard, and buried flattened galvanized rain gutters around the perimeter to prevent predators from digging. The henhouse is elevated to provide an extra-shady spot for cooling off in the summer, and it's open at the south end for lots of ventilation. The solid wall at the south end is to conceal the setup from anyone looking up our driveway, and also to provide some shade in the winter, which can sometimes be surprisingly warm. The screening is 1/2 inch hardware cloth. I do wish I'd painted the wall before starting - it would be nice to have the run look a little less like Stalag 13.
The interior of the henhouse is about 7 feet by 4 1/2 feet - plenty of room for four hens to stretch out and be comfy. The siding is cedar fence planks (and the floor too). The short boards at this end keep the bedding from getting kicked out into the run, and provide an extra perching spot. I think I'd like to add a removable panel at the bottom of the henhouse door, to keep the bedding from spilling out the side when I open it . . .
I made a feeder out of PVC rain gutter stuff, and I especially like the funnel at the top - makes it really easy to fill.
. . . and on the advice of a neighbor I added an automatic waterer. I hung an upside-down hanging plant basket over the water to keep the girls from sitting on it.
The waterer is "plumbed in" using leftover drip-irrigation stuff. So far it works great!
John built the girls their first grown-up roost - took them a few nights of me putting them up there before they figured out it's a nice place to sleep. It's a redwood 2x4 ripped with 30 degree angles and sanded to be somewhat rounded. They seem to like it.
It's amazing how fast they've grown - in just two months they've gone from little fluffballs to big fluffy ladies!
. . . and I think they enjoy their new home!
Future plans include adding a nestbox to the rear wall of the henhouse (I'm thinking one will be sufficient for 4 hens) and maybe adding some decorative touches - don't know what those will be yet. Since the girls don't seem to use the ramp I may get rid of it, although they do seem to like hiding under it! I also think I'll dig out under the waterer and put in a gravel pit, since I dump the water twice a day - it would be nice to have better drainage. Otherwise I'm thrilled with how it turned out - much better than I had hoped (thanks to John's construction skills). Any other changes we might need will have to be discovered as the set-up "matures". Hope you like it as much as I and (more importantly) the chickens do!
Here's an update: I did put a gravel pit, with rocks at the top, under the waterer for drainage - and that's working great. I also took many other people's advice and covered the run with about 2 inches of sand, and boy do I wish I'd done it sooner! It's much easier to clean than the bare dirt was . . . and it keeps the girls' feet much cleaner too. So far the girls have made it through their first summer out there with no problem, even on 100+ degree days. I hope we fare as well this winter once the rains start!
Update #2: I've put a plastic corrugated roof over the run area to keep it dry. It lets a little rain in at the edges but keeps the area nice and dry overall, and also offers more shade during the summer. Also makes it easier to get the leaves off the top. Overall another good improvement. We now have two nest boxes since Buffy turned out to be a "big boned gal" so one box is larger than the other. No other changes in the works - it's all working pretty well as it is right now. I'll be adding some new chicks in the spring - we'll see how that goes!!

First we selected the site, where our vegetable patch once was. Since it receives too much shade during the summer to grow much, I figured it would be a nice spot to build the coop. The overall site is about 4 1/2 feet wide and 16 feet long, and about 4 1/2 feet high, so our neighbor doesn't see it over our wall. I'm trying to be discreet so our neighbors don't complain.

We framed it all with redwood 2x4's we had "left over" from fencing our yard, and buried flattened galvanized rain gutters around the perimeter to prevent predators from digging. The henhouse is elevated to provide an extra-shady spot for cooling off in the summer, and it's open at the south end for lots of ventilation. The solid wall at the south end is to conceal the setup from anyone looking up our driveway, and also to provide some shade in the winter, which can sometimes be surprisingly warm. The screening is 1/2 inch hardware cloth. I do wish I'd painted the wall before starting - it would be nice to have the run look a little less like Stalag 13.


The interior of the henhouse is about 7 feet by 4 1/2 feet - plenty of room for four hens to stretch out and be comfy. The siding is cedar fence planks (and the floor too). The short boards at this end keep the bedding from getting kicked out into the run, and provide an extra perching spot. I think I'd like to add a removable panel at the bottom of the henhouse door, to keep the bedding from spilling out the side when I open it . . .
I made a feeder out of PVC rain gutter stuff, and I especially like the funnel at the top - makes it really easy to fill.

. . . and on the advice of a neighbor I added an automatic waterer. I hung an upside-down hanging plant basket over the water to keep the girls from sitting on it.

The waterer is "plumbed in" using leftover drip-irrigation stuff. So far it works great!
John built the girls their first grown-up roost - took them a few nights of me putting them up there before they figured out it's a nice place to sleep. It's a redwood 2x4 ripped with 30 degree angles and sanded to be somewhat rounded. They seem to like it.

It's amazing how fast they've grown - in just two months they've gone from little fluffballs to big fluffy ladies!


. . . and I think they enjoy their new home!

Future plans include adding a nestbox to the rear wall of the henhouse (I'm thinking one will be sufficient for 4 hens) and maybe adding some decorative touches - don't know what those will be yet. Since the girls don't seem to use the ramp I may get rid of it, although they do seem to like hiding under it! I also think I'll dig out under the waterer and put in a gravel pit, since I dump the water twice a day - it would be nice to have better drainage. Otherwise I'm thrilled with how it turned out - much better than I had hoped (thanks to John's construction skills). Any other changes we might need will have to be discovered as the set-up "matures". Hope you like it as much as I and (more importantly) the chickens do!
Here's an update: I did put a gravel pit, with rocks at the top, under the waterer for drainage - and that's working great. I also took many other people's advice and covered the run with about 2 inches of sand, and boy do I wish I'd done it sooner! It's much easier to clean than the bare dirt was . . . and it keeps the girls' feet much cleaner too. So far the girls have made it through their first summer out there with no problem, even on 100+ degree days. I hope we fare as well this winter once the rains start!
Update #2: I've put a plastic corrugated roof over the run area to keep it dry. It lets a little rain in at the edges but keeps the area nice and dry overall, and also offers more shade during the summer. Also makes it easier to get the leaves off the top. Overall another good improvement. We now have two nest boxes since Buffy turned out to be a "big boned gal" so one box is larger than the other. No other changes in the works - it's all working pretty well as it is right now. I'll be adding some new chicks in the spring - we'll see how that goes!!