In the chicken world, things don't always go as planned, or replanned, or planned again. You see, I had many, many drawings for our first chicken coop before we finally ended up with this one. I can't even begin to tell you how many hours I put into a chicken coop/run design.

At first, I had this fantastic design for a modified Purina coop. I loved my design. The problem was, I was stuck with the reality of actually building the coop. I wasn't sure how I was going to build it, or move it, or hold the posts and put it together on my own. My wonderful husband liked our chickens, but the thought of building a coop overwhelmed him, too. He was very busy and couldn't really put a lot of effort into them. It was an issue of time - we were lacking it, and our girls were getting big. We needed to act fast.
Below is the first design that I had my heart set on. Since this page already has comments on it, I'll keep the info regarding this first design here on this page.
This initial design was meant to house 3 or 4 city chickens. The total square footprint for the coop was to be 12 sq. ft. The total square footprint for the outside run was to be 36 sq. ft (24 sq. ft. exterior run plus 12 sq. ft. beneath the coop). The design was meant to be a modified Purina coop. Currently, our intended modifications were:
So, how did we manage to drastically change to the coop that we currently have? As the pressure to have a completed coop mounted (because the girls were getting big), I began to shop Craig's List. I still wanted a coop that I could customize. I didn't want to try and fit someone else's coop and run into my landscape.
One day, an ad for an unfinished coop showed up. The coop was built, but unfinished. It was bare wood and did not have a roof. The roost poles were not in a position where we needed them to be, and the egg box entrances were way too small for our Light Brahma. So, we got to work to making modifications to the unfinished coop.
The first thing we did was cut the egg-box entrance holes larger. We moved the roosts. We filled nail and screw holes with wood putty. We sanded the coop until it was smooth. Then, we spray-painted it with white primer.
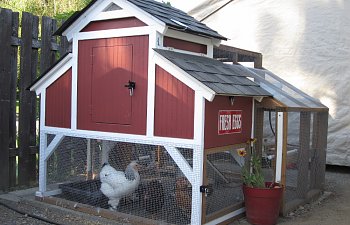
Then we painted it with "Barn Red" paint, and trimmed it out with white paint. My husband roofed it using left-over shingles from when he roofed our house and shed. We added black hardware to add to the country decor.
After the coop was finished, the girls started to sleep in the new coop at night. That was fun. But, we still needed to move it in place and build a run. So, we got to work building the run. The girls did, too.
Our girls had already had a run-in with a neighbor's black lab, so safety became a high priorty. We went over-the-top on safety features for this coop and run.
The first safety feature was the automatic "Pullet Shut" chicken door. The chicken door is powered by a battery pack that gets charged via a small solar panel.
(Hiding beneath the blue tarp is the wood for the run. The coop and run were completed when we were having frequent rain showers, so we kept it covered to protect it).
The second safety feature was a concrete floor buried beneath the coop and run. We dug down about half a foot, with an additional 1 foot trench down the center. In the trench, we laid a drain pipe and filled the trench with gravel. We laid chicken wire down over the entire footing of the run. Then we poured concrete over it, leaving the drain pipe exposed. The concrete slanted toward the drain pipe to help water run down and out of the run. Then we set the footing for the coop and run using concrete blocks. Finally, we filled the run area in with soil.
(This picture shows the run before we laid chicken wire and poured concrete.)
After the run area was complete, the chicken coop was moved into place and we began to build the run.
The third safety feature we added was completely enclosing the run with 1/4" hardware cloth. There isn't a single exposed area in this run where a predator could get in. It is as tight as could be.
Inside the run we added a nipple watering system that is attached to a bucket inside the coop.
And we added two small roosts.
The run isn't quite complete yet. But, is a chicken coop and run ever complete?
Things we still need to do:
Things I wish were different about the coop and run:
I'll post the design drawings of our current run soon. I haven't had time to scan them.

At first, I had this fantastic design for a modified Purina coop. I loved my design. The problem was, I was stuck with the reality of actually building the coop. I wasn't sure how I was going to build it, or move it, or hold the posts and put it together on my own. My wonderful husband liked our chickens, but the thought of building a coop overwhelmed him, too. He was very busy and couldn't really put a lot of effort into them. It was an issue of time - we were lacking it, and our girls were getting big. We needed to act fast.
Below is the first design that I had my heart set on. Since this page already has comments on it, I'll keep the info regarding this first design here on this page.


This initial design was meant to house 3 or 4 city chickens. The total square footprint for the coop was to be 12 sq. ft. The total square footprint for the outside run was to be 36 sq. ft (24 sq. ft. exterior run plus 12 sq. ft. beneath the coop). The design was meant to be a modified Purina coop. Currently, our intended modifications were:
- Resize the width/depth dimensions of the coop to 3' x 4' (the drawings above are not shown to scale).
- Add Plexiglas windows that can open to provide additional ventilation and light.
- Reduce the number of nest boxes to 2.
- Lower the nest boxes so they are below the level of the roost bar.
- Install a removable poop tray system beneath the roost bar to make it easier to clean droppings that accumulate while the chickens are roosting.
- Add a water container to the outside of the coop. Install 3 water nipples beneath the coop and 2 water nipples inside the coop. Vent the back-edge flooring of the coop with hardware cloth so any dripping water will fall to the ground beneath the coop. Install a wood barrier in front of the hardware cloth portion of the floor to keep the floor bedding from falling through the hardware cloth floor vent. Top the wood barrier with a board to create a low "roost" bar for the chickens to stand on while drinking water from the nipples.
- Provide a large cleaning door that swings open to the side, instead of downward.
- Add decorative trim and siding. Paint the coop to match our home. Use decorative hardware. Add a decorative flower box.
- Move the ramp door to the left, back-edge of the coop giving the chickens more space in the front of the run to move about unobstructed.
- Design the ramp door to be a sliding door that is pulled up (opened) and down (closed) by a pulley system.
So, how did we manage to drastically change to the coop that we currently have? As the pressure to have a completed coop mounted (because the girls were getting big), I began to shop Craig's List. I still wanted a coop that I could customize. I didn't want to try and fit someone else's coop and run into my landscape.
One day, an ad for an unfinished coop showed up. The coop was built, but unfinished. It was bare wood and did not have a roof. The roost poles were not in a position where we needed them to be, and the egg box entrances were way too small for our Light Brahma. So, we got to work to making modifications to the unfinished coop.
The first thing we did was cut the egg-box entrance holes larger. We moved the roosts. We filled nail and screw holes with wood putty. We sanded the coop until it was smooth. Then, we spray-painted it with white primer.

Then we painted it with "Barn Red" paint, and trimmed it out with white paint. My husband roofed it using left-over shingles from when he roofed our house and shed. We added black hardware to add to the country decor.

After the coop was finished, the girls started to sleep in the new coop at night. That was fun. But, we still needed to move it in place and build a run. So, we got to work building the run. The girls did, too.

Our girls had already had a run-in with a neighbor's black lab, so safety became a high priorty. We went over-the-top on safety features for this coop and run.
The first safety feature was the automatic "Pullet Shut" chicken door. The chicken door is powered by a battery pack that gets charged via a small solar panel.

(Hiding beneath the blue tarp is the wood for the run. The coop and run were completed when we were having frequent rain showers, so we kept it covered to protect it).
The second safety feature was a concrete floor buried beneath the coop and run. We dug down about half a foot, with an additional 1 foot trench down the center. In the trench, we laid a drain pipe and filled the trench with gravel. We laid chicken wire down over the entire footing of the run. Then we poured concrete over it, leaving the drain pipe exposed. The concrete slanted toward the drain pipe to help water run down and out of the run. Then we set the footing for the coop and run using concrete blocks. Finally, we filled the run area in with soil.
(This picture shows the run before we laid chicken wire and poured concrete.)
After the run area was complete, the chicken coop was moved into place and we began to build the run.
The third safety feature we added was completely enclosing the run with 1/4" hardware cloth. There isn't a single exposed area in this run where a predator could get in. It is as tight as could be.
Inside the run we added a nipple watering system that is attached to a bucket inside the coop.

And we added two small roosts.

The run isn't quite complete yet. But, is a chicken coop and run ever complete?
Things we still need to do:
- Add a translucent roof over the top of the run.
- Paint the run and remaining trim white.
- Add a small roof and swing open door to the top, flat area of the run. This will enable me to stand up in the coop.
Things I wish were different about the coop and run:
- More light. I wish we had the "skylight" that was planned on the modified Purina coop.
- Higher ceilings inside the coop for my Light Brahma.
- Egg box openings that are at least 2" larger.
I'll post the design drawings of our current run soon. I haven't had time to scan them.