The Mulberry Haus Coop
The Mulberry Haus is named after the White Mulberry Tree that decided to grow near my garden on the side of the yard opposite of the coop. Newest photos & updates are first, scroll down to see the beginnings of the Haus and early construction.
Completed, Run and All!
April 7,2010
It has been a long time since my last update (November 2009 I believe...!), but a lot has happened and we are proud to say our birds survived a very cold but relatively short winter here in New York! Besides Robin our Delaware getting a smidge of frostbite on her comb (which healed nicely with fast treatment) our girls are none the worse for wear.
The coop is, and has been for months now, fully sided, painted, and finished. The run is completed as well, thanks to my husband recycling chain-link from a dog run that used to divide our yard. Be sure to check out our other pages to see our eggs and chickens (and soon pictures of our shipment of 25+ chicks due early May!).

July 16, 2009:
It took many weeks of hard work to get to where we were since the last update, and all of the rain didn't help us get things done faster (although my garden loved it!). Well, the popdoor is installed, the egg door, double doors, and windows are all attached, trimmed and secured. The windows are handy little shed windows we got off of Ebay for $20 each. They are single paned, open up to either 2" or all the way (there are locking latches). We used hardware cloth outside on the lower half of the window to cover where the window will open, and no predator without wire cutters will get in that window...
The double doors are fully insulated and heavy, but they open and close nicely. Same with the egg door. The pop door is my husband's brain child. It is essentially a box with insulation inside, 2x4s are the frame and plywood sheathing either side. The bottom is angled to match the bottom opening so that it closes quite heavily and securely like a bank vault. It slides up and down via a pulley system enclosed by a removable panel. The door will be latched and locked but I doubt anything can lift it.
On the inside of the coop there is a central winter roost and also a step to reach the upper summer roosts (the rafters). The roost is removable, a 2x4 that fits into 2 U shaped slots made by 1x2s. The back of the coop features similar slots which will fit plywood in-between them to make the nesting boxes. I like having removable features for easier cleaning! Thank you to my husband for his great ideas!
The girls are now living outside as of today and I am really glad to have them out of the house!
(The little run there in the older pics was temporary )
Pictures:
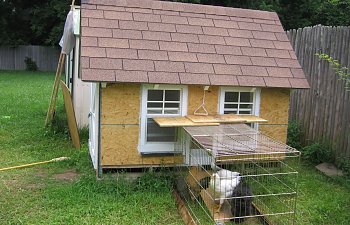
The siding isn't on but the trim is primed and painted. You can see the pull for the door, it needs to be substantial like that because that pop door is heavy!
Just a close up. Hardware cloth and the pop door are a bit more visible here.
The double doors, vent, and the frame with hardware cloth that will have a popout window in it.The Mulberry Haus is named after the White Mulberry Tree that decided to grow near my garden on the side of the yard opposite of the coop. Newest photos & updates are first, scroll down to see the beginnings of the Haus and early construction.
Completed, Run and All!
April 7,2010
It has been a long time since my last update (November 2009 I believe...!), but a lot has happened and we are proud to say our birds survived a very cold but relatively short winter here in New York! Besides Robin our Delaware getting a smidge of frostbite on her comb (which healed nicely with fast treatment) our girls are none the worse for wear.
The coop is, and has been for months now, fully sided, painted, and finished. The run is completed as well, thanks to my husband recycling chain-link from a dog run that used to divide our yard. Be sure to check out our other pages to see our eggs and chickens (and soon pictures of our shipment of 25+ chicks due early May!).


July 16, 2009:
It took many weeks of hard work to get to where we were since the last update, and all of the rain didn't help us get things done faster (although my garden loved it!). Well, the popdoor is installed, the egg door, double doors, and windows are all attached, trimmed and secured. The windows are handy little shed windows we got off of Ebay for $20 each. They are single paned, open up to either 2" or all the way (there are locking latches). We used hardware cloth outside on the lower half of the window to cover where the window will open, and no predator without wire cutters will get in that window...
The double doors are fully insulated and heavy, but they open and close nicely. Same with the egg door. The pop door is my husband's brain child. It is essentially a box with insulation inside, 2x4s are the frame and plywood sheathing either side. The bottom is angled to match the bottom opening so that it closes quite heavily and securely like a bank vault. It slides up and down via a pulley system enclosed by a removable panel. The door will be latched and locked but I doubt anything can lift it.
On the inside of the coop there is a central winter roost and also a step to reach the upper summer roosts (the rafters). The roost is removable, a 2x4 that fits into 2 U shaped slots made by 1x2s. The back of the coop features similar slots which will fit plywood in-between them to make the nesting boxes. I like having removable features for easier cleaning! Thank you to my husband for his great ideas!
The girls are now living outside as of today and I am really glad to have them out of the house!
(The little run there in the older pics was temporary )
Pictures:
The siding isn't on but the trim is primed and painted. You can see the pull for the door, it needs to be substantial like that because that pop door is heavy!

Just a close up. Hardware cloth and the pop door are a bit more visible here.


The egg door, this is opposite of the double doors.

The roost, with the windows, pop door, and nexting box sliders visible. The food and water are on pavers until we decide on how we want to set them up permanently.

Close up of the roost, pop door, windows, and Sprite our Cochin who was curious about what I was doing!

Upwards shot to show rafters, screens, and where the nesting boxes will be.

Close up of the sliders. The ones on the bottom closest to the camera will house a 2x4 lip to keep the straw in. The egg door will have weather stripping on it to keep drafts out of the boxes.
The view! Also a close up of the hardware cloth on the window.
Just for fun, a comparison shot of my garden that I posted a pic of last month. That tall corn in the back is 7' tall!
Read below for older info
June 9, 2009:
We started the coop behind our shed but after a chat with our neighbor we found out the people in back of our yard like to practice with BB guns in other peoples yards... not my chickens!! So.. slowly and dangerously the husband and I moved the coop to where it stands in the picture below.
We are first time chicken owners but I have family in PA that had some chickens for a while so I wasn't completely clueless. I still had a lot of research to do, and thanks to a member on here Tgrlily, we obtained our first three chicks, a tour of her fabulous chicken palace and a recommendation for this website. Thanks so much!
The coop is the length and width of 2 pallets. The pallets were leveled by placing them on stacks of cement paving stones we leveled and then placed the coop ontop of. We used plywood to secure the 2 pallets together and covered the plywood with linoleum. We then framed the walls and roof with pine 2x4s, used chip board for the roof, covered with tar paper and then shingled with golden-red asphalt shingles. The walls were then covered with more chip-board which will be insulated on the inside walls and sheathed with more chipboard. There is an opening in the front where the chicken door will be, and the large cleaning door will have 2 swinging barn doors to make scooping out bedding easier. The side facing the fence is where our egg door will be. We are trying to work quickly to get this in usable condition before our pullets burst out of their oversized dog crate!
Side View w/Sides on, after being moved from the other side of the shed.
The view! Also a close up of the hardware cloth on the window.

Just for fun, a comparison shot of my garden that I posted a pic of last month. That tall corn in the back is 7' tall!

Read below for older info
June 9, 2009:
We started the coop behind our shed but after a chat with our neighbor we found out the people in back of our yard like to practice with BB guns in other peoples yards... not my chickens!! So.. slowly and dangerously the husband and I moved the coop to where it stands in the picture below.
We are first time chicken owners but I have family in PA that had some chickens for a while so I wasn't completely clueless. I still had a lot of research to do, and thanks to a member on here Tgrlily, we obtained our first three chicks, a tour of her fabulous chicken palace and a recommendation for this website. Thanks so much!
The coop is the length and width of 2 pallets. The pallets were leveled by placing them on stacks of cement paving stones we leveled and then placed the coop ontop of. We used plywood to secure the 2 pallets together and covered the plywood with linoleum. We then framed the walls and roof with pine 2x4s, used chip board for the roof, covered with tar paper and then shingled with golden-red asphalt shingles. The walls were then covered with more chip-board which will be insulated on the inside walls and sheathed with more chipboard. There is an opening in the front where the chicken door will be, and the large cleaning door will have 2 swinging barn doors to make scooping out bedding easier. The side facing the fence is where our egg door will be. We are trying to work quickly to get this in usable condition before our pullets burst out of their oversized dog crate!

Vegetable Garden Left of the Mulberry Haus

Frame with Roof on, this is the original position of the coop before we moved it from behind the shed to the side of the shed nearest to our house. Asphalt shingles & linoleum flooring, with 2x4 pine framing and 2 pallets for the base propped up & leveled on concrete paving stones.

Side View, facing the egg door/nest box area. You can see the pallet base more clearly in this image.

Interior View showing roosting rafters. We used short enough nails that none are poking through from the roofing so that there is no chance the chickens can catch themselves in the upper area of the coup as they roost in the rafters (we are not insulating the roof area, this is where the ventilation will be).

That's all for now, July 16, 2009. Thanks for stopping by, more updates coming soon.