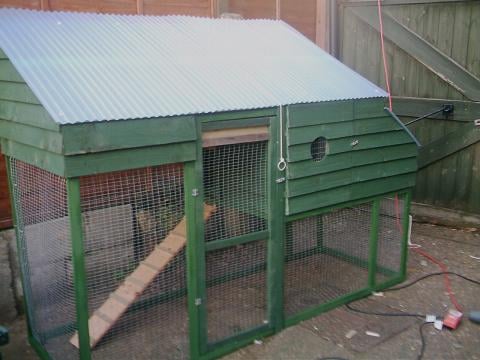
The Plans
After looking online for combination chicken coops with integrated runs, we were not willing to hand over the £500 that these cost. So I sat down with some paper and a pen, and sketched out a design which I guessed would cost around £60 in timber to produce.

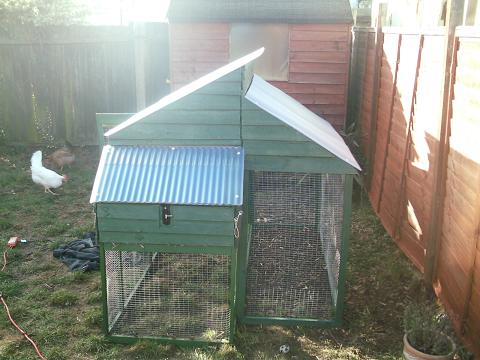
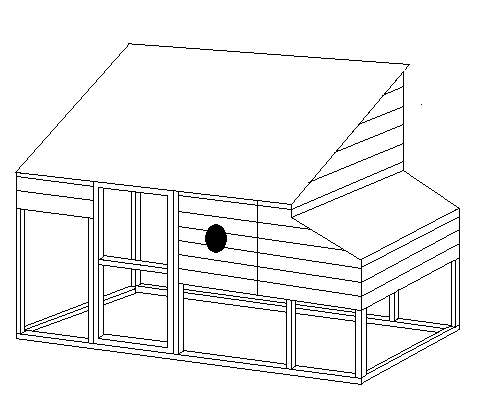
The idea is an integrated coop and run. The hens live in the enclosed box, and the rest of the area is fenced run. This means that the hens can get outside even when not loose in the garden. The nesting box at the side provides an area for egg laying, and a door allows collection. The coop box has an internal poop door with a ramp to the ground. A side door allows access to the coop for cleaning.
The entire run is 200cm long, and 70cm deep. The fenced area is about 100cm high, with a door to allow access for cleaning. The coop is 50cm off the ground, and 80cm high inside, allowing roost space above floor level.
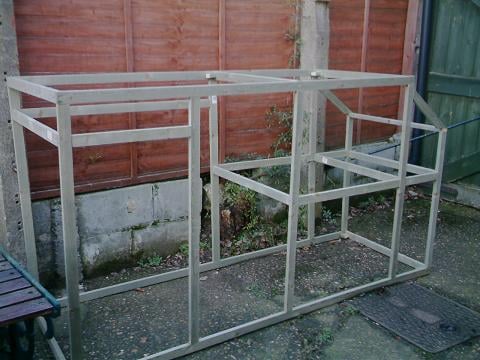
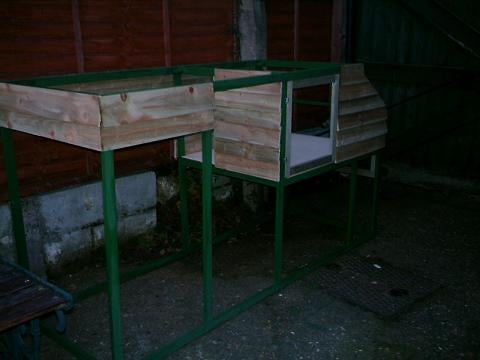
Day 1 - The frame
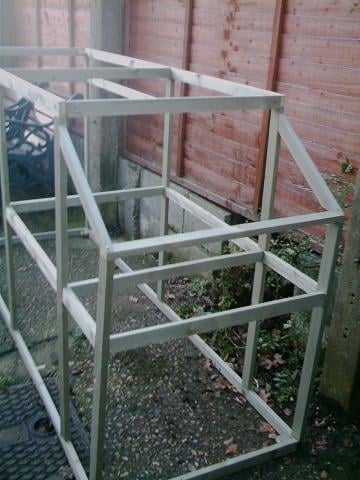
Framework is something I actually enjoy. I used 2x1 tannelised timber strips in 2.4m lengths. There is always that horrible moment when you have to join your 2d panels together, and this usually requires the help of one or more people with infinite hands and patience.
I actually began to construct this frame in the kitchen, because it was bitterly cold, and once it was complete, I noticed that it was somewhat larger than I expected - and we tried to get it out into the garden. Surprise, surprise, we couldn't, and I had to deconstruct some of the joints, and we gingerly shuffled the wobbling unsupported frame work out the back door where I put it back together again with very little damage.
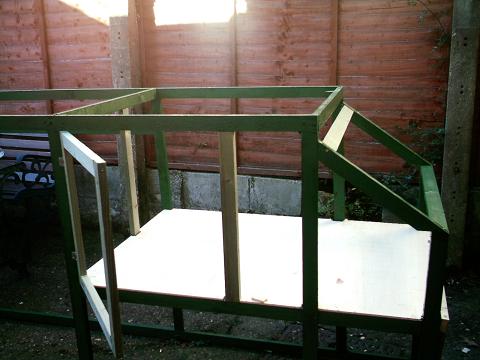
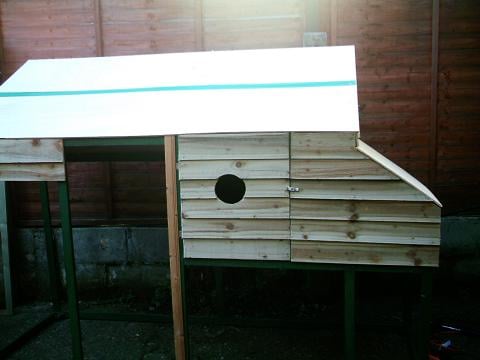
Day 2 - The flat timberwork begins
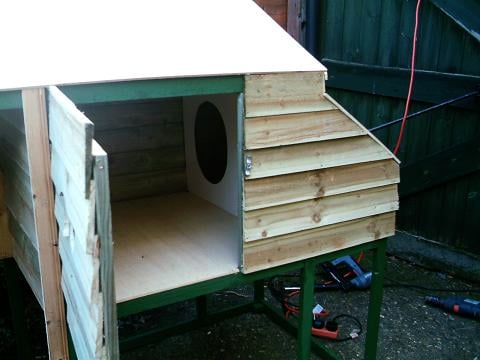
Before starting the flat timber, I made the doors which would enable us to access the coop without having to crawl in through the tiny door on the front. There was a large opening door on the front of the coop, and a small hinged door on the back of the nesting box, which would let us get the eggs out without disturbing the birds too much.
As you can see, I'd already put the floor of the coop in at this point, since I needed the doors to close snugly over them. The floor was a single piece of 8mm ply on which I'd used a bandsaw and hand jigsaw to knock out the notches for the interior timberwork. This meant the panel sat snugly and only required pinning down.
After the floor was in, I began to clad the exterior of the coop with 120mm featherboard (clapboard) which was rough cut (it's used for fencing). The profile of the board is that it is thinner at the top than at the bottom. The technique is simple, working from the bottom, you overlap the previous board by about 20mm. The thicker bottom of the board makes it stick out, allowing water to run off without touching the board below. I would have rather not have the strips run across the top of the run area, but the wire mesh is only 900mm tall, so wouldn't reach right to the ceiling of the run. The 2m lengths at the back of the run provided anti racking anyway, so it was worth it for that extra stability alone.
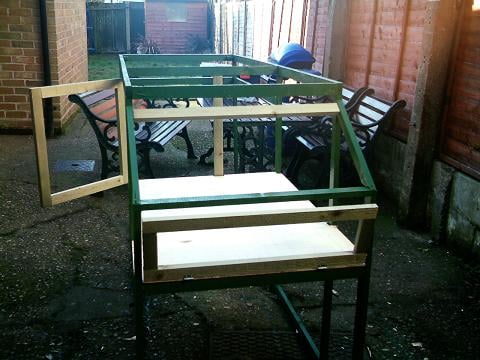
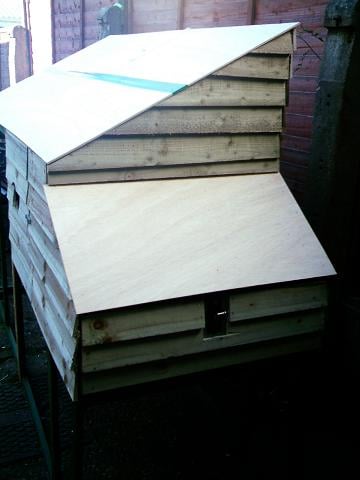
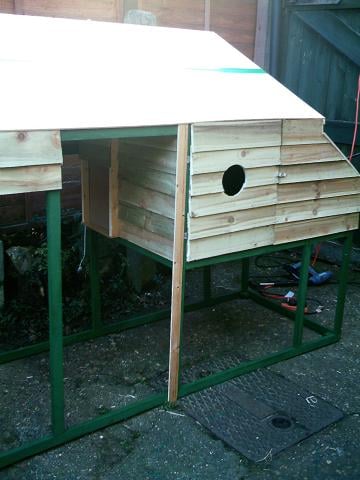
Day 3 - Completing the enclosure
First jobs of the day were to clad the doors. The front door was clad using the same featherboard. I marked out the positions to match the cladding on the right, although when I put the door back on there was a little mismatch. Although these things nark perfectionist me, I'm sure the chickens won't mind, and once it's all painted will be less noticeable. The door itself fits very snugly, it's only the line of the cladding which looks as if it runs a little. If it annoys me too much I can always re-do the cladding sometime.
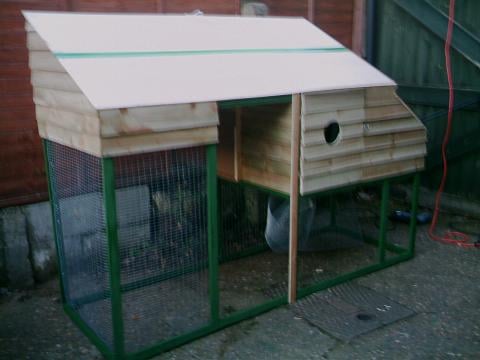
The roof went on much easier than I expected. Having changed the design mid-construction (from a traditional pointy apex roof to an alpine sloped roof - two reasons - it gives the hens more roosting space inside, and we couldn't find any Coroline roofline pieces in B&Q so were forced to redesign if we wanted a plastic corrugated roof - more later) it all went together alarmingly easily. The gable ends were clad in, and the nesting box had it's own sloping roof. A tower bolt secured the nest box door against foxes and the chickens pushing it open as they lay.
Inside the run area, the chickens needed a way to get in and out, so I designed a portcullis style door which slides up on two runners (which I made out of some beech I had lying around). A string goes up through a chase hidden from prying beaks, through a hole in the roof, and down to the front. The intention is to have a ring on the string, and two hooks, one for the open and closed positions of the portcullis door. The chickens will get down to ground level on a ramp.
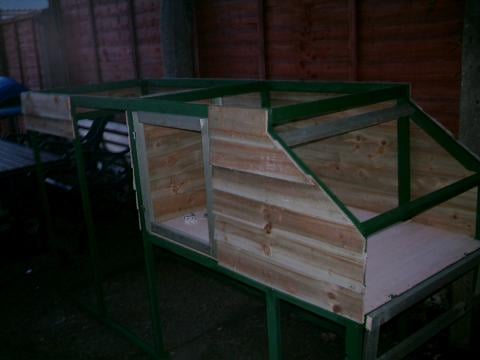
Day 4 - Internals
Before I closed in the coop forever, I inserted a partition inside, dividing the main roosting box from the nesting box. I used a jigsaw to cut two oval holes in the interior hardboard wall to give them some privacy while they lay.
The bit I thought would be easily, turned out to be the most physically demanding. Hammering loads of little u-staples into the wooden frame at weird angles, in constricted space, turned out to be a lot harder than I expected.
Day 5 - Painting
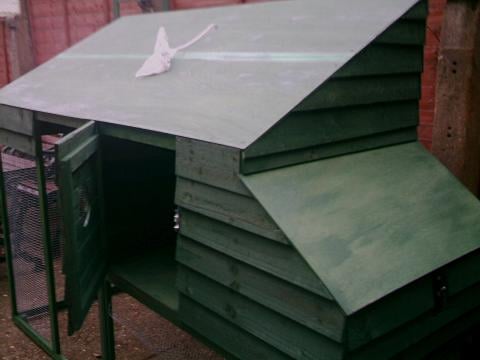
The woodwork was given a complete paint job. This was not just for aesthetics, the paint seals and waterproofs the run, and protects it against redmite larvae. External woodwork paint was used, in Buckingham Green, and given a full week to dry and the vapours to dry out.
Day 6 - Completion
The wire meshing was completed to enclose the run area. The door to the run was constructed and meshed in, and fitted to the frame with a pair of galvanised butt hinges. Stoppers were fitted to the inside of the frame to butt the door up against, and a thumb turner fitted to keep it flush. The major timber construction was completed.
The Coroline roof was cut and installed, on the main Apline roof, and the nesting box, over which I installed a plastic Coroline flashing which went under the lowest piece of cladding, protecting the joint from water ingress. Coroline gives the whole roof extra waterproofing, and is preferable to normal shed felt, which harbours redmites over time. The ramp was constructed from beech, with steps, and attached to the bottom of the portcullis poop door with a couple of hooks to enable it to be removed easily. The string which operates the poop door was brought down under the Coroline and tied to a ring, which can be hooked over a brass hook to keep the poop door open.
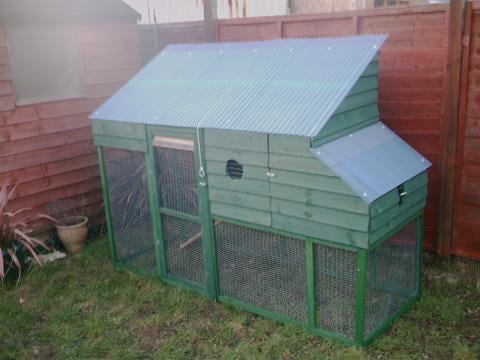
The Extension Plans
After two weeks of chickens, we realised the run was a little too small for comfort. When the hens were out in the garden, it was fine, but if we were ever away for the day, or away for longer and someone was coming in to feed them - the run would not be large enough.
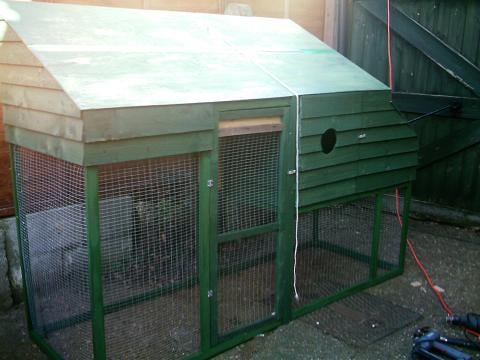
So I drew up a plan to extend the run along the back. This would mean building another roofed enclosure, and attaching it to the back of the run and coop, and then cutting away the mesh on the back side of the run to join the two spaces together.
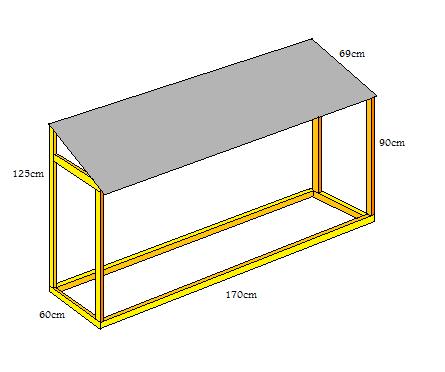
The extension had to run along the entire back side of the run, excluding the nesting box (since this wasn't full height, so would complicate the design). It was made a further 60cm wide (to add to the 70cm run) and the full 170cm of the run/coop at full roof height. The walls were to be meshed, and to keep light levels up, the roof was meshed and covered with translucent Coroline.
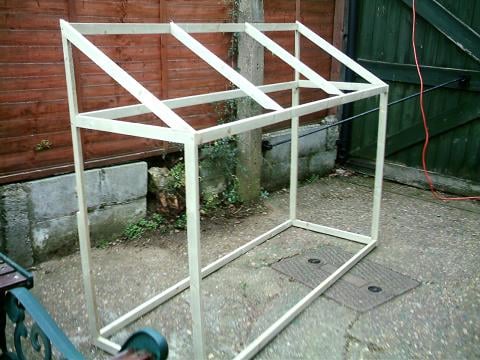
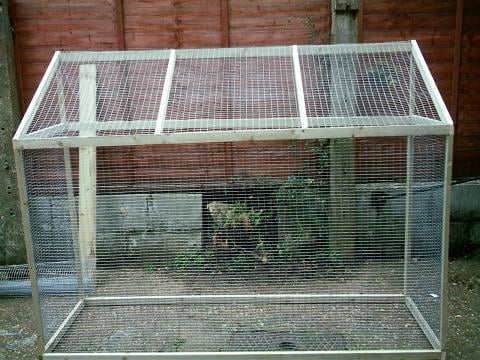
The Frame
With an alarming sense of deja vu, I began framing up the extension. The construction of this frame was far easier and straightforward that the original run, since it was basically just a box. The framing up only took a couple of hours.
The meshing went more quickly than before. There were no awkward spaces under henhouses to squeeze into, and the structure was far lighter, and I could flip it over more easily for access to awkward corners. I meshed the roof, because there was to be no hardboard solid roof this time, and we couldn't rely on the Coroline to protect the contents.
The frame was then painted and left to dry overnight.
Painting and installing
After a stormy night, we awoke to find the painted frame was dry enough to handle.
Fitting the extension to the henhouse was not as straightforward as we had hoped. The measurements were fine, but the mechanics of fitting the new frame to the existing featherboard clad side meant the I had to do some impromptu chiselling and sawing to get it to go together. I used some beech clamps I'd made years ago to hold the frame together while I drilled 2 inch screws through, to secure both parts together.
We thought the hens might get scared when we started up power tools near them, but they showed no fear at all, walking up to us, and even pecking at the tools when I left them down!
Once the extension was securely fitted, we cut away the existing mesh at the back of the run, to allow free passage between the old run and the new extension. I clad the exposed tops of the roof with some of the leftover featherboard, then the Coroline roof went on, nailed into the purlins I'd installed with the frame.
We moved the run back into its previous position, and left the hens to it, and hoped they appreciated the effort that has gone into building their house!
After looking online for combination chicken coops with integrated runs, we were not willing to hand over the £500 that these cost. So I sat down with some paper and a pen, and sketched out a design which I guessed would cost around £60 in timber to produce.
The idea is an integrated coop and run. The hens live in the enclosed box, and the rest of the area is fenced run. This means that the hens can get outside even when not loose in the garden. The nesting box at the side provides an area for egg laying, and a door allows collection. The coop box has an internal poop door with a ramp to the ground. A side door allows access to the coop for cleaning.

The entire run is 200cm long, and 70cm deep. The fenced area is about 100cm high, with a door to allow access for cleaning. The coop is 50cm off the ground, and 80cm high inside, allowing roost space above floor level.
Day 1 - The frame
Framework is something I actually enjoy. I used 2x1 tannelised timber strips in 2.4m lengths. There is always that horrible moment when you have to join your 2d panels together, and this usually requires the help of one or more people with infinite hands and patience.
I actually began to construct this frame in the kitchen, because it was bitterly cold, and once it was complete, I noticed that it was somewhat larger than I expected - and we tried to get it out into the garden. Surprise, surprise, we couldn't, and I had to deconstruct some of the joints, and we gingerly shuffled the wobbling unsupported frame work out the back door where I put it back together again with very little damage.
Day 2 - The flat timberwork begins
Before starting the flat timber, I made the doors which would enable us to access the coop without having to crawl in through the tiny door on the front. There was a large opening door on the front of the coop, and a small hinged door on the back of the nesting box, which would let us get the eggs out without disturbing the birds too much.
As you can see, I'd already put the floor of the coop in at this point, since I needed the doors to close snugly over them. The floor was a single piece of 8mm ply on which I'd used a bandsaw and hand jigsaw to knock out the notches for the interior timberwork. This meant the panel sat snugly and only required pinning down.
After the floor was in, I began to clad the exterior of the coop with 120mm featherboard (clapboard) which was rough cut (it's used for fencing). The profile of the board is that it is thinner at the top than at the bottom. The technique is simple, working from the bottom, you overlap the previous board by about 20mm. The thicker bottom of the board makes it stick out, allowing water to run off without touching the board below. I would have rather not have the strips run across the top of the run area, but the wire mesh is only 900mm tall, so wouldn't reach right to the ceiling of the run. The 2m lengths at the back of the run provided anti racking anyway, so it was worth it for that extra stability alone.
Day 3 - Completing the enclosure

First jobs of the day were to clad the doors. The front door was clad using the same featherboard. I marked out the positions to match the cladding on the right, although when I put the door back on there was a little mismatch. Although these things nark perfectionist me, I'm sure the chickens won't mind, and once it's all painted will be less noticeable. The door itself fits very snugly, it's only the line of the cladding which looks as if it runs a little. If it annoys me too much I can always re-do the cladding sometime.
The roof went on much easier than I expected. Having changed the design mid-construction (from a traditional pointy apex roof to an alpine sloped roof - two reasons - it gives the hens more roosting space inside, and we couldn't find any Coroline roofline pieces in B&Q so were forced to redesign if we wanted a plastic corrugated roof - more later) it all went together alarmingly easily. The gable ends were clad in, and the nesting box had it's own sloping roof. A tower bolt secured the nest box door against foxes and the chickens pushing it open as they lay.
Inside the run area, the chickens needed a way to get in and out, so I designed a portcullis style door which slides up on two runners (which I made out of some beech I had lying around). A string goes up through a chase hidden from prying beaks, through a hole in the roof, and down to the front. The intention is to have a ring on the string, and two hooks, one for the open and closed positions of the portcullis door. The chickens will get down to ground level on a ramp.
Day 4 - Internals
Before I closed in the coop forever, I inserted a partition inside, dividing the main roosting box from the nesting box. I used a jigsaw to cut two oval holes in the interior hardboard wall to give them some privacy while they lay.
The bit I thought would be easily, turned out to be the most physically demanding. Hammering loads of little u-staples into the wooden frame at weird angles, in constricted space, turned out to be a lot harder than I expected.
Day 5 - Painting
The woodwork was given a complete paint job. This was not just for aesthetics, the paint seals and waterproofs the run, and protects it against redmite larvae. External woodwork paint was used, in Buckingham Green, and given a full week to dry and the vapours to dry out.
Day 6 - Completion
The wire meshing was completed to enclose the run area. The door to the run was constructed and meshed in, and fitted to the frame with a pair of galvanised butt hinges. Stoppers were fitted to the inside of the frame to butt the door up against, and a thumb turner fitted to keep it flush. The major timber construction was completed.
The Coroline roof was cut and installed, on the main Apline roof, and the nesting box, over which I installed a plastic Coroline flashing which went under the lowest piece of cladding, protecting the joint from water ingress. Coroline gives the whole roof extra waterproofing, and is preferable to normal shed felt, which harbours redmites over time. The ramp was constructed from beech, with steps, and attached to the bottom of the portcullis poop door with a couple of hooks to enable it to be removed easily. The string which operates the poop door was brought down under the Coroline and tied to a ring, which can be hooked over a brass hook to keep the poop door open.
The Extension Plans
After two weeks of chickens, we realised the run was a little too small for comfort. When the hens were out in the garden, it was fine, but if we were ever away for the day, or away for longer and someone was coming in to feed them - the run would not be large enough.
So I drew up a plan to extend the run along the back. This would mean building another roofed enclosure, and attaching it to the back of the run and coop, and then cutting away the mesh on the back side of the run to join the two spaces together.
The extension had to run along the entire back side of the run, excluding the nesting box (since this wasn't full height, so would complicate the design). It was made a further 60cm wide (to add to the 70cm run) and the full 170cm of the run/coop at full roof height. The walls were to be meshed, and to keep light levels up, the roof was meshed and covered with translucent Coroline.
The Frame
With an alarming sense of deja vu, I began framing up the extension. The construction of this frame was far easier and straightforward that the original run, since it was basically just a box. The framing up only took a couple of hours.
The meshing went more quickly than before. There were no awkward spaces under henhouses to squeeze into, and the structure was far lighter, and I could flip it over more easily for access to awkward corners. I meshed the roof, because there was to be no hardboard solid roof this time, and we couldn't rely on the Coroline to protect the contents.
The frame was then painted and left to dry overnight.
Painting and installing
After a stormy night, we awoke to find the painted frame was dry enough to handle.
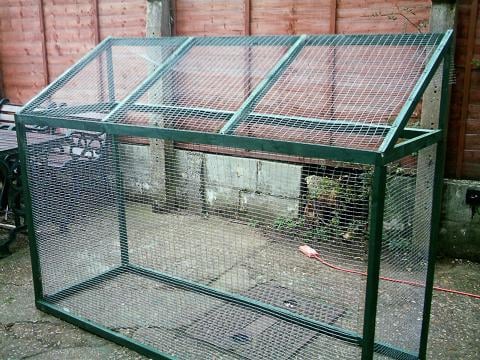
Fitting the extension to the henhouse was not as straightforward as we had hoped. The measurements were fine, but the mechanics of fitting the new frame to the existing featherboard clad side meant the I had to do some impromptu chiselling and sawing to get it to go together. I used some beech clamps I'd made years ago to hold the frame together while I drilled 2 inch screws through, to secure both parts together.
We thought the hens might get scared when we started up power tools near them, but they showed no fear at all, walking up to us, and even pecking at the tools when I left them down!
Once the extension was securely fitted, we cut away the existing mesh at the back of the run, to allow free passage between the old run and the new extension. I clad the exposed tops of the roof with some of the leftover featherboard, then the Coroline roof went on, nailed into the purlins I'd installed with the frame.

We moved the run back into its previous position, and left the hens to it, and hoped they appreciated the effort that has gone into building their house!