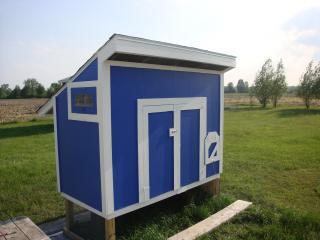
Red White and Blue the Coop

This project started with spending the entire winter drawing numerous rough prints and incorporating ideas from BYC members along the way.Thanks to all of you for your help.
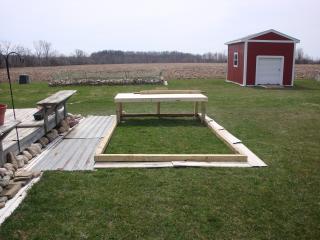
Getting started to prevent anything digging into the run I laid out the footprint of the coop and run.On the left the pressure treated 4x4 is setting on some salvaged galvanized roof material between the coop and deck on the right it is setting on vinyl siding which later will be replaced with steel roof material and in front it sets on vinyl siding. I will add to that later when I get to the landscaping
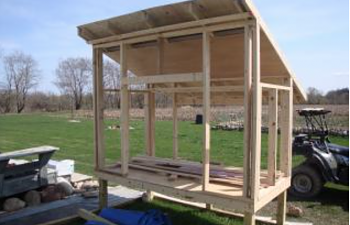
After rough framing the coop I installed the luann sheating for the ceiling then laid 2" styrofoam sheating between the rafters leaving the soffit at the bottom of the roof line open and leaving about 3" of space open at the top ridge of the coop. I also covered both soffits front and back with 1/4" hardware cloth prior to laying down the roof sheating. Prior to adding the facia I also covered both soffits with aluminum screen material to prevent insects from nesting in the open space between the foam and the roof. Thanks to Opa for the ventilation idea.
Next came the 1/2' plywood exterior sheating facia and roof shingles
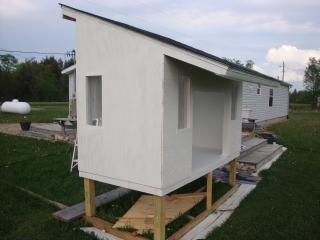
After insulating all the walls with 3" batt insulation and covering all the window openings with 1/4" hardware cloth I installed the luann wall sheeting. Later I also covered the window openings with aluminum screen material on the outside to prevent insects from nesting in the window openings. The photo below also shows one window and the pop door opening.
Next came 2 coats of weatherall oil base exterior primer inside and out.
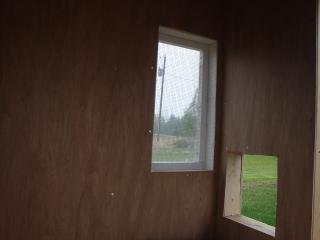
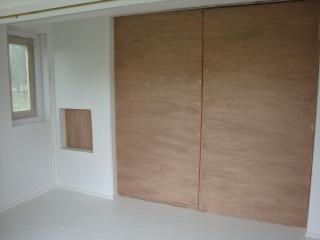
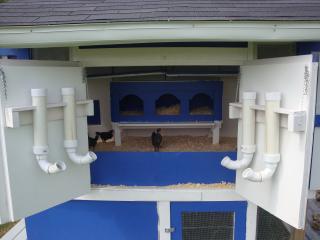
The doors (Including the pop door) are framed with 2x2s with foam insulation between the exterior plywood and interior luann sheating. The windows are plexiglas mounted in a 1x4 frame and cover the openings completly to prevent drafts when closed. To keep the windows from blowing shut I installed a 25# magnet in the window frame and in the window trim so that when they contact each other they hold the window open securely. I did the same thing on the pop door to hold it closed at night. The run is completly secure so I don't have to worry about critters opening the pop door. The pictures below show the doors from outside and from inside.
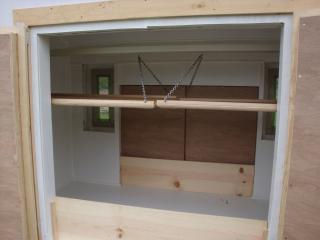
I made the poop boards from 1/4" luann framed with corner round and suspended by chains to the underside of the roost. This picture also shows the 1x12 installed to keep litter away from the doors.
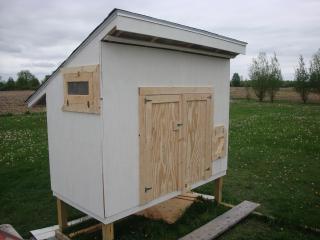
Final coat of paint on the coop exterior and interior.
Mid-May and my girls are here, 6 Barred Rock pullets. They won't be in the brooder long and still a lot to do to finish the coop.
PVC feeders mounted on 1x4 frame and secured with a stainless steel screw through the back, installed on chains so that I can raise them higher as the birds grow. Now that the birds are full grown they will hold about a weeks worth of feed. The waterer sits on an empty cookie tin in the corner to keep it above the litter.The nest boxes are positioned underneath the poop boards. About every two weeks I added another 3 inches of litter so it will eventually come up to the bottom of the nest boxes but for now they have to stay in the coop so I used as little as possible to give them room to roam under the nest box. as you can see the girls are out of the brooder and in the coop. you may also notice that I have closed off the run under the coop on the southwest corner with plywood. This provides a well protected corner in all types of weather. You will notice below the doors is a door to the run under the coop that I open to let the birds in and out to free range the backyard when I am home. I don't let them in or out through the "people" door.
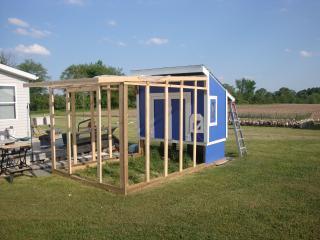
Can't let the girls out of the coop till the run is finished. Here it is framed in. I put a layer of chicken wire on the roof and then covered the roof with two layers thick 60 mil greenhouse plastic covering that has UV protection in it. Temporary until I can sheet and shingle it. The entire run is covered with 1/2" hardware cloth secured with 1 1/4" roofing nails.
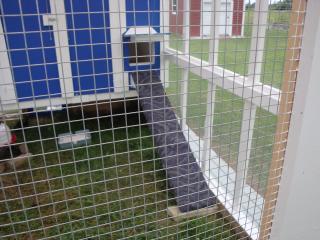
The ramp is covered with commercial grade carpet so cleats aren't necessary. The hardware cloth is on. The screen door is made of 1/2" hardware cloth sandwiched between 2 -1x4 frames and the girls are ready to come out of the coop. As soon as they all came out into the run I moved the food and water outside. I don't keep any food or water in the coop now. I let them eat all the grass in the run and then I added about 3" of coarse sand. The litter box is filled with oyster shell grit but as soon as the sand went in I removed the container and cast the oyster shell grit directly on the ground. The pop door is opened and closed with a cable strung from the door to two pulleys in the run rafters and out through the side of the coop closest to the deck.
After the run was secured I laid a layer of vinyl siding down and added a 4x4 across the front from the coop to the deck. this will all be covered with river rock. I also laid a strip of siding on the outside of the 4x4 so that I can drive the lawnmower right over it and I don't have to weed wack. I still have some painting to do in the run but the girls don't mind my company.
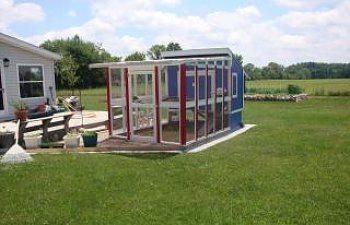
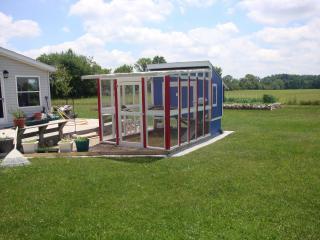
River rock in and landscaping finished. Since then I have added bluestone in with the river rock for stepping stones to the pop door cable and in front of the screen door.
I added some walnut ( nothing but the best for my girls LOL) roosts on the north side of the run and they especially enjoy them in the winter as it allows them to catch the morning sun. That is when the sun shines. Which isn't very often when you live this close to lake michigan.
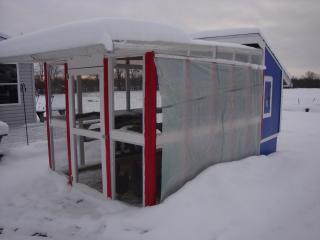
The girls first Michigan winter. The plastic sheating on the side is the same that I used on the roof. Keeps the snow out of the coop quite well and it is attached to a closet rod at the bottom so I can roll it up in the summer. Ahhhh Summmmmer.
This project started with spending the entire winter drawing numerous rough prints and incorporating ideas from BYC members along the way.Thanks to all of you for your help.
Getting started to prevent anything digging into the run I laid out the footprint of the coop and run.On the left the pressure treated 4x4 is setting on some salvaged galvanized roof material between the coop and deck on the right it is setting on vinyl siding which later will be replaced with steel roof material and in front it sets on vinyl siding. I will add to that later when I get to the landscaping
After rough framing the coop I installed the luann sheating for the ceiling then laid 2" styrofoam sheating between the rafters leaving the soffit at the bottom of the roof line open and leaving about 3" of space open at the top ridge of the coop. I also covered both soffits front and back with 1/4" hardware cloth prior to laying down the roof sheating. Prior to adding the facia I also covered both soffits with aluminum screen material to prevent insects from nesting in the open space between the foam and the roof. Thanks to Opa for the ventilation idea.
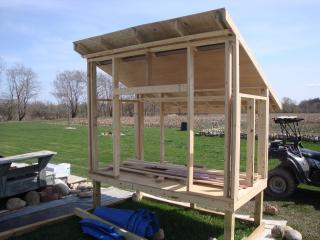
Next came the 1/2' plywood exterior sheating facia and roof shingles
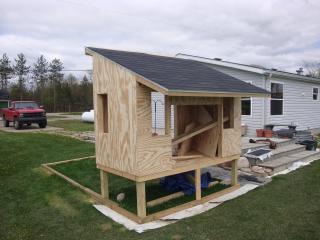
After insulating all the walls with 3" batt insulation and covering all the window openings with 1/4" hardware cloth I installed the luann wall sheeting. Later I also covered the window openings with aluminum screen material on the outside to prevent insects from nesting in the window openings. The photo below also shows one window and the pop door opening.
Next came 2 coats of weatherall oil base exterior primer inside and out.
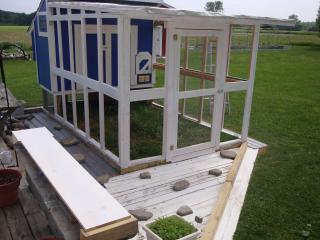
The doors (Including the pop door) are framed with 2x2s with foam insulation between the exterior plywood and interior luann sheating. The windows are plexiglas mounted in a 1x4 frame and cover the openings completly to prevent drafts when closed. To keep the windows from blowing shut I installed a 25# magnet in the window frame and in the window trim so that when they contact each other they hold the window open securely. I did the same thing on the pop door to hold it closed at night. The run is completly secure so I don't have to worry about critters opening the pop door. The pictures below show the doors from outside and from inside.
I made the poop boards from 1/4" luann framed with corner round and suspended by chains to the underside of the roost. This picture also shows the 1x12 installed to keep litter away from the doors.
Final coat of paint on the coop exterior and interior.
Mid-May and my girls are here, 6 Barred Rock pullets. They won't be in the brooder long and still a lot to do to finish the coop.

PVC feeders mounted on 1x4 frame and secured with a stainless steel screw through the back, installed on chains so that I can raise them higher as the birds grow. Now that the birds are full grown they will hold about a weeks worth of feed. The waterer sits on an empty cookie tin in the corner to keep it above the litter.The nest boxes are positioned underneath the poop boards. About every two weeks I added another 3 inches of litter so it will eventually come up to the bottom of the nest boxes but for now they have to stay in the coop so I used as little as possible to give them room to roam under the nest box. as you can see the girls are out of the brooder and in the coop. you may also notice that I have closed off the run under the coop on the southwest corner with plywood. This provides a well protected corner in all types of weather. You will notice below the doors is a door to the run under the coop that I open to let the birds in and out to free range the backyard when I am home. I don't let them in or out through the "people" door.
Can't let the girls out of the coop till the run is finished. Here it is framed in. I put a layer of chicken wire on the roof and then covered the roof with two layers thick 60 mil greenhouse plastic covering that has UV protection in it. Temporary until I can sheet and shingle it. The entire run is covered with 1/2" hardware cloth secured with 1 1/4" roofing nails.
The ramp is covered with commercial grade carpet so cleats aren't necessary. The hardware cloth is on. The screen door is made of 1/2" hardware cloth sandwiched between 2 -1x4 frames and the girls are ready to come out of the coop. As soon as they all came out into the run I moved the food and water outside. I don't keep any food or water in the coop now. I let them eat all the grass in the run and then I added about 3" of coarse sand. The litter box is filled with oyster shell grit but as soon as the sand went in I removed the container and cast the oyster shell grit directly on the ground. The pop door is opened and closed with a cable strung from the door to two pulleys in the run rafters and out through the side of the coop closest to the deck.
After the run was secured I laid a layer of vinyl siding down and added a 4x4 across the front from the coop to the deck. this will all be covered with river rock. I also laid a strip of siding on the outside of the 4x4 so that I can drive the lawnmower right over it and I don't have to weed wack. I still have some painting to do in the run but the girls don't mind my company.
River rock in and landscaping finished. Since then I have added bluestone in with the river rock for stepping stones to the pop door cable and in front of the screen door.
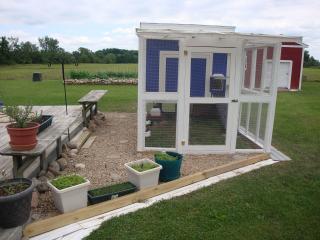
I added some walnut ( nothing but the best for my girls LOL) roosts on the north side of the run and they especially enjoy them in the winter as it allows them to catch the morning sun. That is when the sun shines. Which isn't very often when you live this close to lake michigan.

The girls first Michigan winter. The plastic sheating on the side is the same that I used on the roof. Keeps the snow out of the coop quite well and it is attached to a closet rod at the bottom so I can roll it up in the summer. Ahhhh Summmmmer.