Everytime I go by a old farmstead, I like to look at the old buildings and see the uniqueness of each. When I first decided to get chickens, the first thing you think of is what kind of coop will I need. I started looking through the internet and found the one currently in my avatar and thought that someday I want one like it. The kind of chicken coop you would likely see around a old farmstead. I inquired around to find an old coop (BTW, I like things old) some farmer no longer wanted and I could bring it home on my trailer.....but everyone that was willing to give one away usually had a lot of problems that went along with it. It happens to be I am a building contractor, so it didn't take me long to decide to build one myself.
Since we are currently 12" deep in snow, I am not able to do any home construction so this would be a ideal time to build this new coop in my driveway, and since it is portable, when it gets finished (and the snow is gone where it needs to finally go) I will move it with my farm tractor to it's final destination.
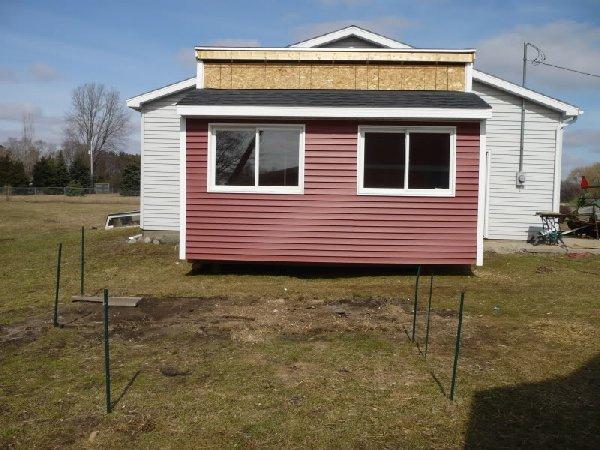
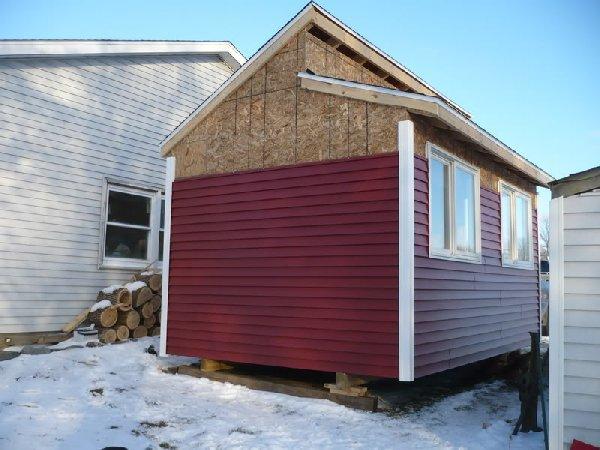
...it warmed up for about 3 hours so I put on as much siding as I could in that amount of time. I think you can begin to see my color vision coming together with the black roof, white trim and bright red siding. My wife's decision on the vinyl siding, and as she pulled up the driveway she told me it looked Beautiful.....you know what they say, "Happy wife, Happy life"
I need to get the white f-channel, soffit & facia installed before I can finish the siding below the eave edge. Here is a view from the front quarter of the henhouse.

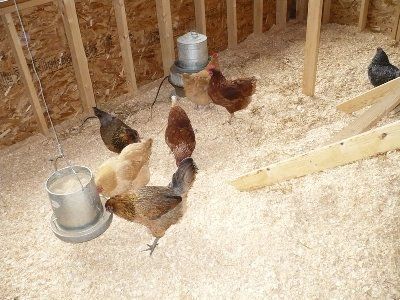
As you can tell the hens are always around their new digs.
And then I moved around to the other end and started installing vinyl siding there. Tomorrow is supposed to be warmer, so with any luck all but the entry door side should be done in vinyl.
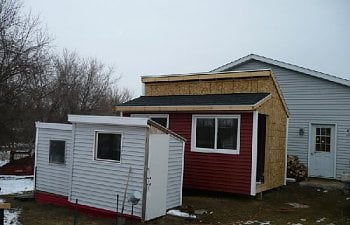
Here is the picture of the front with Red siding and white vinyl trim installed. Little coop sure looks small now.
This is the far end, all done in Red vinyl siding and white vinyl trim.
The backside also done the same way.
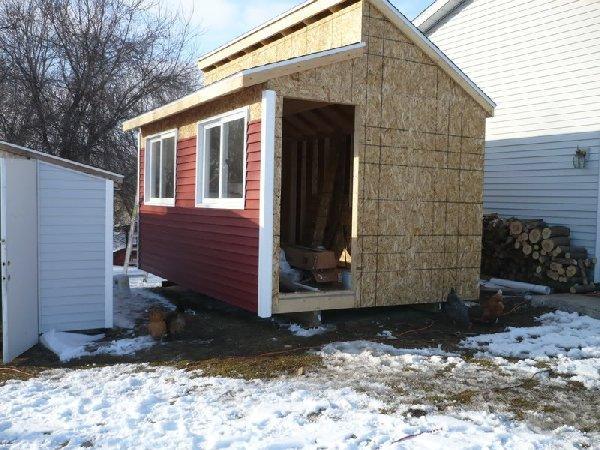
The remaining end needs a chicken door framed and trimmed in aluminum, and the man door installed before I begin siding this part. Also that area up above that gets the small windows needs work. Worst case scenario I will cover it with Tyvek while I get the little windows built. That way everything is covered and protected from the "elements of nature"
I got to thinking about some of the names we call different things such as F channel, soffit and facia and I thought maybe some people don't know what the hen I mean by those names.....so, here is a close up of the F-channel which is actually shaped like the letter "F" and can be installed the way you see it in my pic or turned the other way. Usually I install F channel before all of the siding gets done, but I wanted to get the henhouse covered from the elements and I can install if later. Here you see the F channel and the soffit installed into the F channel.
And a more frontal picture to show all the components including the facia. Aluminum facia is a covering that is installed over the rough facia board, in my case a 2 x 6.
And this is the far gable end of the henhouse with all the siding and aluminum finished.
Now the next steps are to make the little chicken door, install man size door in this end. Install windows up above then install linoleum, nest boxes, roosts and a seperate breeder pen.
Since we are currently 12" deep in snow, I am not able to do any home construction so this would be a ideal time to build this new coop in my driveway, and since it is portable, when it gets finished (and the snow is gone where it needs to finally go) I will move it with my farm tractor to it's final destination.
| The first step was to get the local lumberyard to deliver the framing package. I decided that a 10 x 16 was a good size for me. | 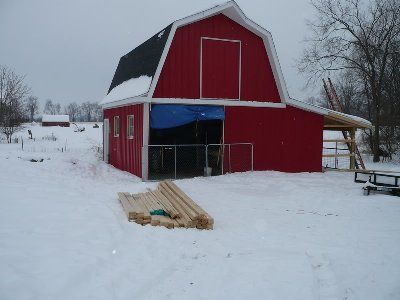
|
| [Then my youngest son Chris and I began framing the exterior walls in my barn where there is no snow and a good flat surface to do the work. After the walls were all framed, we stood them up and went on to the floor system. | 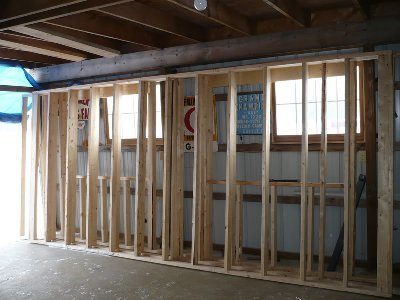
|
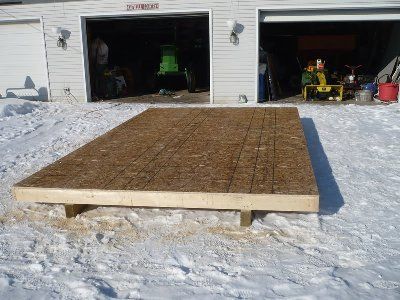
The floor system is 2x6 floor joists laid out on 2 foot centers with a treated 4x6 as the skids, and also a bearing point for the floor joist so that it will be a solid floor. Then I used 3/4" square edge o.s.b. for a floor. Now would have been a good time fo put a 10 x 16 piece of linoleum down....but I am impatient, that will come later. | 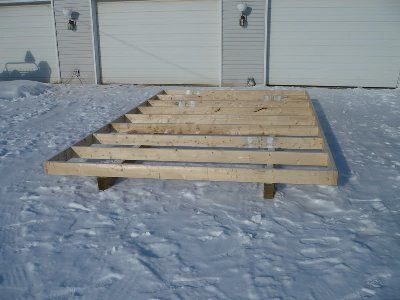
|
|
| Then the next step was to carry those wall sections (pictured earlier) out and nail them to the floor system. I used 2x4 14's cut to 7' for studs and spaced them 16 " on center. I wanted more headroom than I had at 6 foot, but thought 8 foot was too much. I wanted to be able to stand up straight anywhere inside of the new coop. This is the end where my door will go, it is not currently framed down to door size since I will be looking to see what I can find in the scratch and dent area of the lumber yard and then frame it accordingly. | 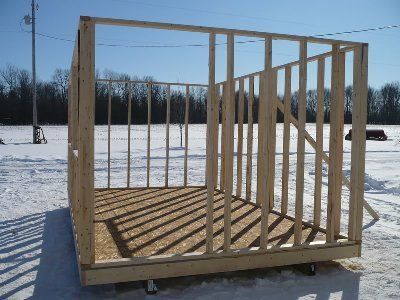
|
| This is the front view, which will have two windows 42" in heighth and 5 foot in width. I have some Andersen windows that were replaced from a house I remodeled last summer and figured they would be perfect for this. | 
|
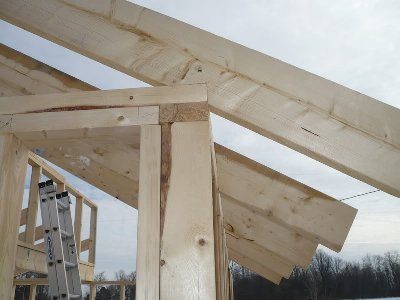
| The next thing I needed to make was the doubled up 2x8 "carrier" which the smaller wall rests on as do the rafters. If I feel the need for added support I will put a 4x4 under the carrrier and down to the floor at a point that a floor joist will help support the load. Bear in mind at this point things are just tacked in place and will need to be squared up permanently secured. | 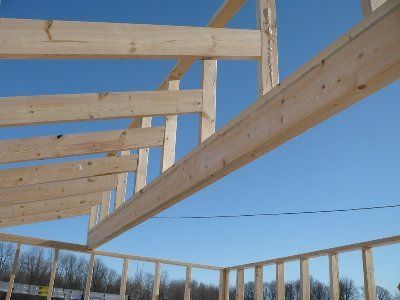
|
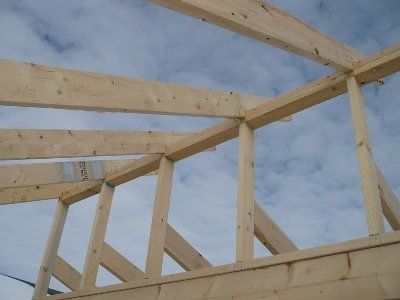
| And a end view showing how the wall rests on the carrier. Under the carrier I will add a few more studs to support the load. Underneath these little rafters where they meet the wall I will add a 2x4 "ledger plate" to ensure the weight of the roof system will not cause these rafters to sag over time. | 
|
| And a quartering view of the coop showing the smaller roof and the distance up for the taller roof. Looking back I would have made the wall another 4" taller, it is gonna be a tight fit to get those little windows in up there. The pitch on the smaller roof is a 4/12. I put a couple of sheets of o.s.b. on the walls to keep them sqaured up and to add some strength until my T-111 siding gets here. | 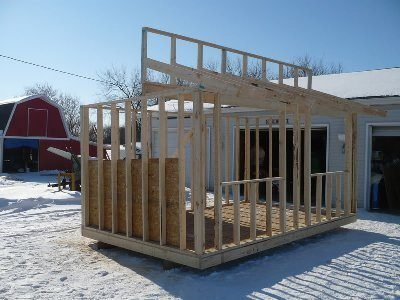
|
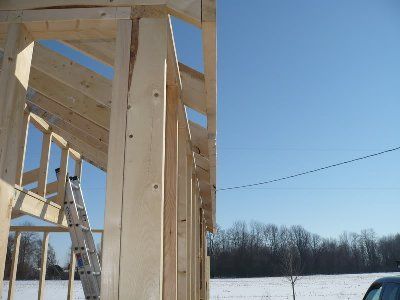
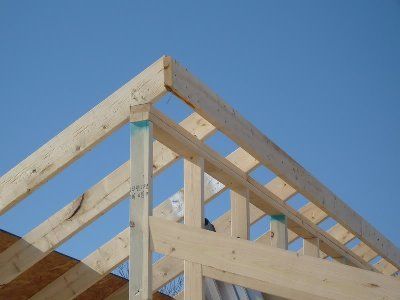
| I started squaring the upper wall using a piece of square plywood. It is actually my jobsite sign with name address and phone# so I didn't show that step. Once I had that square, I took a 2x6 and laid it on top of the tie plates and marked them out then cut the "birdsmouth" out to accept the plates of both walls. That 2x6 long rafter will be a pattern to use for cutting the rest of the rafters. Here is where the rafter fits the plates at the outside wall. |
| Here is where it fits the top wall. |
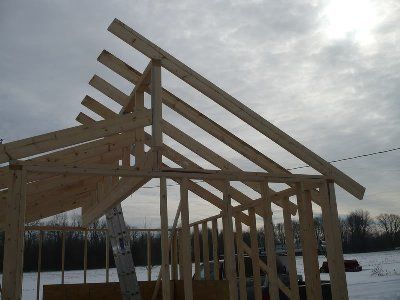
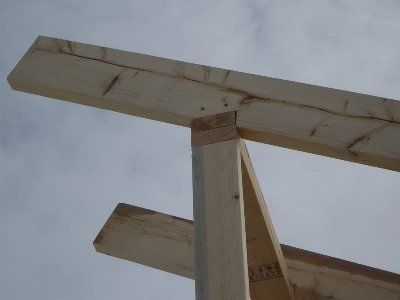
| Now you can begin to see how the roof lines are shaping up. The longer roof line turns out to be a 7/12 pitch. All the ends will be cut later and 2x6 facia nailed on the rafter ends. |
| This is a view from the front. |
| And this view is from underneath, showing you how the rafter sits directly above the short wall stud so that the weight transfers directly down from the rafter to the stud. This probably isn't critical given this is a small build (for me) but it is the method I use when building someones home and therefore why I do it this way. |
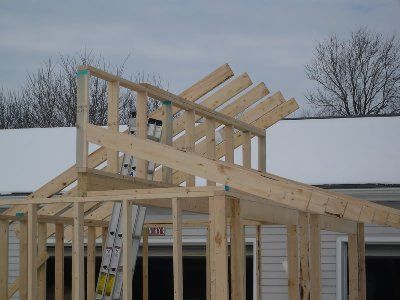
| I got the rest of the rafters put in place and just wanted to post these three pictures from different angles to hopefully give you a better idea of how it will look. | 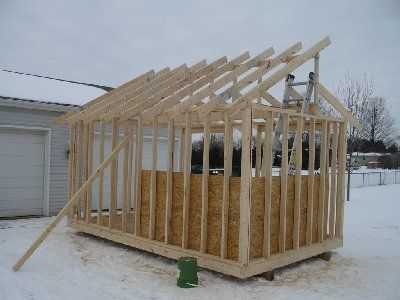
|
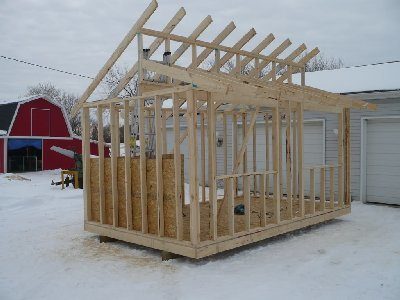
Front quartering view. | 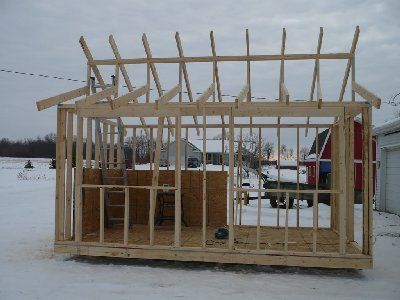
And finally straight on. |
I started cutting the backside rafter tails....there is no magical number to cut these at, I wanted enough to get good ventilation and I have a bunch of short vented soffit panels to use up here when I get to that point. | 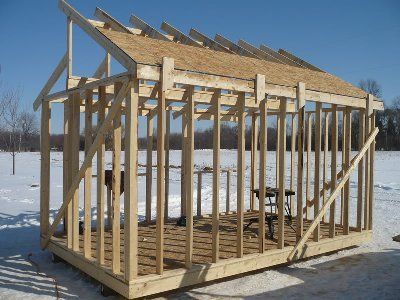
I am a firm believer in the "work smarter not harder" theory, so I put these stop blocks at the eave facia to help hold the roof sheething in place so I can nail it down without trying to hold hammer, nail and sheething all at once. |
As it turned out I had enough area to use a full un ripped sheet of sheeting up top, so I did some figgerin as to how much space a full uncut sheet would need and cut the upper rafters to length and nailed the facia on... then finished sheeting that roof. | 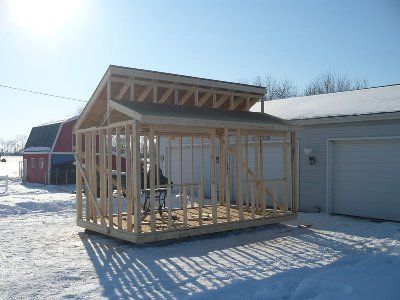
Then I moved to the lower roof, nailed on the sheething, cut the tails, nailed on the other eave facia.....and now you get a very clear idea of whtat the rooflines will finally look like. |
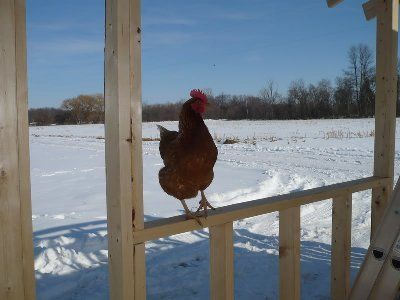
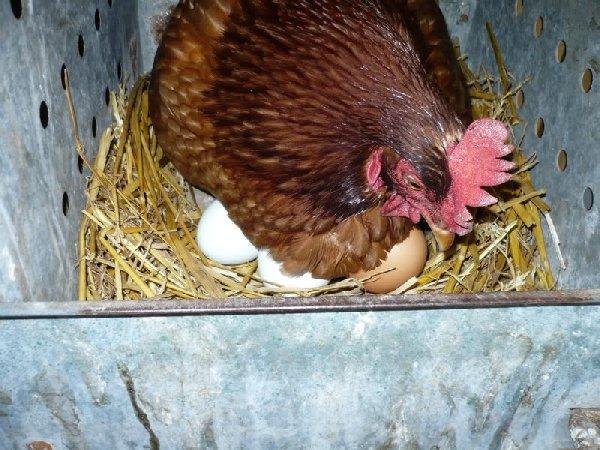
Someone thinks I should be done by now and made their prescence known. | 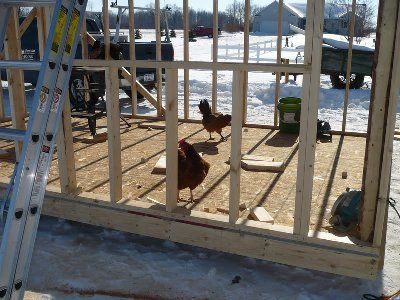
....and brought the floor inspectors with her. |
| The reason I didn't build the henhouse in the spot I wanted it to eventually go was because at the time we had a lot of snow. | 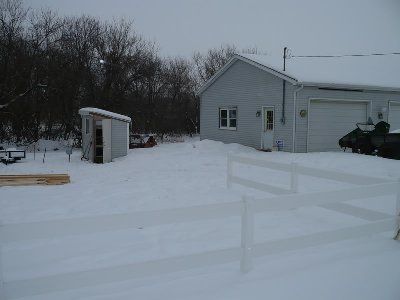
|
| Well that has all changed with the unseasonably warm weather we just got. This is the same area this morning. | 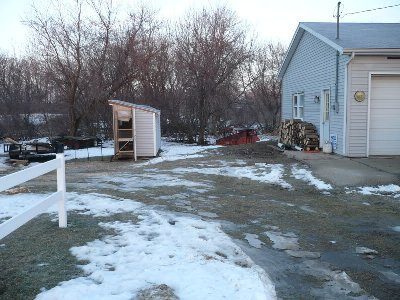
|
| I don't have a loader on my John Deere tractor, but my friend/neighbor does, so I asked him if he'd help me move it......being the kind of folk we are, we help each other out and he was more than happy to. So we got the bucket underneath the skids, then ran a cable and chains back to the rear end of the skids....lifted the front and began to drag the henhouse to it's final resting spot. | 
|
| It was a tight turning radius and we didn't want to chance wrecking the skids so we unhooked the chains and cables, bumped the building a little by hand to get a straighter run at it... hooked back up and pulled again. | 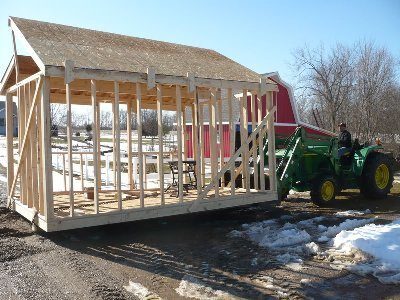
|
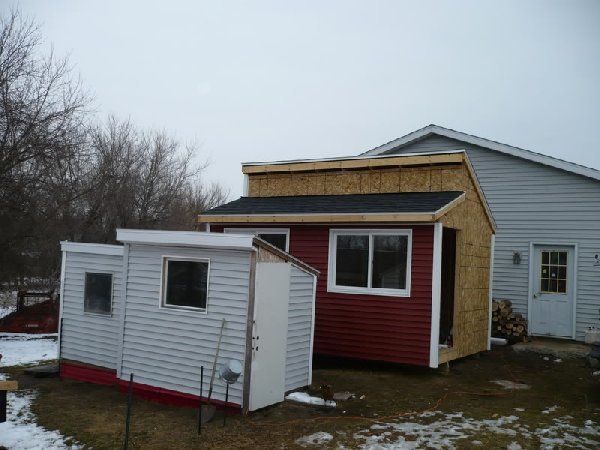
| Then unhooked the chains and cable, got out the jack and started getting it leveled up. Although it is temporarily leveled for now I will be doing this again with supports under the skids every 4 foot. As you can see by the picture, the new building "dwarfs" my old coop. I wanted this henhouse very near my shop so I can run electrical cords to it during the winter and in case I need lights. The backside of the henhouse will be a nice place to pile my firewood for my shop as well. The smaller coop will be moved out of there soon as I am able to....however my wife told me today she thinks after I move it we should still use it.....for a brooder. | 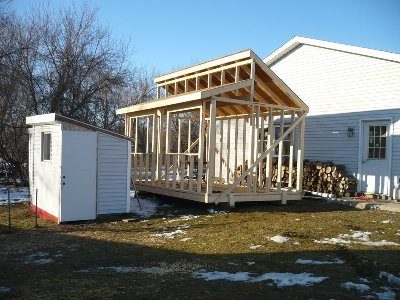
|
| I got all the osb nailed on, with exception to the above little window wall. Then I nailed on the 2x6 gable end facia. Framed the door down to accept a 36" pre hung door. Installed the 2 big Andersen (freebie) windows. I sure wish my little coop wasn't in the way right now, but until I get the henhouse done, it needs to be there. | 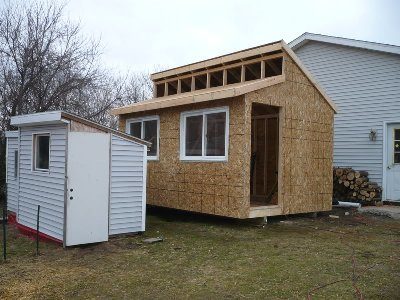
|
| I now have the henhouse all shingled and watertight. I used a wide white drip edge, 15 lb. felt and 30 year Certainteed Landmark series shingles. The color is Moire Black. There isn't much in the way of showing how it is done, guess I have done so many shingles over the years it is pretty redundant. | 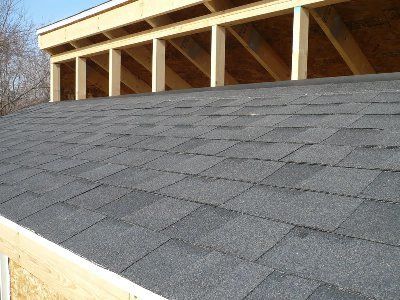
The front flatter roof |
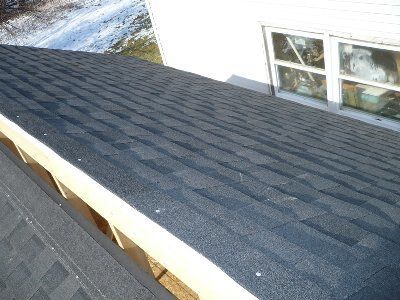
The back steeper roof | 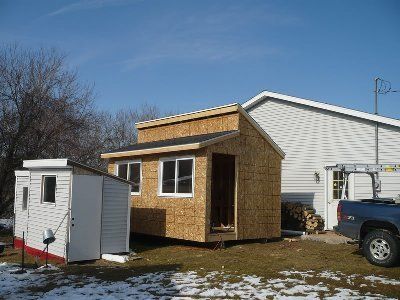
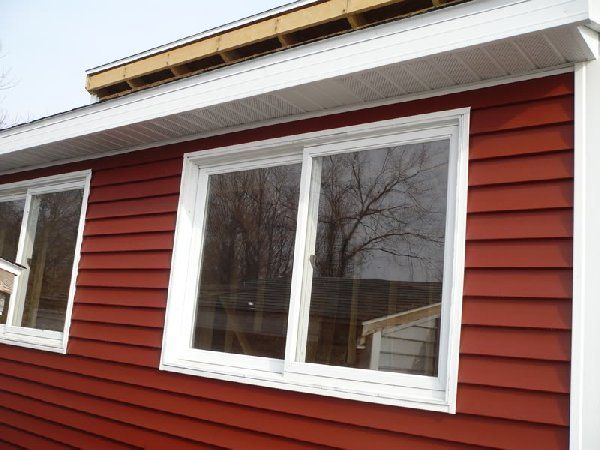
And that little area up there that gets windows needed to be enclosed to keep "horizontal" rains out. I will be able to cut out the openings for the window and install them, when I get them. |
My siding supplier called me to say there was a holdup in getting out the red vinyl siding I ordered.....and that the extra "routing" it was gonna take to get just 4 square was going to cost me another $59.00. At this point it doesn't matter to me, I just want to get it all enclosed and protected from the spring rains we will surely get. I guess the next step is to clean up the leftover materials inside and put that linoleum floor down. As far as I am concerned.....all the hard work is over. Putting on vinyl siding and soffits/facia is a breeze and I can probably have that done in two days tops. I have been giving some thought what I want to do inside, I think I will make a seperate pen starting directly under that double 2x8 carrier and go in a direction of about 5 feet. That makes a 5 x 6 pen to keep youngsters in, or a breeder pen. The nesting boxes will go on the wall opposite the windows, and the nesting boxes to the right of the door as you first walk in. One of my roofing crew guys stopped in yesterday and asked me why I wasn't using my roofing nail guns instead of hand nailing the shingles down. I told him someday, when he gets older he will enjoy the peace and quiet of his surroundings....and not miss the noise of the compressor or the loud "whack" of the nail gun. |
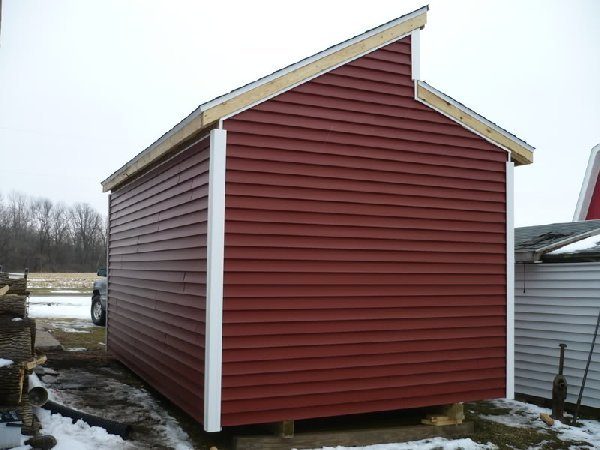
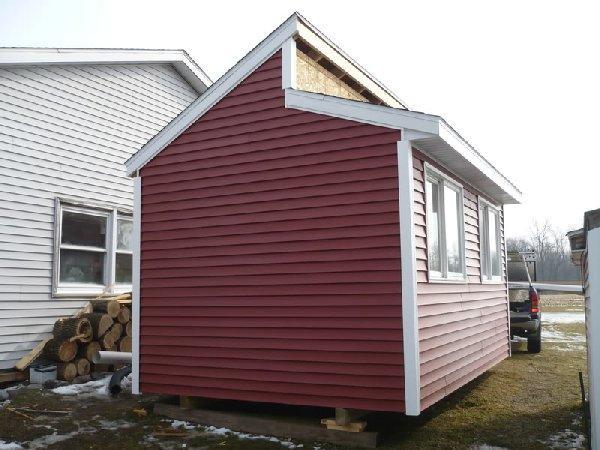
...it warmed up for about 3 hours so I put on as much siding as I could in that amount of time. I think you can begin to see my color vision coming together with the black roof, white trim and bright red siding. My wife's decision on the vinyl siding, and as she pulled up the driveway she told me it looked Beautiful.....you know what they say, "Happy wife, Happy life"
I need to get the white f-channel, soffit & facia installed before I can finish the siding below the eave edge. Here is a view from the front quarter of the henhouse.
As you can tell the hens are always around their new digs.
And then I moved around to the other end and started installing vinyl siding there. Tomorrow is supposed to be warmer, so with any luck all but the entry door side should be done in vinyl.
Here is the picture of the front with Red siding and white vinyl trim installed. Little coop sure looks small now.
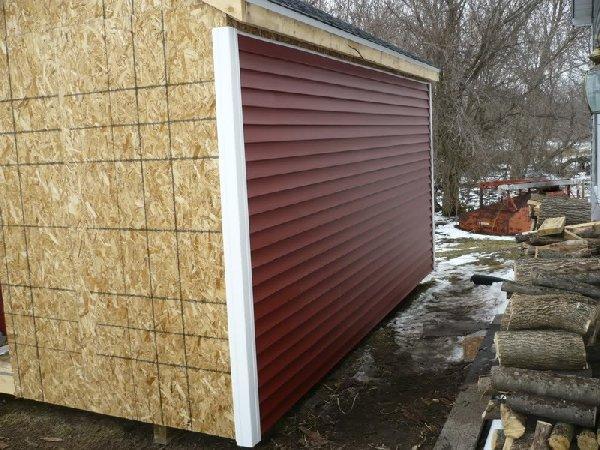
This is the far end, all done in Red vinyl siding and white vinyl trim.
The backside also done the same way.
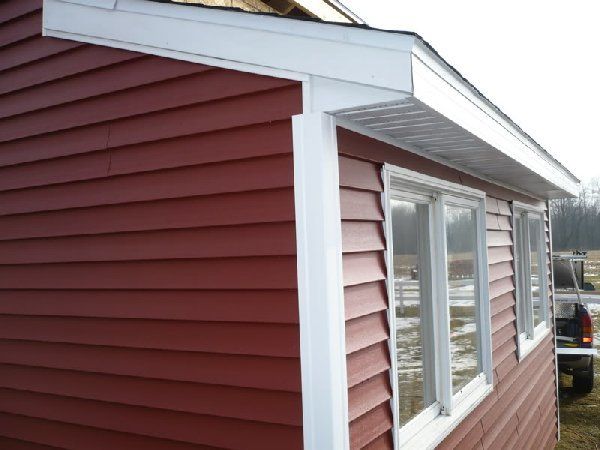
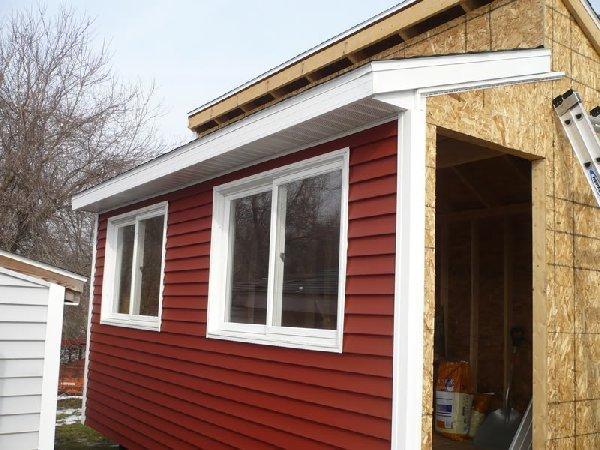
I got to thinking about some of the names we call different things such as F channel, soffit and facia and I thought maybe some people don't know what the hen I mean by those names.....so, here is a close up of the F-channel which is actually shaped like the letter "F" and can be installed the way you see it in my pic or turned the other way. Usually I install F channel before all of the siding gets done, but I wanted to get the henhouse covered from the elements and I can install if later. Here you see the F channel and the soffit installed into the F channel.

Here is the underside view of the soffit panels, as you can see I have used vented panels and solid. I used a pattern of 3 vented, then 1 solid. When I build a house I do the opposite, but since ventilation can be a concern I did it this way.

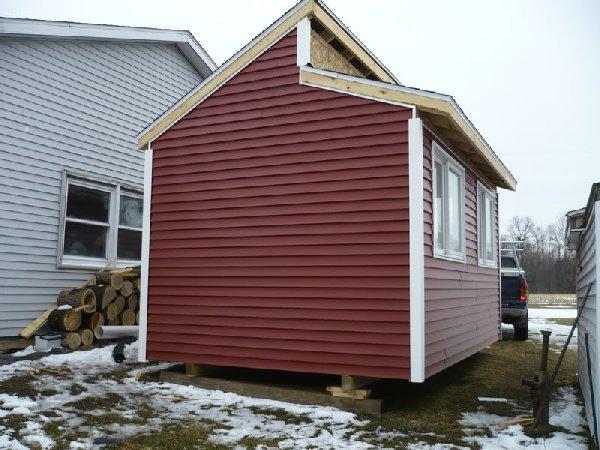
The gable end facia needed a custom made facia covering since typically bought facia is on 3/4 inch at the bottom and I am covering 1 1/2". So the gable end facia which is a 2 x 6 got covered with a custom bent aluminum facia. This picture, I think, really shows off the red and white combination of what the whole coop looks like when finished.
And this is the far gable end of the henhouse with all the siding and aluminum finished.
Now the next steps are to make the little chicken door, install man size door in this end. Install windows up above then install linoleum, nest boxes, roosts and a seperate breeder pen.
| Since I am hatching chicks and nothing much going on, I decided to get a bit more done on the henhouse. First thing I needed was a door, since I didn't want to buy a new one, I went dumpster diving and came up with a solid blank that I could make work. I first got some 1 x 4 pine and made the hinge side jamb. Screwed the door to the jamb, installed that all in the opening. Not bad for a freebie door, even had a doorknob......and a big dent. I also cut out the chicken door. | 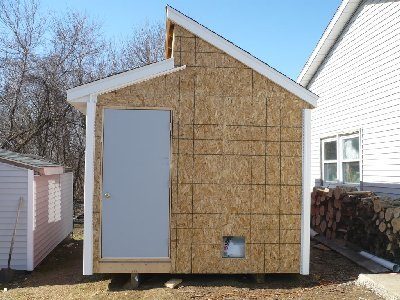
|
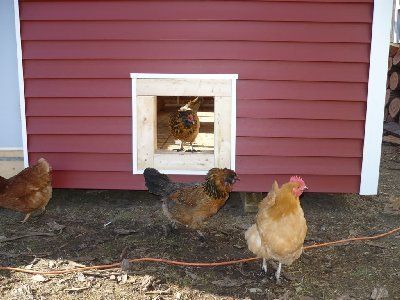
...then I started putting on the vinyl siding, as you can see I have inspectors. | 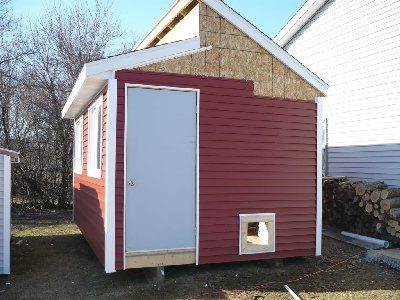
I guess the door size passed, this will get wrapped in white aluminum. |
|
Other than the little wall above, all the siding is now done | 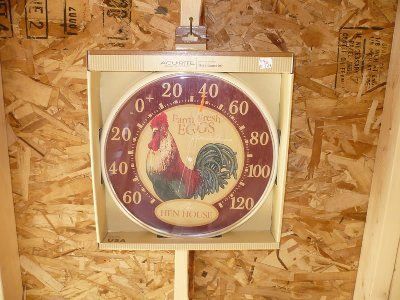
en though it is around 20 degrees outside, the new "just for the henhouse" thermometer reads close to 40. Guess those windows are letting in light and heat. |
| Things went faster than I hoped for. First off....I am not a floor covering installer, but it went al right. First I cleaned the floor super clean...super clean! Then I laid out the covering and let it warm up from the cold ride home. | 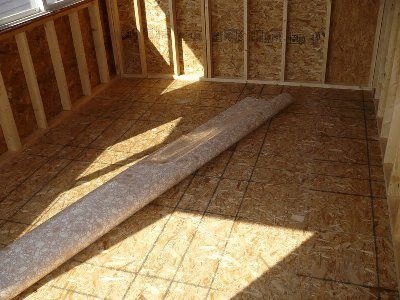
|
| I then managed to get it fitted and cut to size. Final trimming came later. I got the cheapest piece of linoleum I could...the hens won't mind and it will be covered in shavings. | 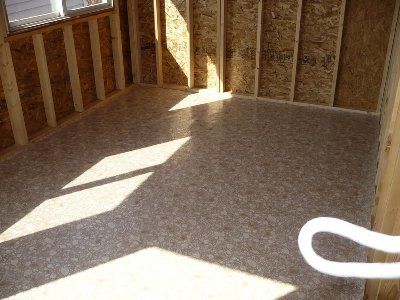
|
| This is the "footprint" size of the breeding/seperation pen. It is roughly 5'6" x 6'0". I will add studs later on. | 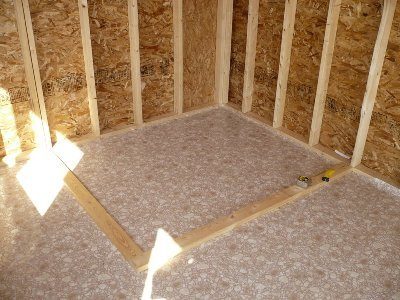
|
| I built this roost to be removable, all I need to do is remove the screws at the top that holds it in place and I could move it between other wall studs if I wanted to. It butts up next to the future breeding pen. | 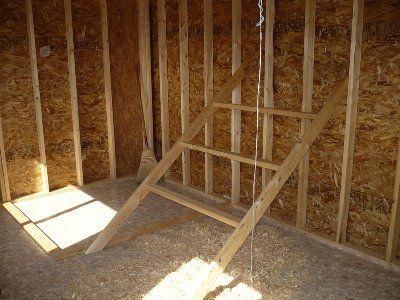
|
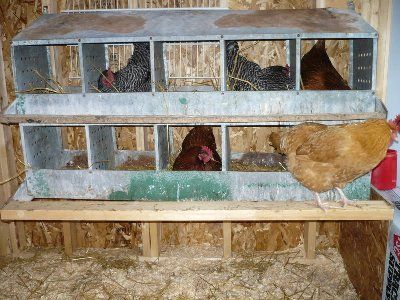
| And looking back towards the walk in door wall is where the nesting boxes are in place. I still need to fix the bottom perch and it is ready to use. | 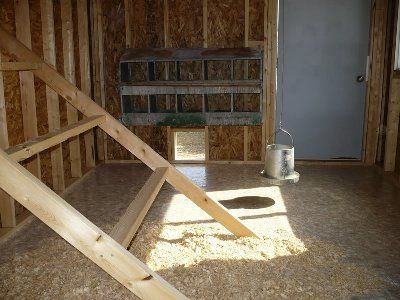
|
| 
|