The Little Urban Coop
This is my adventure into urban chicken keeping. This process has been a long time coming, after searching to find local organic eggs and paying high prices I wanted to have some control over this aspect of our essential menu item. I know it's probably cheaper to just buy the eggs, but what fun is that?
After much lurking on the BYC web-site and getting wonderful input from the chicken minded, and spending hours pouring over the coop pages, it was time to bite the bullet and build a coop. We live in the city, so our coop had to be small, movable and be able to house 3 chickens. We also had to have our coop inspected by the animal control department to make sure it was adequate and appropriate for chickens. It was deemed to be one of the nicest coops they've inspected which made us happy.
In the spirit of adding to the coop pages in hopes that our little endeavor will inspire someone else I'm documenting our journey from pile of supplies to coop.
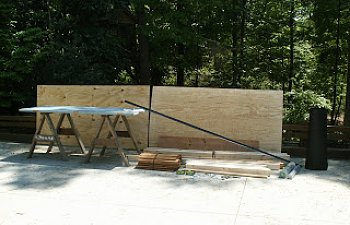
The pile of supplies which included two sheets of plywood, one of which is rough to emulate barn type siding; cedar shakes for the roof; 2x4s; drip edge; 1/2 inch hardware cloth; chicken wire; roofing paper; cedar sticks (for where the coop makes contact with the ground); nails, screws and hinges.

This is my adventure into urban chicken keeping. This process has been a long time coming, after searching to find local organic eggs and paying high prices I wanted to have some control over this aspect of our essential menu item. I know it's probably cheaper to just buy the eggs, but what fun is that?
After much lurking on the BYC web-site and getting wonderful input from the chicken minded, and spending hours pouring over the coop pages, it was time to bite the bullet and build a coop. We live in the city, so our coop had to be small, movable and be able to house 3 chickens. We also had to have our coop inspected by the animal control department to make sure it was adequate and appropriate for chickens. It was deemed to be one of the nicest coops they've inspected which made us happy.
In the spirit of adding to the coop pages in hopes that our little endeavor will inspire someone else I'm documenting our journey from pile of supplies to coop.
The pile of supplies which included two sheets of plywood, one of which is rough to emulate barn type siding; cedar shakes for the roof; 2x4s; drip edge; 1/2 inch hardware cloth; chicken wire; roofing paper; cedar sticks (for where the coop makes contact with the ground); nails, screws and hinges.


The first piece is finished. This large cut out is where the nesting box will be sited. The top cut out is part of the ventilation system.

The large piece on the left is the back side of the coop. Access through this openeing will make cleaning out the coop relatively easy.
]

Three sides done! It took all day what with the shopping and all the measuring and cutting.


Carefully attaching the hardware cloth to the inside of the window. It's very sharp and a pain to work with. We secured it with u shaped tacks.

Here you can see one side with the window completed. The window is held shut by a wooden latch. Keeping it simple.

Hardware cloth is attached to the vents. We covered up the exposed 2x4 with scrap plywood.
Putting the sides together.

Here you can see the coop with the plywood roof attached. The roosting pole can be seen inside. It's a closet pole which is easily removed for cleaning.

The floor is attached temporarily. We have yet to cut out the hole for the chicken ladder.

Here is the bottom of the coop (turned sideways) with the hole cut out for the ramp, or as I like to call it, the drawbridge.
]

Time to add the chicken wire to the first part of the run which is directly under the coop. Here you can see us placing wire on the bottom of the coop to keep predators from digging under.
]

Wire has been placed everywhere except the spot where we will site the access door for feeding and watering and the exit into the run. The part of the coop that sits on the ground is made with cedar.
]

Here is the ramp in the lowered position. You can barely tell that it's in two sections. It ended up being in two sections because if it were in one piece, the ramp would be too steep.

The run is wider than the coop and is detachable. It connects by four hooks and eyes (two on each side). It's not heavy and easily can easily be moved onto the lawn to give the chickens a change of scene and keep them safe from predators. The door on the end is for access to the hanging waterer, and big enough that I can crawl in if necessary! The door has a wooden slider to keep it closed along with a lock and key to keep out racoons! A similar door is located under the coop itself to access the feeder.
]

Here's a better look at the cedar shingled roof. This is much more attractive than ashphalt shingles. It also matches our tree house! Here you can see the nesting box on the outside of the coop for easy access. The chain you can see hanging on the bottom attaches to a hook to hold the roof of the box up for hands free egg collecting or nest cleaning.
]

Here's where we sited the food. It's under shelter and sits up high on a little shelf which has a lip to stop it tipping over. Off the ground like this, there is less chance the girls will sit ontop and poop in their food. We've since added a piece of wood to the back to stop rain splashing in.
]

Here is the sliding mechanism to keep the chickens out of the nesting box at night. You can easily slide the doors open from the outside and allow access to the boxes during the day. The photo is taken from inside the box. Scrap wood was used for this.
]

Here's the door to the bottom level of the coop. We have a lock to keep out critters.
]

We had the great idea of using paint stirrers to make name tags for the girls. We cut two of them in order to make the whole thing look like a chicken foot! The name tags are on the outside of the nesting box.
]

We painted the coop barn red! A little piece of farm in the big city!
]

This is the back side of the coop. The door up above which is where we'll access the coop for cleaning is screwed on for now until we can think of a better way of removing it that won't make it easy for racoons to get in.
Dimensions
Main Coop (upper portion)
Top of the shed roof to the underside of upper coop = 2ft 9.5"
Bottom of shed roof to underside of coop = 2ft 3"
Width of upper coop = 2ft
Length of upper coop = 3' 9"
Nesting box
12.5" x 2'3"
Run
3'x5'
2' 5" high
Let the Chicken Adventure begin!
Things I would change....
The ramp is permanantly in the down position and we have a sliding mechanism to close off the coop at night. It's a piece of wood which sits in grooves on either side (to prevent it from being pushed up from underneath). It's opened and closed by sliding two dowels into drilled holes (two in front, and two in back) and pushing. This solution was what we came up with after we discovered that the original idea of a pulley system to raise and lower the ramp wasn't feasible. Ramp was too heavy, only one side could be attached with rope. Our solution, while not ideal works like a charm. If I had to start again, I would give much more thought to the process of locking up the chickens for the night.
Was it worth it? You decide...

Penguin (left), Puddin' (middle) and Joy (right)
Updates
We ended up making some changes to the coop since we ran into issues with the sliding pop door getting jammed with pine shavings and not closing all the way.
]
The pulley system works well and is accessed from outside the coop.
Since this picture was taken, the only change is that we shaved off a little from the back side of the pop door as the chicken's toes were in the way of the door closing.
Here's the door in the closed position - note the large landscape nail used to hold the door down in case any wiley racoons take it into their heads to try and push the pop door up to gain access to the chickens.
The door is held open by a loop and nail.
We weren't sure how the nest box was going to work out, but one of the girls is laying now and used the nest box right away as evidenced in the picture below.
I'm not sure that Joy, our Red Sex Link was all that thrilled when I took her egg. Here she is giving me the stink eye.

The pulley system works well and is accessed from outside the coop.

Since this picture was taken, the only change is that we shaved off a little from the back side of the pop door as the chicken's toes were in the way of the door closing.

Here's the door in the closed position - note the large landscape nail used to hold the door down in case any wiley racoons take it into their heads to try and push the pop door up to gain access to the chickens.

The door is held open by a loop and nail.
We weren't sure how the nest box was going to work out, but one of the girls is laying now and used the nest box right away as evidenced in the picture below.

I'm not sure that Joy, our Red Sex Link was all that thrilled when I took her egg. Here she is giving me the stink eye.