Before starting on our coop, I reviewed the BYC website member's coop designs for weeks. I narrowed down the top 4 or 5 and combined all the good ideas to make our coop. Our top coops were:
Taj Mahal / Wichita
The Palace
Boisemarker's
(Edit: Now that it has been a little over a year after the completion of my build, I am going back through and editing my original post to include things I should have done or things I didn't think of. This text will be in red so there won't be any confusion. Hopefully this will help anyone wanting to incorporate any part of my design in their own coop.)
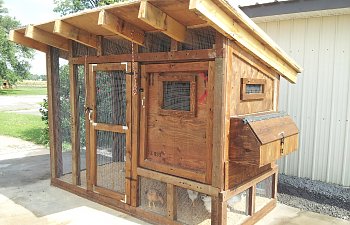
Like the ones listed above, I wanted ease of use, easy cleaning, predator proof, and for my own personal reasons I wanted as much of it as possible built from recycled/re-purposed materials. Our out-of-pocket expenses were right at $500. If we were to buy all new it would have been between $1500-$2000 to build this coop. I do not have plans for this coop as I took ideas straight from the website and adapted them for my application on the fly. I can give rough dimensions, but drawings with exact measurements I do not have.
Foundation: 5' x 10'
Roof: 8' x 12' (3 sheets of plywood)
Front: 7' tall
Rear: 5' tall
Once I started, it took 2 weeks to build this coop (minus the automatic feeder and waterer, which added considerable amounts of extra time to complete). That was 2 weeks from sun up to sun down every day.

Our first consideration was to be predator-proof. Our location has an overpopulation of coyotes and being out in the country, we have our fair share of varmints, hawks, and owls. We thought about putting the coop on the grass, but several factors had to be considered that I didn't want to deal with, such as digging a footer, water drainage, predator-proofing the foundation, etc. Our property was originally an airplane hangar with an air strip so we have an abundance of concrete, so we decided to use some of the concrete behind the house.
Another consideration I should have thought of was orientation of the coop. It is facing north and with the very unusual winter we had, the ice and snow completely destroyed the sand floor and also ruined all of the food hanging in the feeder (more on that later). Since our spring weather usually brings storms from the west, a north and south orientation is best for us. I will be prepared next winter with removable panels to keep and snow and ice out of the run.
Foundation:
The foundation is 5' x 10' and anchored to the concrete slab in several places. It was made in such a way that the studs would screw right to the foundation. The wood used for the foundation was bought new and pressure treated.
We should have included some kind of drain in the foundation. We had to come back after the fact and drill holes on the bottom front boards so that water can escape. We only had a problem when our weather came from the north (ice and snow).
Framing and roof support:
The 2"x4"s used were all pressure treated and bought new. I figured the most important wood was the foundation and support, so I used new. The roof rafters used are 3"x5"x8' and come on large pallets I got from work. Each pallet has (5) 3"x5"x8' topped with 2 full sheets of 3/4" plywood, which I used for the roof, and various other places on the coop. The pallets are also put together with 5/8"x1" lag screws with washers, which were also utilized in the construction of the coop. I don't have pictures of the roof, but the roof is corrugated fiberglass sheets screwed down with roofing screws. The fiberglass sheets were left in our shop from the previous owners so that was no cost to us.
*Hint* Spacing of the 2"x4"s need to be the same as the width of the hardware cloth you are going to use. This will minimize waste.
The frame was stained prior to the installation of the hardware cloth and the bedding of slag (gravel) was laid at that time as well. The slag is almost free at work and was used to help absorb rain that gets in the coop. There will be about 4" of construction sand on top of the slag as you will see later. The base of the hen house is 4' x 5 ' and built at an angle for easier cleaning. In hindsight, this step was unneeded as we went with a different bedding in the hen house (more on that later).
The east and west walls of the hen house were made of the 3/4" plywood donated from work. The north and south walls were made of 1/2" plywood that was also donated from work. I did it this way thinking I would need more strength on the east and west walls with the ramp and automatic feeder (more on that later) on the east wall and the nesting boxes hanging out of the west wall. The south wall of the hen house is just a plain wall (not needing any strength), and the north wall is going to be a door supported with 2"x4"s so I thought 3/4" would be overkill. You can see in the picture (above) the fiberglass sheets used to cover the roof (They are laying inside the coop).
Doors and Nesting boxes:
The door to the hen house and the walk-in door to the run were both constructed in place. I had never built doors like this before, but I used an idea on BYC that a member shared when building their coop. You measure and cut each side of the door, clamp them in place using door shims to space the door off the frame, then measure and cut the top and bottom parts of the door. Using door shims as spacers on top and bottom, you put your door hardware on to stiffen the door, then put your hinges on. It was super easy and my doors fit perfectly. I do not have pictures of the nesting boxes, but all 3 were built as one piece, slid it into the hole and screwed into place. I have pictures later of the insides of the nesting boxes, where "slide-out" pieces of wood were used to assist with cleaning. The nesting boxes are 14" wide x 12" deep x 16" tall and the insides were painted black (for privacy).
The landscape cloth and sand went in prior to the hardware cloth. The hardware cloth went on very easy with the use of an air stapler and staples. Across the hinged section of the nesting box door is a bicycle inner tube cut length-wise fastened down with roofing nails and sealed with caulk. I did it this way to utilize stuff I had on hand. It works, and keeps water out.
The floor of the nesting boxes and hen house was covered with linoleum for ease of cleaning. The chicken door is attached to a rope and through eyelets that lead out of the coop so that we are in charge of when it is open and closed. Originally, our flock consisted of 5 and the one roosting bar was sufficient.
Originally we were using pine shavings as bedding inside the hen house. The flies were unbearable. It got to the point where we would have to clean the coop every day or else we would see maggots in the pine shavings. We ended up putting about 6-7" of the same sand as in the run and mixing it with a big bag of Sweet PDZ. It makes clean up a snap and there are zero flies. We still, however, use pine shavings in the nesting boxes.
The chicken ramp is treated 2"x6" with untreated 1"x2" rungs. The rungs are on 6" centers and the chickens don't seem to have a problem getting in or out at that angle.
Here is a picture up close of the nesting box with it's covered hinge. It works well. If I were to do it again, I definitely would have side access to the eggs instead of top access. Not only would it be easier to seal, but it would be less intrusive for when a hen goes broody and does not want to be disturbed.
The insides of the nesting boxes. The pieces of wood with the hole in it slide out. This reveals a 1" slit to assist with cleaning. We found these to be useless since we went with sand for the inside of the hen house. I would use linoleum again, though, because once we had an egg break and it was really easy to clean up having the linoleum.
This is what we started with and the dead of summer made us look for alternate solutions for bedding. Using the deep litter method in our kind of summers is not recommended. Our fly problem was so bad we were getting maggots by day 3 if the hen house had not been cleaned out. What we changed: We left the nesting boxes with pine shavings and removed the shavings in the floor of the hen house. We replaced the shavings with about 4" of sand with a 40# bag of Sweet PDZ spread across the top. The fly problem almost went away completely.
Automatic Waterer:
It didn't take long before I was disgusted at the amount my chickens were pooping in their own water. Also, I was having to change it out every day and sometimes twice a day just because the amount of poop and shavings that found their way in the water. I wanted a system that didn't need to be refilled for a few days and stayed clean. It just made sense to go with a bucket (bigger reservoir to come later), PVC, and poultry nipples. *Hint* The 2-piece nipples will leak (mine did anyway) and you will have to seal them with caulk or RTV. Do this step with the chickens locked in the hen house or at night while they are sleeping. For some reason chickens love the taste of wet RTV. It really makes a mess on and in their beaks.
There is a valve coming out of the bucket and a union right before going into the hen house. To fill the bucket (since the bucket is over 100' from the nearest water source) I valve off the bucket and undo the union. I then fill the bucket, put my apple cider vinegar in it to prevent slime build up, hook the piping back up, and turn it back on. So clean and easy. The chickens love it and didn't take long for them to learn how to use it.
The piping comes in from the bucket into the hen house where there are 2 nipples and a valve. It then travels down into the run to water chickens outside. I chose to have 2 nipples inside for the times they get locked inside due to weather or whatever. I can also valve it off in extended cold weather to prevent piping from freezing down below. We have mild winters so I think this should be sufficient. I can also wrap the pipes if need be (If the chickens don't eat the insulation).
Then it goes into the run area where there are 3 nipples and then a valve to drain the entire system. This is handy when you worm the chickens, or get some kind of contaminate in the watering system where you want to drain it all and go back with fresh water.
Last winter this was useless. I figured it would be since I didn't have a cold weather solution. Next winter I am going to use a heater in the bucket and heat trace on the PVC lines. This should eliminate any freezing and the heat trace only uses electricity when the temperatures get close to freezing. I just need to make sure the hens won't peck it.
Automatic Feeder:
I wanted a bulk system-one that could go a few days without need of refilling in case we go out of town for a bit. I needed one that would feed in the run and also in the hen house (in case of bad weather or whatever). Space was a consideration as well. We don't have a lot of real estate in the run or the hen house so it had to be low profile. What I ended up doing was hanging a box on the wall to feed inside the run. On the same wall (The back side of the box) I put a long slit with a tray under it. This feeds the inside. Because we have some brutally hot and humid summers, I lined the box with plastic and sealed it using caulk to keep the moisture out. The lid is sealed with foam to also help keep the moisture out. Filled completely, it holds about 75lbs of feed. Actually, I tested this during the past winter. I knew bad weather was coming and I filled the feeder with 2 bags of feed along with some oyster shells. It will hold a little more than 100 lbs. which in it's original design is a bad thing. Little did I know that one of the snow storms was going to dump all that ice and snow in the front side of the coop. It covered the exposed food and clogged up the feeder. The original design needs a hatch down low so that you can safely empty the feeder for whatever reason. Murphy's law tells us that it will not get clogged when it is almost empty. It tells us it will get clogged when it has 100lbs of food in it.
To feed inside the run area.
To let me know when the feeder is getting low.
This is inside the hen house. The shelf above holds scratch, oyster shells, or whatever and serves as a poop deflector for the food tray. As our flock got bigger, the roosting bar design changed and the shelf went away(I did have to make another poop deflector, though). If our flock size stayed the same I would have left the shelf. It wasn't a problem and the birds didn't mess with it. I didn't know beforehand that raising chickens was going to be so addictive and that I would want more and more chickens.
Also, the inside feeder tray can go away in my case. Our average temps in the winter are in the 30s, with the occasional single digit night or two. For that matter, the inside waterer can go away as well. Being new to raising chickens I thought they would be inside a lot during the winter. Last winter was harsh, and if they wanted outside then, they will do fine outside during our typical winter.
Our flock consists of 7 birds now, 1 rooster and 6 hens. We are at our capacity in this coop. Not all my birds are full grown, but there seems to be *maybe* room for 1 more on the roosting bar. We had to add to the original roosting bar to make a "T" to fit all our birds inside.
Now our flock is 8 hens and a rooster. And to be honest, the rooster does nothing but eat and poop. We might eventually incubate some of our eggs, but for our current needs I could do with another hen and no rooster. Something to consider. Besides, I want more chickens and to do that I will have to build another coop. We are at max capacity on this one.
Taj Mahal / Wichita
The Palace
Boisemarker's
(Edit: Now that it has been a little over a year after the completion of my build, I am going back through and editing my original post to include things I should have done or things I didn't think of. This text will be in red so there won't be any confusion. Hopefully this will help anyone wanting to incorporate any part of my design in their own coop.)
Like the ones listed above, I wanted ease of use, easy cleaning, predator proof, and for my own personal reasons I wanted as much of it as possible built from recycled/re-purposed materials. Our out-of-pocket expenses were right at $500. If we were to buy all new it would have been between $1500-$2000 to build this coop. I do not have plans for this coop as I took ideas straight from the website and adapted them for my application on the fly. I can give rough dimensions, but drawings with exact measurements I do not have.
Foundation: 5' x 10'
Roof: 8' x 12' (3 sheets of plywood)
Front: 7' tall
Rear: 5' tall
Once I started, it took 2 weeks to build this coop (minus the automatic feeder and waterer, which added considerable amounts of extra time to complete). That was 2 weeks from sun up to sun down every day.
Our first consideration was to be predator-proof. Our location has an overpopulation of coyotes and being out in the country, we have our fair share of varmints, hawks, and owls. We thought about putting the coop on the grass, but several factors had to be considered that I didn't want to deal with, such as digging a footer, water drainage, predator-proofing the foundation, etc. Our property was originally an airplane hangar with an air strip so we have an abundance of concrete, so we decided to use some of the concrete behind the house.
Another consideration I should have thought of was orientation of the coop. It is facing north and with the very unusual winter we had, the ice and snow completely destroyed the sand floor and also ruined all of the food hanging in the feeder (more on that later). Since our spring weather usually brings storms from the west, a north and south orientation is best for us. I will be prepared next winter with removable panels to keep and snow and ice out of the run.
Foundation:
The foundation is 5' x 10' and anchored to the concrete slab in several places. It was made in such a way that the studs would screw right to the foundation. The wood used for the foundation was bought new and pressure treated.
We should have included some kind of drain in the foundation. We had to come back after the fact and drill holes on the bottom front boards so that water can escape. We only had a problem when our weather came from the north (ice and snow).
Framing and roof support:
The 2"x4"s used were all pressure treated and bought new. I figured the most important wood was the foundation and support, so I used new. The roof rafters used are 3"x5"x8' and come on large pallets I got from work. Each pallet has (5) 3"x5"x8' topped with 2 full sheets of 3/4" plywood, which I used for the roof, and various other places on the coop. The pallets are also put together with 5/8"x1" lag screws with washers, which were also utilized in the construction of the coop. I don't have pictures of the roof, but the roof is corrugated fiberglass sheets screwed down with roofing screws. The fiberglass sheets were left in our shop from the previous owners so that was no cost to us.
*Hint* Spacing of the 2"x4"s need to be the same as the width of the hardware cloth you are going to use. This will minimize waste.
The frame was stained prior to the installation of the hardware cloth and the bedding of slag (gravel) was laid at that time as well. The slag is almost free at work and was used to help absorb rain that gets in the coop. There will be about 4" of construction sand on top of the slag as you will see later. The base of the hen house is 4' x 5 ' and built at an angle for easier cleaning. In hindsight, this step was unneeded as we went with a different bedding in the hen house (more on that later).
The east and west walls of the hen house were made of the 3/4" plywood donated from work. The north and south walls were made of 1/2" plywood that was also donated from work. I did it this way thinking I would need more strength on the east and west walls with the ramp and automatic feeder (more on that later) on the east wall and the nesting boxes hanging out of the west wall. The south wall of the hen house is just a plain wall (not needing any strength), and the north wall is going to be a door supported with 2"x4"s so I thought 3/4" would be overkill. You can see in the picture (above) the fiberglass sheets used to cover the roof (They are laying inside the coop).
Doors and Nesting boxes:
The door to the hen house and the walk-in door to the run were both constructed in place. I had never built doors like this before, but I used an idea on BYC that a member shared when building their coop. You measure and cut each side of the door, clamp them in place using door shims to space the door off the frame, then measure and cut the top and bottom parts of the door. Using door shims as spacers on top and bottom, you put your door hardware on to stiffen the door, then put your hinges on. It was super easy and my doors fit perfectly. I do not have pictures of the nesting boxes, but all 3 were built as one piece, slid it into the hole and screwed into place. I have pictures later of the insides of the nesting boxes, where "slide-out" pieces of wood were used to assist with cleaning. The nesting boxes are 14" wide x 12" deep x 16" tall and the insides were painted black (for privacy).
The landscape cloth and sand went in prior to the hardware cloth. The hardware cloth went on very easy with the use of an air stapler and staples. Across the hinged section of the nesting box door is a bicycle inner tube cut length-wise fastened down with roofing nails and sealed with caulk. I did it this way to utilize stuff I had on hand. It works, and keeps water out.
The floor of the nesting boxes and hen house was covered with linoleum for ease of cleaning. The chicken door is attached to a rope and through eyelets that lead out of the coop so that we are in charge of when it is open and closed. Originally, our flock consisted of 5 and the one roosting bar was sufficient.
Originally we were using pine shavings as bedding inside the hen house. The flies were unbearable. It got to the point where we would have to clean the coop every day or else we would see maggots in the pine shavings. We ended up putting about 6-7" of the same sand as in the run and mixing it with a big bag of Sweet PDZ. It makes clean up a snap and there are zero flies. We still, however, use pine shavings in the nesting boxes.
The chicken ramp is treated 2"x6" with untreated 1"x2" rungs. The rungs are on 6" centers and the chickens don't seem to have a problem getting in or out at that angle.
Here is a picture up close of the nesting box with it's covered hinge. It works well. If I were to do it again, I definitely would have side access to the eggs instead of top access. Not only would it be easier to seal, but it would be less intrusive for when a hen goes broody and does not want to be disturbed.
The insides of the nesting boxes. The pieces of wood with the hole in it slide out. This reveals a 1" slit to assist with cleaning. We found these to be useless since we went with sand for the inside of the hen house. I would use linoleum again, though, because once we had an egg break and it was really easy to clean up having the linoleum.
This is what we started with and the dead of summer made us look for alternate solutions for bedding. Using the deep litter method in our kind of summers is not recommended. Our fly problem was so bad we were getting maggots by day 3 if the hen house had not been cleaned out. What we changed: We left the nesting boxes with pine shavings and removed the shavings in the floor of the hen house. We replaced the shavings with about 4" of sand with a 40# bag of Sweet PDZ spread across the top. The fly problem almost went away completely.
Automatic Waterer:
It didn't take long before I was disgusted at the amount my chickens were pooping in their own water. Also, I was having to change it out every day and sometimes twice a day just because the amount of poop and shavings that found their way in the water. I wanted a system that didn't need to be refilled for a few days and stayed clean. It just made sense to go with a bucket (bigger reservoir to come later), PVC, and poultry nipples. *Hint* The 2-piece nipples will leak (mine did anyway) and you will have to seal them with caulk or RTV. Do this step with the chickens locked in the hen house or at night while they are sleeping. For some reason chickens love the taste of wet RTV. It really makes a mess on and in their beaks.
There is a valve coming out of the bucket and a union right before going into the hen house. To fill the bucket (since the bucket is over 100' from the nearest water source) I valve off the bucket and undo the union. I then fill the bucket, put my apple cider vinegar in it to prevent slime build up, hook the piping back up, and turn it back on. So clean and easy. The chickens love it and didn't take long for them to learn how to use it.
The piping comes in from the bucket into the hen house where there are 2 nipples and a valve. It then travels down into the run to water chickens outside. I chose to have 2 nipples inside for the times they get locked inside due to weather or whatever. I can also valve it off in extended cold weather to prevent piping from freezing down below. We have mild winters so I think this should be sufficient. I can also wrap the pipes if need be (If the chickens don't eat the insulation).
Then it goes into the run area where there are 3 nipples and then a valve to drain the entire system. This is handy when you worm the chickens, or get some kind of contaminate in the watering system where you want to drain it all and go back with fresh water.
Last winter this was useless. I figured it would be since I didn't have a cold weather solution. Next winter I am going to use a heater in the bucket and heat trace on the PVC lines. This should eliminate any freezing and the heat trace only uses electricity when the temperatures get close to freezing. I just need to make sure the hens won't peck it.
Automatic Feeder:
I wanted a bulk system-one that could go a few days without need of refilling in case we go out of town for a bit. I needed one that would feed in the run and also in the hen house (in case of bad weather or whatever). Space was a consideration as well. We don't have a lot of real estate in the run or the hen house so it had to be low profile. What I ended up doing was hanging a box on the wall to feed inside the run. On the same wall (The back side of the box) I put a long slit with a tray under it. This feeds the inside. Because we have some brutally hot and humid summers, I lined the box with plastic and sealed it using caulk to keep the moisture out. The lid is sealed with foam to also help keep the moisture out. Filled completely, it holds about 75lbs of feed. Actually, I tested this during the past winter. I knew bad weather was coming and I filled the feeder with 2 bags of feed along with some oyster shells. It will hold a little more than 100 lbs. which in it's original design is a bad thing. Little did I know that one of the snow storms was going to dump all that ice and snow in the front side of the coop. It covered the exposed food and clogged up the feeder. The original design needs a hatch down low so that you can safely empty the feeder for whatever reason. Murphy's law tells us that it will not get clogged when it is almost empty. It tells us it will get clogged when it has 100lbs of food in it.
To feed inside the run area.
To let me know when the feeder is getting low.
This is inside the hen house. The shelf above holds scratch, oyster shells, or whatever and serves as a poop deflector for the food tray. As our flock got bigger, the roosting bar design changed and the shelf went away(I did have to make another poop deflector, though). If our flock size stayed the same I would have left the shelf. It wasn't a problem and the birds didn't mess with it. I didn't know beforehand that raising chickens was going to be so addictive and that I would want more and more chickens.
Also, the inside feeder tray can go away in my case. Our average temps in the winter are in the 30s, with the occasional single digit night or two. For that matter, the inside waterer can go away as well. Being new to raising chickens I thought they would be inside a lot during the winter. Last winter was harsh, and if they wanted outside then, they will do fine outside during our typical winter.
Our flock consists of 7 birds now, 1 rooster and 6 hens. We are at our capacity in this coop. Not all my birds are full grown, but there seems to be *maybe* room for 1 more on the roosting bar. We had to add to the original roosting bar to make a "T" to fit all our birds inside.
Now our flock is 8 hens and a rooster. And to be honest, the rooster does nothing but eat and poop. We might eventually incubate some of our eggs, but for our current needs I could do with another hen and no rooster. Something to consider. Besides, I want more chickens and to do that I will have to build another coop. We are at max capacity on this one.

") Kudos for finding a solution that works and explaining it so that others with similar problems can try it.
Kudos for finding a solution that works and explaining it so that others with similar problems can try it.