February 28, 2009
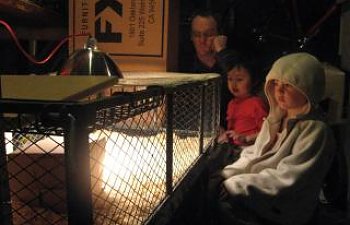
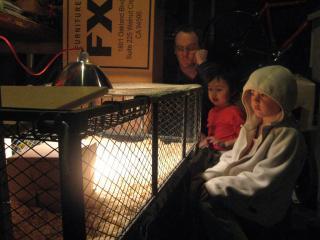
These are our week old chicks from the local feed store. We thought about ways to make a home for them out of wire mesh but it seemed too much trouble for such a temporary home. So, their home was a garden cart covered with hardware cloth in the garage. The heater light rested directly on the wire mesh. Nighttime temperatures ran about 40 F outside. I covered the cart with cardboard from boxes, towels and a blanket. During the day I put them out in the sun since it was warmer than the garage but kept one end covered and kept the light on.

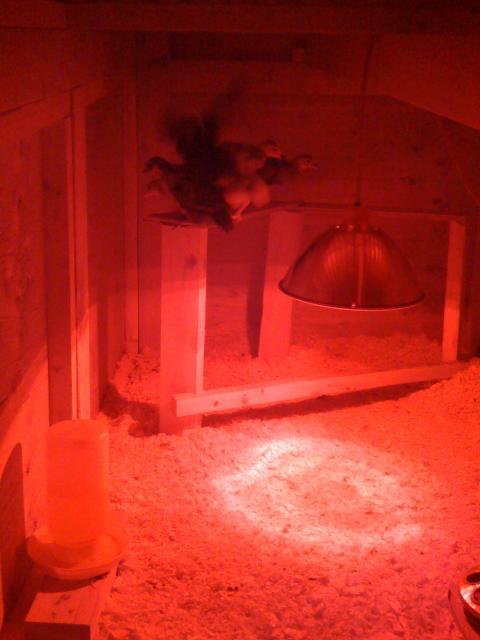
After the first two nights, I switched to a red reptile heat light bulb instead. I didn't see how the chicks could sleep at night with such a bright light on them all the time. They slept much more quietly that night.
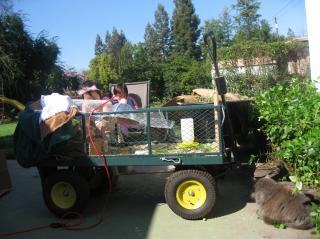
After about a week, it was clear that they needed some outside time to run around. So I built an A frame type of run out of bamboo and chicken wire. The whole thing was secured together using wire. The sides were about 6' x 4' with about the same ground footprint. One end of it was closed with chicken wire and the other with a plywood board. I hung the heat lamp close to the board and kept a cardboard box under it for any chicks that wanted to get out of the wind. Of course all the children were more than happy to warm any cold chicks up in their laps. It was light enough to move around every day and strong enough to keep the cats out and the chicks in. After a couple of weeks with this, the cats lost interest and the chicks didn't seem to feel cold anymore so I just let them free-range. They were about 5 weeks old and really didn't go far from me while I worked on a real coop for them.
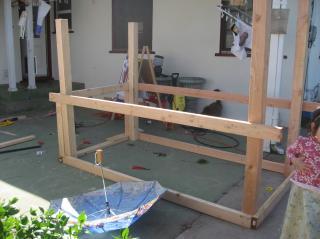
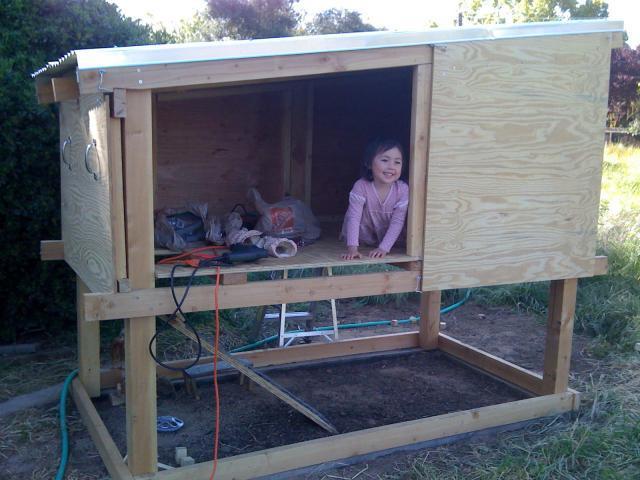
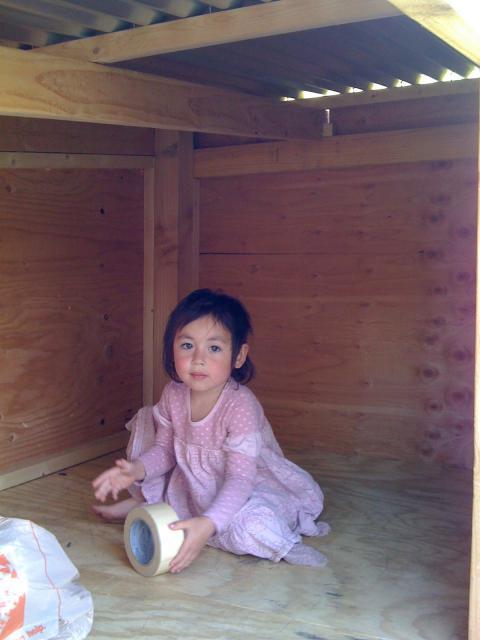
The most construction I have ever done has been putting up shelves. I have always just used pine lumber and screws so that is what I used for the coop. I built the whole thing with my 3 /2 and 5 1/2 year old daughters. Mostly they handed things to me, held pieces in place so I could mark them with a pencil, or I held pieces while they marked them. The spot I chose is next to our garden with a big mock orange bush on the west side for shade in the summer (95-105 F is expected here). Our winters are mild (lows in the 30-40 F range with rain and rare hail and even rarer snow once every 10 years). The winds come from the northwest in the winter.
Other equipment I used:
power saw
jigsaw
hand saw
saw horses
power drill and screwdriver
right angle framing tool
measuring tape
level
pencil
stepstool
tin snips
sanding bit for the power drill to trim off bits that stuck out no matter how careful I tried to be with measuring things
The basic structure has a 4'x7' footprint and runs from 5' to 6' tall lengthwise.
I started with:
two 5' 4x4
two 6' 4x4
I joined them with:
two 7' 2x4 and two 4' 2x4 on the bottom
two 8' 2x4 and two 4' 2x4 in the middle (2 /2' up the 4x4)
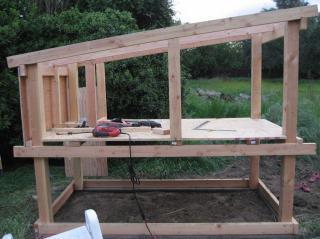
two 4' 2x4 on the ends and two 8' 2x4 on the diagonal on the tops (these required notching to fit snugly on the crosswise 4' 2x4s)
I added 4' 2x2 on the ends and three additional 4' 2x4 resting on the 8' 2x4 across the middle level. On top of this I put the 3/4" tongue in groove flooring plywood.
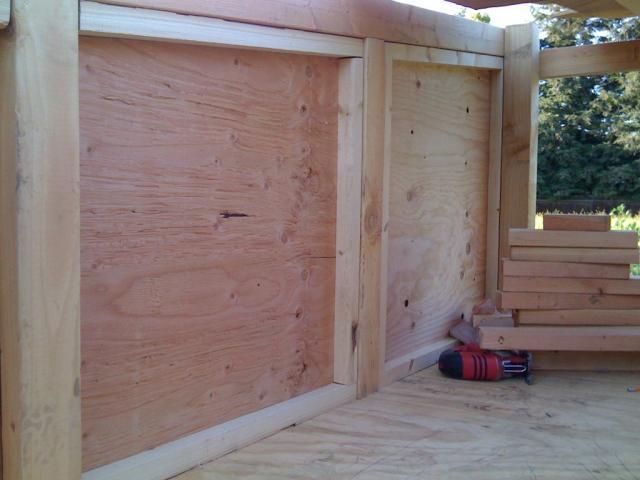
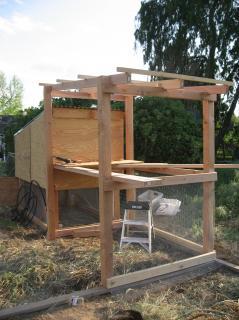
I used 1/2" plywood with a sanded side for the walls. I cut 2x2 to frame the walls and then screwed them to the inside of the plywood walls so that each wall rests on the flooring with the 2x2 frame. Each wall except the taller north end wall is removable and is held in place with hook and eye latches (for now). The south and east walls also have handles on them to make it easier for me.
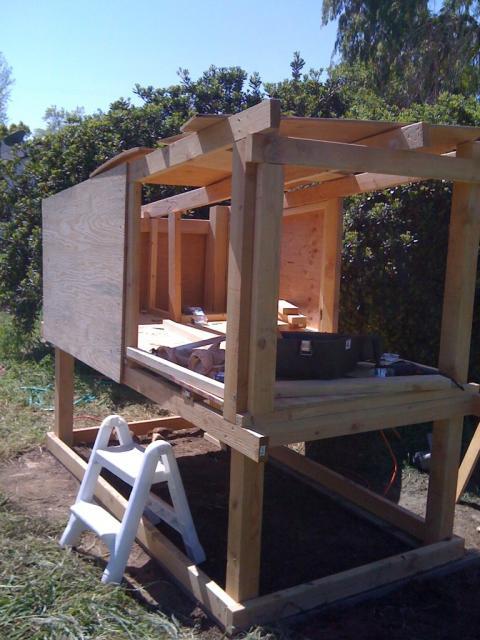
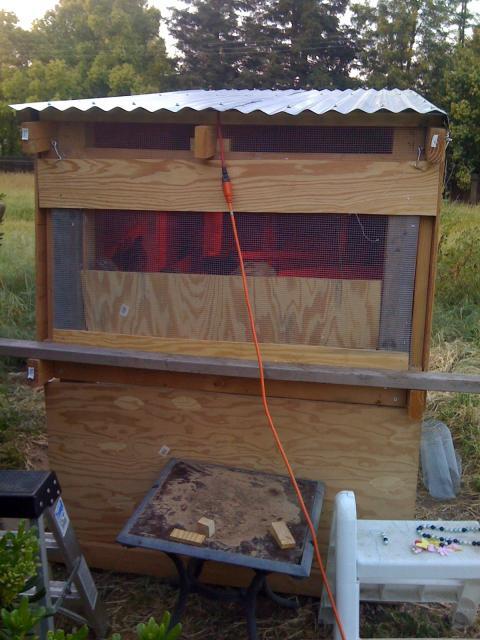
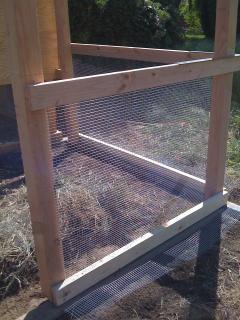
I used another 8' 2x4 down the middle of the top to match the ones I already put on the sides. Then I added 2x2s across as "purlins." I had to add some on the sides too to get rid of the gap between roof and the 2x4 rafter beams. On the north and south walls I had a gap between the walls I made and the roof. On the north side I cut a piece of plywood and put it on slanted. On the south side I stapled hardware cloth over the openings.
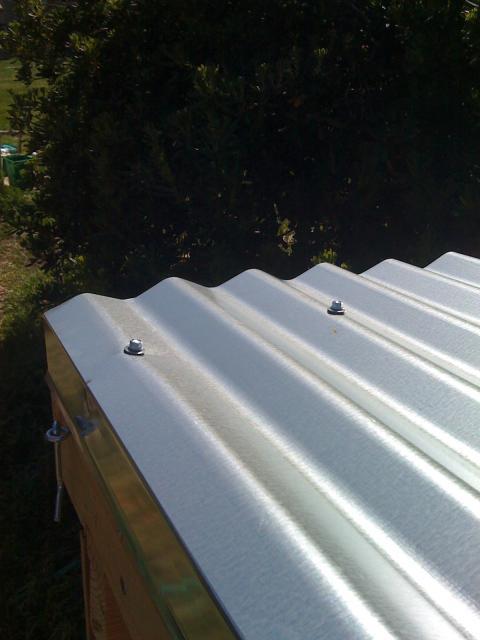
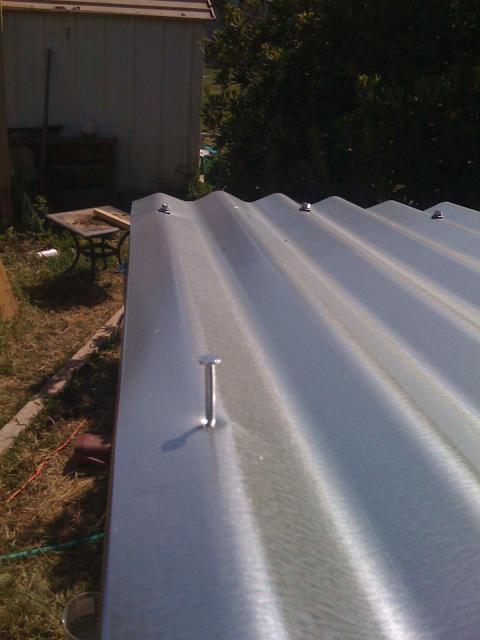
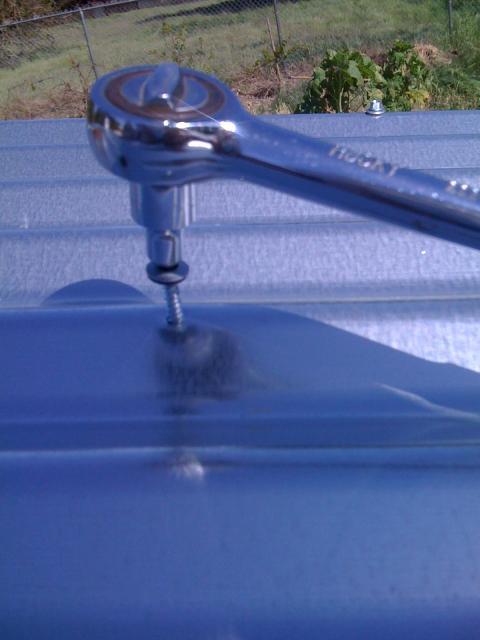
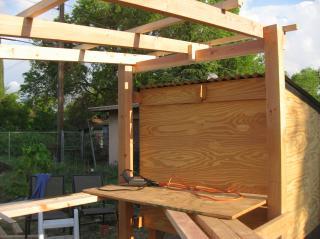
I trimmed 10' of 3"x3" galvanized flashing on the sides to 8' to fit under the roofing. I used a nail to make the pilot holes in the corrugated metal roofing (two sheets of 8'x29"), through the flashing and into the wood underneath. Everything I found online said to use a drill but that just seemed crazy to me given the amount of sawdust in myhair and clothes at the end of each day just working with wood. I couldn't imagine the metal bits flying around. Then I used a hand wrench to screw in the special 3" metal roofing screws with the rubber washers for watertightness. I put them in on the tops of the ridges, not in the valleys all along the purlins and the sides.
Tips for putting on corrugated metal roofing:
Do not do it on a windy day.
Wear gloves.
Buy some tin snips. They are great for cutting the roofing, the flashing, chicken wire and hardware cloth.
Wear a hat. Consider wearing sunglasses also.
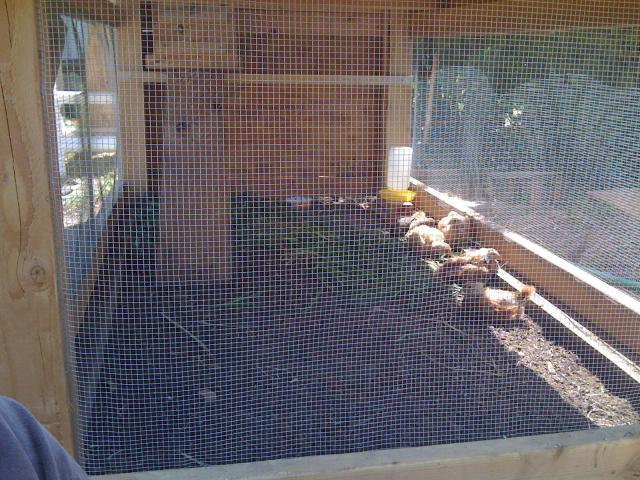
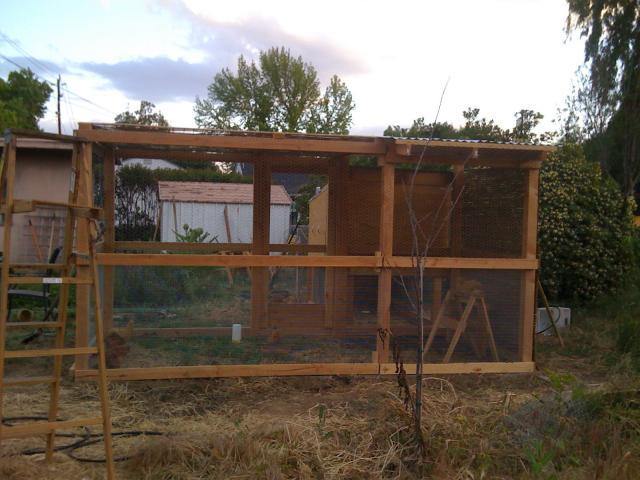
The picture below shows the north wall of the coop. The south side has mesh instead of wood between the top 2x2 and the lower 2x4 where the long roof beams rest.
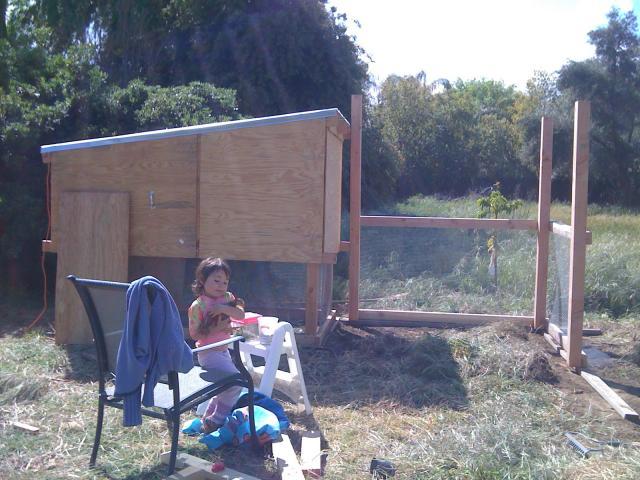
Finally I put in a trapdoor that drops down onto a ramp under the coop and covered the bottom with hardware cloth. I did this part in kind of a hurry because the chicks were starting to be really squished in the garden cart at night and I wanted to move them to bigger quarters QUICKLY. The next picture shows the chicks on the west side of the run under the coop enjoying a dust bath.
March 30, 2009
The first night they resisted going in the new coop despite familiar pine shavings, water and food. I also hung the red heat lamp from a beam and put a box in there with them but they spent the whole night up against the south wall next to the food and water. They have been free ranging in the yard (we have about an acre) but their first few days I kept them in the coop/ run so they would stop trying to go into the garden cart. I still need to put in a window and a smaller door so I don't have to take the whole wall off every time. Right now they just have a 2x4 about 3 inches off the floor of the coop but I will be putting up real roosts for them. I plan to make a larger covered run which will attach to the north end of the coop and help shield it from wind in the winter. Nest boxes are also to come later!
April 2, 2009
UPDATE:
Although the chicks learned after just one day that this was their new home instead of the garden cart, they argued very loudly every night about sleeping places . In the morning, they would stay in the coop until I came and took a wall off. It was just too dark in there for them to know when morning came.
So I took off the southern wall and put in a removable screened wall instead. They are up with the sun now and are ready to run out the second I open the door. I also made a sloppy roost which they could all sleep on but only two or three actually do. The others sleep on the floor against the screened wall. In the picture below you can also see the slanted board inside the screened wall to keep the litter from flying out every time I open the wall. I was afraid it would be too cold for them since they still have some down, but they seem fine. On the colder nights they sleep in a ring just outside the red circle from the heat lamp.
Here is a picture of all six chicks trying to claim the same spot on the new roost closest to the wall I just opened and closed. Before I made the roost, they all tried to sleep roosting on the slanting board I use to keep the litter inside the coop.
UPDATE:
April 4, 2009
This evening a Coopers hawk got the biggest chick with a stripe on her head. I stepped out of the house around 19:30 to make sure they were in bed and to close the coop door. Immediately I knew something was wrong because it was silent outside. No songbirds or squirrels or anyone made any sounds. I walked towards the coop and the hawk was stomping on our chick. I screamed and waved my arms. The hawk just looked at me. I walked over to it and it finally lazily took flight carrying the chick with it. Then it dropped the chick and sat on our fence watching me. I was afraid to call the chicks to me since the hawk was still there. I called for the girls to help look for the chicks while I watched the hawk. Eventually the hawk flew up to the neighbor's Modesto ash tree. We found the chicks hiding under our overturned wheelbarrow and put them in the coop straightaway. So now I am building the attached covered run I had originally intended.
April 8, 2009
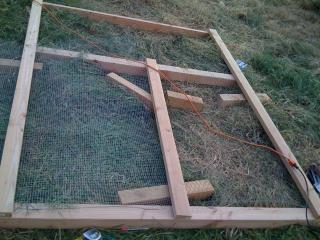
I have leveled the ground for the run and got two walls started. This part of the run will have a slanted roof from 7ft to 6 1/2 ft and part plywood part welded wire walls to block the northwest winds in the winter and the western sun in the summer. This time I also put the welded wire in at the same time I secured the 2x4s to the 4x4 posts instead of crawling around after the whole structure is done.
April 10, 2009
April 12, 2009
The Coopers hawk has been back almost every day. One time I found the chicks all hiding silently under the bushes. One chick is turning out to be a rooster. He was somehow separated from the rest of the chicks and I thought that the hawk had gotten him. After almost 30 minutes of silence, however, he started making the "I am lost where is everybody?" cheep and joined the rest of the flock. Together they remained unmoving and silent for an hour under our privet hedge.
Today we saw a pair of red tailed hawks circling. Beautiful and menacing at the same time. Some crows chased them away. I am leveling the ground for the rest of the run today. I still have a few screws to put in the roofing too.
April 14, 2009
Roofing is on and two walls of run are up. A hawk (not sure which one) flew over my head today chasing a little bird across the yard. I only got to see it because one of the jay birds gave a warning squawk and the chicks all ran for cover.
April 15, 2009
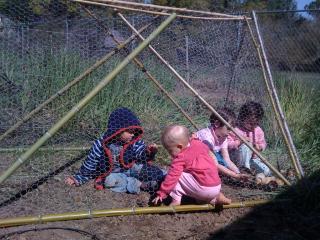
Still putting chicken wire up over top of run and on upper sides of walls. I would use welded wire on all of it but I have a huge roll of chicken wire so I am using that too. If it rusts or gets loose, then I'll replace it with welded wire. The chicken wire and bamboo tent in front of the coop is a mobile run I used more when the chicks were smaller to protect them from the cats. Now I use it just to block hawk access to the way into the coop.
April 24, 2009
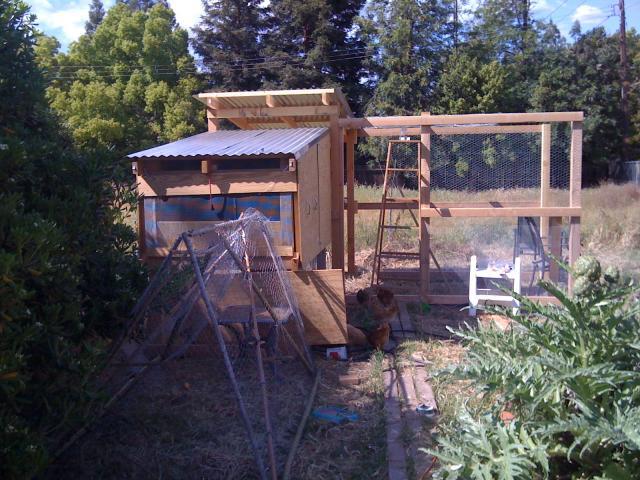
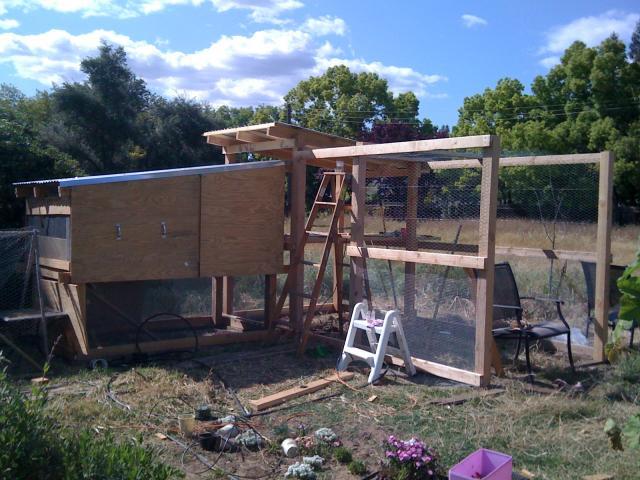
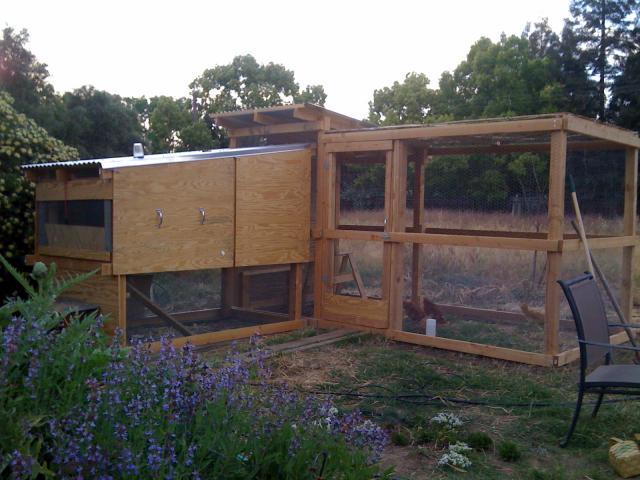
It is done! I made the door out of leftover 2x4s, plywood and wire. Our high temperatures have suddenly been over 95 F so I got some bamboo shades to cover part of the top and west side of the run until I can get some plants for shade. The west end of the coop has a corrugated metal roof just like the coop does. The rest has wire roof with a bamboo shade for the summer.
July 4, 2009
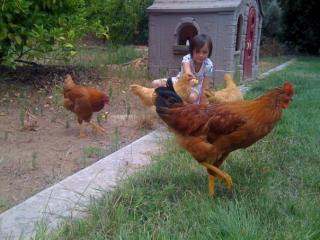
Today we had to send our rooster back to the farm where we bought him as a chick. Although we and all the neighbors loved him, he attacks my 4 year old. He never attacked me but he was anxious much of the time, stamping and fluffing every time we went in the yard. I considered fencing off part of the yard just for the chickens or keeping them in their pen. Going back to a 40 acre farm seemed like it would be more fun for him though, so we sent him away.
After he was gone, we found that the alpha hen Saffron had started laying and the rooster had just been defending his hens and the eggs.
August 15, 2009
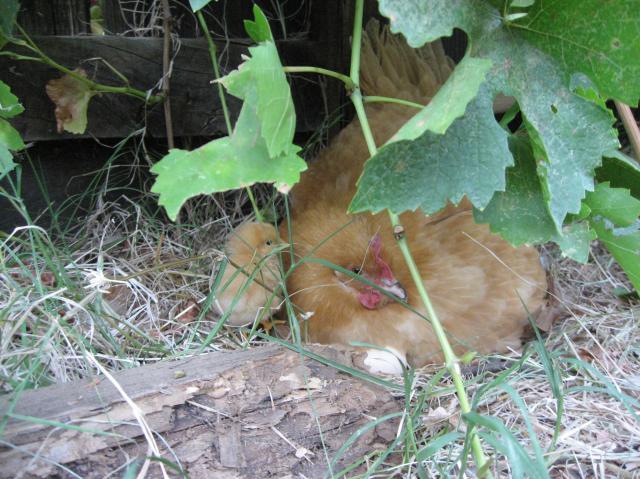
At first Saffron our alpha hen did not seem to be sitting on her eggs so I took them, but then one day she started disappearing throughout the day and would only reappear at dusk to go to roost in the coop. After a few days we finally found where she was hiding. Since about July 25, she stays on the nest even at night. I have seen her get off occasionally during the warmest part of the day to take a dust bath and get a drink. More than 21 days went by and there was still nothing. We considered getting her some store bought fertilized eggs, but yesterday she had a baby chick! Congratulations to Saffron!!!
September 6, 2009
Saffron has moved herself and her chick over to our lawn now instead of on the other side of the dirt by the fence. I think the chick is going to be a rooster.
These are our week old chicks from the local feed store. We thought about ways to make a home for them out of wire mesh but it seemed too much trouble for such a temporary home. So, their home was a garden cart covered with hardware cloth in the garage. The heater light rested directly on the wire mesh. Nighttime temperatures ran about 40 F outside. I covered the cart with cardboard from boxes, towels and a blanket. During the day I put them out in the sun since it was warmer than the garage but kept one end covered and kept the light on.
After the first two nights, I switched to a red reptile heat light bulb instead. I didn't see how the chicks could sleep at night with such a bright light on them all the time. They slept much more quietly that night.
After about a week, it was clear that they needed some outside time to run around. So I built an A frame type of run out of bamboo and chicken wire. The whole thing was secured together using wire. The sides were about 6' x 4' with about the same ground footprint. One end of it was closed with chicken wire and the other with a plywood board. I hung the heat lamp close to the board and kept a cardboard box under it for any chicks that wanted to get out of the wind. Of course all the children were more than happy to warm any cold chicks up in their laps. It was light enough to move around every day and strong enough to keep the cats out and the chicks in. After a couple of weeks with this, the cats lost interest and the chicks didn't seem to feel cold anymore so I just let them free-range. They were about 5 weeks old and really didn't go far from me while I worked on a real coop for them.
The most construction I have ever done has been putting up shelves. I have always just used pine lumber and screws so that is what I used for the coop. I built the whole thing with my 3 /2 and 5 1/2 year old daughters. Mostly they handed things to me, held pieces in place so I could mark them with a pencil, or I held pieces while they marked them. The spot I chose is next to our garden with a big mock orange bush on the west side for shade in the summer (95-105 F is expected here). Our winters are mild (lows in the 30-40 F range with rain and rare hail and even rarer snow once every 10 years). The winds come from the northwest in the winter.
Other equipment I used:
power saw
jigsaw
hand saw
saw horses
power drill and screwdriver
right angle framing tool
measuring tape
level
pencil
stepstool
tin snips
sanding bit for the power drill to trim off bits that stuck out no matter how careful I tried to be with measuring things
The basic structure has a 4'x7' footprint and runs from 5' to 6' tall lengthwise.
I started with:
two 5' 4x4
two 6' 4x4
I joined them with:
two 7' 2x4 and two 4' 2x4 on the bottom
two 8' 2x4 and two 4' 2x4 in the middle (2 /2' up the 4x4)
two 4' 2x4 on the ends and two 8' 2x4 on the diagonal on the tops (these required notching to fit snugly on the crosswise 4' 2x4s)
I added 4' 2x2 on the ends and three additional 4' 2x4 resting on the 8' 2x4 across the middle level. On top of this I put the 3/4" tongue in groove flooring plywood.
I used 1/2" plywood with a sanded side for the walls. I cut 2x2 to frame the walls and then screwed them to the inside of the plywood walls so that each wall rests on the flooring with the 2x2 frame. Each wall except the taller north end wall is removable and is held in place with hook and eye latches (for now). The south and east walls also have handles on them to make it easier for me.
I used another 8' 2x4 down the middle of the top to match the ones I already put on the sides. Then I added 2x2s across as "purlins." I had to add some on the sides too to get rid of the gap between roof and the 2x4 rafter beams. On the north and south walls I had a gap between the walls I made and the roof. On the north side I cut a piece of plywood and put it on slanted. On the south side I stapled hardware cloth over the openings.
I trimmed 10' of 3"x3" galvanized flashing on the sides to 8' to fit under the roofing. I used a nail to make the pilot holes in the corrugated metal roofing (two sheets of 8'x29"), through the flashing and into the wood underneath. Everything I found online said to use a drill but that just seemed crazy to me given the amount of sawdust in myhair and clothes at the end of each day just working with wood. I couldn't imagine the metal bits flying around. Then I used a hand wrench to screw in the special 3" metal roofing screws with the rubber washers for watertightness. I put them in on the tops of the ridges, not in the valleys all along the purlins and the sides.
Tips for putting on corrugated metal roofing:
Do not do it on a windy day.
Wear gloves.
Buy some tin snips. They are great for cutting the roofing, the flashing, chicken wire and hardware cloth.
Wear a hat. Consider wearing sunglasses also.
The picture below shows the north wall of the coop. The south side has mesh instead of wood between the top 2x2 and the lower 2x4 where the long roof beams rest.
Finally I put in a trapdoor that drops down onto a ramp under the coop and covered the bottom with hardware cloth. I did this part in kind of a hurry because the chicks were starting to be really squished in the garden cart at night and I wanted to move them to bigger quarters QUICKLY. The next picture shows the chicks on the west side of the run under the coop enjoying a dust bath.
March 30, 2009
The first night they resisted going in the new coop despite familiar pine shavings, water and food. I also hung the red heat lamp from a beam and put a box in there with them but they spent the whole night up against the south wall next to the food and water. They have been free ranging in the yard (we have about an acre) but their first few days I kept them in the coop/ run so they would stop trying to go into the garden cart. I still need to put in a window and a smaller door so I don't have to take the whole wall off every time. Right now they just have a 2x4 about 3 inches off the floor of the coop but I will be putting up real roosts for them. I plan to make a larger covered run which will attach to the north end of the coop and help shield it from wind in the winter. Nest boxes are also to come later!
April 2, 2009
UPDATE:
Although the chicks learned after just one day that this was their new home instead of the garden cart, they argued very loudly every night about sleeping places . In the morning, they would stay in the coop until I came and took a wall off. It was just too dark in there for them to know when morning came.
So I took off the southern wall and put in a removable screened wall instead. They are up with the sun now and are ready to run out the second I open the door. I also made a sloppy roost which they could all sleep on but only two or three actually do. The others sleep on the floor against the screened wall. In the picture below you can also see the slanted board inside the screened wall to keep the litter from flying out every time I open the wall. I was afraid it would be too cold for them since they still have some down, but they seem fine. On the colder nights they sleep in a ring just outside the red circle from the heat lamp.
Here is a picture of all six chicks trying to claim the same spot on the new roost closest to the wall I just opened and closed. Before I made the roost, they all tried to sleep roosting on the slanting board I use to keep the litter inside the coop.
UPDATE:
April 4, 2009
This evening a Coopers hawk got the biggest chick with a stripe on her head. I stepped out of the house around 19:30 to make sure they were in bed and to close the coop door. Immediately I knew something was wrong because it was silent outside. No songbirds or squirrels or anyone made any sounds. I walked towards the coop and the hawk was stomping on our chick. I screamed and waved my arms. The hawk just looked at me. I walked over to it and it finally lazily took flight carrying the chick with it. Then it dropped the chick and sat on our fence watching me. I was afraid to call the chicks to me since the hawk was still there. I called for the girls to help look for the chicks while I watched the hawk. Eventually the hawk flew up to the neighbor's Modesto ash tree. We found the chicks hiding under our overturned wheelbarrow and put them in the coop straightaway. So now I am building the attached covered run I had originally intended.
April 8, 2009
I have leveled the ground for the run and got two walls started. This part of the run will have a slanted roof from 7ft to 6 1/2 ft and part plywood part welded wire walls to block the northwest winds in the winter and the western sun in the summer. This time I also put the welded wire in at the same time I secured the 2x4s to the 4x4 posts instead of crawling around after the whole structure is done.
April 10, 2009
April 12, 2009
The Coopers hawk has been back almost every day. One time I found the chicks all hiding silently under the bushes. One chick is turning out to be a rooster. He was somehow separated from the rest of the chicks and I thought that the hawk had gotten him. After almost 30 minutes of silence, however, he started making the "I am lost where is everybody?" cheep and joined the rest of the flock. Together they remained unmoving and silent for an hour under our privet hedge.
Today we saw a pair of red tailed hawks circling. Beautiful and menacing at the same time. Some crows chased them away. I am leveling the ground for the rest of the run today. I still have a few screws to put in the roofing too.
April 14, 2009
Roofing is on and two walls of run are up. A hawk (not sure which one) flew over my head today chasing a little bird across the yard. I only got to see it because one of the jay birds gave a warning squawk and the chicks all ran for cover.

April 15, 2009
Still putting chicken wire up over top of run and on upper sides of walls. I would use welded wire on all of it but I have a huge roll of chicken wire so I am using that too. If it rusts or gets loose, then I'll replace it with welded wire. The chicken wire and bamboo tent in front of the coop is a mobile run I used more when the chicks were smaller to protect them from the cats. Now I use it just to block hawk access to the way into the coop.
April 24, 2009
It is done! I made the door out of leftover 2x4s, plywood and wire. Our high temperatures have suddenly been over 95 F so I got some bamboo shades to cover part of the top and west side of the run until I can get some plants for shade. The west end of the coop has a corrugated metal roof just like the coop does. The rest has wire roof with a bamboo shade for the summer.
July 4, 2009
Today we had to send our rooster back to the farm where we bought him as a chick. Although we and all the neighbors loved him, he attacks my 4 year old. He never attacked me but he was anxious much of the time, stamping and fluffing every time we went in the yard. I considered fencing off part of the yard just for the chickens or keeping them in their pen. Going back to a 40 acre farm seemed like it would be more fun for him though, so we sent him away.
After he was gone, we found that the alpha hen Saffron had started laying and the rooster had just been defending his hens and the eggs.
August 15, 2009
At first Saffron our alpha hen did not seem to be sitting on her eggs so I took them, but then one day she started disappearing throughout the day and would only reappear at dusk to go to roost in the coop. After a few days we finally found where she was hiding. Since about July 25, she stays on the nest even at night. I have seen her get off occasionally during the warmest part of the day to take a dust bath and get a drink. More than 21 days went by and there was still nothing. We considered getting her some store bought fertilized eggs, but yesterday she had a baby chick! Congratulations to Saffron!!!
September 6, 2009
Saffron has moved herself and her chick over to our lawn now instead of on the other side of the dirt by the fence. I think the chick is going to be a rooster.