(Thanks, Nifty-Chicken for tweaking the title for me.
 )
)
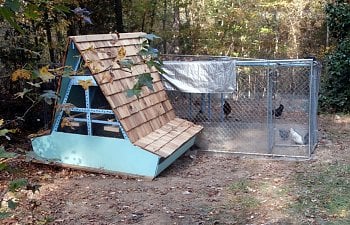
Coop is 48 Ft2, 7+ foot interior height. Run is 400 Ft2, around 6' high. Chain-link walls, 2" x 3" welded wire roof. 10' x 15' area covered by a tarp for shade & protection from rain.
I didn't care for the plainness of the front wall so I added a pair of flower boxes.
Double-door entrance insures chickens will not escape into the dog's area while I'm entering/leaving.
These doors are the only way into the coop, which is 'sealed' against the fully enclosed run.
I saw these doorknobs at Hobby Lobby and I just couldn't resist.
Poop trays with sweet PDZ to catch the bird's business and absorb the ammonia, keeping their room fresher smelling and healthier. Both roosts and trays can easily be removed to aid cleaning.
Interior cabinet holds feed and sweet PDZ for the poop trays.
Cabinet creates a nesting area on either side.
Either dormer area (including nest area) can easily be screened off creating a separate
brooding area with access to the outside via their respective 'chicken door'.
.
Feed bin. Raised to prevent the chickens from spilling their feed, roofed to keep them from walking (and pooping) in it. Roof is hinged to 'dump' any chicken that tries to roost on it.
Rain (and snow) falling on the tarp is collected via the gutters into the buckets to supply drinking water.
Buckets are connected via siphon to keep all three filled evenly, a tap off the siphon allows me to fill their water bin from the collected supply.
The Build.
August 23, 2016 ~ Design.
When I decided to start having chickens again, I figured on a small flock, say 6-7 chickens. However it wasn't long before "Chicken Math" (part of which was my housemates' sudden cravings for fresh eggs!) made it obvious that dozen birds would not be sufficient! So obviously "The Dawg House" would no longer work; I would have to build something bigger. In order to be big enough to give the 11 birds I am now raising the ballpark recommended 4 ft2 of floor space per bird, I would need about 48 ft2. So I figured 8' wide by 6' front-to-back would fit 'The Lower 40' best. And since I would have to be able to get in to collect the eggs and clean it, with that much space I definitely wanted a walk-in design.
I've always loved the A-Frame design, and for various reasons I thought it would best suit my needs. So I started looking through the various A-coops that were built by fellow BYC'ers, noting how they were built and any comments on their designs, both good and bad. Then I downloaded some CAD software and started playing with lines, to get what I decided what would give me the best results. The first thing I did was to abandon the equilateral design. Nailing three 8 foot studs together end to end is simple, but the resulting frame is too short to stand in without risking many bumps on the head. Also it limits the usable floor space, as the corners are too tight to allow a fully grown chicken to stand up in them. So instead I changed the triangle from an equilateral to what is known as an 'acute isosceles'. In English: Taller and narrower. Naturally this meant the base of the triangle would be less than 8 feet wide, so I added dormers (or 'wings') to either side. Because the outer walls of these dormers do not angle inwards like the corners of the main triangle the birds can now use the full 8 feet of width. Well actually, they angle slightly outwards, although that's more for looks than function.
As you can see everyone has room. The figures are scaled to the frame size.
This is 'me' standing under what will be the center rafters.
My height is 5', 10", and I also scaled a hen to a height of 17 inches,
which is admittedly taller then the EE's I have now.
I am having the Lower 40 Bush-Hogged this weekend and was going to wait until I could see the terrain better before I decided on exact placement; although I think I will be abandoning my original idea of building this coop outside the current pen then adding access to it. Instead I will probably put it on the same site as the original coop, seeing as that is already mostly flat, which I why I chose it for the current coop in the first place. I will, of course have to move that coop and close off the area until I finish the new coop. But considering the birds spend most of their time in that 'Northern' section anyway, I don't think they'll mind a temporarily reduced run area too much. In the meantime I will be working up the plans for the coop. Here is a preliminary sketch of the front side of the new building that will be facing the house. The back will be connected to the pen and have the doors accessing it. This will be the only access to the coop, so I won't have to worry about having to put a double door on the front to prevent birds 'escaping' and risking encounters with my dogs, who are not chicken-trained!
The name, "Eggcorn" is based on the name of our little piece of SC, "Acorn Acres".
Ironically enough, it turns out that "Eggcorn" is an actual word!
Eggcorn: Substitution of a word or phrase for a word
August 28, 2016
Got the framing drawn up. Front, side and back, at least. I haven't done the inside detail yet. I'm thinking of adding a low cabinet in the center against the front wall, thereby creating nesting boxes in the front corners. That way i can store their feed and other chicken things without using up any space. It will also protect it better than the plastic trash can that I currently have in their pen.
I'm using 2x3s for the framing studs as they will give me that little extra room under the one set of rafters I will have to contend with while inside, and also because this is a lightweight structure. One of the advantages of the A-frame design is that it is self supporting; It's strength comes from it's shape so it doesn't require as much from the material.
September 4, 2016 ~ Preparing the site
Nice neighborhood!
Once the Lower 40 was cleared I got to re-structuring the pen to allow me to build the new coop on the 'pad' where the old one is/was. Alas, when I built the addition to The Dawg Hawse I didn't think I would be relocating it. As such it was not sturdy enough to survive the move, and is now once again a 4' x 4' mini-coop.
Fortunately at the moment there are only seven chickens occupying the coop (6 if I am able to get rid of Blackstock), and before I put up the 2x4 wire around it many of them would choose to roost on the roof of the coop anyway, using the inside only as a very big nesting box. Hopefully they will do so again. There is still a tarp covering the wire ceiling over the coop, so it's not as if they will be unprotected; the nights are holding at 65-75 degrees F so they should be fine for the next week or so while I build their new hillside chalet.
Where the new coop is going.
This is the site of the original 10' x 10' pen and coop.
Their temporary holding area looks like something Katrina left behind, but it should keep them safe. And it is only temporary. Tomorrow i am going to go lumber shopping. I have tallied up a materials list and used Lowes' website to price it. Judging from the results I'm hoping I can finish the entire coop for under $500.
Considering a pre-made building of similar size can cost upwards of $1.300, I think I should come out pretty good. Especially as I will be taking advantage of the Labor Day sales.
Did I mention that this will be my first attempt at an actual structure?
As a side note, while I was rearranging the pen fencing, Braveheart, one of my EEs, climbed into one of the nesting boxes and settled down to work. I was hoping for a new colored egg, but hers turned out to be a very light brown. Pink, even.
- - - - -
September 9 ~ Let the building begin!
Sorry it's been awhile. I got all (I hope) the lumber for the foundation and framing, taking advantage of Lowes' Labor Day sales (cost so far - $200).
I had to do a little digging to get the 2" x 4" foundation joists level. I decided against sinking posts as what slope that existed was so small that simply setting it in blocks should be enough. My shed, which is significantly larger has remained stable on such a foundation for decades and it's on a much steeper slope, so I figured this little coop should sit OK. The black is asphalt, A.K.A. roofing tar, which I thinned with some mineral spirits and brushed on. Probably overkill, but once built I didn't think it would be very accessible so I wanted to be sure it didn't decay.
After making sure the entire foundation was level and square, I nailed down the floor and built up the rear and front walls. I took a break around 1:00 when the temperature got up over 95F and the area of the coop came into full sun. I did a few errands and got back to building around 4:30 and almost finished the front wall before quitting for the day.
All the while My chickens would periodically cheer me on with a chorus of what sounded like egg song, even the rooster, who was singing right along with them. You think I could teach him to lay eggs too?
September 10
Got the walls up today, screwed on the top spar and the center framing studs (most of this construction is being done with screws, not nails). After the noonday sun had moved on and the area was again in the shade I cut up all the pieces for the dormers.
Stress test - Yup, it look like it might be strong enough!
I'm going on a ride tomorrow, so I don't know if I'll be able to do much.
The weather report said fair skies until Friday. There was a 20% chance of rain yesterday, but seeing as this is our dry season I didn't think much of it, that is until all 20% decided to fall on my town, my yard and my unfinished plywood floor! It wasn't a long shower, only 30 minutes or so, but it was heavy enough to saturate the top layer of wood causing it to buckle slightly. It's still structurally sound, far as I can tell, but there is going to be a wrinkle or three under their tiny feet. When I painted the side of the sheets that were going to be face down I also painted the edges too, with two coats. I guess I should have sealed it with the asphalt instead.
I layed on a good coat of exterior latex decking paint once the wood had dried sufficiently. I'm obviously
going to have to find something to cap the edges though.
Before painting the floor though I cut and screwed together all the pieces of the dormers. Both went together nicely, and both are stiff and strong, much stronger then they looked like they would be on paper, even without their plywood panels. Last thing I did was with the floor paint drying I set about cutting the pieces for the cupboard frame. Turns out I had estimated the amount of wood I needed pretty good; I easily had enough with very little left over.
Got the cabinet framed out yesterday, then went to Lowe's to get the plywood for the roof, moulding and plastic for the windows, some angle to cap off the edges so hopefully the rain won't get in, some more screws and a gallon of white paint. I got a couple of really small cans of color paints and I am going to mix my own pastel tints. cost: $260, bring the total so far to $460.
I had to pick up my tenant from the hospital in Columbia this morning, but I did manage to get the two exposed edges tarred and capped (the dormer walls will cover the other two). D@m^ that crap is messy! And sticky! After working with it for a while I can really empathize with Brer Rabbit!
Tomorrow morning I'm going to mix up some paint and get all the beams covered. Then it's back to the garage to prepare the roof panels.
I spent 7 hours yesterday measuring, cutting, trimming and tacking in the interior moulding for the windows. Man, that was a tedious task! I'm glad today was a lot easier. I mixed up some of the colored paint I bought to use as a tinting agent with a 1/3 full gallon can of white exterior latex I had in the garage left over from some forgotten project to get the tone I wanted, and it turned out to be just enough for all the framing (seriously, I have less than 1/2 cup left)!
One of the window panes showing the moulding
After lunch I got to cutting up the plywood for the roof panels and got two of them painted on the 'in' side. The outside will be tarred once I get them screwed onto the frame. I really want to cover the roof with shake, but the estimated $150-$200 price tag has me balking. I probably will do it anyway*, but it will definitely blast me over my original $500 estimate!
* Hey, this is a labor of love; after all, it's for my ladies!
Been spending the past few days in the garage measuring, cutting and painting plywood for the walls, roof and the interior cabinet. Finally got it all done this morning and was even able to get the cabinet built into the coop. I figured it would be easier to do it now than after the roof and walls were in the way. Oh, and I decided to go with the cedar shingles after all. By the math 6 bundles should just about cover it. I also got some more building supplies. $240 so far, most of it the shingles, bringing the total to $700 even. More than my original guess (Chicken Coop Math?), but still a lot less that a pre-built of equivalent size.
I sure hope they appreciate this!
The feed cabinet and tarred roof from the last few days.
...And I got the shingles on. Well one side of the top section, at least. I haven't trimmed them yet.
I decided against the top 'flaps' it would have been too complicated.
You can't really see it in the photo, but I have also installed the HC ventilation screening along the top edge of the dormer wall. Or where the wall will be, anyway.
- - - - -
September 30
The roof is done, at least the top half is.
Dormer wall and ventilation screen
October 5 ~ Almost done!
The walls are all on, the windows are in, both dormers are roofed and one is shingled. I ran out so I have to get one more pack.
I also got the front window trim painted and installed.
You can see where I ran out of shingles. I almost had it figured perfect.
Painting that trim took most of a whole day; it all had to be done by hand - one leaf at a time. I still have to screen in the top vents, put in the doors and the roosting bars, but it's about finished. At least now that it's fully roofed I don't have to worry about rain.
And just in time for hurricane Matthew. I guess that's one way to test it!
October 11 ~ Finished (mostly)
There are a couple of cosmetic touches left, but for all practical purposes the coop is finished. I got the roof completely shingled in time for Matthew, which she handled without flinching. So I know it's tough enough to handle a category 1 hurricane.
Well, the edge of one anyway.
After the storm had passed I added the front doors, thresholds, roosts / 'poop'-trays and screened the top vents. Now I have to start on the run. Not sure what 'm going to do with the chickens yet, the pullets are still small enough to keep in the large dog cage, the mature birds are a different story. I'm thinking I could either lock them inside the coop while I'm rebuilding the run, or else clip their wings while I work on it so the can't fly out while it's missing it's roof.
Both the roosts and the 'trays can be removed for easier cleaning.
Because the poop-trays were not part of the original design, I had to redo the cabinet lid so it would open. So I cut it in half and gave it an accordion fold
The Run ~ design
OK, this is what I came up with. It will use the same 8 10' x 6' dog kennel panels, plus the scavenged remains of a 4' x 8' chain-link gate(?) left behind by the former owner, some extra hardware I will need to buy, lumber and 2" x 4" welded wire for the top.
Previously it was an odd shaped polygon that gave me approximately 300 Ft2 with the 32 Ft2 coop inside taking up part of it. By using the exact same number of panels but re-arranging them in a plain square I increase the square footage by over 30% to 400 ft2 (isn't geometry wonderful?
), and the coop will now be on the outside to boot, so they will have all 400 to play around in. I will be keeping the double-door alcove arrangement for security (OK, so 391 Ft2) and the run will be 'roofed' with welded wire fencing as before. I will be using a 15' x 10' tarp on top (in the section on the lower right corner of the drawing) for shade, rain cover and water collection. The bottom two feet will be covered with 1/2" hardware cloth with a 'skirt' extending 12" around the perimeter.
Unfortunately I am currently low on funds so it will be a few days before I can get the needed supplies. Since I will be locking all the birds inside the coop while I am building this I have to be sure I have everything ready before I start in order to minimize their time in 'lock-up'.
October 20 - 25 ~ De and Reconstruction
I finally got all the pieces together, the wood painted and as much as I could get done in preparation before actual building began. I did this because while I am building the run I have to lock all the birds inside the coop, and I don't want to keep them captive for any longer than necessary.
Step 1: Round up the chickens
Getting the babies into the coop was easy. They let me pick them up and put them inside without any struggling whatsoever! I hope they keep this friendly attitude! Braveheart and Glinda went in easily enough also, Muffins was sitting in one of the nesting boxes so she was no problem either. Ol' Red, Robin and Chaz weren't as cooperative, but after a bit of running around I was able to get them inside. Once everyone was sequestered though they all got along great. I guess keeping the babies caged but still in the presence of the others for a few weeks worked.
Step 2 - take down the old
With the chickens safely locked away along with their water and food, I was able to break down the old run. Once the walls were down I cleared out the remains of their old mini-coop and set about rebuilding the panels into their new 20' x 20' layout, erecting the central column and bolting in the rafters (20' is too long a span to just stretch the welded wire deer netting across).
Step 3 - put up the new!
Unfortunately I wasn't able to completely enclose the pen before dark. I did get the walls up, the central pillar and rafters in place but was only able to do part of the roofing (about 150 Ft2). So they will have to wait until tomorrow (hopefully before) noon. I don't have to completely finish it before I let them out, but they do have to have a completely enclosed space. Once I have that I can let them roam as I work on the rest. They usually retire to their coop at night anyway, so those hours shouldn't bother them much.
I can't believe I am almost done with this thing.
Finished stretching the welded wire over the entire run, creating the roof (and I have the cuts on my hands to prove it
). With the area fully enclosed I let the ladies out of confinement. The pullets stayed inside, but their older sisters did the same when I first released them until they were as big as the older birds also, so I expected them to do that. There is still work to do before I'm done, but now that everyone is free to roam safely I can do the rest at my leisure.
P.S. I don't know if I should consider it a good omen or not, but while I was weaving on the roof 'Dusty Crophopper'* Flew overhead.
Twice!
*Well, it looked like an AT-502 anyway...
Halloween
Been installing the hardware cloth predator skirts, and I found an interesting way to clip the hardware cloth to the chain link. I'm using pig rings of all things! At least for the top edge. And I got the chain link stapled onto the outside edge of the coop, sealing off that part from predators. With the coop fully attached against the chain-link fencing of the run I opened up the chicken portals on the dormer ends.
I also got the tarp on the roof, to provide shade, rain/snow protection and it will also be used to collect that same water.
So far the chickies seem to like it (and the PDZ filled poop trays make cleaning a breeze!)
I do need to raise the trays a little closer to the roosts though.
If I were to do it over what would I do different? Hard to say at this moment. This design was built out of what I learned from my last coop, and what i picked up here from BYC and what others "would have done". Is this coop perfect? Likely not, It is only a few weeks old, not really long enough for the faults in it's design the really show them selves yet. But I'm sure their are some. I already know the poop trays could be a little wider (but I can still do that), and I am already seeing I should have covered the top of the cabinet with something easier to clean. Formica would have been a good choice. I would also like to add an electrical connection so I can put some heaters in their water on those days when it gets cold enough for it to freeze.
Total cost for both the coop and run; just a shade under $1,000.

Coop is 48 Ft2, 7+ foot interior height. Run is 400 Ft2, around 6' high. Chain-link walls, 2" x 3" welded wire roof. 10' x 15' area covered by a tarp for shade & protection from rain.
I didn't care for the plainness of the front wall so I added a pair of flower boxes.

Double-door entrance insures chickens will not escape into the dog's area while I'm entering/leaving.
These doors are the only way into the coop, which is 'sealed' against the fully enclosed run.
I saw these doorknobs at Hobby Lobby and I just couldn't resist.

Poop trays with sweet PDZ to catch the bird's business and absorb the ammonia, keeping their room fresher smelling and healthier. Both roosts and trays can easily be removed to aid cleaning.
Interior cabinet holds feed and sweet PDZ for the poop trays.
Cabinet creates a nesting area on either side.
Either dormer area (including nest area) can easily be screened off creating a separate
brooding area with access to the outside via their respective 'chicken door'.
.
Feed bin. Raised to prevent the chickens from spilling their feed, roofed to keep them from walking (and pooping) in it. Roof is hinged to 'dump' any chicken that tries to roost on it.
Rain (and snow) falling on the tarp is collected via the gutters into the buckets to supply drinking water.
Buckets are connected via siphon to keep all three filled evenly, a tap off the siphon allows me to fill their water bin from the collected supply.
The Build.
August 23, 2016 ~ Design.
When I decided to start having chickens again, I figured on a small flock, say 6-7 chickens. However it wasn't long before "Chicken Math" (part of which was my housemates' sudden cravings for fresh eggs!) made it obvious that dozen birds would not be sufficient! So obviously "The Dawg House" would no longer work; I would have to build something bigger. In order to be big enough to give the 11 birds I am now raising the ballpark recommended 4 ft2 of floor space per bird, I would need about 48 ft2. So I figured 8' wide by 6' front-to-back would fit 'The Lower 40' best. And since I would have to be able to get in to collect the eggs and clean it, with that much space I definitely wanted a walk-in design.
I've always loved the A-Frame design, and for various reasons I thought it would best suit my needs. So I started looking through the various A-coops that were built by fellow BYC'ers, noting how they were built and any comments on their designs, both good and bad. Then I downloaded some CAD software and started playing with lines, to get what I decided what would give me the best results. The first thing I did was to abandon the equilateral design. Nailing three 8 foot studs together end to end is simple, but the resulting frame is too short to stand in without risking many bumps on the head. Also it limits the usable floor space, as the corners are too tight to allow a fully grown chicken to stand up in them. So instead I changed the triangle from an equilateral to what is known as an 'acute isosceles'. In English: Taller and narrower. Naturally this meant the base of the triangle would be less than 8 feet wide, so I added dormers (or 'wings') to either side. Because the outer walls of these dormers do not angle inwards like the corners of the main triangle the birds can now use the full 8 feet of width. Well actually, they angle slightly outwards, although that's more for looks than function.
As you can see everyone has room. The figures are scaled to the frame size.
This is 'me' standing under what will be the center rafters.
My height is 5', 10", and I also scaled a hen to a height of 17 inches,
which is admittedly taller then the EE's I have now.
I am having the Lower 40 Bush-Hogged this weekend and was going to wait until I could see the terrain better before I decided on exact placement; although I think I will be abandoning my original idea of building this coop outside the current pen then adding access to it. Instead I will probably put it on the same site as the original coop, seeing as that is already mostly flat, which I why I chose it for the current coop in the first place. I will, of course have to move that coop and close off the area until I finish the new coop. But considering the birds spend most of their time in that 'Northern' section anyway, I don't think they'll mind a temporarily reduced run area too much. In the meantime I will be working up the plans for the coop. Here is a preliminary sketch of the front side of the new building that will be facing the house. The back will be connected to the pen and have the doors accessing it. This will be the only access to the coop, so I won't have to worry about having to put a double door on the front to prevent birds 'escaping' and risking encounters with my dogs, who are not chicken-trained!
The name, "Eggcorn" is based on the name of our little piece of SC, "Acorn Acres".
Ironically enough, it turns out that "Eggcorn" is an actual word!

...or words that sound similar or identical in the speaker's dialect (sometimes called oronyms). The new phrase introduces a meaning that is different from the original, but plausible in the same context, such as "old-timers' disease" for "Alzheimer's disease".
- - - - -
- - - - -
August 28, 2016
Got the framing drawn up. Front, side and back, at least. I haven't done the inside detail yet. I'm thinking of adding a low cabinet in the center against the front wall, thereby creating nesting boxes in the front corners. That way i can store their feed and other chicken things without using up any space. It will also protect it better than the plastic trash can that I currently have in their pen.
I'm using 2x3s for the framing studs as they will give me that little extra room under the one set of rafters I will have to contend with while inside, and also because this is a lightweight structure. One of the advantages of the A-frame design is that it is self supporting; It's strength comes from it's shape so it doesn't require as much from the material.
- - - - -
September 4, 2016 ~ Preparing the site
Nice neighborhood!
Once the Lower 40 was cleared I got to re-structuring the pen to allow me to build the new coop on the 'pad' where the old one is/was. Alas, when I built the addition to The Dawg Hawse I didn't think I would be relocating it. As such it was not sturdy enough to survive the move, and is now once again a 4' x 4' mini-coop.
Fortunately at the moment there are only seven chickens occupying the coop (6 if I am able to get rid of Blackstock), and before I put up the 2x4 wire around it many of them would choose to roost on the roof of the coop anyway, using the inside only as a very big nesting box. Hopefully they will do so again. There is still a tarp covering the wire ceiling over the coop, so it's not as if they will be unprotected; the nights are holding at 65-75 degrees F so they should be fine for the next week or so while I build their new hillside chalet.
Where the new coop is going.
This is the site of the original 10' x 10' pen and coop.
Their temporary holding area looks like something Katrina left behind, but it should keep them safe. And it is only temporary. Tomorrow i am going to go lumber shopping. I have tallied up a materials list and used Lowes' website to price it. Judging from the results I'm hoping I can finish the entire coop for under $500.

Did I mention that this will be my first attempt at an actual structure?
As a side note, while I was rearranging the pen fencing, Braveheart, one of my EEs, climbed into one of the nesting boxes and settled down to work. I was hoping for a new colored egg, but hers turned out to be a very light brown. Pink, even.
- - - - -
September 9 ~ Let the building begin!
Sorry it's been awhile. I got all (I hope) the lumber for the foundation and framing, taking advantage of Lowes' Labor Day sales (cost so far - $200).
I had to do a little digging to get the 2" x 4" foundation joists level. I decided against sinking posts as what slope that existed was so small that simply setting it in blocks should be enough. My shed, which is significantly larger has remained stable on such a foundation for decades and it's on a much steeper slope, so I figured this little coop should sit OK. The black is asphalt, A.K.A. roofing tar, which I thinned with some mineral spirits and brushed on. Probably overkill, but once built I didn't think it would be very accessible so I wanted to be sure it didn't decay.
After making sure the entire foundation was level and square, I nailed down the floor and built up the rear and front walls. I took a break around 1:00 when the temperature got up over 95F and the area of the coop came into full sun. I did a few errands and got back to building around 4:30 and almost finished the front wall before quitting for the day.
All the while My chickens would periodically cheer me on with a chorus of what sounded like egg song, even the rooster, who was singing right along with them. You think I could teach him to lay eggs too?

- - - - -
September 10
Got the walls up today, screwed on the top spar and the center framing studs (most of this construction is being done with screws, not nails). After the noonday sun had moved on and the area was again in the shade I cut up all the pieces for the dormers.
Stress test - Yup, it look like it might be strong enough!

I'm going on a ride tomorrow, so I don't know if I'll be able to do much.
- - - - -
September 13
The weather report said fair skies until Friday. There was a 20% chance of rain yesterday, but seeing as this is our dry season I didn't think much of it, that is until all 20% decided to fall on my town, my yard and my unfinished plywood floor! It wasn't a long shower, only 30 minutes or so, but it was heavy enough to saturate the top layer of wood causing it to buckle slightly. It's still structurally sound, far as I can tell, but there is going to be a wrinkle or three under their tiny feet. When I painted the side of the sheets that were going to be face down I also painted the edges too, with two coats. I guess I should have sealed it with the asphalt instead.
I layed on a good coat of exterior latex decking paint once the wood had dried sufficiently. I'm obviously
going to have to find something to cap the edges though.
Before painting the floor though I cut and screwed together all the pieces of the dormers. Both went together nicely, and both are stiff and strong, much stronger then they looked like they would be on paper, even without their plywood panels. Last thing I did was with the floor paint drying I set about cutting the pieces for the cupboard frame. Turns out I had estimated the amount of wood I needed pretty good; I easily had enough with very little left over.
The frame went together quire nicely, I am rather impressed with myself, everything fits exactly as it is supposed to and is every bit as sturdy as I hoped it would be. Now I have to sit down and make a list of the things I am going to need to cover and finish this thing off.
- - - - -
September 15
Got the cabinet framed out yesterday, then went to Lowe's to get the plywood for the roof, moulding and plastic for the windows, some angle to cap off the edges so hopefully the rain won't get in, some more screws and a gallon of white paint. I got a couple of really small cans of color paints and I am going to mix my own pastel tints. cost: $260, bring the total so far to $460.
I had to pick up my tenant from the hospital in Columbia this morning, but I did manage to get the two exposed edges tarred and capped (the dormer walls will cover the other two). D@m^ that crap is messy! And sticky! After working with it for a while I can really empathize with Brer Rabbit!


Tomorrow morning I'm going to mix up some paint and get all the beams covered. Then it's back to the garage to prepare the roof panels.
- - - - -
September 17 ~ Covering.
I spent 7 hours yesterday measuring, cutting, trimming and tacking in the interior moulding for the windows. Man, that was a tedious task! I'm glad today was a lot easier. I mixed up some of the colored paint I bought to use as a tinting agent with a 1/3 full gallon can of white exterior latex I had in the garage left over from some forgotten project to get the tone I wanted, and it turned out to be just enough for all the framing (seriously, I have less than 1/2 cup left)!
One of the window panes showing the moulding
After lunch I got to cutting up the plywood for the roof panels and got two of them painted on the 'in' side. The outside will be tarred once I get them screwed onto the frame. I really want to cover the roof with shake, but the estimated $150-$200 price tag has me balking. I probably will do it anyway*, but it will definitely blast me over my original $500 estimate!

* Hey, this is a labor of love; after all, it's for my ladies!
- - - - -
September 22
Been spending the past few days in the garage measuring, cutting and painting plywood for the walls, roof and the interior cabinet. Finally got it all done this morning and was even able to get the cabinet built into the coop. I figured it would be easier to do it now than after the roof and walls were in the way. Oh, and I decided to go with the cedar shingles after all. By the math 6 bundles should just about cover it. I also got some more building supplies. $240 so far, most of it the shingles, bringing the total to $700 even. More than my original guess (Chicken Coop Math?), but still a lot less that a pre-built of equivalent size.
I sure hope they appreciate this!
- - - - -
September 26
The feed cabinet and tarred roof from the last few days.
...And I got the shingles on. Well one side of the top section, at least. I haven't trimmed them yet.
I decided against the top 'flaps' it would have been too complicated.
You can't really see it in the photo, but I have also installed the HC ventilation screening along the top edge of the dormer wall. Or where the wall will be, anyway.
- - - - -
The roof is done, at least the top half is.
Dormer wall and ventilation screen
- - - - -
October 5 ~ Almost done!
The walls are all on, the windows are in, both dormers are roofed and one is shingled. I ran out so I have to get one more pack.
I also got the front window trim painted and installed.
You can see where I ran out of shingles. I almost had it figured perfect.
Painting that trim took most of a whole day; it all had to be done by hand - one leaf at a time. I still have to screen in the top vents, put in the doors and the roosting bars, but it's about finished. At least now that it's fully roofed I don't have to worry about rain.
And just in time for hurricane Matthew. I guess that's one way to test it!
- - - - -
October 11 ~ Finished (mostly)
There are a couple of cosmetic touches left, but for all practical purposes the coop is finished. I got the roof completely shingled in time for Matthew, which she handled without flinching. So I know it's tough enough to handle a category 1 hurricane.
Well, the edge of one anyway.

After the storm had passed I added the front doors, thresholds, roosts / 'poop'-trays and screened the top vents. Now I have to start on the run. Not sure what 'm going to do with the chickens yet, the pullets are still small enough to keep in the large dog cage, the mature birds are a different story. I'm thinking I could either lock them inside the coop while I'm rebuilding the run, or else clip their wings while I work on it so the can't fly out while it's missing it's roof.
Both the roosts and the 'trays can be removed for easier cleaning.
Because the poop-trays were not part of the original design, I had to redo the cabinet lid so it would open. So I cut it in half and gave it an accordion fold
- - - - -
The Run ~ design
OK, this is what I came up with. It will use the same 8 10' x 6' dog kennel panels, plus the scavenged remains of a 4' x 8' chain-link gate(?) left behind by the former owner, some extra hardware I will need to buy, lumber and 2" x 4" welded wire for the top.
Previously it was an odd shaped polygon that gave me approximately 300 Ft2 with the 32 Ft2 coop inside taking up part of it. By using the exact same number of panels but re-arranging them in a plain square I increase the square footage by over 30% to 400 ft2 (isn't geometry wonderful?

Unfortunately I am currently low on funds so it will be a few days before I can get the needed supplies. Since I will be locking all the birds inside the coop while I am building this I have to be sure I have everything ready before I start in order to minimize their time in 'lock-up'.
- - - - -
October 20 - 25 ~ De and Reconstruction
I finally got all the pieces together, the wood painted and as much as I could get done in preparation before actual building began. I did this because while I am building the run I have to lock all the birds inside the coop, and I don't want to keep them captive for any longer than necessary.
Step 1: Round up the chickens
Getting the babies into the coop was easy. They let me pick them up and put them inside without any struggling whatsoever! I hope they keep this friendly attitude! Braveheart and Glinda went in easily enough also, Muffins was sitting in one of the nesting boxes so she was no problem either. Ol' Red, Robin and Chaz weren't as cooperative, but after a bit of running around I was able to get them inside. Once everyone was sequestered though they all got along great. I guess keeping the babies caged but still in the presence of the others for a few weeks worked.
Step 2 - take down the old
With the chickens safely locked away along with their water and food, I was able to break down the old run. Once the walls were down I cleared out the remains of their old mini-coop and set about rebuilding the panels into their new 20' x 20' layout, erecting the central column and bolting in the rafters (20' is too long a span to just stretch the welded wire deer netting across).
Step 3 - put up the new!
Unfortunately I wasn't able to completely enclose the pen before dark. I did get the walls up, the central pillar and rafters in place but was only able to do part of the roofing (about 150 Ft2). So they will have to wait until tomorrow (hopefully before) noon. I don't have to completely finish it before I let them out, but they do have to have a completely enclosed space. Once I have that I can let them roam as I work on the rest. They usually retire to their coop at night anyway, so those hours shouldn't bother them much.
I can't believe I am almost done with this thing.
- - - - -
October 26
Finished stretching the welded wire over the entire run, creating the roof (and I have the cuts on my hands to prove it

P.S. I don't know if I should consider it a good omen or not, but while I was weaving on the roof 'Dusty Crophopper'* Flew overhead.
Twice!

*Well, it looked like an AT-502 anyway...
- - - - -
Halloween
Been installing the hardware cloth predator skirts, and I found an interesting way to clip the hardware cloth to the chain link. I'm using pig rings of all things! At least for the top edge. And I got the chain link stapled onto the outside edge of the coop, sealing off that part from predators. With the coop fully attached against the chain-link fencing of the run I opened up the chicken portals on the dormer ends.
I also got the tarp on the roof, to provide shade, rain/snow protection and it will also be used to collect that same water.
So far the chickies seem to like it (and the PDZ filled poop trays make cleaning a breeze!)
I do need to raise the trays a little closer to the roosts though.
- - - - -
November 8 ~ FINISHED!


If I were to do it over what would I do different? Hard to say at this moment. This design was built out of what I learned from my last coop, and what i picked up here from BYC and what others "would have done". Is this coop perfect? Likely not, It is only a few weeks old, not really long enough for the faults in it's design the really show them selves yet. But I'm sure their are some. I already know the poop trays could be a little wider (but I can still do that), and I am already seeing I should have covered the top of the cabinet with something easier to clean. Formica would have been a good choice. I would also like to add an electrical connection so I can put some heaters in their water on those days when it gets cold enough for it to freeze.
Total cost for both the coop and run; just a shade under $1,000.