Staff note: We’ve been trying to find a way to restore the missing pics to this article but haven’t had any luck. Hopefully the author will be able to help us get the pics loaded back up!
Welcome to our Back Yard Chicken Page
Be sure to check out our 2nd page for more recent pictures!We started out buying some baby chicks from the local Farm supply store (Petersen Farm Supply) in Layton, UT.
Here is a picture of the 6 chicks (3 barred rocks and 3 white leghorns) we purchased there:

Next we put together a plan/idea for the coop. We had limited time, but knew that we wanted something decently sized adjacent to the current dog-run in our back yard. We could easily (we thought) convert it over to a chicken run.
We then built up the base. I started out with some 2ft 4x4 posts, and a sheet of plywood. Then framed all in with 2x4's. Next I built up the frames 4 corners with 2x4's and then continued the rest of the framing in with 2x2 support boards. Next we decided to divide 1/2 for open wired-in area, and the other 1/2 fully enclosed. We decided to have a slope to it since where we live there gets to be quite a bit of snow in the winter. So in the front it's 5' high, and the back is 4' high.
Here are some coop pictures:
Here is another:
and... wait.. who's this guy?? Oh, right! It's me
It's kind of hard to see, but I'm wearing a San Diego Chargers hat!
And more....
Here we got the outside plywood completed on the right 1/2:
so... it's starting to take shape... next is a view of the open area that we'll put the wire around (note the 45 degree braces for my 2x4's):
Next is a good shot from the side so you can see the sliding door mechanism we built for them...
Here is a nice close-up of the door. We put an eye at the top with a pully attached, so that the door can slide open and closed (up/down) with ease:
As we are progressing along... the chicks are still getting MUCH bigger so far!
Starting Saturday the 14th of June, they began living in the coop! Here are the next two pictures... July 17th... they are getting much older. Our daughter named one of the Barredrocks Stormy, and there are a few other names for them, but I forgot what they were.
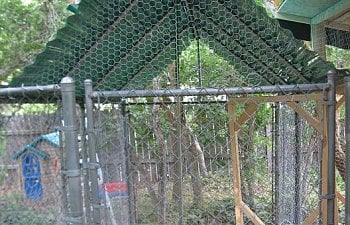
Also, here is a picture of the completed chicken "run" area:
I've taken this 6x12 dog-run with chain-link fencing and converted it to a hawk/racoon/skunk proof area for them to hang out in during the day when we're not home. What we've been doing is letting them "free range" in our back yard when we are home.. I took a couple of 2x6's and stapled some tar-paper roofing material to them, then nailed a small board in 3 places to the back, next I took some small strips of plywood and screwed them to the tar paper roughly every 8" and it worked pretty well as a heavy-duty ramp for them!
Bad thing is... the POOP all over the place!
Yuckk! Which means that I'm stepping in it all over the grass. They also scatter the leaves onto our lawn which is very annoying especially when it's time to mow the lawn. oh well.... they're just chickens!
August 2008 - well, we definitely have discovered that all 3 of the bardrocks are Roosters, so we gave them away to prevent the neighbors from getting upset. All that's left now is our 3 white leghorns. More chicks have been ordered! Please see our 2nd webpage.
Welcome to our Back Yard Chicken Page
Be sure to check out our 2nd page for more recent pictures!
Here is a picture of the 6 chicks (3 barred rocks and 3 white leghorns) we purchased there:

Next we put together a plan/idea for the coop. We had limited time, but knew that we wanted something decently sized adjacent to the current dog-run in our back yard. We could easily (we thought) convert it over to a chicken run.
We then built up the base. I started out with some 2ft 4x4 posts, and a sheet of plywood. Then framed all in with 2x4's. Next I built up the frames 4 corners with 2x4's and then continued the rest of the framing in with 2x2 support boards. Next we decided to divide 1/2 for open wired-in area, and the other 1/2 fully enclosed. We decided to have a slope to it since where we live there gets to be quite a bit of snow in the winter. So in the front it's 5' high, and the back is 4' high.
Here are some coop pictures:

Here is another:

and... wait.. who's this guy?? Oh, right! It's me


And more....

Here we got the outside plywood completed on the right 1/2:

so... it's starting to take shape... next is a view of the open area that we'll put the wire around (note the 45 degree braces for my 2x4's):

Next is a good shot from the side so you can see the sliding door mechanism we built for them...

Here is a nice close-up of the door. We put an eye at the top with a pully attached, so that the door can slide open and closed (up/down) with ease:

As we are progressing along... the chicks are still getting MUCH bigger so far!

Starting Saturday the 14th of June, they began living in the coop! Here are the next two pictures... July 17th... they are getting much older. Our daughter named one of the Barredrocks Stormy, and there are a few other names for them, but I forgot what they were.

Also, here is a picture of the completed chicken "run" area:


I've taken this 6x12 dog-run with chain-link fencing and converted it to a hawk/racoon/skunk proof area for them to hang out in during the day when we're not home. What we've been doing is letting them "free range" in our back yard when we are home.. I took a couple of 2x6's and stapled some tar-paper roofing material to them, then nailed a small board in 3 places to the back, next I took some small strips of plywood and screwed them to the tar paper roughly every 8" and it worked pretty well as a heavy-duty ramp for them!
Bad thing is... the POOP all over the place!

August 2008 - well, we definitely have discovered that all 3 of the bardrocks are Roosters, so we gave them away to prevent the neighbors from getting upset. All that's left now is our 3 white leghorns. More chicks have been ordered! Please see our 2nd webpage.