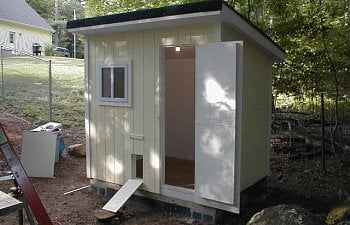
Here is what my coop looked like after the basic building was done. I have posted photos of the whole project. The roosts, nesting boxes, and outdoor run photos have also been posted. The birds seem to be very content in their new home. They are usually just in the run, but get free-ranged as often as possible. Due to the predator problem, they get locked in at night and let out early in the morning.
 Here is a photo of my nesting boxes right after I mounted them.
 This is the detailed plans and materials list.
The lumber required if purchased for each unit is as follows:
(1) 1"X12"X8' Pine Board (straight with minimal knots)
(2) 1"X12"X6' Pine Boards (straight with minimal knots)
(1) 2"X4"X8'
(2) 1"X3"X8'
Put together with 2" finish nails and exterior grade screws
OK......51 3/4" overall length. Cut all three 1 X 12' s, one 1 X 3 and the 2 X 4 to this length and set aside. Cut the leftover pieces of the 1 X 12 (total of 5) to the width of your 1 X 12 minus the thickness of the same board. In my case my 1 X 12 was 11 1/4" wide by 3/4" thick, so my partition/end boards were cut to 10 1/2". Be sure to make nice clean straight cuts so that it all fits together easy. Start assembly by nailing together the ends, top, bottom, and back to form a long open box. The back piece fits in between the top and bottom, and the end pieces should be oriented so that the planed factory edge meets the top and bottom, and your cut edges are against the back and out to the front. Mark the inside back 12" on center for the proper spacing of the partitions, set the partitions the same way as the ends, and nail from the outside on all three edges. So now you should have the basic 4 unit nesting box. The 1 X 3 you cut to 51 3/4" will go across the bottom of all four nests to keep eggs and litter in. Be sure to round off the top edge with a sander to protect the birds' feet. If you mount your boxes like I did, through the back wall and into the structural studs of my coop, put that on last so you have room to get the screw gun into the nesting boxes. On mine I just happened to have a piece of leftover T-111 siding to use in place of the 1 X 3.
To construct the roost, I ripped (cut lengthwise) the 2 X 4 and mounted cut side down. The boards it mounts to are three pieces of 1 X 3 cut to 21" in length, and mounted evenly spaced to the underside of the nesting boxes with 1 1/4" galvanized sheetrock screws. The roost bar is then attached to those supports from underneath using the same screws. A word of caution, pre-drill the 1 X 3's for the screws or the wood may split. The completed boxes are hefty and cumbersome, so make sure you have a helper to level and hang them. I used three 3" deck screws right through the back of the nesting boxes, through my interior wall panels and into each stud. I hit three studs, so those boxes aren't going anywhere. After they are hung, nail on the lip across the bottom of the boxes and you're done. Good luck and have fun!