Pallet Coop Hybrid
Greetings from Upstate, NY! First of all, I'm cheap but I'm also a perfectionist which makes for a conflict of interest. I wanted to build a coop and pen on a budget but I wanted it to look good, keep the chickens safe and clean, and keep predators out. So I ended up with what I call a "Pallet Coop Hybrid". Which really just means I used pallet wood wherever I could and where it wasn't necessarily unsightly. After all I plan to enjoy it for years to come and people are constantly coming over to see the chickens so... BTW the budget for this entire project is $1000 including the chickens and supplies. Much better than $2K+ for delivered solution and most which don't account for Deep Litter (more on that later).
BTW, if you're looking for pallet wood, I suggest you try to get pallets that are fairly new (Check CraigsList or just about any industrial-type business. Everybody want to get rid of them.) The 'screw' nails that are used in pallets are nearly impossible to remove easily if they are old. Newer pallets means less rusty brittle nails and usually less 're-enforcement' nails. I learned that lesson the hard way. Also make sure you get all the same sized pallets (bring your tape measure). I used 40" x 48" pallets for everything. Otherwise you'll be scratching your head wondering why nothing lines up.
I'd like to give a shout-out to Butch Bridges in Lone Grove Oklahoma for the idea for the foundation base skeleton for my coop. He also built a coop out of primarily pallets. The link can be found here:
http://www.oklahomahistory.net/chickencoop.html
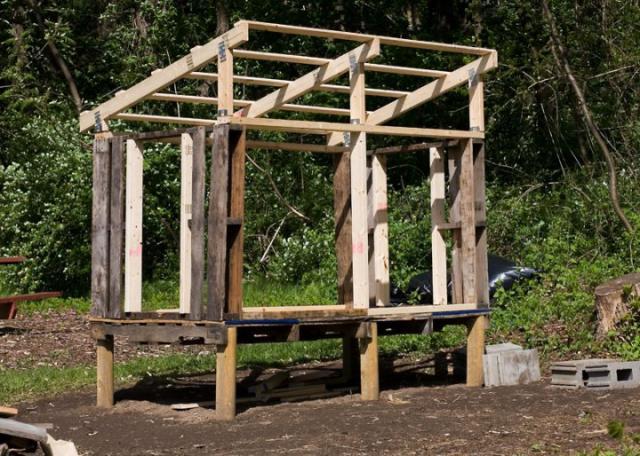
Here's the finished framing. For the roof, I used bracing plates available at your local hardware store for I think 50c each. I then actually used geometry(!?) to calculate the cut angles. Basically 4 pallets, a few 2x4's, 5" carriage bolts and nuts, some 1x2's for the metal roof slats, a couple of treated fence posts for the post risers, and a 4'x 8' sheet of cheap OSB for the floor. I cut up the pallets on the ends to allow for access through backdoor and the chicken door. I suggest you use screws. I realized that after I put it together that it wasn't perfectly 'square' which annoys me to no end. This way you could easily take it apart and re-square. If not, no biggie. Plain old steel nails here will suffice since they won't be under the elements. Also in my opinion it is critical to level the foundation on which the posts will reside first. Since my yard is on a slope, this was a bit of a challenge, but using some string, a line level and a measuring tape, I was able to get a fairly level base. I measured where the feet would be and dug about 10 inches down and packed in crusher run stone using a tamper. I then used the line level to ensure the footings were level to one another. Once this was done I was ready to lower the already-made base onto it, backfill with a bit of dirt and start building the walls in place. I'm hoping by doing it this way instead of using concrete, I can totally avoid any frost heaving which pulls concrete right out of the ground.
Once the foundation and frame is set, it's really all just busy work!

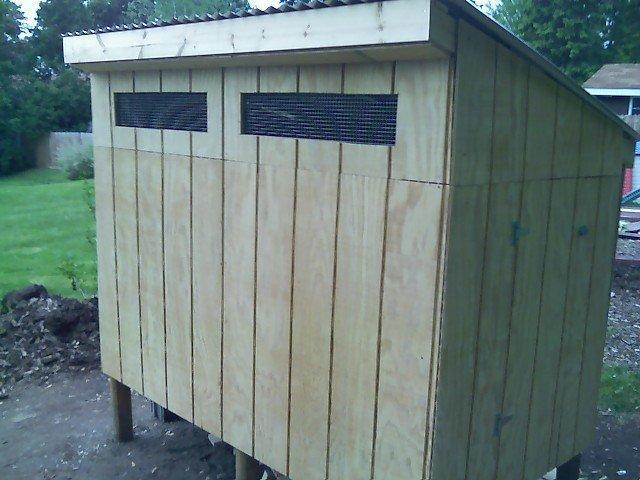
I then bought a few sheet of the fancier slotted plywood and started to piece the monster together. The tricky part is using plunge cuts for the 'windows' (to be finished in fall) and doors. You can't see but I used 1/2" hardware cloth to cover the windows. Also used some galvanized hinges, nails (to prevent rusting). I never worked with metal roofing before and boy was it nice! Just need some metal tin snips (yellow handle) and some metal roofing screws with the urethane washer on them. Start your roofing from the lower side first and overlap the pieces without screwing anything in. Position the whole roof well and then screw everything in with your screws in the 'flattest' location possible to ensure a good seal. I have seen torrential weather hit this coop and not a single drop get in. The coop is actually bone dry inside - impressive!
The chicken door is really just some of the fancy plywood turned over and kept snug against the door by a couple of pieces of scrap wood so it slides up and down easily. The handle acts as a stop to keep the door from sliding all the way down. The side doors open up to expose the inside to change the food and get to the nest boxes. The clean-out door is in the back on the east side. I was also really aware of the orientation of this coop. The coop is oriented with the biggest side facing south. I plan to actually hang a homemade solar air can heater to that side in the winter for free/simple heat.
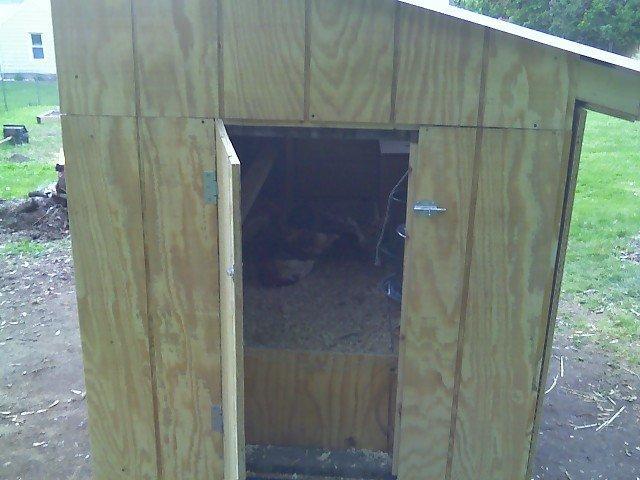
The cleanout door. I'm 6' 180lbs and I can actually climb in this thing.
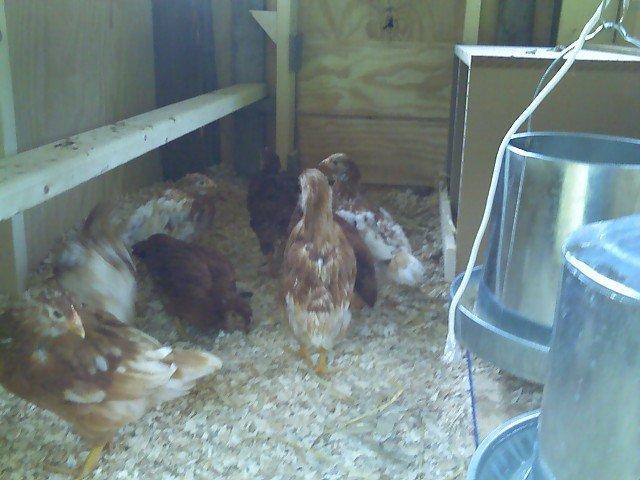
Yet another thing I need to mention is that you notice there is a plywood stop inside keeping the bedding from spilling out. This is because I designed the coop to use the deep litter method. If you don't know about this method you need to check it out. I suggest you get a full understanding of the method before you start. I started with a full 12 inches of bedding first and I should have started with far less and built up to that. Either way, I stir the bedding and after 3 months I do not have any significant odor issues and the chickens churn it happily.
Inside the coop:
The roost bar was down for a few until they got used to it (2x4 rounded on the edges). Now its about 2 feet from the base of the bedding. I also have a nice little 'shelf under the food and nest boxes so that when I open the sides I have a tad bit of storage for stuff. Not much for anything significant, but it helps and also it keeps from having to fill the entire base with bedding and keeps from getting the bedding wet directly under the water can.
I was terrified one night when I went to check on them and they were all 'gone'. I came back with a flashlight and it turns out they started taking to sleeping the eves of the roof and were almost completely invisible! That can't last for long as they are getting to big for that nonsense. Although they still seem to fight every night for the prime spots.
I was originally planning on having them free-range my yard but instead decided to pen them in after I witnessed on at least one occasion one of the chickens jumping over my head (6' +!!) No fence would contain them and me and my neighbors have terriers which would love to have chicken over for dinner.
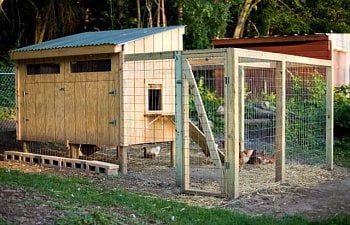
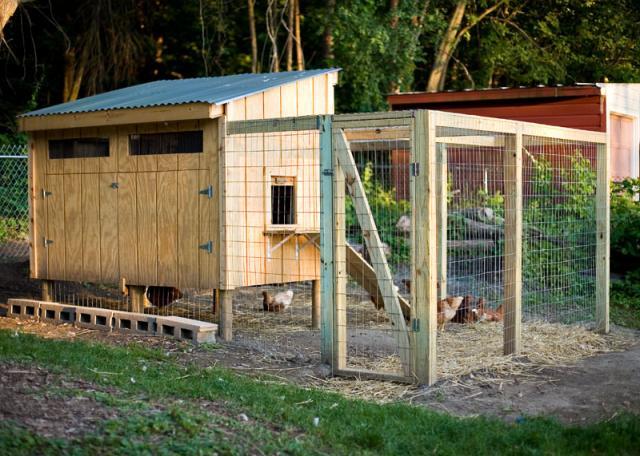
The 10' x 12' pen is just what the clucker ordered! Made with treated 4x4 posts and leveled with crusher run stone tamped in using a 2x4. Just need to stain the coop a nice barn red and white trim, get the window enclosures built and it will be a site to behold!
That's it! I hope this inspires folks. Thanks also to Gail Damerow's "Raising Chickens" book for some of the knowledge, insight and inspiration in all of this.
Kids Love Cluckers!
-A
Greetings from Upstate, NY! First of all, I'm cheap but I'm also a perfectionist which makes for a conflict of interest. I wanted to build a coop and pen on a budget but I wanted it to look good, keep the chickens safe and clean, and keep predators out. So I ended up with what I call a "Pallet Coop Hybrid". Which really just means I used pallet wood wherever I could and where it wasn't necessarily unsightly. After all I plan to enjoy it for years to come and people are constantly coming over to see the chickens so... BTW the budget for this entire project is $1000 including the chickens and supplies. Much better than $2K+ for delivered solution and most which don't account for Deep Litter (more on that later).
BTW, if you're looking for pallet wood, I suggest you try to get pallets that are fairly new (Check CraigsList or just about any industrial-type business. Everybody want to get rid of them.) The 'screw' nails that are used in pallets are nearly impossible to remove easily if they are old. Newer pallets means less rusty brittle nails and usually less 're-enforcement' nails. I learned that lesson the hard way. Also make sure you get all the same sized pallets (bring your tape measure). I used 40" x 48" pallets for everything. Otherwise you'll be scratching your head wondering why nothing lines up.
I'd like to give a shout-out to Butch Bridges in Lone Grove Oklahoma for the idea for the foundation base skeleton for my coop. He also built a coop out of primarily pallets. The link can be found here:
http://www.oklahomahistory.net/chickencoop.html
Here's the finished framing. For the roof, I used bracing plates available at your local hardware store for I think 50c each. I then actually used geometry(!?) to calculate the cut angles. Basically 4 pallets, a few 2x4's, 5" carriage bolts and nuts, some 1x2's for the metal roof slats, a couple of treated fence posts for the post risers, and a 4'x 8' sheet of cheap OSB for the floor. I cut up the pallets on the ends to allow for access through backdoor and the chicken door. I suggest you use screws. I realized that after I put it together that it wasn't perfectly 'square' which annoys me to no end. This way you could easily take it apart and re-square. If not, no biggie. Plain old steel nails here will suffice since they won't be under the elements. Also in my opinion it is critical to level the foundation on which the posts will reside first. Since my yard is on a slope, this was a bit of a challenge, but using some string, a line level and a measuring tape, I was able to get a fairly level base. I measured where the feet would be and dug about 10 inches down and packed in crusher run stone using a tamper. I then used the line level to ensure the footings were level to one another. Once this was done I was ready to lower the already-made base onto it, backfill with a bit of dirt and start building the walls in place. I'm hoping by doing it this way instead of using concrete, I can totally avoid any frost heaving which pulls concrete right out of the ground.
Once the foundation and frame is set, it's really all just busy work!
I then bought a few sheet of the fancier slotted plywood and started to piece the monster together. The tricky part is using plunge cuts for the 'windows' (to be finished in fall) and doors. You can't see but I used 1/2" hardware cloth to cover the windows. Also used some galvanized hinges, nails (to prevent rusting). I never worked with metal roofing before and boy was it nice! Just need some metal tin snips (yellow handle) and some metal roofing screws with the urethane washer on them. Start your roofing from the lower side first and overlap the pieces without screwing anything in. Position the whole roof well and then screw everything in with your screws in the 'flattest' location possible to ensure a good seal. I have seen torrential weather hit this coop and not a single drop get in. The coop is actually bone dry inside - impressive!

The chicken door is really just some of the fancy plywood turned over and kept snug against the door by a couple of pieces of scrap wood so it slides up and down easily. The handle acts as a stop to keep the door from sliding all the way down. The side doors open up to expose the inside to change the food and get to the nest boxes. The clean-out door is in the back on the east side. I was also really aware of the orientation of this coop. The coop is oriented with the biggest side facing south. I plan to actually hang a homemade solar air can heater to that side in the winter for free/simple heat.
The cleanout door. I'm 6' 180lbs and I can actually climb in this thing.
Yet another thing I need to mention is that you notice there is a plywood stop inside keeping the bedding from spilling out. This is because I designed the coop to use the deep litter method. If you don't know about this method you need to check it out. I suggest you get a full understanding of the method before you start. I started with a full 12 inches of bedding first and I should have started with far less and built up to that. Either way, I stir the bedding and after 3 months I do not have any significant odor issues and the chickens churn it happily.
Inside the coop:
The roost bar was down for a few until they got used to it (2x4 rounded on the edges). Now its about 2 feet from the base of the bedding. I also have a nice little 'shelf under the food and nest boxes so that when I open the sides I have a tad bit of storage for stuff. Not much for anything significant, but it helps and also it keeps from having to fill the entire base with bedding and keeps from getting the bedding wet directly under the water can.
I was terrified one night when I went to check on them and they were all 'gone'. I came back with a flashlight and it turns out they started taking to sleeping the eves of the roof and were almost completely invisible! That can't last for long as they are getting to big for that nonsense. Although they still seem to fight every night for the prime spots.
I was originally planning on having them free-range my yard but instead decided to pen them in after I witnessed on at least one occasion one of the chickens jumping over my head (6' +!!) No fence would contain them and me and my neighbors have terriers which would love to have chicken over for dinner.
The 10' x 12' pen is just what the clucker ordered! Made with treated 4x4 posts and leveled with crusher run stone tamped in using a 2x4. Just need to stain the coop a nice barn red and white trim, get the window enclosures built and it will be a site to behold!
That's it! I hope this inspires folks. Thanks also to Gail Damerow's "Raising Chickens" book for some of the knowledge, insight and inspiration in all of this.
Kids Love Cluckers!

-A