Home On The Urban
We live in the City of San Diego, in an older neighborhood where most of the homes were built in the 1930's and 1940's. It's a cool, artsy, hip (dare I say slightly hippie) neighborhood. We are smack in the center of everything - very urban indeed. But, the lifestyle of many of us is very rural, or perhaps a better word would be 'sustainable'. Local farmers markets abound, we know and are friends with our neighbors and local business owners. Community supported agriculture is widely used and supported by many of us and backyard chickens are becoming more and more accepted and wanted by many of us. Our laws are still antiquated and many of us urban chicken people are raising our ladies illegally - such a life of crime to live sustainably")
One day, while at the City Farm nursery, I gazed at all the little baby chicks and knew that we had to have chickens to add to all that we are trying to do to live a sustainable life. We had added solar panels, re-landscaped our front yard adding plants that were native to San Diego (and thus needed less water), we were planning out our aquaponic gardening system and have our electric car on order. The next most logical step...chickens.
The thing is, we have a 3 year old, and full-time jobs, and two cats...two cats who love to bring us lizards (i.e. two cats who like to hunt). So, I researched and I researched and I researched some more. I realized that little baby chicks were not the way we could go. We had to start with about 17 week pullets. I found out that while we would be within the legal 50 foot limit of our neighbors, we would not be within the 50 foot limit of our house. I was willing to take that chance - we have cool neighbors and would easily be 50 feet away from them. They won't even know we have chickens. Plus, my Mom was totally on board and she is very involved in our community association. Therefore, she is in the right position to start talking to City Council and other neighborhood associations about changing the laws. So, she has hopped onto (along with other residents) the lofty task of changing the rules (fingers crossed) with us.
We decided on Rhode Island Reds due to their docile nature, limited broodiness and beauty. Through the forums, I found exactly what we were looking for 3, 17 week old Rhode Island Reds at a hacienda in Warner Springs - about an hour and a half outside of San Diego. But the coop wasn't ready. Lynne, at the hacienda assured us she'd hold onto them for us for the next couple of weeks. I gave my husband the now firm deadline because in two weeks, the chickens were leaving home on the range and coming home on the urban.
The Story Behind the Coop
Like I said, we live in an urban neighborhood. Thus, our backyard is exactly that - a backyard. Not a large plot of land somewhere out in the boonies where people have all this crazy room. When we throw summer parties, I can stand in one spot and see everyone in my backyard. Thus, our coop had to be pretty as well as useful. It also had to give our hens a decent amount of room to roam when we weren't home to guard them from our cats.
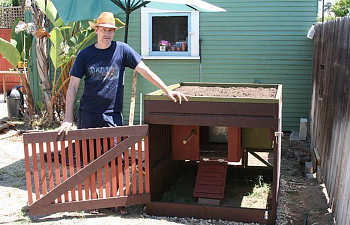
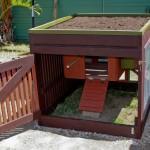
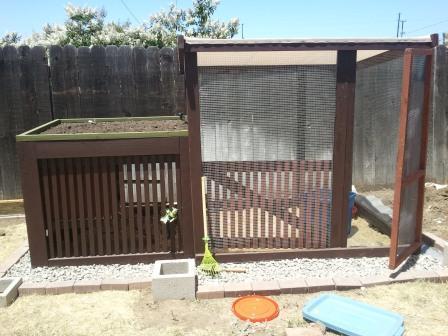
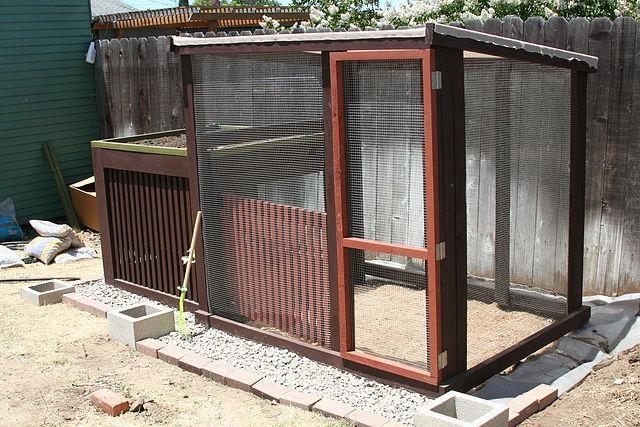
To go along with our sustainable efforts, we found the plans for the green roof garden coop on MyPetChicken. We loved this design due its aesthetics, as well as the garden on top which would provide us with a place to plant some herbs and as a bonus the garden keeps the coop cool in the summer and warm in the winter for the girls. The coop, however, is only 4x4 - not enough room for the girls during the day. So, my husband designed a simple framed chicken run (that I can stand inside for cleaning purposes) that is an additional 4x5 with a slanted roof and covered with hardware wire. When we're home, the girls get to free range.
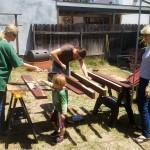
It took 5 weeks of mostly weekends really (we did take one weekend off to go to Palm Springs and recoop er, recuperate) for us to build the coop & run. And, by us, I mean mostly my dear husband who had never really built anything before. The family - me, our 3 year old son, my Mom and my brother all helped with the staining of the coop. We did use mostly new wood mainly because scrap was a little difficult to come by on our limited schedule and because Chris was adamant that he would not be re-building in 5 years - thus marine stain, and every little possible piece of wood is sealed with caulking so rain can't seep in and cause mold. It truly is more than just a chicken coop
We dug a trench around the coop and filled it with rocks. We made an apron with hardware wire and then covered it with rocks and then surrounded it all by bricks in an effort to protect the hens from predators. The roof of the coop is wood, carpet, garden cloth and of course dirt. The roof of the run is covered with garden shading cloth which is perfect for the daytime, but we do plan on eventually covering with the corrugated ceiling.
After much research, I decided on the deep litter method with pine shavings and food grade diotomaceous earth. It has only been 2 weeks since the girls have moved in, but we are having so much fun. The flies are a little more than we expected, but not so bad that it's annoying. I do wish we had put a pull out tray in the hen house. Chris kept saying it would be okay, but since I'm the cleaner, I should have insisted It's okay though, I use a scraper and have added a piece of wood under their roost.
For food, I made a food dish with a 5 gallon bucket, drilled holes on the bottom sides and bought a cheap plant saucer to place it all in. For water, our son kindly donated one of his beach buckets. I almost bought an automatic dog waterer at a garage sale this weekend, but realized that I change their water every day and that would only make it more difficult, so am sticking with the bucket for now.
Since the coop has been built and the girls have moved in, I've added a picture frame I found in our alley to the outside of the run where I will then attach little plants. As it is, when the girls roost on the gate, they look like they're framed - it's kinda neat.
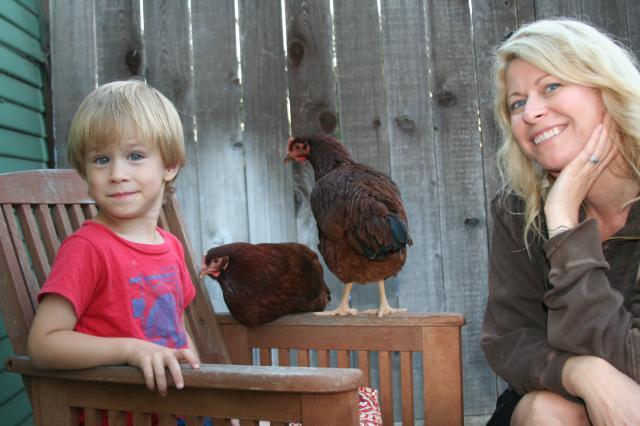
We sit outside with the girls every night and they're starting to feel comfortable around us. Last night they even jumped up on the arm chairs where we were sitting and hung out with us a bit It was super cool.
Time for Pictures
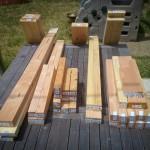
The plans were sectioned off alphanumerically, so we made labels for the wood. This allowed Chris to cut most of the wood in one shot while we labelled them accordingly. We were then able to stain the pieces by just looking at the labels and set each piece of wood aside in its own sectioned pile for Chris to easily build each section of the coop. It was a good assembly line process that prevented Chris from having to cut wood for one section, then stain, then build that section, then go cut wood for the next section...rinse repeat.
Below: The initial supply of wood needed to build the coop. You can see the litte labels on the ends - all color coded and marked with its alphanumeric code that matched the coop section where it applied.

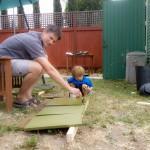
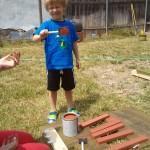
Below shows the whole family staining the wood before it was all put together to make sure it was totally sealed - not a raw edge in sight.
Below:
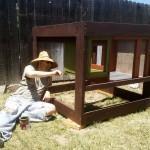
(1) The coop is coming together. We've even roped in a friend to come help with final touch-up staining and building.
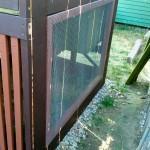
(2) Right side of the coop covered with hardware wire
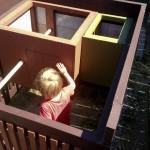
(3) Inside of the coop shown from above before the garden roof went on. That's K checking out Daddy's work.
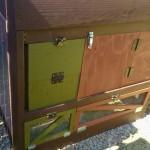
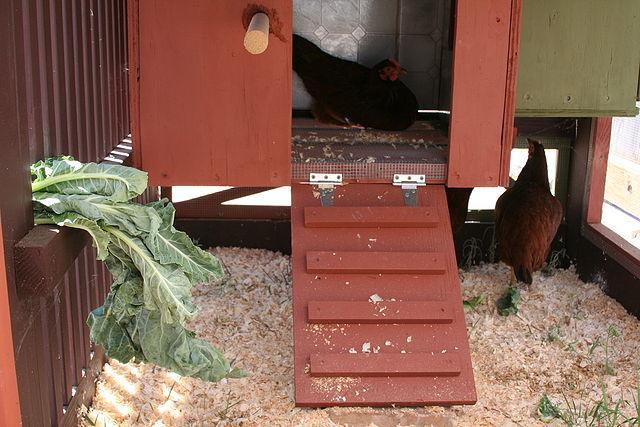
(4) Showing the outside of the coop access to the nesting box and the hen house for easy collection of eggs and cleaning.
(5) Showing the nesting box and hen house doors open from the outside. We lined everything with scrap linoleum for ease of cleaning.
Below:
(1) Looking into the coop at the hen house
(2) Coop almost finished. Just need to fill the garden roof with soil.
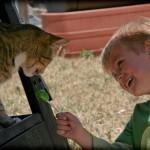
(3) But first, we need to take a snack break & give the cat a lollipop - the felines have worked so hard. They will be sad when they realize this house isn't for them.
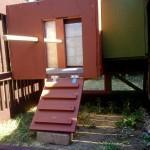
(4) The finished coop. Now to build and add the chicken run...
Chris and his coop...Good job on your first build Daddy!
The completed coop & attached run. Locks on the run door still need to be added in these pictures, but have been added since the girls arrived.To go along with our sustainable efforts, we found the plans for the green roof garden coop on MyPetChicken. We loved this design due its aesthetics, as well as the garden on top which would provide us with a place to plant some herbs and as a bonus the garden keeps the coop cool in the summer and warm in the winter for the girls. The coop, however, is only 4x4 - not enough room for the girls during the day. So, my husband designed a simple framed chicken run (that I can stand inside for cleaning purposes) that is an additional 4x5 with a slanted roof and covered with hardware wire. When we're home, the girls get to free range.
It took 5 weeks of mostly weekends really (we did take one weekend off to go to Palm Springs and recoop er, recuperate) for us to build the coop & run. And, by us, I mean mostly my dear husband who had never really built anything before. The family - me, our 3 year old son, my Mom and my brother all helped with the staining of the coop. We did use mostly new wood mainly because scrap was a little difficult to come by on our limited schedule and because Chris was adamant that he would not be re-building in 5 years - thus marine stain, and every little possible piece of wood is sealed with caulking so rain can't seep in and cause mold. It truly is more than just a chicken coop
We dug a trench around the coop and filled it with rocks. We made an apron with hardware wire and then covered it with rocks and then surrounded it all by bricks in an effort to protect the hens from predators. The roof of the coop is wood, carpet, garden cloth and of course dirt. The roof of the run is covered with garden shading cloth which is perfect for the daytime, but we do plan on eventually covering with the corrugated ceiling.
After much research, I decided on the deep litter method with pine shavings and food grade diotomaceous earth. It has only been 2 weeks since the girls have moved in, but we are having so much fun. The flies are a little more than we expected, but not so bad that it's annoying. I do wish we had put a pull out tray in the hen house. Chris kept saying it would be okay, but since I'm the cleaner, I should have insisted
It's okay though, I use a scraper and have added a piece of wood under their roost.For food, I made a food dish with a 5 gallon bucket, drilled holes on the bottom sides and bought a cheap plant saucer to place it all in. For water, our son kindly donated one of his beach buckets. I almost bought an automatic dog waterer at a garage sale this weekend, but realized that I change their water every day and that would only make it more difficult, so am sticking with the bucket for now.
Since the coop has been built and the girls have moved in, I've added a picture frame I found in our alley to the outside of the run where I will then attach little plants. As it is, when the girls roost on the gate, they look like they're framed - it's kinda neat.
We sit outside with the girls every night and they're starting to feel comfortable around us. Last night they even jumped up on the arm chairs where we were sitting and hung out with us a bit
It was super cool.Time for Pictures
The plans were sectioned off alphanumerically, so we made labels for the wood. This allowed Chris to cut most of the wood in one shot while we labelled them accordingly. We were then able to stain the pieces by just looking at the labels and set each piece of wood aside in its own sectioned pile for Chris to easily build each section of the coop. It was a good assembly line process that prevented Chris from having to cut wood for one section, then stain, then build that section, then go cut wood for the next section...rinse repeat.
Below: The initial supply of wood needed to build the coop. You can see the litte labels on the ends - all color coded and marked with its alphanumeric code that matched the coop section where it applied.
Below shows the whole family staining the wood before it was all put together to make sure it was totally sealed - not a raw edge in sight.
Below:
(1) The coop is coming together. We've even roped in a friend to come help with final touch-up staining and building.
(2) Right side of the coop covered with hardware wire
(3) Inside of the coop shown from above before the garden roof went on. That's K checking out Daddy's work.
(4) Showing the outside of the coop access to the nesting box and the hen house for easy collection of eggs and cleaning.
(5) Showing the nesting box and hen house doors open from the outside. We lined everything with scrap linoleum for ease of cleaning.

Below:
(1) Looking into the coop at the hen house
(2) Coop almost finished. Just need to fill the garden roof with soil.
(3) But first, we need to take a snack break & give the cat a lollipop - the felines have worked so hard. They will be sad when they realize this house isn't for them.
(4) The finished coop. Now to build and add the chicken run...

Chris and his coop...Good job on your first build Daddy!

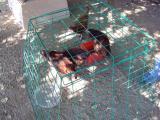
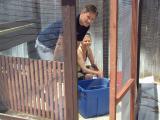
Below: Time to pick up the chickens
(1) Kieran at the hacienda in Warner Springs in front of the Iron Rooster
(2) Our girls at the hacienda in Warner Springs in their temporary enclosure - all ready for us to take home.
(3) Mom & Dad getting the food dispenser ready for the girls.
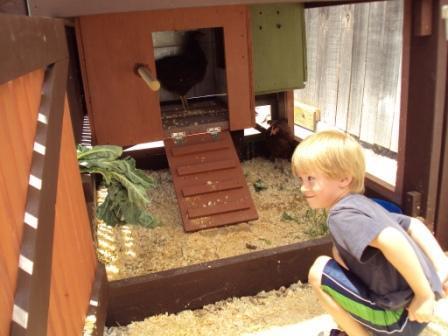
Below, first day the girls are introduced to their new home
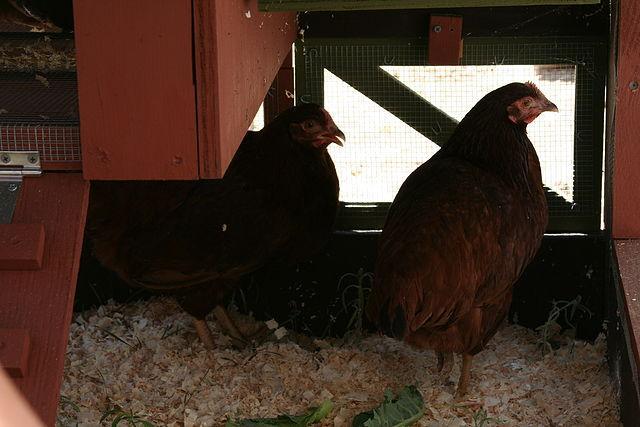
Our son, looking into the coop at one of the girls doing his best chicken impression
It's been two weeks and we're all getting used to each other. Two of the girls jumped up on the chair and decided to hang out with us - so cool: