The Ugliest Coop on BYC - My $13.00 coop
by Southernbelle
by Southernbelle
UPDATE: Fall 2010 - coop renovations below
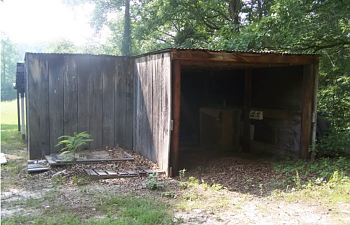
When we moved to this house we had a few outbuildings and this one was furthest from the house - about 100 yards from the back door. DH initially stored his boat under the overhang, but we weren't using it for anything else. I bought chickens rather impulsively, but knowing we had this building already, I didn't worry about building a coop. The only thing I bought for the coop (besides chickens) was a $13 roll of poultry netting to cover the run to keep the hawks out and chickens in, so I call it my $13 coop and let's face it - it's UGLY!This is the before picture. It is "L" shaped with a total of 208 square feet on the inside. The 8 supporting poles are old telephone poles so this thing is really sturdy.

Here is the overhang built off of one side of the building. DH used to store his boat here, but he moved it when I got rabbits. The overhang gives me an additional 380 sq feet of covered space.

A friend gave me a 10x10x6' dog kennel that was stored under her porch. It was left there by a previous owner of the house and my friend was moving, so she figured I could use it more than whoever she sold the house to. I attached the 3 solid sides to the exterior of the coop and that gives me 100 sq ft of run space. I put the panel with the door in it on the inside of the building between 2 of the poles to partition part of the interior for the chickens. POOF! Instant chicken coop.

I made roosts from scrap 2x4s and oak branches and I use 5 gal buckets and cat litter boxes for nests.
When winter set in DH made barn doors for me to block the wind - it makes it really dark inside, but nice and toasty. There's still a lot of gaps between the boards, so I'm not too worried about ventilation. This picture was taken with our wildlife camera and I saved it to prove that our neighbors dog DOES come over here! But it's only picture I have of the barn doors. I used a tarp on the other end of the open-ended building to block wind from that side.

UPDATED: Fall 2010 Coop Renovations to my Ugly Coop
DH and I are expecting our 4th baby this fall - quite a surprise for us! I was worried about being able to handle all my animal chores and focusing on a new baby and taking care of my DH and other 3 kids. I decided to cut back on the number of animals I keep to simplify things - I rehomed the quail and meat rabbits and sold about 2/3 of my chickens. I decided to keep my pet rabbits (show quality Holland Lops) and I kept a flock of laying hens and some bantams because after enjoying years of farm fresh eggs, there's no way I can return to store-bought eggs.
To make animal chores easier, I wanted to install a nipple watering system and I wanted a way to access the nestbox, feeder and water bucket from the outside of the pen. One of the things my husband hated about taking care of my chickens for me is that you had to enter the pen to feed, water and gather eggs, so I wanted to change it so when I'm recovering from the baby, my husband, kids or my mother could take care of the chickens without worrying about stepping in chicken poo or fighting off a rooster. My husband and I came up with a plan for a dividing wall for the interior of the barn that had roll-out nest boxes, a huge feeder that can hold 2 bags of feed, a trap door to empty kitchen scraps and a nipple watering system. Also, the placement of the chain link run needed to be moved - it was on a downhill slope and heavy rain would flood the coop. We built a trench running through the pen to divert water, but the chickens packed dirt over the gravel trench which ruined the whole plan, so I moved the pen to give the trench a chance to work properly.
A friend of DH's was moving and gave DH 2 pick-up truck loads of prime wood - 2x4s, 2x2s, 1x2s, 12" pine boards, OSB and sheets of plywood! The purple paint was leftover from my sister ordering way more than she needed to paint the basement bedroom. Which made the total for our building project: $0 (We did buy some hardware) DH built the divider wall in 2 4'x4' sections. Here's the feeder section (partially painted) with the trapdoor for kitchen scraps. The feeder is modeled after Nifty's monster feeder. I wanted a small plexi-glass window so I can check feed levels at a glance.

The other side of the wall where the feeder opens into the pen for the chickens:

Looking down into the feeder. DH put a board at an angle inside to help keep feed from piling in the corner.

The roll out nestboxes: I just wanted simple nest boxes with a top opening, but DH read something about roll-out nest boxes helping to prevent egg eating and with him being an engineer, it sparked his interest, so I got roll-out nests!
From the front - I wanted them low to the ground since my main pen has a lot of bantam chickens.

From the side - the height at the top of the incline is 3" - the bottom is covered with outdoor plastic grass.

Back view - the opening for the egg to roll through is 2." I still wanted access to the top of the nests for easy cleaning, removing stuck eggs or broody chickens.

Interior view:

Here's the wall assembled in the barn:

From the chicken's point of view: To make the transistion easier to the roll-out nests, I added hay to the interior of the nests (which makes it impossible for the eggs to roll out) but as the hay gradually disappears, I won't replace it and the eggs will roll out. I also stapled some 2x4" wire to the top of the feeder tray to keep the chickens from getting in the tray and kicking feed everywhere.

I still need to add the gravity nipple watering system, so I'll update when I get it done.
Thanks for looking!
Karen