Ol' Suzanna Had a Farm...
Much to her husband's dismay.
Chapter 1:First she had the barn built by aforementioned loving hubby.
Then she brought her horse Bandit, a.k.a. her "other husband".
Then she brought a friend for Bandit, named Kokopelli, and a barn cat (who doesn't associate with humans).
Then she took in a friend's mini, Stumpy, and took in another rescue cat named Godiva.
Then she adopted an unwanted baby mini, Skyler.
"No Chickens!" said Hubby. "No Chickens!" said Mum (the barn's at her place).
And then she brought in two Americanus chicks anyway, and won the battle thanks to a report on NPR about the conditions of henhouses for storebought eggs.
("Besides, stores don't sell green/blue eggs, which are my favorite color." said Sue)
Godiva moved up into the hayloft because the chicks keep her up at night with all the peeping noises.
Bandit just wants to eat their food, and Skyler wants them to play with him.
The inspiration for my chicken coop:
Why are there only two doors on a chicken coop?
Because if there were more doors, it would be a sedan!
Chapter 2:
Where to start.... I guess I'll work from the chicken outward....
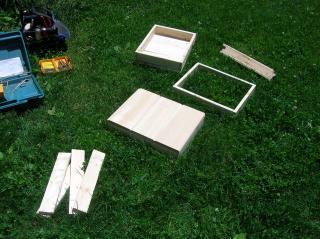
I made the nesting boxes from building scraps from my parents' new home. Furring strips & cedar tongue & groove. If I had any plywood scraps I could've used that for the bottoms. I haven't added the "four poster bed" part of the boxes yet, so I can add sides and a top if I need to. I might also add a handle to the top so I can lift out the boxes for easier cleaning. The corner posts are in the bottom left of the pic, and what could be considered the "canopy" of the four poster bed doesn't yet have a top on it. Now I've got artistic ambitions to paint them to look like beds!
I also made blueprints of the nesting boxes. The sides of the boxes will be screwed to the bottoms instead of nailed, because I'm not too sure about the height. Mum remembers that Gramma's boxes had taller sides for deeper nests. More like a letter drawer than a pencil drawer.
Hmm... maybe I should have dismantled an old desk instead?
Next "chicken sized" item: The door. I want to have a door that also works as an awning, so I'll be scrounging around the house for leftover hinges & eye hooks. The door will be wider than the cedar scraps, so I'll nab one of the oak floor planks. Well, I finished the coop, and it survived the winter until we had a huge storm which blew off the hinged roof. Also, this past fall/winter, I lost an awesome barn cat and my beloved horse. It was not a good season.
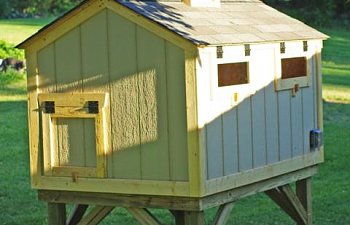
My awesome husband offered to make me a new coop! (I guess he really likes fresh eggs). We used Atholcoop's design as a starting point. Because of our cold New England winters, we didn't want the nesting boxes outside of the coop, the way they are typically designed. We also wanted to have a fenced run for the chicks under the coop, so we added a hatch.
https://www.backyardchickens.com/web/viewblog.php?id=16357
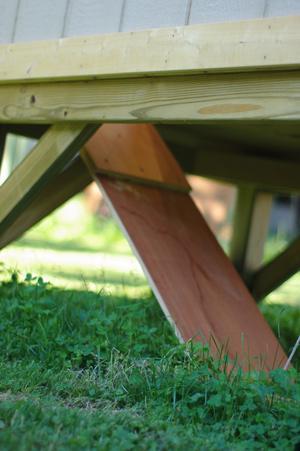
Our coop doesn't look that different than AtholCoop's, except I think he used nicer trim wood. We used strapping for the trim. The overall size is 4' wide by 6' long. It's about 6 feet high. We built the coop on two pressure treated ski's so we can drag it around the yard. The coop-ola
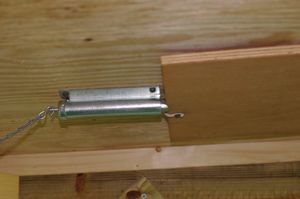
") has removable panels, so we can have glass in the winter and screens in the summer. You can see a string and a chain below the doors on the gable end. The string raises and lowers the hatch ramp, and the chain operates a catch that keeps the ramp raised for night.
has removable panels, so we can have glass in the winter and screens in the summer. You can see a string and a chain below the doors on the gable end. The string raises and lowers the hatch ramp, and the chain operates a catch that keeps the ramp raised for night.Not including the roofing, light fixture or the electrical outlet, the cost of materials was about $250. I will still have to buy some paint, so figure about $300 for the grand total.
Pete spent at least 40 hours making the coop.
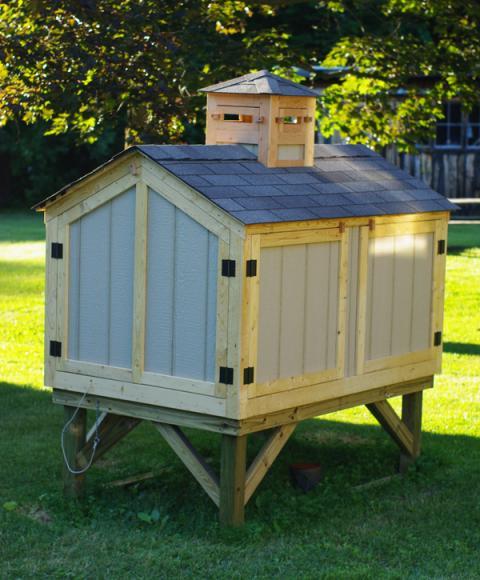
On the gable end is the pop door, which I still have to add hooks to, to make it an awning when it's open. Pete made two glass hopper windows that will have screens inside. Below the windows on the far right, is an exterior outlet box. Inside the outlet box is the end of the cord for the interior light, so all I have to do is plug an extension cord into the outlet box. It's much safer than running the cord through the window to power the lamp inside.
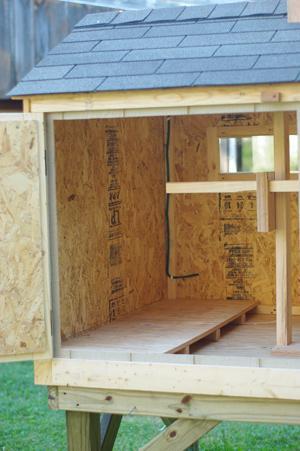
With the side doors open you can see the shelf that holds the removable nesting boxes, so the string to raise& lower the bottom hatch doesn't get squished. The shelf lifts off for cleaning. There is also a center support for the roof ridge and the roost. The roost is a 2x4 on the flat, and it is also removable for cleaning.
The string (hidden behind the catch) raises and lowers the ramp/hatch door. The other end of the string is tied to the other end of the chain that releases the catch. The second picture shows the ramp in the lowered position. I have to add some grip strips to the ramp, cuz the chicks slide down it.
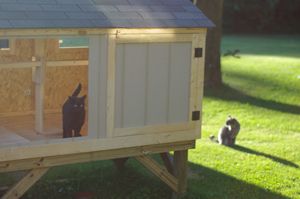
The cats are standing in for the chickens. I think.