I had wanted chickens since I was 6 years old. So at the age of 38, when I heard the news that the city of Jacksonville, Fl was going to give out 300 permits I excitedly jumped in. We were awarded permit #185! Neither my boyfriend nor I are handy people. In fact we had never built a thing in our lives. We also are constantly low on funds, but who isn't these days. My kids never used their playhouse anymore and being that it was made from plastic, it was still in perfect shape and that was much less that had to be built. It's the Step 2 Storybook Cottage playhouse and I swear it was designed to be a chicken coop. It has plenty of ventilation, a front door for cleaning, a built in pop door for the hens, and even little shelves one on top of the other that perfectly hold a 2x4 for a roost and a poop board/ droppings board. We decided to build a deck 2 feet high to put the house on and an 8 foot run behind it. The deck ended up larger than we were intending because we know nothing about building, but it's ok. The girls have just that much more run space now.

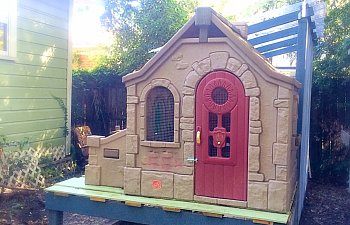
This is Cluck Cottage as it is now. It's almost finished. Though, what isn't ever "almost" finished?
Here is Tim making sure our deck posts are level. This is where we made our measurement mistake. Level they were, but set too far apart they also were. The intension was to have a deck that measured 4'x6'. We set the posts at that measurement so when the decking went on, it ended up being larger. This has brought a problem that I will share in a bit.
Next we built the walls for the run. We built 2 side walls that were 8' long. One is 7' high and the other is 6' high so that our roof has a pitch to allow rain to run off. The last wall is for the end with the people door. It measures 6' high and 4' wide.
We decided to go ahead and stain the walls before assembling. We used a semi-transparent stain from Benjamin Moore. It gave color and protection without a primer being needed.
Here's the little house set up on it's platform. We used 1" plywood cut in strips 12" wide and staggered them on top of one another for added strength. One solid piece that was thicker would have been better. We didn't really think the floor joists through and we had already spent an arm and a leg on lumber. We will probably have to redo this in a couple of years. The rain uses the "valleys" to creep into the coop floor. I think it will eventually cause rot to happen sooner than later. Time will tell.
These are the perfectly placed shelves I was telling you about. The roost sets into the top and the droppings board into the bottom. They can easily be removed entirely for cleaning!
My impatience for babies stepped up our speed. Hurry!
This is the poop board from the under side. I attached a 2x4 tab to each end of a 1" piece of plywood that measured 4'Wx1'D. I applied some 12"x12" linoleum squares or the top for easy cleaning.
Here's the roost and the droppings board securely in their shelves.
Getting the perimeters secure. The window is temporarily bolted shut because we will be building the nest box there soon. All other windows were covered with 1/2" hardware cloth.
The girls are waiting patiently in their "playpen".
I was afraid they were still too small to reach the roost. I went ahead and built them a ladder that could later be used for the pop door to the run. This was last minute so I used what I had. I stained a 2x4x4. Then I sawed and old weed-turned-tree into rungs. I screwed the rungs to the 2x4 using 2 screws per rung. It turned out pretty cute!
Roost, droppings board and ladder all seem to fit well.
Sand going in.
Ready! This was home for the next week or so while we built the run. It was good they were able to get to know where to go back at night. They felt secure in the coop by the time the run was finished.
They like the new found space!
We leveled out some bricks and used pressure treated wood for the foundation of the run.
Here are the walls going up.
For the roof we used these metal brackets to secure the rafters and some clear corrugated plastic.
I found this old screen door in the trash!
This is the problem I spoke of when I told you we had incorrectly measured for the deck. See the gap? We have it temporarily secured with a mishmash of things. Eventually we will need to move the entire coop back toward the run. I was hoping to devise a different solution, but so far I can' tome up with one. Once the coop has been moved back, I will no longer be able to easily clean from the front door without some steps. I'm super short, by the way.
Everybody is happy!