My First Egg Incubating Experience
After reading here on the BYC Forum tons of great info about incubating eggs, I decided to buy an incubator, purchase some fertilized eggs, and try hatching chicks myself. In this blog I'll keep track of my very first incubating experience. Thanks for stopping by, and have a nice day!
3/28/09
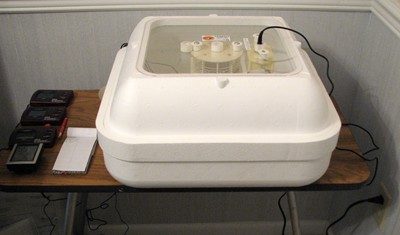
INCUBATOR
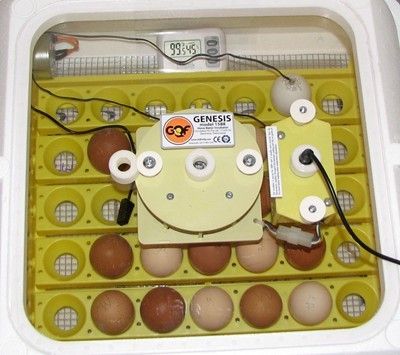
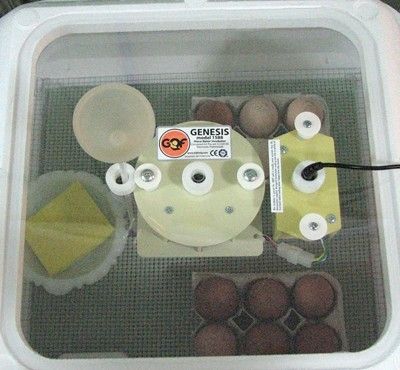
I bought a new Genesis 1588 incubator with a 1610 egg turner on eBay:

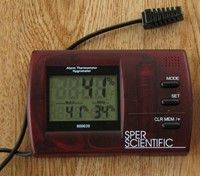
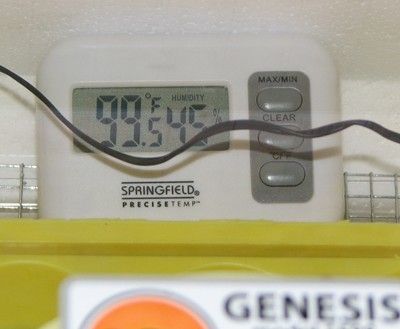
I also purchased some thermo-hygrometers to measure the temperature and humidity:
Left: The white one (WalMart) sits inside the incubator.
Center: The gray one (WalMart) sits outside the incubator to measure the room temperature & humidity.
Right: The red one (eBay purchase) sits outside the incubator & its probe lays inside on the egg turner.
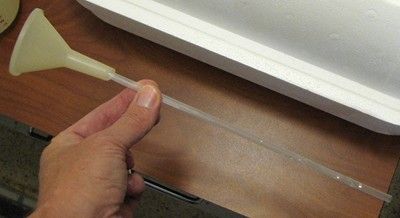
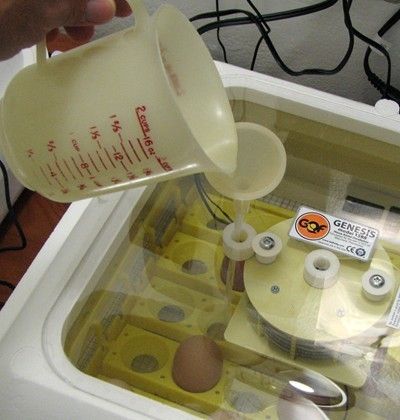
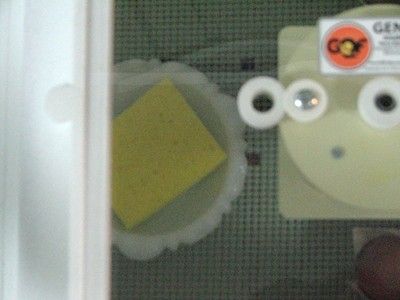
To maintain the humidity in the incubator, I need to add water to a plastic tray in the bottom, underneath the egg turner. I kept the space in the turner open directly over part of the water channel and directly underneath the lid's air hole. I fed an extra-long straw attached to a small funnel through the top airhole and turner and into the water channel. I will add 2 ounces of hot water at a time to maintain the proper humidity level.
EGGS
I won Welsummer eggs from vicki2x2 in the "24HR POULTRY/EGG AUCTION" section and purchased Silver Penciled Plymouth Rock eggs from ugly ducky on the "Hatching Chicken Eggs - Buy Sell Trade" section.
I left a note in my mailbox for my mail carrier letting her know I would be receiving some eggs in the mail. I asked her if she could call me from the post office the morning they arrived so that I could come pick them up. She left me a nice little note in reply:
4/01/09
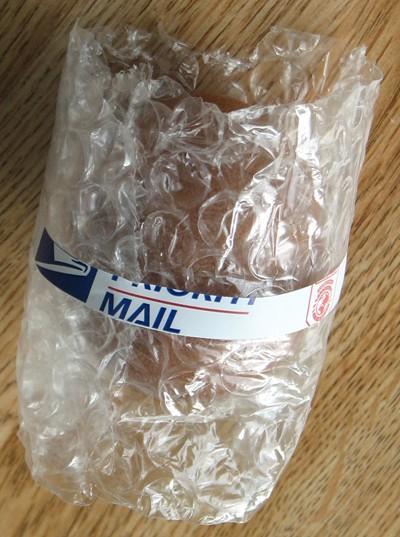
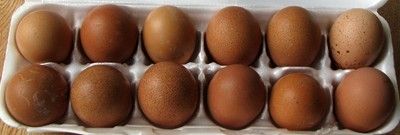
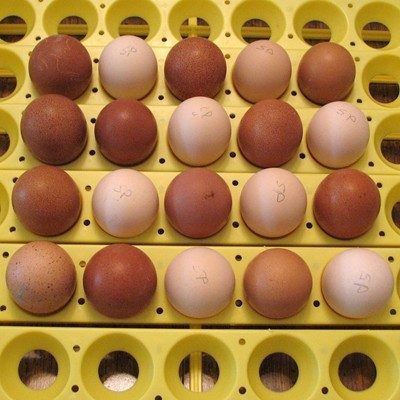
I received a call from the post office at 9:00am in the morning to let me know my eggs had arrived...I was so excited!! These eggs were shipped from Michigan to Florida; vicki2x2 did a wonderful job packing them. All eggs arrived intact. Here they are:
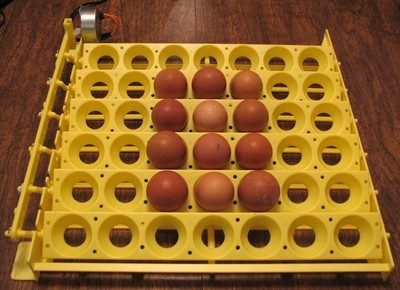
They are now sitting in the automatic egg turner resting (I have the turner plugged in) and waiting for the arrival of the Silver Penciled Plymouth Rock eggs:
4/02/09
This morning at 9:57am I received another call from the post office letting me know my Silver Penciled Plymouth Rock eggs had arrived...yippee! Shipped from Missouri to Florida, these eggs were carefully packaged by BYC member ugly ducky and arrived safe & sound. I ordered 6, but she packed two extras (thanks!!). Here they are:
I added these SPR eggs into with the W eggs in the turner to rest until 11pm:
SETTING UP INCUBATOR
After reading throughout the forum, I found the following thread on the Message Board in the "Incubating & Hatching Eggs" section, concerning humidity & temperature:
» Humidity in Bator...EXCELLENT INFO HERE! EVERYONE SHOULD READ THIS!
I decided to try to keep the following temperature & humidity values:
DAY 1-18: Temperature 99.5 / Humidity 40%- 44%
DAY 19-21: Temperature 99.5 / Humidity 60% - 65%
Through trial and error over the past five days, I have been testing the temperature and humidity in my incubator to find out exactly how much water I need to add through the funnelled straw and air hole in the top to the bottom water tray. Since the humidity averages 53% in the room where the incubator is located, I found adding 2 ounces of water approximately every other day to the "C" trough maintains the proper humidity.
The Genesis 1588 incubator's thermosat works great, because it maintains a steady temperature between 99.7 - 99.9. The instructions say to run it for your first hatch with the factory settings, and depending on your hatch results, then make changes if necessary. So, even though my target temp is 99.5, I'm going to see how hatching goes with the factory settings (actually, I'm just scared if I fiddle with anything, I'll mess it up!).
4/03/09
Day 1
Loaded my 20 eggs into the incubator last night at 11pm; I stayed up awhile to make sure everything stabilized. Today the temperature and humidity are holding steady at 99.5 and 45% respectively, with minimal variation.
I have several thermometers and hydrometers, but I'm using this one in the incubator as my main one:
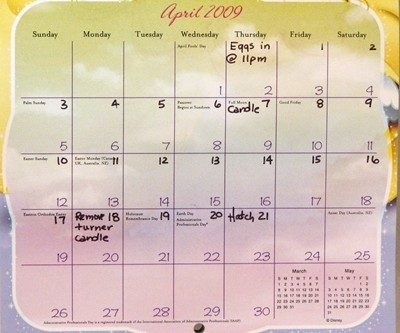
Here's my mini-calendar I have posted above my incubator showing my incubation time period, candling dates, day to remove the egg turner, and the hatch date:
I'm using this small notepad to record my temperature and humidity readings:
After reading here on the BYC Forum tons of great info about incubating eggs, I decided to buy an incubator, purchase some fertilized eggs, and try hatching chicks myself. In this blog I'll keep track of my very first incubating experience. Thanks for stopping by, and have a nice day!
3/28/09
INCUBATOR
I bought a new Genesis 1588 incubator with a 1610 egg turner on eBay:
I also purchased some thermo-hygrometers to measure the temperature and humidity:
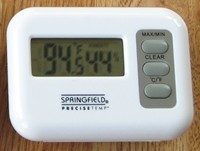

Left: The white one (WalMart) sits inside the incubator.
Center: The gray one (WalMart) sits outside the incubator to measure the room temperature & humidity.
Right: The red one (eBay purchase) sits outside the incubator & its probe lays inside on the egg turner.
To maintain the humidity in the incubator, I need to add water to a plastic tray in the bottom, underneath the egg turner. I kept the space in the turner open directly over part of the water channel and directly underneath the lid's air hole. I fed an extra-long straw attached to a small funnel through the top airhole and turner and into the water channel. I will add 2 ounces of hot water at a time to maintain the proper humidity level.
EGGS
I won Welsummer eggs from vicki2x2 in the "24HR POULTRY/EGG AUCTION" section and purchased Silver Penciled Plymouth Rock eggs from ugly ducky on the "Hatching Chicken Eggs - Buy Sell Trade" section.
I left a note in my mailbox for my mail carrier letting her know I would be receiving some eggs in the mail. I asked her if she could call me from the post office the morning they arrived so that I could come pick them up. She left me a nice little note in reply:

4/01/09
I received a call from the post office at 9:00am in the morning to let me know my eggs had arrived...I was so excited!! These eggs were shipped from Michigan to Florida; vicki2x2 did a wonderful job packing them. All eggs arrived intact. Here they are:


They are now sitting in the automatic egg turner resting (I have the turner plugged in) and waiting for the arrival of the Silver Penciled Plymouth Rock eggs:
4/02/09
This morning at 9:57am I received another call from the post office letting me know my Silver Penciled Plymouth Rock eggs had arrived...yippee! Shipped from Missouri to Florida, these eggs were carefully packaged by BYC member ugly ducky and arrived safe & sound. I ordered 6, but she packed two extras (thanks!!). Here they are:


I added these SPR eggs into with the W eggs in the turner to rest until 11pm:
SETTING UP INCUBATOR
After reading throughout the forum, I found the following thread on the Message Board in the "Incubating & Hatching Eggs" section, concerning humidity & temperature:
» Humidity in Bator...EXCELLENT INFO HERE! EVERYONE SHOULD READ THIS!
I decided to try to keep the following temperature & humidity values:
DAY 1-18: Temperature 99.5 / Humidity 40%- 44%
DAY 19-21: Temperature 99.5 / Humidity 60% - 65%
Through trial and error over the past five days, I have been testing the temperature and humidity in my incubator to find out exactly how much water I need to add through the funnelled straw and air hole in the top to the bottom water tray. Since the humidity averages 53% in the room where the incubator is located, I found adding 2 ounces of water approximately every other day to the "C" trough maintains the proper humidity.
The Genesis 1588 incubator's thermosat works great, because it maintains a steady temperature between 99.7 - 99.9. The instructions say to run it for your first hatch with the factory settings, and depending on your hatch results, then make changes if necessary. So, even though my target temp is 99.5, I'm going to see how hatching goes with the factory settings (actually, I'm just scared if I fiddle with anything, I'll mess it up!).
4/03/09
Day 1
Loaded my 20 eggs into the incubator last night at 11pm; I stayed up awhile to make sure everything stabilized. Today the temperature and humidity are holding steady at 99.5 and 45% respectively, with minimal variation.
I have several thermometers and hydrometers, but I'm using this one in the incubator as my main one:
Here's my mini-calendar I have posted above my incubator showing my incubation time period, candling dates, day to remove the egg turner, and the hatch date:
I'm using this small notepad to record my temperature and humidity readings:
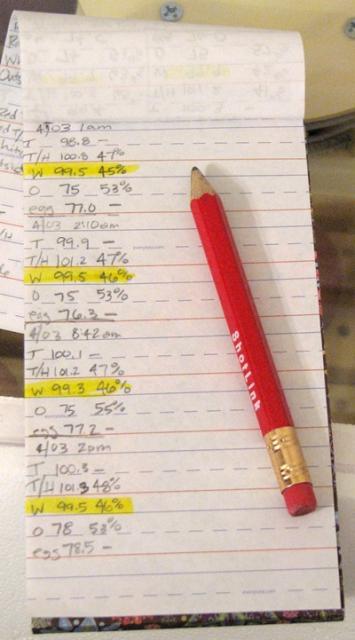
I record:
- DATE & TIME (if I am adding water, I write down here)
- T = Temperature of the probe thermometer I have sitting in the egg turner
- T/H = Temperature & humidity of the probe thermo-hygrometer sitting in the egg turner
- W = Temperature & humidity of the white thermo-hygrometer in incubator (highlighted because it's my main reading)
- O = Temperature & humidity reading outside the incubator (the room)
- egg = Temperature of a blown store-bought egg with water inside (I blew out the egg, hot-glued the bottom hole, filled it with water, placed a temperature probe in it, and sealed the top with hot glue).
4/07/09
Day 5
Day 5
I decided last night to purchase another Genesis 1588 incubator to use as a hatcher. After reading up around the Message Board, I ordered one online from
Cutler's Supply. Sitting down at the computer with my morning coffee to catch up on BYC happenings (my new daily ritual!), I found my way to the "Hatching Chicken Eggs - Buy Sell Trade" section in the Message Board here on BYC. This thread was calling my name..."Silkie eggs FS GA Two offers SQ/BQ." With my newly acquired chicken acumen, I deduced that if bought an egg turner to go in my new 1588 "hatcher" I ordered from Cutler's Supply, I could turn the incubator I had running now (with the Welsummer & SPR eggs in it) into my designated hatcher, and as a result, I could... ORDER MORE EGGS! Result of said chicken brain activity:
I bought Silkie eggs from Pumpkinup...yippee!
4/08/09
Day 6
Yes, it gets better...since extra egg holes would exist in the egg turner of my new Genesis 1588, I set out to find a few more eggs to incubate alongside the Silkie eggs. Shortcake1806 sold me some Delaware eggs to fill the holes. Now I need to get busy building my brooder, because I also ordered some Rhode Island Red eggs from sunshinesilkies!
Tomorrow is candling day. I have several ideas for making a candler with stuff I have around the house, so I'll document everything tomorrow night. Have a nice day, and thanks for stopping by.
4/09/09
Day 7
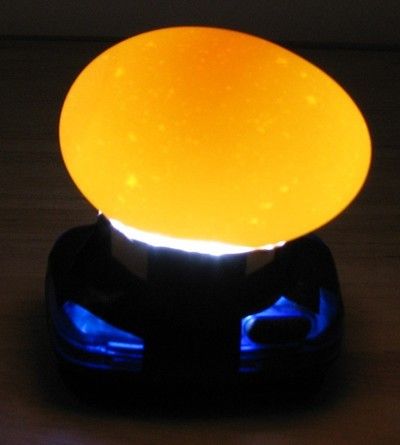
Candling has made me a nervous wreck! My biggest fear I is won't do it right and it will affect their hatchability. I looked at several examples of candling on the internet to see how they handled the eggs. University of Nebraska has an awesome 4-H incubation website and great candling videos.
I decided to make a candler from a headlamp I used when I went dogsledding. I wrapped some black electrical tape around it to focus the light and held it up to the eggs.
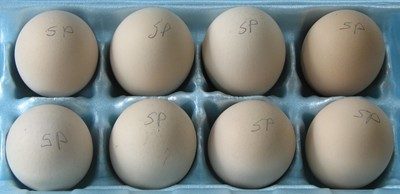
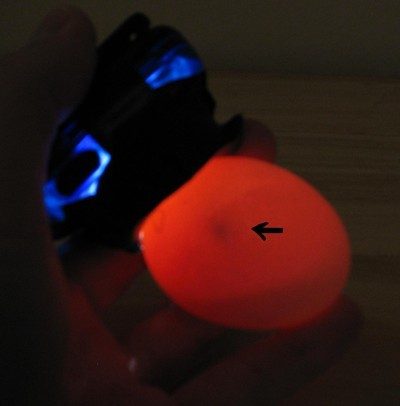
LEFT: store-bought unfertilized white egg. RIGHT: 7 Day fertilized Silver Penciled Rock egg
Because the Silver Penciled Rock eggs were light colored, they were easy to candle, but I didn't couldn't see into the darker Welsummer eggs. I saw definite movement in at least 5 eggs (seeing this for the first time is an absolute thrill!), and I will candle again on day 14.
4/10/09
Day 8
Since I had more fertilized eggs being mailed to me, I left a note in the mailbox for my mail carrier (they're really nice at my post office - thank goodness!):
________________________________________
3 Packages Coming…
Please Call & I will come pick them up at post office.
Thanks again!
Judy (phone #)
(address)
Hi!
I have ordered some more fertilized eggs via Priority Mail.
They should arrive (3 pkgs. from 3 different shipping addresses) in the next several days.
Thanks so much for taking the time to call me (I know how busy you must always be!).
I really appreciate your kindness; have a nice day!
Judy
(address)
(phone #)
__________________________________________
4/11/09
Day 9
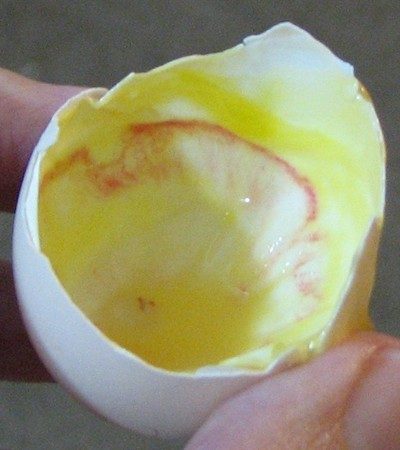
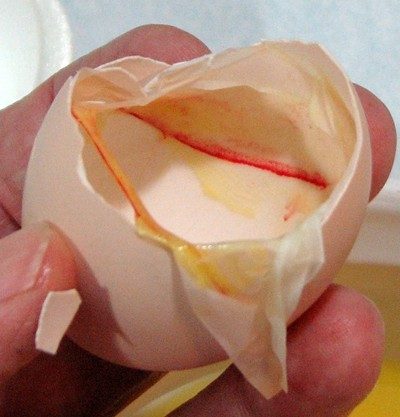
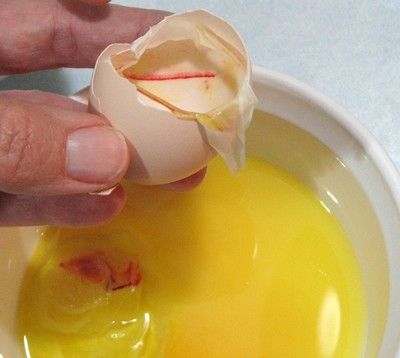
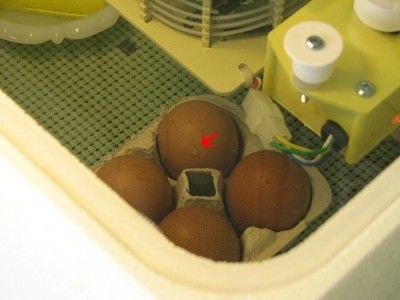
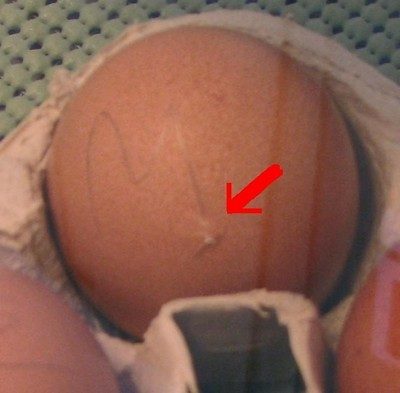
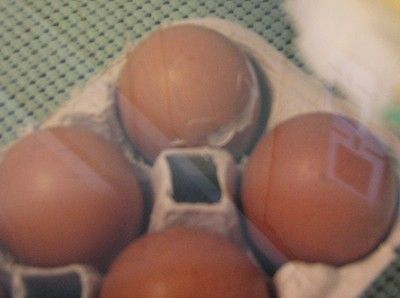
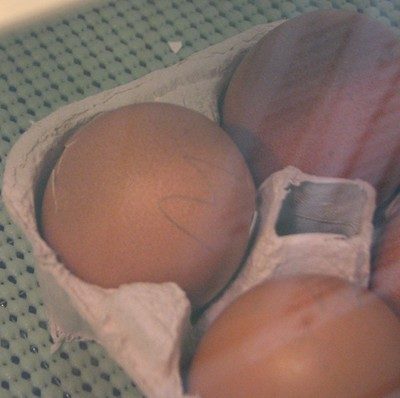
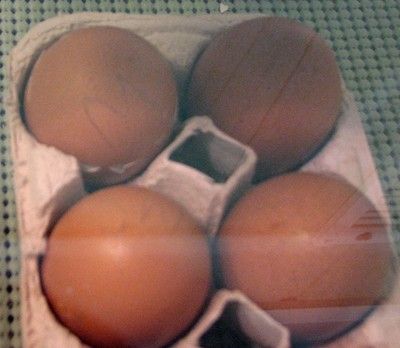
Today I recandled the two SPR eggs that I believed had bloodrings. My DH helped me, and we both decided to cull them; I cracked them open and found a distinct bright red ring around the inside circumference of each egg. I still have 18 eggs in the incubator. Here's some pics:
4/12/09
Day 10
Happy Easter!
4/14/09
Day 12
4/08/09
Day 6
Yes, it gets better...since extra egg holes would exist in the egg turner of my new Genesis 1588, I set out to find a few more eggs to incubate alongside the Silkie eggs. Shortcake1806 sold me some Delaware eggs to fill the holes. Now I need to get busy building my brooder, because I also ordered some Rhode Island Red eggs from sunshinesilkies!

Tomorrow is candling day. I have several ideas for making a candler with stuff I have around the house, so I'll document everything tomorrow night. Have a nice day, and thanks for stopping by.
4/09/09
Day 7
Candling has made me a nervous wreck! My biggest fear I is won't do it right and it will affect their hatchability. I looked at several examples of candling on the internet to see how they handled the eggs. University of Nebraska has an awesome 4-H incubation website and great candling videos.


I decided to make a candler from a headlamp I used when I went dogsledding. I wrapped some black electrical tape around it to focus the light and held it up to the eggs.
LEFT: store-bought unfertilized white egg. RIGHT: 7 Day fertilized Silver Penciled Rock egg
Because the Silver Penciled Rock eggs were light colored, they were easy to candle, but I didn't couldn't see into the darker Welsummer eggs. I saw definite movement in at least 5 eggs (seeing this for the first time is an absolute thrill!), and I will candle again on day 14.
4/10/09
Day 8
Since I had more fertilized eggs being mailed to me, I left a note in the mailbox for my mail carrier (they're really nice at my post office - thank goodness!):
________________________________________
3 Packages Coming…
Please Call & I will come pick them up at post office.
Thanks again!
Judy (phone #)
(address)
Hi!
I have ordered some more fertilized eggs via Priority Mail.
They should arrive (3 pkgs. from 3 different shipping addresses) in the next several days.
Thanks so much for taking the time to call me (I know how busy you must always be!).
I really appreciate your kindness; have a nice day!
Judy
(address)
(phone #)
__________________________________________
4/11/09
Day 9
Today I recandled the two SPR eggs that I believed had bloodrings. My DH helped me, and we both decided to cull them; I cracked them open and found a distinct bright red ring around the inside circumference of each egg. I still have 18 eggs in the incubator. Here's some pics:


4/12/09
Day 10
Happy Easter!

4/14/09
Day 12
After I candled tonight, I had to toss 6 eggs. Starting the first incubation day with 20 eggs, I culled two with bloodrings on day eight, leaving 18. With 6 more removed, 12 eggs are now left in the incubator. Because the Welsummer eggs were very dark, I was unable to see in those eggs as I candled at 7 days. I couldn't tell if they were fertilized and/or growing or not. With definite development and shadowing appearing in the viable eggs this evening, I determined that any Welsummer eggs lacking shadows were more than likely clear. I found four that seemed clear and so I culled them. Two of my Silver Penciled Rock eggs had stopped developing; I also removed them. I broke all the culled eggs open and confirmed that none were good (to my relief!).
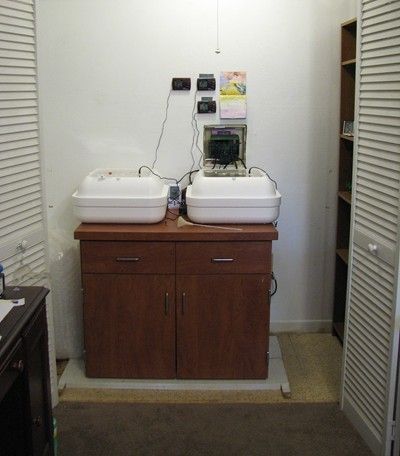
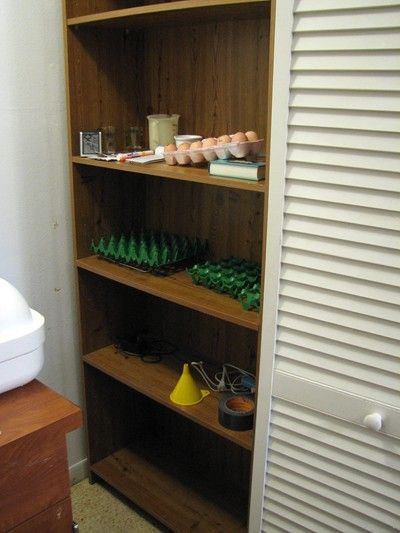
On a brighter note, I have been working on an "incubator room." Basically, it's a former laundry room closet that was previously made to house a washer & dryer. The washer & dryer were moved back to their original location in the garage, leaving the perfect space to incubate and hatch chicks! The extra large closet is located right next to our computer, so I can enjoy the humming of the 'bators while keeping up with the BYC forum happenings! Here's some pics of my new room:
See that cabinet? I found that dumpster diving! The local hospital remodeled and left it sitting by the road next to a dumpster. I gave a guy that was walking down the street five bucks (in quarters...the only money I had in the truck!) to help me load it - man, was it HEAVY. I moved it today from my garage to the incubation room by putting a blanket underneath it and dragging it along the floor.
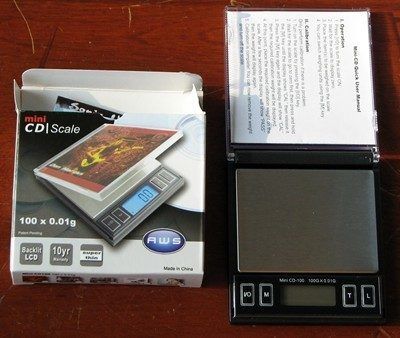
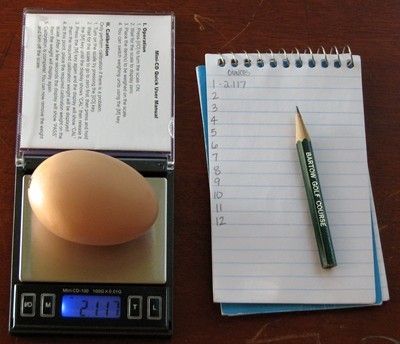
I also purchased, on eBay, a small gram/ounces scale to weigh eggs. In actuality a jewelry scale, it has a 100 gram capacity and weighs in 1/100 of a gram increments (it also measures ounces); it's perfect to use to grade eggs, and I want to start weighing my future hatching eggs throughout their incubation period to monitor for proper humidity levels. They should lose approximately 13% of their weight as evaporation takes place in the egg. Here's a link explaining it: Controlling Your Incubator's Humidity by Monitoring Egg Weight Loss
4/17/09
Day 15
I experienced my first "temperature hike" with my red probe thermohygrometer today; it freaked me out! At 8:45am I recorded the red gauge at 101.2 temp/50% humidity & the white gauge (my main one) at 99.5 temp/48% humidity. Away all morning, I returned at 1:30pm to find the red gauge reading 102.2 temp/20% humidity & the white gauge at 99.5 temp/20% humidity. AAAAGGHH! I immediately filled the "C" water channel with 6 ounces of hot water; the humidity climbed rather quickly to 58%, but eventually levelled out to 55%. As the eggs get closer to their due date and developmental & liquid changes are made within the eggs, the elapsed time between temperature & humidity changes has shortened (especially the humidity).
4/19/09
Day 17
Another interesting temperature change today; returning from church, we noticed the power had been cut off for a period of time (?) and restored. Thankfully, one of my temperature/humidity gauges has a high/low reading, so I at least could see how far the temperature in the incubator dropped. The temperature was back to 99.5, but had dropped to 83 degrees in the midst of the power outage. Yep, I should have picked up that battery backup the other day when I was at the store! I candled this evening, and all but two eggs "look" like they should at this stage. No eggs smell bad, so I'm leaving all remaining 12 in the 'bator. On a brighter note, I have been working on an "incubator room." Basically, it's a former laundry room closet that was previously made to house a washer & dryer. The washer & dryer were moved back to their original location in the garage, leaving the perfect space to incubate and hatch chicks! The extra large closet is located right next to our computer, so I can enjoy the humming of the 'bators while keeping up with the BYC forum happenings! Here's some pics of my new room:
See that cabinet? I found that dumpster diving! The local hospital remodeled and left it sitting by the road next to a dumpster. I gave a guy that was walking down the street five bucks (in quarters...the only money I had in the truck!) to help me load it - man, was it HEAVY. I moved it today from my garage to the incubation room by putting a blanket underneath it and dragging it along the floor.
I also purchased, on eBay, a small gram/ounces scale to weigh eggs. In actuality a jewelry scale, it has a 100 gram capacity and weighs in 1/100 of a gram increments (it also measures ounces); it's perfect to use to grade eggs, and I want to start weighing my future hatching eggs throughout their incubation period to monitor for proper humidity levels. They should lose approximately 13% of their weight as evaporation takes place in the egg. Here's a link explaining it: Controlling Your Incubator's Humidity by Monitoring Egg Weight Loss
4/17/09
Day 15
I experienced my first "temperature hike" with my red probe thermohygrometer today; it freaked me out! At 8:45am I recorded the red gauge at 101.2 temp/50% humidity & the white gauge (my main one) at 99.5 temp/48% humidity. Away all morning, I returned at 1:30pm to find the red gauge reading 102.2 temp/20% humidity & the white gauge at 99.5 temp/20% humidity. AAAAGGHH! I immediately filled the "C" water channel with 6 ounces of hot water; the humidity climbed rather quickly to 58%, but eventually levelled out to 55%. As the eggs get closer to their due date and developmental & liquid changes are made within the eggs, the elapsed time between temperature & humidity changes has shortened (especially the humidity).
4/19/09
Day 17
4/20/09
Day 18
Day 18
I can't believe day 18 is finally here! I'm supposed move the eggs to my hatcher tonight at 11pm, but there's a slight problem - it's being shipped and hasn't made it here, yet! AAAAGGHH! I ordered & received a second incubator to use as a hatcher, but it mysteriously filled up with Silkie, Delaware, & Rhode Island Red eggs last week. I can't just take out the turner in the first 'bator and leave the 12 eggs due to hatch, because I added new Delaware Blue Hen and Welsummer eggs, and they need to keep turning. Yep, I have hatching fever in a bad way! Hopefully, my THIRD incubator will be here tomorrow. I do have a homemade 'bator that I made; I might have to crank it up. I'm scared to use it, because I just don't know if it will work and I don't want to kill anything.
4/21/09
Day 19
Whew! UPS delivered my incubator today! I had worked on my homemade 'bator and got it up and running just in case I needed it (praying all the while that UPS would come through for me!). I set the hatcher up in the room that will also house the brooder; it's our enclosed back porch. At the suggestion of some BYCers, I placed open weave (has holes in it) rubberized shelf liner over the hardware cloth to help the chicks get a good grip when trying to walk. I cut larger holes over the "C" & "T" water channels so that I could add water via my funnel & extra-long straw as needed. I have intially filled the "C" & "T" water channels with 4 ounces each of water (total 8 ounces). I also soaked a small sponge (3" x 2 1/2") in a small glass saucer and placed it in the 'bator right next to the holes I made for access to the "C" & "T" water channels, I can add water to the sponge, too. This way, I don't have to open the 'bator to add water. IMPORTANT RULE: Do not open the 'bator the last three days! Opening the 'bator lets dry air in and allows moist air to escape; this will cause pipped egg membranes to dry out, become rubbery, and make it harder (if not impossible) for the chick to zip and hatch.Day 19
4/22/09
Day 20
Spending most of the day working on the chicks' brooder, I constantly checked the eggs in the hatcher. I added 1 ounce of water to the sponge via funnel & straw at 1pm to keep humidity at 67%. At 7:48pm, I didn't notice any pips, so I broke the rule (written in on day 19!) and opened the 'bator for a quick listen. Low and behold, an egg cheeped! Unbelievable! I've never experienced anything quite like this; it's no wonder so many BYCers become hatchaholics! After sharing the peeping experience with my DH, I put the eggs back in the 'bator (temperature & humidity stayed the same) and will not open the bator again until after the hatching has finished...promise!red
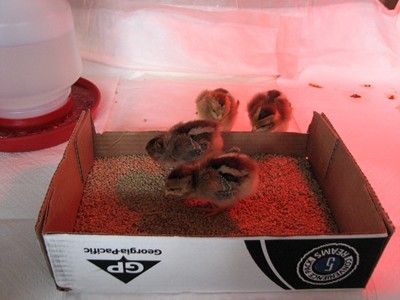
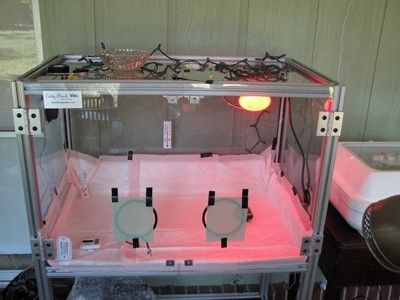
For the chicks' brooder I decided to start out with my plexiglass cat dryer (yes, a cat dryer!). I had purchased a reptile ceramic 250 watt heat bulb for heat (isn't a light) and wanted to use LED red christmas lights for a light source, but I quickly learned the bulb was too hot. I then went to Lowe's and purchased an 85 watt red flood light and a waterproof flood light holder. My cat dryer/brooder has a heavy duty clamp inside that I used to hold the light. There is a circular opening on both the left (low) and right (high) side. The light cord runs out the right side, and I rigged up a computer fan to blow out of the left side. I super glued two yellow foam ear plugs to the liner to make space between the liner & the fan. The fan blows just hard enough to keep the air moving within the brooder. There are also two circular openings on the front (Your arms go through them when drying a cat) that I wrapped a small bungee cord through to keep the doors closed. I also taped woven shelf liner over the holes (so air can still come through, but chicks can't come out).


I'm going to use pads (used for adult incontinence on beds) to spread out on the floor; I will also make a hardware wire frame when they get a little older.
4/23/09
Day 21!
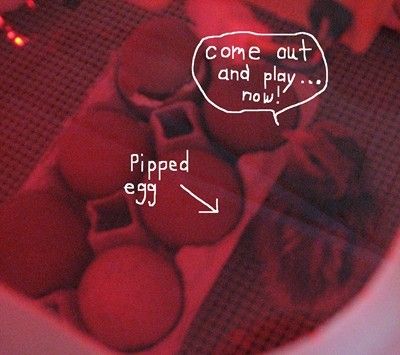
Good Grief! After I went to bed last night, I dreamed 3 of my eggs hatched! Hatching is definitely on my mind; I didn't find 3 hatched eggs at 8am this morning, but I did find my first pip!
I found my brooder temperature running at 101 directly under the heat lamp this morning, so I spent some time tweaking this and that to make it run closer to 95 degrees. I placed the liners on the floor and replaced the small computer fan with a larger one; the fan faces outward so that air is pulled through the brooder from the lower right and two front holes to the upper left hole. With a piece of open weave shelf liner in front of all the holes, it slows down the rate of air flow so there isn't a draft, just a steady circulation of air coming through the brooder. I just checked it, and the temperature ranges from 92 (under lamp), 90 (front right corner), 86 (front left corner), and 82 (back left corner). From the threads I've read here on BYC, a slight variation in temperatures is good, so that the chicks can move from hot to cool as needed. I'll also watch their behavior once they take up residence: crowding around light (too cold), staying in the far corners far away from the light and/or panting (too hot), running around all over eating, drinking, sleeping (just right!).


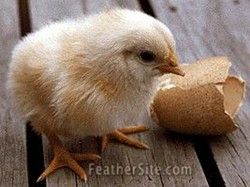
The pipped egg starting zipping at 4:30pm, and he was finished at 5pm! He didn't mess around, tapping the eggshell like a little woodpecker!
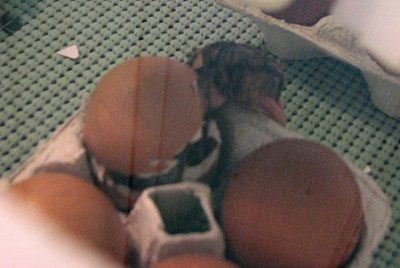
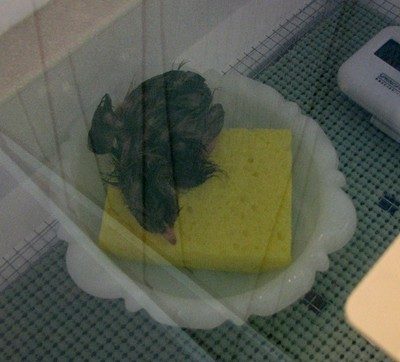
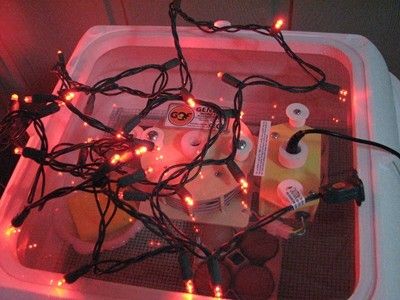
The 2nd one didn't hatch until 3:30am, so the 5pm hatchling was lonely and cheeping loudly until I put a small string of red LED Christmas lights on top of the 'bator (they stay cool to the touch). Instant silence! Wow, he calmed right down and didn't emit any more distress (LOUD) cheeps; he justed started talking to the eggs.
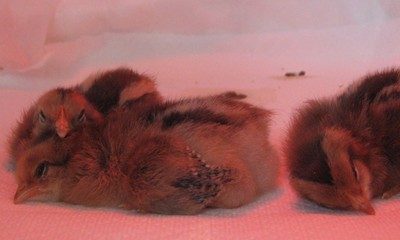
4/27/09
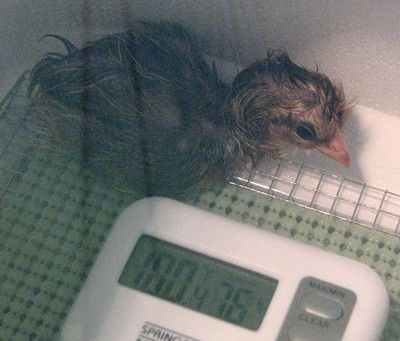
I've been at the hospital with my mom since last Friday, so my DH took over supervision of the hatching (he's a blessing from heaven, let me tell you!). 4 out of 20 eggs ended up hatching, and they're all Welsummer chicks. Friendly and very actice, they look like little chipmunks with their variated brown stripes! I shot a few quick picks this morning to show you before I head back to the hospital to stay with my mom (not sure when she's coming home). Thanks for sharing my 1st incubating experience with me!