The Unintended Anniversary Gift Incubator
This is based on MissPrissy' s incubator with a few changes.
Materials List (scavenged if price unlisted):
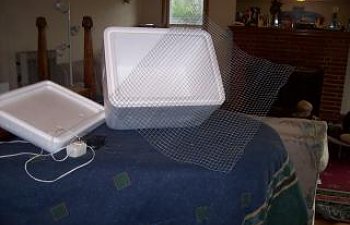
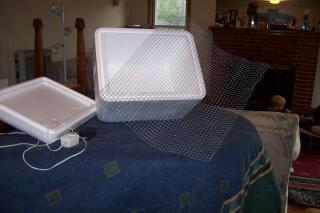
Omaha Steak Syrofoam Cooler from your anniversary present. (Thanks Dad and Ann!)
A bit of leftover hardware cloth
Bottom of plastic take-out container
PC fan
Kiddie cup from restaurant
Instant Read Thermometer
Electrical tape
Twistie tie
Wine corks or rolled up paper towels
12 volt transformer from some old, abandoned, electrical thing
Thermometer/hydrometer from Wal-Mart $4
Hot water heater thermostat: $8 Home Depot
Plexiglass sheet: $3 Home Depot
Snap light fixture for night lights (I didn't want to have to wire up a fixture) $6 Home Depot
25 Watt bulbs $2 Home Depot
Band-aid
Old egg carton
Gaff tape (couldn't find the duct tape).
Step One: Gather Materials.
This took me around three hours due to the fact that we have a million places to put and forget stuff.
Step Two: Assemble the Parts
- Cut hardware cloth to fit the bottom.
- Put band-aid on finger where hardware cloth stabbed you.
- Install pan under hardware cloth.
- Cut hardware cloth guard to shield chickies from electrical stuff.
Step Three, the hard part: Wire the dang thing

- Stare at thermostat. Figure out how to wire the power in and out.
- Cut the clicky on/off switch out of the light fixture cord.
- Split both cut ends of the light fixture cord apart and strip 1/2 inch off of both ends.
- Cut two holes into the wall of the cooler for the power cords for the thermostat and PC fan. Run the wires through the holes.
- Wire unribbed side of light fixture cord into thermostat. Join with other piece of unribbed wire. Splice together the ribbed side of the cord.
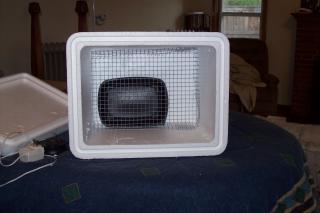
- Install light in Incubator. I cut a hole in the hardware cloth and snapped the fixture into that hole.
- Cautiously plug in to see if light works.
- Undo any tripped breakers and wire it the other way if you did something wrong.
- Cut the end of the transformer (the part that plugs into some unused machine, not the part that plugs into the wall). Separate the cords and expose 1/2 inch of bare wire.
- Splice the wires of the PC fan and the transformer together.
- Cautiously plug that in to see if it works.
- Undo any tipped breakers and rewire appropriately.
- Cover bare wires with splicer caps or electrical tape.
- Install fan and thermostat into incubator using twistie ties through the walls of the cooler.
- Check again to make sure it all works.
- Enclose electrical stuff behind hardware cloth guard.
- Cut a hole in top of the cooler smaller than the glass. Tape glass to top of cooler from the top.
- Poke 4 air holes at the bottom and two larger holes (plug with paper towel wad or corks) to regulate humidity.
- Let the incubator run overnight to get an idea of levels. Adjust thermostat until the incubator reads steady at the temperature/humidity you want. To make this easier, set an open top quart jar of water in the incubator. It serves as a "heat sink" and will help keep both temp and humidity steady.
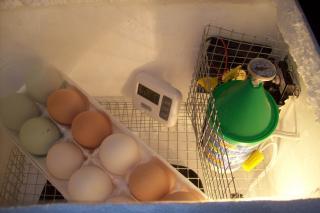
- Fill Kiddie cup with water, insert instant read thermometer into top of kiddie cup. This tells you the interior temp of the eggs.
- Calibrate thermometer/hydrometer in bag of 1/2 cup salt and 1/4 cup water. Don't let the unit touch the salt and water mixture! After eight hours, it should read a humidity of 75%. Put in incubator after calibration.
- When the levels hold steady, set eggs. I used an egg carton propped on its own lid so all I have to do to turn is lean it to the other side.
- Try not to candle every single day. Admit to no one that the spider thingies fascinate you to the point that you must gaze at them regularly.
- Cross fingers, be a basket case for 3-4 weeks, and join the ranks of hatchaholics.
Please send me a PM if something isn't clear or if I got my facts wrong.