My wife and I began talking about chicken husbandry about a year ago and then attended a local seminar put on by our Extension Service this past February. Things just snowballed from there (with lots of reference to "BackyardChckens") as the final decision was made to jump into preparation, care, and maintenance of chickens.
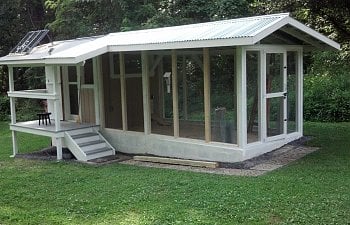
The main house is 8x8' and the run is coming in at about 8x16'. Referencing the many beautiful and ingenious coop plans here was critical in many of the design decisions we made with our coop.
Here is the nearly completed coop, minus gutters, some paint, and a 12v electric fence on the run.

The reason I call this the "Domino Affect" Coop is that we had a few projects all going on at once which affected each other. We were having our front walk and back ground level deck replaced with pavers. All the old concrete was to be used to fill my "pit" in the run area to cut down on gravel needed and provide a impervious barrier for digging critters. I was also using all the wood coming off the lower and upper deck to build the coop and run (gotta love recycling wood). The challenge was that due to all the rain this year, the landscapers fell 4 weeks behind schedule and thereby set my back in getting the house up and operational for the chicks that arrived on 18 June. When you all say chicks grow fast, we had no idea of how fast, fast was!!! Man do chicks grow fast!!! We finally got them out of our house on week 5 and that will never happen again!!!
And now for the real story:
Our odyssey began in March this year with a ground breaking for the foundation. Our property has a high clay content and does not perk well, so getting both a house and a run off the ground seemed to be a smart way forward. The challenge was digging, setting a footer, and laying block as a novice.
My daughter even helped a little with the initial dig...
Gravel arrives...
Main house pit done, that was allot of dirt!
Pit for the main house done, graveled and corner footings in place.
Block arrives, ugh...
And the back breaking work of laying block. I think once will be enough for me in my lifetime!
And the finished product. No levels allowed!!!
What have I learned so far?? Never to lay block again...
I did buy some new wood for some critical parts of the coop.
And paint to seal everything up.
Wall #1 and some new siding (Smart Siding). Built the wall first with siding on it and then propped it up and nailed/screwed it down. Using all that recycled deck material.
Wall #2
And wall framing complete.
Finished up the siding
Roof framing
And add the roof and porch overhang, can you see the "Snowball Affect" starting to take place?
By golly, we have a shingled roof. I added a 5 foot roof vent along the right side.
And I get back to digging for the run...
I thought I said I would never lay block again? Well, I've said a lot of things...
Daughter tempting me away from the build... Yes she is of age...
Add trim, pop door, a deck, stairs, and a bit more paint. All that recycled wood looks pretty good with paint on it!
And dig out what was now referred to as the "Alligator Pit."
Guess who arrived on 18 June? They sure are cute little buttons.
Framing the run roof, and start filling the "Alligator Pit" with all the concrete from our front walk and back concrete pad.
And now it becomes the local "Snake Pit." Each of those rafter shadows is about 14" apart. This guy was no baby. We don't want him back anytime soon. I chased him off to the neighbor's where I think he ate one of her many cats...
Added purlins for the upcoming new tin roof.
Two weeks old and starting to kick up that fine dust!!!
Tin roof is on. I was surprised how fast it went on once I had everything ready. I was sort of afraid to stand on it at first, but it held my weight with no problem (~170lb).
I had some oak flooring sitting around from about 5 years ago when we put in wood floors in our house. The girls have a mini grand entrance with an oak french door. I also built a screen on the inside when we can leave both doors open.
I added a solar array, after reading a few posts here. This house will be green. Lights, fans, electric fence, water heater in winter all powered by the sun.
We're going with inside nest boxes since it gets pretty hot in the summer here. I kept reading about people's outside "Hot Boxes" and decided to go interior with another oak door to access the boxes from the outside. There is the upper roost with poop board and a lower roost. My wife had some "Chiffon" yellow paint left over from a previous project and decided on that for the inside walls of the coop. We also found and put a $12 piece of linoleum down on the floor. Up above the nest boxes is a storage cabinet that runs the length of the 8' wall.
Three weeks old, they outgrew the low stock tank we had them in and we had to upgrade to a taller brooder enclosure. Can you say dust? My wife is now second guessing what we did, well only an little. But the sooner we can get these girls outside the better!!!
Week 5 and the girls are in their own house, THANK GOD!
The 1/2x1/2" hardware cloth is up on the run
And time to let them out in the new run.
This Barred Rock seems to be the leader.
And they all seem pretty happy.
And here's where I'm at. I still have gutters, electric fence, and some painting to do as well as add a post at the end of the steps. But things are winding down a bit.
This was definitely an experience and took almost 6 months to get to this point. But I had fun and we're having more fun just watching these little clowns experience life.
I do have plans that I created using AutoDesk AutoSketch 8, but I do not have permission to attach them here.
I did add insulation to the walls of the house, mostly to keep main house from heating up. But I may also add some reflective faced foam insulation to the ceiling of the main coop this fall when things start cooling off. For now, the house is staying pretty cool, but we've not had any really hot weather since the girls went out. I still have some shelves to put up inside the coop for the 12v fans and a couple roosts to put up in the run.
After reading all they good things here about sand, we ended up going with sand in both the main house and the run. So far, we love it!
Once the electric fence goes in, I may need to upgrade from one to two 12v batteries to charge via the solar array, but I'll wait and see how much drain the electric fence actually put on the system.
What would I do different? I'm not too sure yet, but once they start laying, I'm sure there will be something I'll need to change/adjust regarding the 4 interior nest boxes and outside access door.
Thanks to everyone here for all the information and great pictures and ideas. I used many of them and grew from there.
We have 8 hens (we hope at the moment), but I'm sure we are starting to see some rooster in a couple. We hope to round out/up to about 9-10 hens which this coop is more than capable of supporting... Yes, they will be spoiled rotten!!!
=========================
** UPDATE: 25 September 2013
So, we've added the electric fence, windows, final coat of paint, some extra support posts and some landscaping to cut down on the mud paths. It turns out that one 12v gel battery being charged by the solar array runs the lights, fans, and electric fence just fine. I still have to experience the draw from the heater for the waterer and will try that out soon to make sure all is ready for coming cold weather. One last thing is to add gutters and some rain barrels. Our 8 hens all still seem to be hens at this point (15 weeks old) and we expect to see eggs sometime in November, right when egg production is supposed to start slowing down. So far we have not seen any wild critters hanging around, but our neighbor's dog did test out the electric fence for us and it is working just fine. We've only had to make small door/window adjustments so far as the structure begins to settle out. I kind of feel sorry for bugs that fly into the run when our pack of 8 wolves (oh, I mean hens) use their uncanny radar to locate and devour anything that makes it through the 1/2" hardware cloth. So we're just waiting for eggs and then the winter adjustments to our cleaning/feeding schedule. I'll make sure to take some winter pictures this year and report what adjustments we will surely have to make based on that new experience.
And the windows are in to protect from those nasty drafts soon to come this fall. The chickies are getting big as well, put them on a grower blend and boy are they filling out...
=========================
** UPDATE: 11 November 2013
Still waiting on eggs, chicks (Ok, Chickens) are now 22 weeks old, should be soon...
Coop now has gutters installed and rain barrels ready for spring hookup.
I think we are also ready for winter at this point, we'll see how everything goes.
=========================
** UPDATE: 1 December 2013
Yay... The chicks are 25 weeks old and we received or first egg on Sunday from one of our Barred Rocks. My wife had just made some curtains for the nest boxes the day before, which the chickens seemed to really enjoy messing with. One of our Black Astralorps is now showing interest and trying the boxes out a well. We're still hoping for all hens, but it's hard to tell for us newbies. The curtains were made from a bunch of old jeans cutoffs. I'll try to get a pic with somebody in the next box.
=========================
** UPDATE: 23 December 2013
Well, the chicken we thought was a rooster (RIR) laid an egg this week... We're now getting 5 eggs a day on average. Both Black Astralorps, at least one Barred Rock, the RIR, and maybe one Golden Laced Wynadotte are laying. They are all getting a bit noisy as I think they are finally establishing a pecking order. What bunch of clowns...
=========================
** UPDATE: 29 May 2014
Almost coming up on a year now. Wow, we have eggs and all the neighbors and work mates are loving the stream of eggs. This Spring we decided that the 8x16 foot enclosed run (with sand base) was just not enough for our fine feathered friends. They do what chickens do best when bored and pull each others feathers out...
So now they have an attached ~500sq/ft enclosed grass play area. We thought it was a lot of grass, but two weeks later, the grass does not seem to be able to keep up with the demand of 8 hens... But wow, what a difference in the egg yokes! Their egg yokes were dark yellow to begin with, but now they are almost orange. What a difference the addition of a few bugs and worms makes.
Here's the latest shot with the attached play yard:
The first 4' of wire is a heavy duty geometric galvanized net with 1' hinged bottom facing out in the yard. The top 5' is then regular chicken wire. We then strung some wires and ribbon over the top to keep the hawks out.
The local fox population has been testing the fence and finding it a formidable barrier. And once I extend the electric fence totally around the outside perimeter, we should deter any prolonged attempts to get at the chickens. You can also see a small pop door that I installed on the inner run where they still spend those really rainy days.
The main house is 8x8' and the run is coming in at about 8x16'. Referencing the many beautiful and ingenious coop plans here was critical in many of the design decisions we made with our coop.
Here is the nearly completed coop, minus gutters, some paint, and a 12v electric fence on the run.
The reason I call this the "Domino Affect" Coop is that we had a few projects all going on at once which affected each other. We were having our front walk and back ground level deck replaced with pavers. All the old concrete was to be used to fill my "pit" in the run area to cut down on gravel needed and provide a impervious barrier for digging critters. I was also using all the wood coming off the lower and upper deck to build the coop and run (gotta love recycling wood). The challenge was that due to all the rain this year, the landscapers fell 4 weeks behind schedule and thereby set my back in getting the house up and operational for the chicks that arrived on 18 June. When you all say chicks grow fast, we had no idea of how fast, fast was!!! Man do chicks grow fast!!! We finally got them out of our house on week 5 and that will never happen again!!!
And now for the real story:
Our odyssey began in March this year with a ground breaking for the foundation. Our property has a high clay content and does not perk well, so getting both a house and a run off the ground seemed to be a smart way forward. The challenge was digging, setting a footer, and laying block as a novice.
My daughter even helped a little with the initial dig...
Gravel arrives...
Main house pit done, that was allot of dirt!
Pit for the main house done, graveled and corner footings in place.
Block arrives, ugh...
And the back breaking work of laying block. I think once will be enough for me in my lifetime!
And the finished product. No levels allowed!!!
What have I learned so far?? Never to lay block again...
I did buy some new wood for some critical parts of the coop.
And paint to seal everything up.
Wall #1 and some new siding (Smart Siding). Built the wall first with siding on it and then propped it up and nailed/screwed it down. Using all that recycled deck material.
Wall #2
And wall framing complete.
Finished up the siding
Roof framing
And add the roof and porch overhang, can you see the "Snowball Affect" starting to take place?
By golly, we have a shingled roof. I added a 5 foot roof vent along the right side.
And I get back to digging for the run...
I thought I said I would never lay block again? Well, I've said a lot of things...
Daughter tempting me away from the build... Yes she is of age...
Add trim, pop door, a deck, stairs, and a bit more paint. All that recycled wood looks pretty good with paint on it!
And dig out what was now referred to as the "Alligator Pit."
Guess who arrived on 18 June? They sure are cute little buttons.
Framing the run roof, and start filling the "Alligator Pit" with all the concrete from our front walk and back concrete pad.
And now it becomes the local "Snake Pit." Each of those rafter shadows is about 14" apart. This guy was no baby. We don't want him back anytime soon. I chased him off to the neighbor's where I think he ate one of her many cats...
Added purlins for the upcoming new tin roof.
Two weeks old and starting to kick up that fine dust!!!
Tin roof is on. I was surprised how fast it went on once I had everything ready. I was sort of afraid to stand on it at first, but it held my weight with no problem (~170lb).
I had some oak flooring sitting around from about 5 years ago when we put in wood floors in our house. The girls have a mini grand entrance with an oak french door. I also built a screen on the inside when we can leave both doors open.
I added a solar array, after reading a few posts here. This house will be green. Lights, fans, electric fence, water heater in winter all powered by the sun.
We're going with inside nest boxes since it gets pretty hot in the summer here. I kept reading about people's outside "Hot Boxes" and decided to go interior with another oak door to access the boxes from the outside. There is the upper roost with poop board and a lower roost. My wife had some "Chiffon" yellow paint left over from a previous project and decided on that for the inside walls of the coop. We also found and put a $12 piece of linoleum down on the floor. Up above the nest boxes is a storage cabinet that runs the length of the 8' wall.
Three weeks old, they outgrew the low stock tank we had them in and we had to upgrade to a taller brooder enclosure. Can you say dust? My wife is now second guessing what we did, well only an little. But the sooner we can get these girls outside the better!!!
Week 5 and the girls are in their own house, THANK GOD!
The 1/2x1/2" hardware cloth is up on the run
And time to let them out in the new run.
This Barred Rock seems to be the leader.
And they all seem pretty happy.
And here's where I'm at. I still have gutters, electric fence, and some painting to do as well as add a post at the end of the steps. But things are winding down a bit.
This was definitely an experience and took almost 6 months to get to this point. But I had fun and we're having more fun just watching these little clowns experience life.
I do have plans that I created using AutoDesk AutoSketch 8, but I do not have permission to attach them here.
I did add insulation to the walls of the house, mostly to keep main house from heating up. But I may also add some reflective faced foam insulation to the ceiling of the main coop this fall when things start cooling off. For now, the house is staying pretty cool, but we've not had any really hot weather since the girls went out. I still have some shelves to put up inside the coop for the 12v fans and a couple roosts to put up in the run.
After reading all they good things here about sand, we ended up going with sand in both the main house and the run. So far, we love it!
Once the electric fence goes in, I may need to upgrade from one to two 12v batteries to charge via the solar array, but I'll wait and see how much drain the electric fence actually put on the system.
What would I do different? I'm not too sure yet, but once they start laying, I'm sure there will be something I'll need to change/adjust regarding the 4 interior nest boxes and outside access door.
Thanks to everyone here for all the information and great pictures and ideas. I used many of them and grew from there.
We have 8 hens (we hope at the moment), but I'm sure we are starting to see some rooster in a couple. We hope to round out/up to about 9-10 hens which this coop is more than capable of supporting... Yes, they will be spoiled rotten!!!
=========================
** UPDATE: 25 September 2013
So, we've added the electric fence, windows, final coat of paint, some extra support posts and some landscaping to cut down on the mud paths. It turns out that one 12v gel battery being charged by the solar array runs the lights, fans, and electric fence just fine. I still have to experience the draw from the heater for the waterer and will try that out soon to make sure all is ready for coming cold weather. One last thing is to add gutters and some rain barrels. Our 8 hens all still seem to be hens at this point (15 weeks old) and we expect to see eggs sometime in November, right when egg production is supposed to start slowing down. So far we have not seen any wild critters hanging around, but our neighbor's dog did test out the electric fence for us and it is working just fine. We've only had to make small door/window adjustments so far as the structure begins to settle out. I kind of feel sorry for bugs that fly into the run when our pack of 8 wolves (oh, I mean hens) use their uncanny radar to locate and devour anything that makes it through the 1/2" hardware cloth. So we're just waiting for eggs and then the winter adjustments to our cleaning/feeding schedule. I'll make sure to take some winter pictures this year and report what adjustments we will surely have to make based on that new experience.
And the windows are in to protect from those nasty drafts soon to come this fall. The chickies are getting big as well, put them on a grower blend and boy are they filling out...
=========================
** UPDATE: 11 November 2013
Still waiting on eggs, chicks (Ok, Chickens) are now 22 weeks old, should be soon...
Coop now has gutters installed and rain barrels ready for spring hookup.
I think we are also ready for winter at this point, we'll see how everything goes.
=========================
** UPDATE: 1 December 2013
Yay... The chicks are 25 weeks old and we received or first egg on Sunday from one of our Barred Rocks. My wife had just made some curtains for the nest boxes the day before, which the chickens seemed to really enjoy messing with. One of our Black Astralorps is now showing interest and trying the boxes out a well. We're still hoping for all hens, but it's hard to tell for us newbies. The curtains were made from a bunch of old jeans cutoffs. I'll try to get a pic with somebody in the next box.
=========================
** UPDATE: 23 December 2013
Well, the chicken we thought was a rooster (RIR) laid an egg this week... We're now getting 5 eggs a day on average. Both Black Astralorps, at least one Barred Rock, the RIR, and maybe one Golden Laced Wynadotte are laying. They are all getting a bit noisy as I think they are finally establishing a pecking order. What bunch of clowns...
=========================
** UPDATE: 29 May 2014
Almost coming up on a year now. Wow, we have eggs and all the neighbors and work mates are loving the stream of eggs. This Spring we decided that the 8x16 foot enclosed run (with sand base) was just not enough for our fine feathered friends. They do what chickens do best when bored and pull each others feathers out...
So now they have an attached ~500sq/ft enclosed grass play area. We thought it was a lot of grass, but two weeks later, the grass does not seem to be able to keep up with the demand of 8 hens... But wow, what a difference in the egg yokes! Their egg yokes were dark yellow to begin with, but now they are almost orange. What a difference the addition of a few bugs and worms makes.
Here's the latest shot with the attached play yard:
The first 4' of wire is a heavy duty geometric galvanized net with 1' hinged bottom facing out in the yard. The top 5' is then regular chicken wire. We then strung some wires and ribbon over the top to keep the hawks out.
The local fox population has been testing the fence and finding it a formidable barrier. And once I extend the electric fence totally around the outside perimeter, we should deter any prolonged attempts to get at the chickens. You can also see a small pop door that I installed on the inner run where they still spend those really rainy days.