A Frame Chicken Cottage

~A Work In Progress

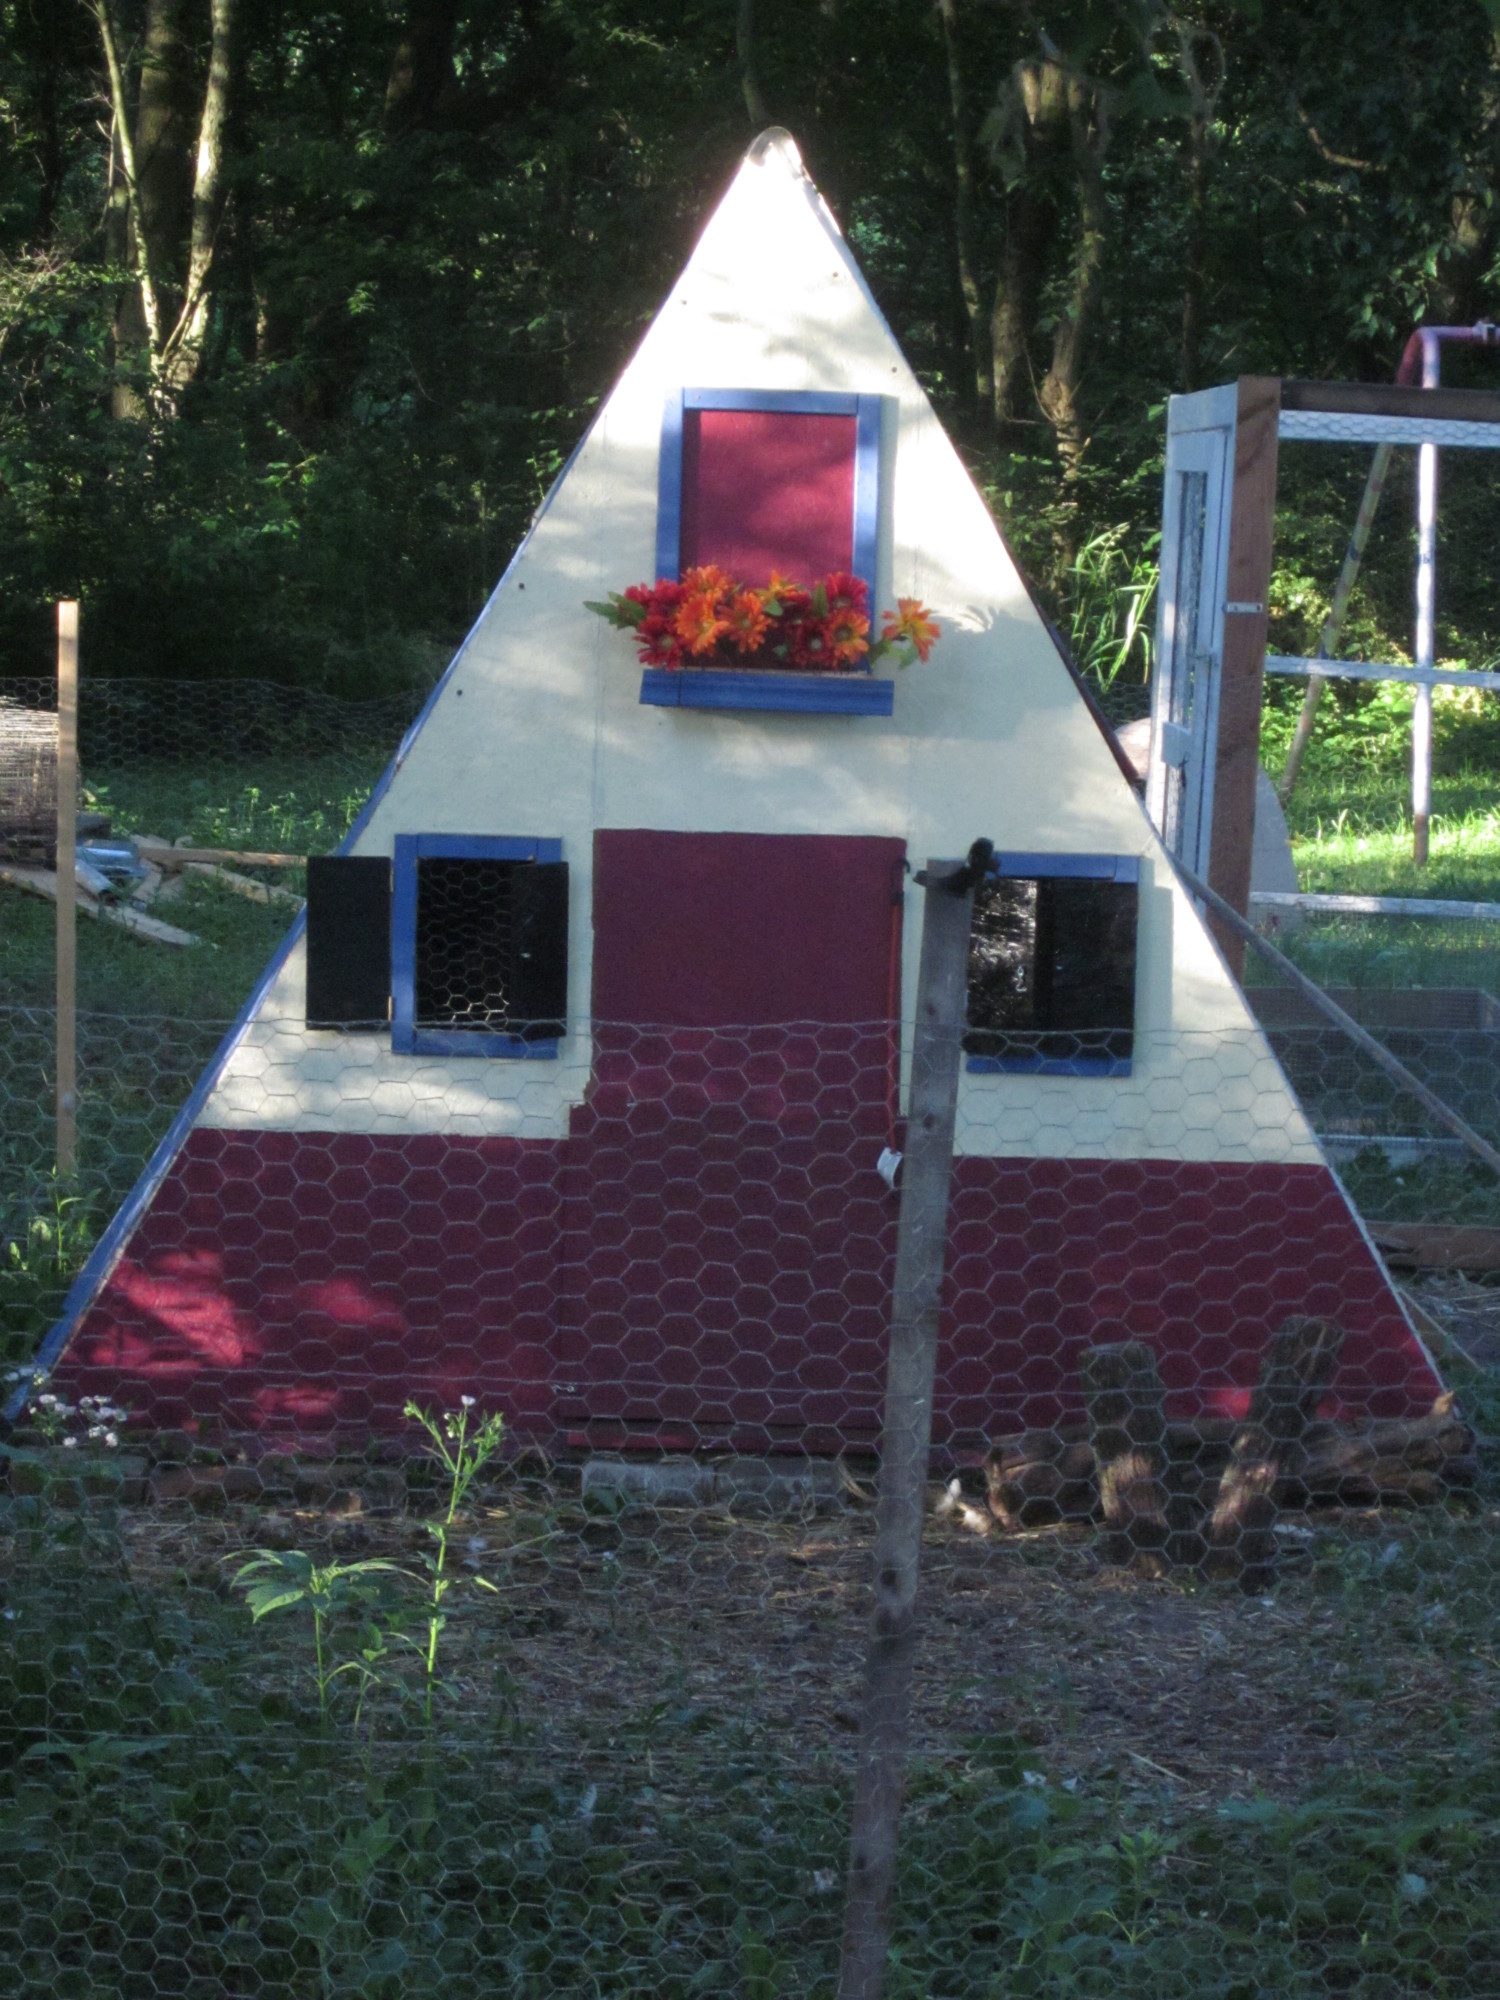
This is our new coop. It is still in progress which is why you see the lumber and fencing in the background and why the arbor needs paint and lattice yet.
The plan was that the chicks would not move into here until it was finished but raccoon attacked their little coop (hadn't headed warnings about burying wire) and the two white chickens were having a hard time fitting thru the door it just made more sense to get them into their larger home now. Their inhabitance has slowed down some of the but it will get finished.
The design of this coop was inspired by so many of you here at BYC. And I can't thank you enough for your willingness to share, document and explain how you did what you did.
Firstly UrbanMama's coop here https://www.backyardchickens.com/a/urbanmamas-a-frame-chicken-coop
I loved the big 'people door' and wanted this BUT I got the different coops I was looking at confused with each other and thought her coop was made with all 8' boards. Knowing this I decided on a coop with a footprint of 8' x8'. With an angle around 32 percent (I think--hubby figured that part out) we got the coop about 6' tall inside.
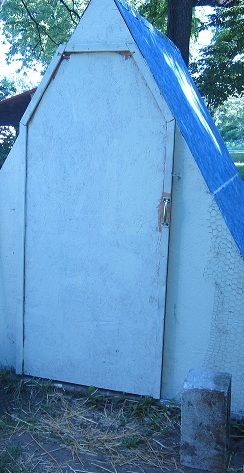
Hubby built the back door aka the 'people door' which was so much better than what I would have come up with.
HeatherJ's coop here https://www.backyardchickens.com/a/heather-js-rooster-coop was the one with an 8' x 8' footprint and gave a lot of detailed info to help me with my inexperience do much of it without having to bother Steve. The fact she did all this by herself and in ONE day reminded me what an amatuer woodworker I am but this was a challenge I am so glad I took.
Our neighbor offered up some landscape timbers with long spikes that could be pounded into the ground. I laid them out and we started attaching the supports. My big error there was it was no longer a true 8x8 which ended up making my husband's job a bit more involved but we figured it out as we went along and like he said, I saved 4 new boards by using re-purposed ones that were headed for the burn pile.
Once the coop exterior was put together I started thinking of how I could make it look 'cottagey'. I love 'New Henstein Castle' so I decided we were definitely doing a flower box. The flower box was made out of some scrap firing straps, scrap 1x4 and some old crown moldings I found in the garage. It isn't deep enough for real flowers but that's fine since fake flowers are much easier to water and with a 3,100 square foot garden an acre away and four thirsty dogs, I haul enough water every day!
A google search of A Frame Cottages found me this picture http://www.flickr.com/photos/8283056@N03/623015110/in/faves-pumpkin_n/
and this photo: http://media-cdn.tripadvisor.com/media/photo-s/02/2b/8f/40/a-frame-cottage.jpg
so we began combining the two ideas. You will notice the front door on the coop is not trimmed out yet and is on my 'to do' list.
We have some hot spells so ventilation was a concern. The Chick Shell-A https://www.backyardchickens.com/a/the-chick-shell-a has an awesome door to retrieve eggs. A similar idea was implemented to catch some of the nice breeze we get from the west thanks to Lake Michigan.
Currently the door gets closed at night. We are thinking of attaching hardware cloth to the inside so it can stay open around the clock. Unfortunately my husband was not part of the engineering for this hatch door so you will notice in the pic it is starting to sag. He will be looking into revamping this a little.
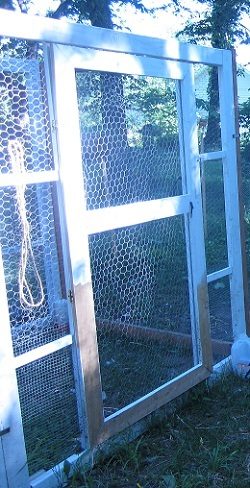
Cutting out the windows on the front and adding shutters for night time was an afterthought. The shutters have latches to keep out predators.
The arbor - at this time I am not sure if it is staying. This was originally built to be an enclosed run for the little store bought coop we started out with.
The pen around the chicken yard is temporary. It is planned that I will make panels --similar to cattle panels so that I can change up their foraging area so there will always be fresh grass and clover. Because we already had this it made more sense to use it temporarily opposed to building a gate.
Anyway it is a work in progress and something that a year ago I would have never thought I could plan out and help build. Thanks to all of the members here who have shared their knowledge and experience!!!
~A Work In Progress
This is our new coop. It is still in progress which is why you see the lumber and fencing in the background and why the arbor needs paint and lattice yet.
The plan was that the chicks would not move into here until it was finished but raccoon attacked their little coop (hadn't headed warnings about burying wire) and the two white chickens were having a hard time fitting thru the door it just made more sense to get them into their larger home now. Their inhabitance has slowed down some of the but it will get finished.
The design of this coop was inspired by so many of you here at BYC. And I can't thank you enough for your willingness to share, document and explain how you did what you did.
Firstly UrbanMama's coop here https://www.backyardchickens.com/a/urbanmamas-a-frame-chicken-coop
I loved the big 'people door' and wanted this BUT I got the different coops I was looking at confused with each other and thought her coop was made with all 8' boards. Knowing this I decided on a coop with a footprint of 8' x8'. With an angle around 32 percent (I think--hubby figured that part out) we got the coop about 6' tall inside.
Hubby built the back door aka the 'people door' which was so much better than what I would have come up with.
HeatherJ's coop here https://www.backyardchickens.com/a/heather-js-rooster-coop was the one with an 8' x 8' footprint and gave a lot of detailed info to help me with my inexperience do much of it without having to bother Steve. The fact she did all this by herself and in ONE day reminded me what an amatuer woodworker I am but this was a challenge I am so glad I took.
Our neighbor offered up some landscape timbers with long spikes that could be pounded into the ground. I laid them out and we started attaching the supports. My big error there was it was no longer a true 8x8 which ended up making my husband's job a bit more involved but we figured it out as we went along and like he said, I saved 4 new boards by using re-purposed ones that were headed for the burn pile.
Once the coop exterior was put together I started thinking of how I could make it look 'cottagey'. I love 'New Henstein Castle' so I decided we were definitely doing a flower box. The flower box was made out of some scrap firing straps, scrap 1x4 and some old crown moldings I found in the garage. It isn't deep enough for real flowers but that's fine since fake flowers are much easier to water and with a 3,100 square foot garden an acre away and four thirsty dogs, I haul enough water every day!
A google search of A Frame Cottages found me this picture http://www.flickr.com/photos/8283056@N03/623015110/in/faves-pumpkin_n/
and this photo: http://media-cdn.tripadvisor.com/media/photo-s/02/2b/8f/40/a-frame-cottage.jpg
so we began combining the two ideas. You will notice the front door on the coop is not trimmed out yet and is on my 'to do' list.
We have some hot spells so ventilation was a concern. The Chick Shell-A https://www.backyardchickens.com/a/the-chick-shell-a has an awesome door to retrieve eggs. A similar idea was implemented to catch some of the nice breeze we get from the west thanks to Lake Michigan.
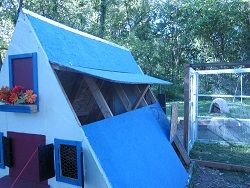
Currently the door gets closed at night. We are thinking of attaching hardware cloth to the inside so it can stay open around the clock. Unfortunately my husband was not part of the engineering for this hatch door so you will notice in the pic it is starting to sag. He will be looking into revamping this a little.
Cutting out the windows on the front and adding shutters for night time was an afterthought. The shutters have latches to keep out predators.

The arbor - at this time I am not sure if it is staying. This was originally built to be an enclosed run for the little store bought coop we started out with.
The pen around the chicken yard is temporary. It is planned that I will make panels --similar to cattle panels so that I can change up their foraging area so there will always be fresh grass and clover. Because we already had this it made more sense to use it temporarily opposed to building a gate.
Anyway it is a work in progress and something that a year ago I would have never thought I could plan out and help build. Thanks to all of the members here who have shared their knowledge and experience!!!