After getting several ideas on coop design I had decided to take on my own little project. For the most part I managed to scavenge most of the materials for my project, keeping down the price.
I decided on using 4x4's for the corners and framing out the walls using 2x2's and 2x3's. The over all size is 4 foot by 6 foot, with enough height to allow me to stand up in it. I'd planned out my cuts so that I would have zero waste on the corner posts.

I laid out the posts for the first wall and was content with the over all appearance. Next step was to frame out the floor. I'd used 2x4's and some deck brackets build the deck.
Next it was time for the flooring. I had managed to pick several scraps of plywood at a discount. These would be perfect for this project. Here I had begun framing the back wall. There will be a guillotine door for access to the run.
I had originally planned to frame out the side walls with 2x2's, but decided to go with 2x3's in order to make the inside walls flush. This way I can panel the inside and not have my chickens exposed to the pressure treated wood. I'd used the side walls to help tie in the roof beams.
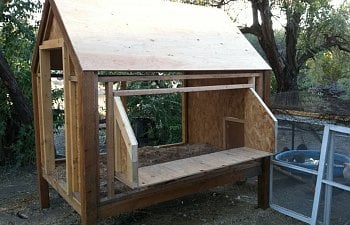
After finishing the framing we have moved the coop out doors. I had forgotten to take photos of several steps. But hopefully you can get the gist of how it went together. Latter on I will begin paneling the inside. More to come as things progress.
Today I've began working on the nesting boxes. I wasn't quite sure on how to proceed. I started by framing out a 5 foot opening on the wall. Then I attached the shelving extending 12 inches.
I found it easier to build the side walls by cutting the sheathing first, then attaching the frame work to it afterwards. Afterwards I cut the top points down so that it mounts flush with the header.
I decided on using 4x4's for the corners and framing out the walls using 2x2's and 2x3's. The over all size is 4 foot by 6 foot, with enough height to allow me to stand up in it. I'd planned out my cuts so that I would have zero waste on the corner posts.
I laid out the posts for the first wall and was content with the over all appearance. Next step was to frame out the floor. I'd used 2x4's and some deck brackets build the deck.
Next it was time for the flooring. I had managed to pick several scraps of plywood at a discount. These would be perfect for this project. Here I had begun framing the back wall. There will be a guillotine door for access to the run.
I had originally planned to frame out the side walls with 2x2's, but decided to go with 2x3's in order to make the inside walls flush. This way I can panel the inside and not have my chickens exposed to the pressure treated wood. I'd used the side walls to help tie in the roof beams.
After finishing the framing we have moved the coop out doors. I had forgotten to take photos of several steps. But hopefully you can get the gist of how it went together. Latter on I will begin paneling the inside. More to come as things progress.
Today I've began working on the nesting boxes. I wasn't quite sure on how to proceed. I started by framing out a 5 foot opening on the wall. Then I attached the shelving extending 12 inches.
I found it easier to build the side walls by cutting the sheathing first, then attaching the frame work to it afterwards. Afterwards I cut the top points down so that it mounts flush with the header.