Motivations: When I was a kid, we raised chickens for eggs to eat. It was the responsibility of my brother first, then me to take care of the chickens, feeding them daily, cleaning out their waterers and filling with fresh water, gathering the eggs, washing the eggs, and fending off predator dogs and such. I learned at that time to hate chickens because of their insistence on pooping on everything available -- eggs, waterer, nest box, roost poles and you if you stayed too long near them. But in my later life, I have for some strange reason been drawn back to fowl. In order to stay somewhat true to my dislike for chickens carried over from childhood, we decided raising guineas would be okay. They are not really chickens but they are fowl and I hope not foul. And, it turns out, we read that guineas will eat ticks (we have plenty this year), spiders (which I really hate) and various other bugs. So what benefits they bring!
Picking a coop design: We looked all over the internet for ideas but found that the best stuff was right here on Backyard Chickens. There are so many different designs to look at. We looked many of them over, then sort of came up with a combination of a few of them for our design. Being an engineer, my tendency normally is to draw a detailed scale design of anything I intend to build. In this case, however, I suppose I was in too much of a hurry. I just hand sketched out an basic concept, ran to Lowe's for materials, and started building. Here are the sketches:

Rough, agreed but it got the idea down on paper. From our later pictures, you'll see that there were several "field modifications" to the original plan but the basic concept did show up in the finished product. We read that you need 4 SF per bird. We started with five guineas and two ducks that that would be 28 SF of space needed. Knowing that the ducks were temporary occupants, we decided on the 4' x 6' size giving 24 SF, skimping just a little on the recommended space for the first few weeks. We also wanted something low maintenance and aesthetically pleasing. We decided on mostly treated pine materials, trex for the flooring, and vinyl siding so we didn't have to paint.
Construction:
Step 1: Layout We picked a location behind our existing barn. We wanted the guinea house to be near our backyard garden (flowers not vegetables) but somewhat out of the way. The area behind our barn was perfect -- not being used now but adjacent to what we call "Shade Garden No. 1". We oriented it parallel to our back property line, five feet inside our back fence line. This would give adequate space behind the coop for opening large doors on the back for cleaning out the coop -- my previous experience with chicken gave me a hint that guineas would also poop on everything.
Step 2: Posts and Flooring Now the hard work began -- using post hole diggers to dig four holes, each 2' deep in the exact locations to result in a square, properly aligned rectangular structure. Digging holes around our place is quite a challenge. First come roots from surrounding trees, then comes hard compacted clay-gravel that sets up almost like rock. The details of laying out the posts is a whole separate subject of construction techniques, probably not interesting to most of us. : ) After posts were in the ground, trex flooring was installed. The floor framing and flooring help to brace the four posts, keeping the structure rigidly square for the roof framing operation to follow. Here is what it looked like after this operation:
Step 3: Roofing Now some carpentry skills were needed to frame the roof. We had to decide on a roof slope for the guinea's overhead protection. We decided they deserved what we had on our people house -- 1 on 1 slope or 12/12 as roofers refer to it, meaning it goes down 12 inches for every 12 inches horizontally. Anyhow, once the slope was decided, I was off and running to cut rafters. I cut the more complicated end rafters first, with their notches for outlookers. After putting some temporary uprights to hold the ridge pole, I then added the end rafters. All the others were a piece of cake to cut so that went pretty quickly. Then I decked the roof with 1/2" plywood made for such a purpose -- this is the only material in the project that was not treated. It SHOULD never get wet so standard roof decking material is plenty adequate. Here is the developing project at this point:
Oh, and I forgot to point out, I used shingles left over from our home construction so they were free. I had too many anyway. I also used a ridge vent on the roof. Some folks might fault me for that but I am more concerned about heat than about cold here in Alabama. Feel free to let me know if I shouldn't have used a roof vent.
Step 4: Sides Now that we were done with the roof, I felt as though I about had this thing whipped. Now the work would all be more toward the ground where I could more easily reach it. I used 1/2" treated plywood for sheathing all over the sides, including on the next box on the North end of the coop. Here we are with the siding mostly done, ready for decorative stuff:
This is also a little better photo of the finished roof too, with ridge cap in place. Also the old builder is giving the Vana White presentation.
Another shot of the sides further along:
It's starting to actually look like something at this point!
Step 5: Decorative Vinyl Siding I had never applied any vinyl siding before, mostly because I don't much care for it but in this case we found a new color at Lowe's that happened to be almost exactly the same color as our existing barn. And, I just wanted something to make the coop look better without have to paint, so vinyl siding fit the bill just right. It was relatively easy to install, even for a novice such as me. Getting it applied to the arched top of the front door was something of a challenge but I just slit the J-mold about every 1-1/2 inches around the top and it conformed fairly well to the curve. Up close it doesn't look all that good but from a distance, it's fine. : )
Note also at this point that we have installed shingles same as the roof on the top of the nest box. Looking pretty good! Also, the posts in the foreground indicate that I have started construction of the run. That's a whole other story.
Step 6: The Run Our research indicated that the area of run needs to be about the same as the area inside the coop -- 4 SF per guinea. So that would have made the area under the house alone sufficient for the guinea's outdoor exercise needs but we thought if 4 SF was adequate, 9 SF per guinea would be glorious, so we decided to add an additional 36 SF more than the area under the coop by penning an area on the front. Layout of this area had an interesting evolution -- We were shooting for about an area equal to 6' x 6', but there was a big ole tree about 5' out from the front door of the coop. So, I thought, "I could 45 degree the side of the run out to miss the tree (and all the associated roots). That led to the thought that I could just make it a 6' x 6' parallelogram! What a deal! A geometric shape appealed to my engineering mind but my wife had serious doubts about it. But she was willing to give it a try. Thus, the story behind why we have a run in the shape of a parallelogram.
We installed six posts, two with 4x4's eight feet long, four with 2x4's eight feet long. Most of those are showing in the last photo above. Once I had them in the holes, I leveled and plumbed them, then set the 4x4's in concrete and just packed clay gravel around the 2x4's.
At this point a little story is appropriate. We bought our guineas at a flea market that is held in our county every Wednesday. There is always someone there selling ducks, geese, bantam chickens, and guineas. We had seen them a few times on periodic visits. This one Wednesday in early July, after reading that guineas ate ticks, etc, we couldn't resist buying five of them. The lady selling them had a deal for $20 if you bought five or $5 each if you bought less than five. She loaded them up into a cardboard box for us. Since the same lady was also selling ducks, we had her throw in two ducks for $4 each. We got them home and I cobbled together some hog wire I had on hand to make a sort of cage to keep them in. The first time I put two of the guineas in the cage, they just walked right out through the hog wire openings which were, obviously, too large to contain guineas. So, I doubled the wire around the inside, meshing it to half the opening size. They still got out of that though with a little more trouble. So, I put boards all around the inside of the cage and that did it. They couldn't get out. We watched them that evening for a good while, satisfied that they were happy, fed and safe. That night we had one of the most awful thunderstorms we had in a long time. My wife worried about the guineas getting wet all night. We did have a large piece of plywood across the top of our temporary cage so I was relatively at ease that they could withstand the storm. Next morning after the storm was gone and the sun had just come up, I trekked out to see how they fared. What? I counted only four guineas and two ducks! We are still not sure what happened to guinea number 5 but he was just gone. I read that they tend to sleep right up against the outside of their pen/cage/coop so I theorize that a plundering raccoon that we sometimes have, was able to scratch a little dirt away and reach under the cage side and pull out one of them. We saw no sign of the lost one so will never know what really happened. I kept hoping that perhaps out of the blue it would come pattering up all happy about the adventure it had that the other four missed. But, alas, I knew in my heart that it had gone to that big guinea house in the sky. : ) So, now you know (if you had the patience to read all this) why we only had four guineas when we bought five. After that night, we moved the temporary house for all the six remaining fowl to the box of our Kubota RTV. Covered with some netting, it made a great temporary space for them. Here they are in the RTV (my wife aptly named it Artie):
Armed with that fear that a raccoon snagged one of our innocent birds, I was determined that there would be no reaching under the side of the permanent run. So, I used a pickax and trenched all around the perimeter where the eventual hardware cloth would go. I trenched a mininum of six inches deep all around, installed the first round of 3' high hardware cloth, embedding it in the trench to the bottom. Then to be certain, I placed concrete all around filling about the bottom 3 inches of the trench, making sure it was enough to embed at least the bottom 2-3 inches of the hardware cloth. This made the entire bottom of the perimeter one unit so that the wire can't be pulled up to reach under. In addition to raccoons we have a problem with coyotes in our area so I figure that will thwart their threat as well. Here is a photo of the trenches with concrete:
Step 7: Finishing Touches With all that done there were still a few little things left. I built a gate/door for the run and installed hardware, attached the house door for guinea use and to lock them up at night if needed or lock them out for cleaning the house, latches and hardware on the nest box lid and back access doors. We put large doors on the back because my wife is a cleaning addict and has to always consider ways to make cleaning easier. Note that I didn't put vinyl siding on the back of the house because it would have been a pain to install with all the door hardware and besides, y'all won't be seeing the back anyhow. : ) We also installed two roosting poles (using 2x4's placed vertically after reading in-depth discussion of this here), and nest box dividers. Finally, the ramp from the yard into the house. That was a bit of a controversy between my wife and me. She says it looks goofy but I made the ramp parallel to the parallelogram of the run. Now I do have to admit, just between y'all and me, the guineas do tend to slide off because of its orientation but I have to uphold the case of men everywhere and hold the line that it is no worse than a straight ramp in that regard. Well, but, uh, the ducks can't seem to navigate the angled ramp at all. I foresee a fix in the near future for the ramp.
In summary, construction of the house took me right at a week, working mostly half days (well, I AM retired so I tend to go a little slower). I figure I have about 40 hours in the house. The run took only an additional 3 days or about 18 hours. It was a fun project. I think the guineas will enjoy it as we watch them on "Guinea TV" in their new house. I'm sorry to admit that this whole project cost a whopping $1,100. I don't suppose I could have purchased one for that but it seems like a pretty big hunk of money. I could have paid an exterminator to get rid of the bugs and spiders, I guess, but look at the hours of enjoyment we will get from watching "Guinea TV". Well worth it, I say.
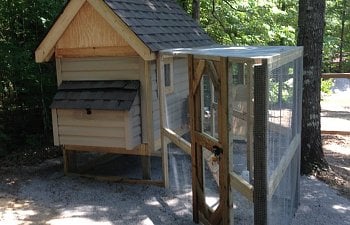
Adding the Guineas/Ducks We actually jumped the gun on this step a little, introducing the occupants before the run was complete. It was convenient to lock them into the house and we needed to be able to use our RTV as soon as we could get the birds out of it. So we put them in the house while we finished the run. Here are some photos of the completed house and run along with a few of the happy inhabitants:
That's about it for our story for now. We have four happy guineas and two happy ducks, safe from predators and learning to make this their home for years to come.
Modifications:
We had a couple of issues right off the bat. First, I had to admit my wife had a point about the ramp -- combine its steepness with the angle and the guineas had a little trouble using it. The ducks found it impossible to navigate and would not do so. Therefore, I had to come up with a better one. I added a perpendicular section (perpendicular to the house) at the start and then used my angled portion to be along the South side of the pen so that the fowl could not fall off on that side. Here is the modified ramp:
The length went from a total of 6' when it was just the angled ramp, to a total of 8' on the new ramp. With a total vertical distance of 24" from the ground to the door sill, that means it went from a 1 on 3 slope to a 1 on 4 slope. That seems to have made all the difference in the confidence level of the guineas and the ducks. Now both of them are willing to go up and down the ramp with no skidishness. The guineas will run up and down it just for fun now! So, I can highly recommend that your ramp slope be 1 on 4 (4 inches horizontal for every 1 inch vertically).
A second, simple addition was a door handle on the inside of the pen door. This allows anyone on the inside to open the door easily.
Picking a coop design: We looked all over the internet for ideas but found that the best stuff was right here on Backyard Chickens. There are so many different designs to look at. We looked many of them over, then sort of came up with a combination of a few of them for our design. Being an engineer, my tendency normally is to draw a detailed scale design of anything I intend to build. In this case, however, I suppose I was in too much of a hurry. I just hand sketched out an basic concept, ran to Lowe's for materials, and started building. Here are the sketches:
Rough, agreed but it got the idea down on paper. From our later pictures, you'll see that there were several "field modifications" to the original plan but the basic concept did show up in the finished product. We read that you need 4 SF per bird. We started with five guineas and two ducks that that would be 28 SF of space needed. Knowing that the ducks were temporary occupants, we decided on the 4' x 6' size giving 24 SF, skimping just a little on the recommended space for the first few weeks. We also wanted something low maintenance and aesthetically pleasing. We decided on mostly treated pine materials, trex for the flooring, and vinyl siding so we didn't have to paint.
Construction:
Step 1: Layout We picked a location behind our existing barn. We wanted the guinea house to be near our backyard garden (flowers not vegetables) but somewhat out of the way. The area behind our barn was perfect -- not being used now but adjacent to what we call "Shade Garden No. 1". We oriented it parallel to our back property line, five feet inside our back fence line. This would give adequate space behind the coop for opening large doors on the back for cleaning out the coop -- my previous experience with chicken gave me a hint that guineas would also poop on everything.
Step 2: Posts and Flooring Now the hard work began -- using post hole diggers to dig four holes, each 2' deep in the exact locations to result in a square, properly aligned rectangular structure. Digging holes around our place is quite a challenge. First come roots from surrounding trees, then comes hard compacted clay-gravel that sets up almost like rock. The details of laying out the posts is a whole separate subject of construction techniques, probably not interesting to most of us. : ) After posts were in the ground, trex flooring was installed. The floor framing and flooring help to brace the four posts, keeping the structure rigidly square for the roof framing operation to follow. Here is what it looked like after this operation:
Step 3: Roofing Now some carpentry skills were needed to frame the roof. We had to decide on a roof slope for the guinea's overhead protection. We decided they deserved what we had on our people house -- 1 on 1 slope or 12/12 as roofers refer to it, meaning it goes down 12 inches for every 12 inches horizontally. Anyhow, once the slope was decided, I was off and running to cut rafters. I cut the more complicated end rafters first, with their notches for outlookers. After putting some temporary uprights to hold the ridge pole, I then added the end rafters. All the others were a piece of cake to cut so that went pretty quickly. Then I decked the roof with 1/2" plywood made for such a purpose -- this is the only material in the project that was not treated. It SHOULD never get wet so standard roof decking material is plenty adequate. Here is the developing project at this point:
Oh, and I forgot to point out, I used shingles left over from our home construction so they were free. I had too many anyway. I also used a ridge vent on the roof. Some folks might fault me for that but I am more concerned about heat than about cold here in Alabama. Feel free to let me know if I shouldn't have used a roof vent.
Step 4: Sides Now that we were done with the roof, I felt as though I about had this thing whipped. Now the work would all be more toward the ground where I could more easily reach it. I used 1/2" treated plywood for sheathing all over the sides, including on the next box on the North end of the coop. Here we are with the siding mostly done, ready for decorative stuff:
This is also a little better photo of the finished roof too, with ridge cap in place. Also the old builder is giving the Vana White presentation.
Another shot of the sides further along:
It's starting to actually look like something at this point!
Step 5: Decorative Vinyl Siding I had never applied any vinyl siding before, mostly because I don't much care for it but in this case we found a new color at Lowe's that happened to be almost exactly the same color as our existing barn. And, I just wanted something to make the coop look better without have to paint, so vinyl siding fit the bill just right. It was relatively easy to install, even for a novice such as me. Getting it applied to the arched top of the front door was something of a challenge but I just slit the J-mold about every 1-1/2 inches around the top and it conformed fairly well to the curve. Up close it doesn't look all that good but from a distance, it's fine. : )
Note also at this point that we have installed shingles same as the roof on the top of the nest box. Looking pretty good! Also, the posts in the foreground indicate that I have started construction of the run. That's a whole other story.
Step 6: The Run Our research indicated that the area of run needs to be about the same as the area inside the coop -- 4 SF per guinea. So that would have made the area under the house alone sufficient for the guinea's outdoor exercise needs but we thought if 4 SF was adequate, 9 SF per guinea would be glorious, so we decided to add an additional 36 SF more than the area under the coop by penning an area on the front. Layout of this area had an interesting evolution -- We were shooting for about an area equal to 6' x 6', but there was a big ole tree about 5' out from the front door of the coop. So, I thought, "I could 45 degree the side of the run out to miss the tree (and all the associated roots). That led to the thought that I could just make it a 6' x 6' parallelogram! What a deal! A geometric shape appealed to my engineering mind but my wife had serious doubts about it. But she was willing to give it a try. Thus, the story behind why we have a run in the shape of a parallelogram.
We installed six posts, two with 4x4's eight feet long, four with 2x4's eight feet long. Most of those are showing in the last photo above. Once I had them in the holes, I leveled and plumbed them, then set the 4x4's in concrete and just packed clay gravel around the 2x4's.
At this point a little story is appropriate. We bought our guineas at a flea market that is held in our county every Wednesday. There is always someone there selling ducks, geese, bantam chickens, and guineas. We had seen them a few times on periodic visits. This one Wednesday in early July, after reading that guineas ate ticks, etc, we couldn't resist buying five of them. The lady selling them had a deal for $20 if you bought five or $5 each if you bought less than five. She loaded them up into a cardboard box for us. Since the same lady was also selling ducks, we had her throw in two ducks for $4 each. We got them home and I cobbled together some hog wire I had on hand to make a sort of cage to keep them in. The first time I put two of the guineas in the cage, they just walked right out through the hog wire openings which were, obviously, too large to contain guineas. So, I doubled the wire around the inside, meshing it to half the opening size. They still got out of that though with a little more trouble. So, I put boards all around the inside of the cage and that did it. They couldn't get out. We watched them that evening for a good while, satisfied that they were happy, fed and safe. That night we had one of the most awful thunderstorms we had in a long time. My wife worried about the guineas getting wet all night. We did have a large piece of plywood across the top of our temporary cage so I was relatively at ease that they could withstand the storm. Next morning after the storm was gone and the sun had just come up, I trekked out to see how they fared. What? I counted only four guineas and two ducks! We are still not sure what happened to guinea number 5 but he was just gone. I read that they tend to sleep right up against the outside of their pen/cage/coop so I theorize that a plundering raccoon that we sometimes have, was able to scratch a little dirt away and reach under the cage side and pull out one of them. We saw no sign of the lost one so will never know what really happened. I kept hoping that perhaps out of the blue it would come pattering up all happy about the adventure it had that the other four missed. But, alas, I knew in my heart that it had gone to that big guinea house in the sky. : ) So, now you know (if you had the patience to read all this) why we only had four guineas when we bought five. After that night, we moved the temporary house for all the six remaining fowl to the box of our Kubota RTV. Covered with some netting, it made a great temporary space for them. Here they are in the RTV (my wife aptly named it Artie):
Armed with that fear that a raccoon snagged one of our innocent birds, I was determined that there would be no reaching under the side of the permanent run. So, I used a pickax and trenched all around the perimeter where the eventual hardware cloth would go. I trenched a mininum of six inches deep all around, installed the first round of 3' high hardware cloth, embedding it in the trench to the bottom. Then to be certain, I placed concrete all around filling about the bottom 3 inches of the trench, making sure it was enough to embed at least the bottom 2-3 inches of the hardware cloth. This made the entire bottom of the perimeter one unit so that the wire can't be pulled up to reach under. In addition to raccoons we have a problem with coyotes in our area so I figure that will thwart their threat as well. Here is a photo of the trenches with concrete:
Step 7: Finishing Touches With all that done there were still a few little things left. I built a gate/door for the run and installed hardware, attached the house door for guinea use and to lock them up at night if needed or lock them out for cleaning the house, latches and hardware on the nest box lid and back access doors. We put large doors on the back because my wife is a cleaning addict and has to always consider ways to make cleaning easier. Note that I didn't put vinyl siding on the back of the house because it would have been a pain to install with all the door hardware and besides, y'all won't be seeing the back anyhow. : ) We also installed two roosting poles (using 2x4's placed vertically after reading in-depth discussion of this here), and nest box dividers. Finally, the ramp from the yard into the house. That was a bit of a controversy between my wife and me. She says it looks goofy but I made the ramp parallel to the parallelogram of the run. Now I do have to admit, just between y'all and me, the guineas do tend to slide off because of its orientation but I have to uphold the case of men everywhere and hold the line that it is no worse than a straight ramp in that regard. Well, but, uh, the ducks can't seem to navigate the angled ramp at all. I foresee a fix in the near future for the ramp.
In summary, construction of the house took me right at a week, working mostly half days (well, I AM retired so I tend to go a little slower). I figure I have about 40 hours in the house. The run took only an additional 3 days or about 18 hours. It was a fun project. I think the guineas will enjoy it as we watch them on "Guinea TV" in their new house. I'm sorry to admit that this whole project cost a whopping $1,100. I don't suppose I could have purchased one for that but it seems like a pretty big hunk of money. I could have paid an exterminator to get rid of the bugs and spiders, I guess, but look at the hours of enjoyment we will get from watching "Guinea TV". Well worth it, I say.
Adding the Guineas/Ducks We actually jumped the gun on this step a little, introducing the occupants before the run was complete. It was convenient to lock them into the house and we needed to be able to use our RTV as soon as we could get the birds out of it. So we put them in the house while we finished the run. Here are some photos of the completed house and run along with a few of the happy inhabitants:
That's about it for our story for now. We have four happy guineas and two happy ducks, safe from predators and learning to make this their home for years to come.
Modifications:
We had a couple of issues right off the bat. First, I had to admit my wife had a point about the ramp -- combine its steepness with the angle and the guineas had a little trouble using it. The ducks found it impossible to navigate and would not do so. Therefore, I had to come up with a better one. I added a perpendicular section (perpendicular to the house) at the start and then used my angled portion to be along the South side of the pen so that the fowl could not fall off on that side. Here is the modified ramp:
The length went from a total of 6' when it was just the angled ramp, to a total of 8' on the new ramp. With a total vertical distance of 24" from the ground to the door sill, that means it went from a 1 on 3 slope to a 1 on 4 slope. That seems to have made all the difference in the confidence level of the guineas and the ducks. Now both of them are willing to go up and down the ramp with no skidishness. The guineas will run up and down it just for fun now! So, I can highly recommend that your ramp slope be 1 on 4 (4 inches horizontal for every 1 inch vertically).
A second, simple addition was a door handle on the inside of the pen door. This allows anyone on the inside to open the door easily.