(this page is under construction!)Our First Chickens and Coop
Scroll down for more pictures
We have 11 chickens (soon to be 8) that we keep for eggs. The 3 older girls are laying now, the 8 younger ones (by one month) are due to start laying soon.
This is the coop after it was built but before it was painted:

This is the "back", and the eggs are accessed from the door. Originally the plan was to access the eggs from the outside but the elevation of the coop and general logistics made that inconvenient.
All windows have hardware cloth over them to keep out critters. The feed is located inside (wall mounted) and there is a 3 gallon nipple waterer inside and a 5 gallon waterer outside (see below for pictures).
At this point, in August 2010, I have cleaned the coop once (meaning all bedding removed and walls and floor washed) and all 11 have been in there since May 2010.
There is little I would change regarding the design of the coop. The elevated coop prevents rodents from setting up house underneath the coop and it provides a great deal of shade in the heat of the day and it's much easier to clean out with the elevated floor.
Planning of Coop Placement:
1. Establishing the number of chickens we would have determined the size of the coop, the coop is 4'x8'.
2. We removed a large pine tree that was shading a veggie garden and placed the coop in that spot.
3. The back of the coop (with a large window) faces east, this floods the coop with light and in turn, the coop shades the run. As the sun progresses westward, the trees on the south that border our lot shade the coop and run. Eventually the area is almost completely shaded toward mid-afternoon. It has worked out surprisingly well especially with our month-long run of 100+ degree heat.
4. The run was extended and this extension was unfortunately full sun most of the day. A pumpkin/squash vine was trained up this extension and now provides a very good supply of dappled shade.
Coop Management/Set-up:
Simple maintenance was a requirement. This meant a secure coop to avoid having to open/lock the pop door every day, twice a day, a large feeder to minimize filling, poop trays to minimize bedding clean-outs and large waterers (nipples are the answer!!).
1. Coop and run are integrated so the run is very secure. Pop doors remain open all the time so the girls come and go as they want.
2. There is a 2 foot apron around the ground (1/2" hardware cloth) to prevent diggers.
3. The entire inside is painted with exterior high-gloss paint and the cleanup is EASY.
4. The nest boxes were specifically located next to the door and NOT the window as this area would be darkest. In addition, it is the southeast wall so it stays quite dark in the cubbies, a bonus when you want the eggs to go in the nest boxes. Painting a darker color helps as well.
5. The roost is removable for easier cleaning.
6. There are poop trays to catch the majority of the poop. It's stunning really, how much they poop.
7. The 10lb. feeder is wall mounted to maximize available floor space and the 3 gallon waterer is hung in a corner for the same reason.
8. There is 32 square feet of unobstructed walking space on the coop floor with ~3-4" of pine shavings (about 1/2 bale).
9. There are 3 nest boxes for 11 chickens, I would not do any more simply because the 3 girls laying right now all use the same box.
General Maintenance:
I scoop the poop tray a few times a week, it takes literally less than 5 minutes and one of the girls always comes in to check on me and see what I'm up to--sqwuaks at me a few times. Removing the poop more frequently helps with odor management. Stall-Dri is in the poop tray and acts as a dessicant to facilitate drying of the poop (I don't want to scoop wet poop which is why I avoided the poop BOARDS, ick). Food storage is OUTSIDE the coop in a metal seed bin from TSC, there is enough room for a bucket of home-made scratch and their oyster shell and grit.
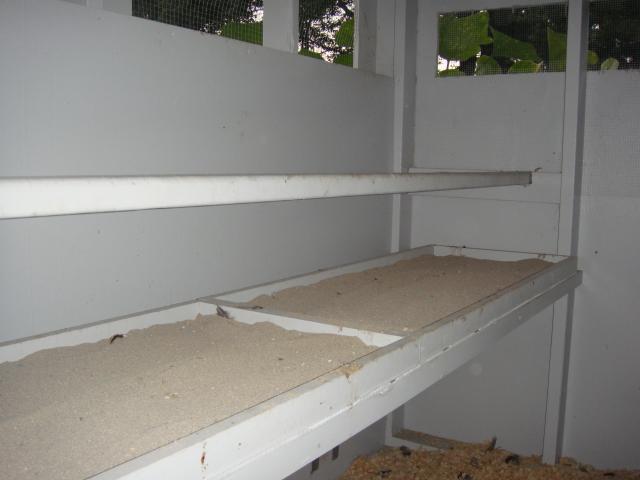
Poop Tray under roost, filled with Stall-Dri:
Feed storage bin outside: Five gallon Little Giant waterer converted to nipples:
Wall mounted feeder (holds 10lbs)
and nipple waterer in the back corner:
Run Maintenance and set-up:
The run originally was 13'x8' and adequate for the 4 (one rooster who had to go) older chickens. Originally, we had just the normal dirt/clay that's in our yard. We added the 8 other girls and expanded the run to 15'x13' but after a couple of months I noticed that there was a certain ODOR. I would periodically use a pitchfork to loosen the compacted dirt but it would immediately compact again. Since bad smells are not allowed from my pets, we ordered bulk Leaf-Gro (which is a compost of strictly leaves collected by Maryland counties from residents and turned into a commercial product). It is SO loose and easy to rake that the smell has completely disappeared even if it has rained. I used 2-3 inches of the Leaf-Gro in the entire run area and added sand and wood-ashes under the coop area as that is the one area that stays dry all the time and can always be used for dust bathing.
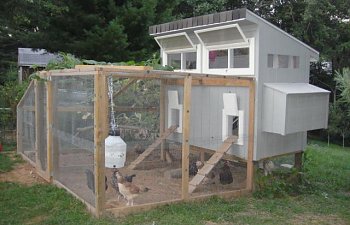
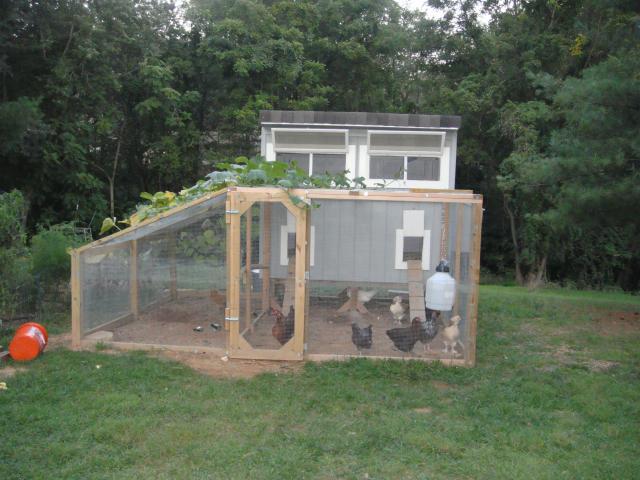
Coop and run BEFORE run expansion:
AFTER expansion:
There is also a roost (tree branch) in the run for extra fun for them. You can also see the Leaf-Gro that's in there--nice loose dirt for them. I use the dog food dish to put some of their scraps into.
Dimensions of coop and run: before expansion: 8'x13', after: 15'x13', **********height of coop elevation: add this!
Window square footage: All windows add up to 13.5 sq. ft. The recommended ventilation is 1sq ft per chicken, if they are confined to the coop I believe. In addition to the windows, there is also 8sq ft of eave ventilation, which makes it 21.5 sq. ft in the coop. The chickens are always outside unless they are sleeping or laying eggs, mine are never confined. There is one window that would allow cold drafts onto the girls at night during the winter, so when I close that window I will still have 18 sqft of ventilation for either 11 or 8 chickens.
************Changes: run expanded, hay instead of straw in nest boxes.
Welsummer in the nest box: Welsummer egg, the dark one!
Scroll down for more pictures
We have 11 chickens (soon to be 8) that we keep for eggs. The 3 older girls are laying now, the 8 younger ones (by one month) are due to start laying soon.
This is the coop after it was built but before it was painted:
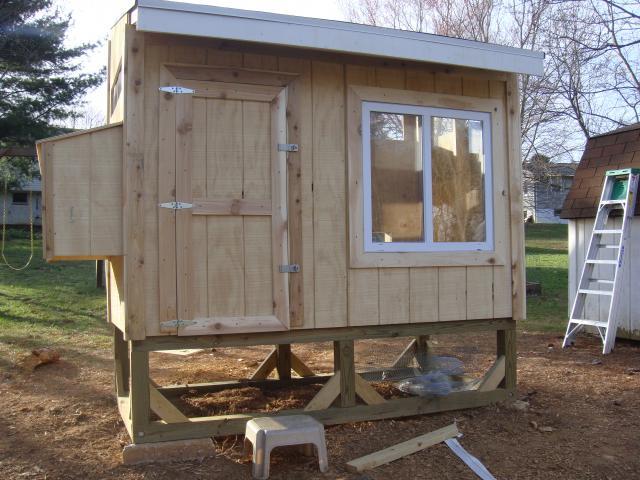
This is the "back", and the eggs are accessed from the door. Originally the plan was to access the eggs from the outside but the elevation of the coop and general logistics made that inconvenient.
All windows have hardware cloth over them to keep out critters. The feed is located inside (wall mounted) and there is a 3 gallon nipple waterer inside and a 5 gallon waterer outside (see below for pictures).
At this point, in August 2010, I have cleaned the coop once (meaning all bedding removed and walls and floor washed) and all 11 have been in there since May 2010.
There is little I would change regarding the design of the coop. The elevated coop prevents rodents from setting up house underneath the coop and it provides a great deal of shade in the heat of the day and it's much easier to clean out with the elevated floor.
Planning of Coop Placement:
1. Establishing the number of chickens we would have determined the size of the coop, the coop is 4'x8'.
2. We removed a large pine tree that was shading a veggie garden and placed the coop in that spot.
3. The back of the coop (with a large window) faces east, this floods the coop with light and in turn, the coop shades the run. As the sun progresses westward, the trees on the south that border our lot shade the coop and run. Eventually the area is almost completely shaded toward mid-afternoon. It has worked out surprisingly well especially with our month-long run of 100+ degree heat.
4. The run was extended and this extension was unfortunately full sun most of the day. A pumpkin/squash vine was trained up this extension and now provides a very good supply of dappled shade.
Coop Management/Set-up:
Simple maintenance was a requirement. This meant a secure coop to avoid having to open/lock the pop door every day, twice a day, a large feeder to minimize filling, poop trays to minimize bedding clean-outs and large waterers (nipples are the answer!!).
1. Coop and run are integrated so the run is very secure. Pop doors remain open all the time so the girls come and go as they want.
2. There is a 2 foot apron around the ground (1/2" hardware cloth) to prevent diggers.
3. The entire inside is painted with exterior high-gloss paint and the cleanup is EASY.
4. The nest boxes were specifically located next to the door and NOT the window as this area would be darkest. In addition, it is the southeast wall so it stays quite dark in the cubbies, a bonus when you want the eggs to go in the nest boxes. Painting a darker color helps as well.
5. The roost is removable for easier cleaning.
6. There are poop trays to catch the majority of the poop. It's stunning really, how much they poop.
7. The 10lb. feeder is wall mounted to maximize available floor space and the 3 gallon waterer is hung in a corner for the same reason.
8. There is 32 square feet of unobstructed walking space on the coop floor with ~3-4" of pine shavings (about 1/2 bale).
9. There are 3 nest boxes for 11 chickens, I would not do any more simply because the 3 girls laying right now all use the same box.
General Maintenance:
I scoop the poop tray a few times a week, it takes literally less than 5 minutes and one of the girls always comes in to check on me and see what I'm up to--sqwuaks at me a few times. Removing the poop more frequently helps with odor management. Stall-Dri is in the poop tray and acts as a dessicant to facilitate drying of the poop (I don't want to scoop wet poop which is why I avoided the poop BOARDS, ick). Food storage is OUTSIDE the coop in a metal seed bin from TSC, there is enough room for a bucket of home-made scratch and their oyster shell and grit.
Poop Tray under roost, filled with Stall-Dri:
Feed storage bin outside: Five gallon Little Giant waterer converted to nipples:


Wall mounted feeder (holds 10lbs)
and nipple waterer in the back corner:

Run Maintenance and set-up:
The run originally was 13'x8' and adequate for the 4 (one rooster who had to go) older chickens. Originally, we had just the normal dirt/clay that's in our yard. We added the 8 other girls and expanded the run to 15'x13' but after a couple of months I noticed that there was a certain ODOR. I would periodically use a pitchfork to loosen the compacted dirt but it would immediately compact again. Since bad smells are not allowed from my pets, we ordered bulk Leaf-Gro (which is a compost of strictly leaves collected by Maryland counties from residents and turned into a commercial product). It is SO loose and easy to rake that the smell has completely disappeared even if it has rained. I used 2-3 inches of the Leaf-Gro in the entire run area and added sand and wood-ashes under the coop area as that is the one area that stays dry all the time and can always be used for dust bathing.
Coop and run BEFORE run expansion:
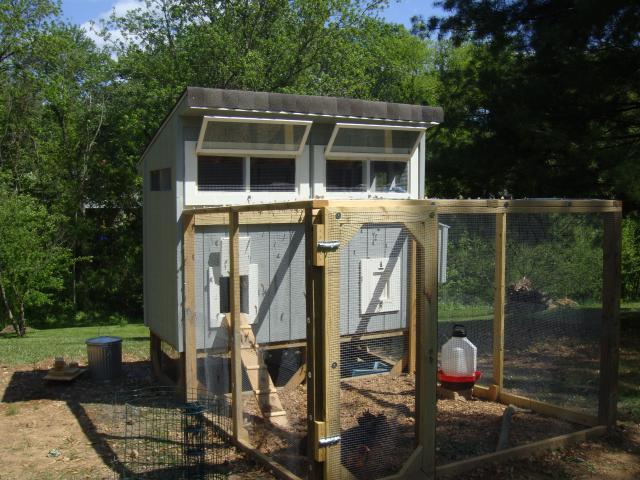
AFTER expansion:
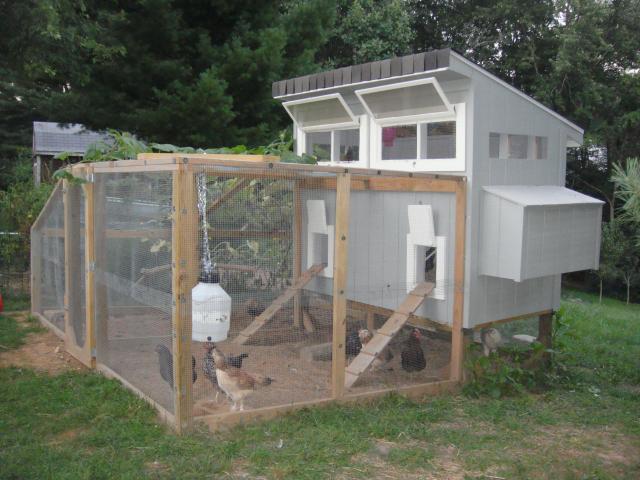
There is also a roost (tree branch) in the run for extra fun for them. You can also see the Leaf-Gro that's in there--nice loose dirt for them. I use the dog food dish to put some of their scraps into.

Dimensions of coop and run: before expansion: 8'x13', after: 15'x13', **********height of coop elevation: add this!
Window square footage: All windows add up to 13.5 sq. ft. The recommended ventilation is 1sq ft per chicken, if they are confined to the coop I believe. In addition to the windows, there is also 8sq ft of eave ventilation, which makes it 21.5 sq. ft in the coop. The chickens are always outside unless they are sleeping or laying eggs, mine are never confined. There is one window that would allow cold drafts onto the girls at night during the winter, so when I close that window I will still have 18 sqft of ventilation for either 11 or 8 chickens.
************Changes: run expanded, hay instead of straw in nest boxes.
Welsummer in the nest box: Welsummer egg, the dark one!