This is a hybrid design, based on the ever-popular Wichita Cabin Coop and the Playhouse Coop. Originally, I was going to downsize the Cabin Coop, but due to the available space I was working with, the orientation of the coop and the shed roof weren't a good combination. Because I wanted to put the door on the short side, the Playhouse roof worked better, but I liked the coop part of the Cabin design and decided to combine the two.
The enclosed run is roughly 4' x 8', while the coop where our four ladies sleep is 3' x 4' and is outfitted with a Pullet-Shut Automatic Door (highly recommended) that's activated by a light sensor.
The front door opens into our fenced-in garden area, but there's also a pet door (minus the flap) in the back that can be opened to provide access to a separate fenced-in outdoor run behind the garden area (see the two photos above of the back of the coop -- the first shows the door open and the other shows it closed).
The nest box is on the inside of the enclosed run. There are a few reasons I chose to put it there instead of outside on the back, but the main one is because of the wind. The back of the coop faces north, where most of our winds come from, especially during the cold months. It just seemed like a better idea to put it on the south side so the coop blocks the wind and the roof protects it from precipitation.
One of the smarter things I did was put hinges on the bottom panel of the nest box, so when it's time to clean it out, all I have to do is release two latches and the panel swings down, making it easy to clean.
Just for the record, though, if you're looking for an inexpensive coop design, this isn't it. There's an insane amount of wood in this thing.
The following pictures show the coop at various stages as it was being built.
First came site preparation. The 2x4 frame serves a couple of purposes. Once it was leveled, it was used to then level the gravel that was placed around it using a long 2x4 with another piece of wood nailed to one end of it, so that the level of the gravel was the desired distance below the top of the frame. A later photo will show how the frame was used to position the cement blocks that form the foundation for the coop.
Next, sand was poured over the gravel, which was likewise leveled with a thinner piece of wood nailed to the end of the long 2x4. The sand makes it easy to get the blocks even with each other.
Then the cement blocks were positioned around the frame. The blocks on the two left corners were subsequently cut to the desired length.
Mulch was then added to help hold the gravel in place. Later, I added metal edging around the perimeter of the blocks as an added measure to keep the gravel from migrating from under the blocks. That edging can be seen in the first few photos of this post.
Next, I started building the frame.
Next came the framing for the floor of the coop.
I'm missing a few steps photo-wise, but this shows framing for the windows.
I primed as I went, and kept it covered with a tarp when I wasn't working on it. Here, one of our cats is enjoyng the view from the top of the coop.
The coops exterior walls consist of tongue and groove boards. I started at the bottom, with the tongue pointing up.
The back wall is done.
It works better to install the hardware cloth first.
The 1/2" hardware cloth is always sandwiched between boards.
Two walls nearly complete. Note the corner where the two walls meet. They don't butt against each other. This is intentional. A 2x2 will be fitted into that corner notch. Each corner of the coop is done this way.
More sandwiching of the hardware cloth. Those clamps are a lifesaver.
Jumping ahead, the third wall is done and paint is being applied. The big gap is where the nest box and automatic door will go.
And more hardware cloth goes up.
A lot of progress has been made, but there's still a long way to go. I started this project in May. At this point, it's early August. By mid-October it will be just about complete. It will be ready enough for our four birds to move into when they're feathered out, but there will still be some detail work left to do even then
And here are our ladies the first day we met them in late August.
Next, the coop door was installed.
And the automatic door and window frames.
And the nest box and the framing for the roof.
The inside of the coop.
The roof goes on.
The gables and the door.
Windows and the ramp.
The gutters.
The ladies move in.
Their evening accommodations...
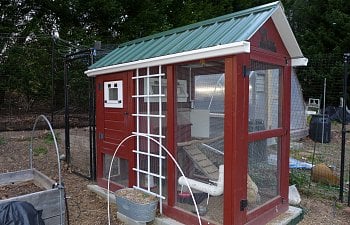
The coop and its surroundings.
And the ladies. Rue and Samantha (Sam)
Henrietta...
Ebony and Sam...
Sam...
The birds are always a big hit with visitors...