I am a newbie to chicken raising since I purchased my first chickens in August 2012. I have 4 hatchery Plymouth Partridge Rocks.
I originally purchased one of those cute prefabricated chicken coops that state they will house between 4-6 chickens.(they were stretching the truth on that) I then attached an enclosed 4x8 run out of lattice work.
As soon as the 4 hens started growing I realized they needed a bigger coop. There is no way 4 LF hens can fit in there comfortably.

So then after being on this forum I realized a hoop coop is what I needed. Others had put them together simply and it didn't take someone with construction knowledge to make. I am a female who is 5'2" so it needed to be simple")
I have also enclosed pictures of most of the steps. I am a visual person & I know I like pictures of a projects process & I think others do as well.
Tools needed:
-cordless drill
-bolt cutters
-wire snips
-saw
Supplies I used:
- (3) cattle panels 4'x16'
- (1) roll welded wire 48" x 100'
- (4) 2x4s
- (2) 1x3s
- (5) 2x2s
- (1) white tarp 10'x20' Heavy duty, waterproof, mildew resistant, Attic proof
- (1) box fence staples
- (1) roll Gorilla duct tape (suppose to be stickier & weather proof)
- Zip Ties LOTS & LOTS
- screws- I used 1" & 1/2" screws
- plastic cable fasteners
-plastic strapping
- (8) U connectors
-1 old aluminum screen door
-waterproof silicone
-2 re purposed plastic roof vents
-6 attic/gable flat vents
- 2 gallons roof tar
I started by attaching 2 of the cattle panels to the 2x4s with fencing staples
Then after the cattle panels were attached to the 2x4s at each long end I then attached the 1x3s to the center of the panels. I initially did this to put clear plastic at the top but in the end it gave me an extra spot to attach things and increase the stability of the coop
The next step with the help of my best friend was to take the other 2x4s and connect them all to make the *hoop*. We also put supports in each corner to help keep it together. The total square is 8'x8'
Next up was to put take the last cattle panel and cut it to fit the rear and front of the hoop coop.I attached the cattle panels to each other with metal u clips and zip ties.. the U clips gave it more strength. I then covered the cattle panels with smaller welded wire fencing from ground level to the the top of the hoop coop. I attached the welded wire to the cattle panels with zip ties. I used plastic & metal cable ties to attach the cattle panels to the wood frame. Especially handy when I had to cut holes for the pop doors.
My best friend then framed out the area for the screen door for me using 2x2's and made the frame the length of the front of the coop again for more stability.
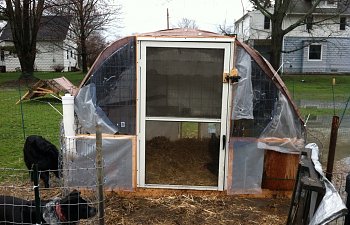
We then attached the door and then moved the hoop coop to the area where it will remain. I left the glass in the door so it will offer protection from weather. I also added a slide latch to the door to make sure it stays closed and it is up high enough so its predator proof.
We leveled the coop with a few old 2x4's at the front since the area is unlevel. Next up was to put the tarp on. The tarp was 10' x 20'. I put it over the coop frame and then attached it with zip ties. I didn't like how it looked so I ended up cutting it so it followed the hoop coop frame better and used the extra pieces to fill in the back and sides.
I attached the back walls of the tarp using zip ties and bungee cords and 4 tarp clips. The part that hangs over from the top I want to be able to roll us during the warmer weather for greater ventilation. The piece you see in the middle above the pop door will stay to help with shade and keep rain out.
Since I know how important ventilation is to keep it cool during the summer & keep moisture down during the winter to prevent frostbite I added several vents. These black plastic roof vents were re purposed from when I had a new roof put on my house. I initially secured them with zip ties to the cattle panels underneath using zip ties. I then used waterproof silicone to try and plug the holes for the zip ties to prevent leaks inside. Didnt work well so I ended up using roof tar on the outside around the vents. I just put the tar over the duct tape, zip ties & silicone I tried first. The tar worked awesome & I am happy to say no more leaks
Here is the vent on the top of the coop.
Here is the vent looking at it from inside the coop. I cut out the opening after attaching the vent.I immediately felt the fresh air from outside and noticed later that the temp in the coop seemed to decrease.
Roof vents with the tar around the edges. The tar plugged the few holes that were leaking and now the inside of the coop is dry
`
Side vents that I put lower down along the side where rain wont come directly in. I put silicone around the edges & zip tie slits & the covered with gorilla duct tape. Inside & outside.
When I put the tarp on I left space at the bottom ventilation. Unfortunately the east side I cut to much off and the south end (back) the piece didn't go down far enough. So I took the extra piece I had cut off and attached it from the inside using zip ties. A couple pieces of the tarp still had the attachment holes for zip ties but some didn't. On the parts that didn't have holes I used Gorilla duct tape down the length to reinforce the tarp then cut slits in it & then used zip ties to attach to the cattle panels. For the bottoms of the side pieces I used Gorilla tape at about 2 inch intervals on the tarp and then used screws to fasten the tarp to scrap pieces of wood to hold it down. I used the scrap wood so that I could roll up theses side pieces during warmer weather for ventilation.
Next up was the frames for the automatic pop door. I wanted a frame on each end of the coop. The south end the door will be there for the warmer weather. The north end will be for winter when they have access to the enclosed vegetable garden area. When one of the doorways is not being used it will be covered with a piece of wood on hinges so that it can still be opened if needed.
Lily checking out the new pop door
The pop door on the right is covered by wood.
Here are a few pics of the pop door I purchased. Its battery powered with a solar panel to charge the battery. It also has a light sensor so that it will open at dawn & close at dusk without me needing to adjust the times with daylight savings and shorter/longer days.
I used an old plastic container I had to store the battery & wires. Drilled 3 holes in it to attach it with zip ties to the cattle panel. And one hole on the side for the wires to go into the container. (Its sitting on the frame of the pop door) I then ran the wires for the light sensor out under the edge of the tarp and attached the wires and sensor on the outside of the coop with zip ties right outside the pop door high enough to keep it out of the snow & away from curious chickens (I hope)
The solar panel was attached to a scrap piece of wood with hard as nails adhesive and the wood was then attached to the roof of the coop on the south end using zip ties. I then siliconed around the edges and in the zip tie slits to prevent water getting in. And then later used roofing tar to put around the wooden edges and on top of holes where zip ties are and it has prevented any more leaks inside.
Solar panel on roof
Inside looking up to where the solar panel was attached. More silicone and gorilla tape to keep weather out.
I then set up the inside of the coop. The roosts were made out of an old wood branch I had and an old 2x4 someone had out for trash day. I attached the roosts to the cattle panels using plastic strapping tape normally used to hold PVC pipes up.
Next up was the nesting boxes. I saw some nesting boxes advertised on BYC that gave me ideas on how to make some but for free instead of $50. The shelf someone had out for trash, the plastic litter boxes were from my best friend and the milk crate I had. The perches were made from scrap lumber I had already. The milk crate & plastic boxes were attached with screws. And the shelf was secured to the cattle panels with more plastic strapping.
I filled them with some wood ash & shavings.
***I removed the milk crate since the girls never used it. I now store the FF on the top shelf with an extra gallon of water for when I need to make more. Makes it easier at feeding time to have everything in one place
I hung a suet holder with their homemade suet next to the water-er along with their treat ball filled with Oat hay.
Here you can see their oyster shell in a drywall pan. I took one drywall pan & drilled 3 holes on one side and attached it to the cattle panel with zip ties. Its up high enough to not get rain in it and to also keep the DL out of it when the chickens are in there scratching.
Here is the area above the door that was open. I took some heavy duty plastic and taped it down to the canvas & then stapled the other side to the wood frame so that its smooth & will keep the rain & snow out.
Here is a picture of the coop finished. This is the north end (facing the house) Normally the wind doesn't come from this direction. There are plastic window well covers covering the top half of this end. They are the perfect shape to keep out rain yet still allow ventilation.
****Plastic on bottom half has been removed for summer & I opened the window on the door as well. I only close it if its raining and getting into the coop but that is rare since this is not the prevailing wind side of the coop.
****05/24/13
Today I attached hardware cloth to the bottom half of coop at the south end. It is not protected by the electric netting. I used staples and zip ties
***The girls were moved into their hoop coop mid April. All is working well. Torrential rain for several days showed me what I needed to tweak to keep the interior dry. Even after some late snow in April the hens were still happy, healthy & draft free and keeping themselves toasty warm.
I might add another tarp on top of the white one next winter as more protection against the winds. But the white tarp is heavy duty that is suppose to be water & mildew proof, Arctic proof with UV protection.I may also put some hay bales around the sides for winter as extra insulation and some different roosting spaces for the hens for the winter.
**4/5/43 UPDATE
I was able to get the chicken wire around the outside perimeter of the coop
Took the chicken wire and folded it in half attaching the top part of the *L* to the cattle panels with zip ties. The bottom half is just sitting on the grass with some gutter nails to hold it to the ground.. The grass will grow up thru it. On the other side its dirt so I moved the dirt back & put the wire down then covered the wire with the dirt & then put clover, sunflowers & snap pea flowers in the dirt.
Around the pop door I just cut the chicken wire away from the opening. I also put a light covering on top of the chicken wire on the grass to protect the hens feet. Since this is a high traffic area I put grass clippings in front of the pop door. The girls like to dig through the clippings looking for bugs.
And the girls used the new nesting boxes today all on their own.
****05/10/13 I did end up moving the nesting boxes to the south end to the right of the pop door. .It's more secure against the flat wall & I don't have to stoop to stir their FF which is on the top shelf above the nesting boxes.
5/26/13 I added to my hens. 1 EE, 1 BR, & 2 BCM.
Still plenty of wing room in the coop for everyone. The tots roost on one branch & the big girls are on their roost.
I originally purchased one of those cute prefabricated chicken coops that state they will house between 4-6 chickens.(they were stretching the truth on that) I then attached an enclosed 4x8 run out of lattice work.
As soon as the 4 hens started growing I realized they needed a bigger coop. There is no way 4 LF hens can fit in there comfortably.
So then after being on this forum I realized a hoop coop is what I needed. Others had put them together simply and it didn't take someone with construction knowledge to make. I am a female who is 5'2" so it needed to be simple
I have also enclosed pictures of most of the steps. I am a visual person & I know I like pictures of a projects process & I think others do as well.
Tools needed:
-cordless drill
-bolt cutters
-wire snips
-saw
Supplies I used:
- (3) cattle panels 4'x16'
- (1) roll welded wire 48" x 100'
- (4) 2x4s
- (2) 1x3s
- (5) 2x2s
- (1) white tarp 10'x20' Heavy duty, waterproof, mildew resistant, Attic proof
- (1) box fence staples
- (1) roll Gorilla duct tape (suppose to be stickier & weather proof)
- Zip Ties LOTS & LOTS
- screws- I used 1" & 1/2" screws
- plastic cable fasteners
-plastic strapping
- (8) U connectors
-1 old aluminum screen door
-waterproof silicone
-2 re purposed plastic roof vents
-6 attic/gable flat vents
- 2 gallons roof tar
I started by attaching 2 of the cattle panels to the 2x4s with fencing staples
Then after the cattle panels were attached to the 2x4s at each long end I then attached the 1x3s to the center of the panels. I initially did this to put clear plastic at the top but in the end it gave me an extra spot to attach things and increase the stability of the coop
The next step with the help of my best friend was to take the other 2x4s and connect them all to make the *hoop*. We also put supports in each corner to help keep it together. The total square is 8'x8'
Next up was to put take the last cattle panel and cut it to fit the rear and front of the hoop coop.I attached the cattle panels to each other with metal u clips and zip ties.. the U clips gave it more strength. I then covered the cattle panels with smaller welded wire fencing from ground level to the the top of the hoop coop. I attached the welded wire to the cattle panels with zip ties. I used plastic & metal cable ties to attach the cattle panels to the wood frame. Especially handy when I had to cut holes for the pop doors.
My best friend then framed out the area for the screen door for me using 2x2's and made the frame the length of the front of the coop again for more stability.
We then attached the door and then moved the hoop coop to the area where it will remain. I left the glass in the door so it will offer protection from weather. I also added a slide latch to the door to make sure it stays closed and it is up high enough so its predator proof.
We leveled the coop with a few old 2x4's at the front since the area is unlevel. Next up was to put the tarp on. The tarp was 10' x 20'. I put it over the coop frame and then attached it with zip ties. I didn't like how it looked so I ended up cutting it so it followed the hoop coop frame better and used the extra pieces to fill in the back and sides.
I attached the back walls of the tarp using zip ties and bungee cords and 4 tarp clips. The part that hangs over from the top I want to be able to roll us during the warmer weather for greater ventilation. The piece you see in the middle above the pop door will stay to help with shade and keep rain out.
Since I know how important ventilation is to keep it cool during the summer & keep moisture down during the winter to prevent frostbite I added several vents. These black plastic roof vents were re purposed from when I had a new roof put on my house. I initially secured them with zip ties to the cattle panels underneath using zip ties. I then used waterproof silicone to try and plug the holes for the zip ties to prevent leaks inside. Didnt work well so I ended up using roof tar on the outside around the vents. I just put the tar over the duct tape, zip ties & silicone I tried first. The tar worked awesome & I am happy to say no more leaks

Here is the vent on the top of the coop.
Here is the vent looking at it from inside the coop. I cut out the opening after attaching the vent.I immediately felt the fresh air from outside and noticed later that the temp in the coop seemed to decrease.
Roof vents with the tar around the edges. The tar plugged the few holes that were leaking and now the inside of the coop is dry
`
Side vents that I put lower down along the side where rain wont come directly in. I put silicone around the edges & zip tie slits & the covered with gorilla duct tape. Inside & outside.
When I put the tarp on I left space at the bottom ventilation. Unfortunately the east side I cut to much off and the south end (back) the piece didn't go down far enough. So I took the extra piece I had cut off and attached it from the inside using zip ties. A couple pieces of the tarp still had the attachment holes for zip ties but some didn't. On the parts that didn't have holes I used Gorilla duct tape down the length to reinforce the tarp then cut slits in it & then used zip ties to attach to the cattle panels. For the bottoms of the side pieces I used Gorilla tape at about 2 inch intervals on the tarp and then used screws to fasten the tarp to scrap pieces of wood to hold it down. I used the scrap wood so that I could roll up theses side pieces during warmer weather for ventilation.
Next up was the frames for the automatic pop door. I wanted a frame on each end of the coop. The south end the door will be there for the warmer weather. The north end will be for winter when they have access to the enclosed vegetable garden area. When one of the doorways is not being used it will be covered with a piece of wood on hinges so that it can still be opened if needed.
Lily checking out the new pop door

The pop door on the right is covered by wood.
Here are a few pics of the pop door I purchased. Its battery powered with a solar panel to charge the battery. It also has a light sensor so that it will open at dawn & close at dusk without me needing to adjust the times with daylight savings and shorter/longer days.
I used an old plastic container I had to store the battery & wires. Drilled 3 holes in it to attach it with zip ties to the cattle panel. And one hole on the side for the wires to go into the container. (Its sitting on the frame of the pop door) I then ran the wires for the light sensor out under the edge of the tarp and attached the wires and sensor on the outside of the coop with zip ties right outside the pop door high enough to keep it out of the snow & away from curious chickens (I hope)
The solar panel was attached to a scrap piece of wood with hard as nails adhesive and the wood was then attached to the roof of the coop on the south end using zip ties. I then siliconed around the edges and in the zip tie slits to prevent water getting in. And then later used roofing tar to put around the wooden edges and on top of holes where zip ties are and it has prevented any more leaks inside.
Solar panel on roof
Inside looking up to where the solar panel was attached. More silicone and gorilla tape to keep weather out.
I then set up the inside of the coop. The roosts were made out of an old wood branch I had and an old 2x4 someone had out for trash day. I attached the roosts to the cattle panels using plastic strapping tape normally used to hold PVC pipes up.
Next up was the nesting boxes. I saw some nesting boxes advertised on BYC that gave me ideas on how to make some but for free instead of $50. The shelf someone had out for trash, the plastic litter boxes were from my best friend and the milk crate I had. The perches were made from scrap lumber I had already. The milk crate & plastic boxes were attached with screws. And the shelf was secured to the cattle panels with more plastic strapping.
I filled them with some wood ash & shavings.
***I removed the milk crate since the girls never used it. I now store the FF on the top shelf with an extra gallon of water for when I need to make more. Makes it easier at feeding time to have everything in one place
I hung a suet holder with their homemade suet next to the water-er along with their treat ball filled with Oat hay.
Here you can see their oyster shell in a drywall pan. I took one drywall pan & drilled 3 holes on one side and attached it to the cattle panel with zip ties. Its up high enough to not get rain in it and to also keep the DL out of it when the chickens are in there scratching.
Here is the area above the door that was open. I took some heavy duty plastic and taped it down to the canvas & then stapled the other side to the wood frame so that its smooth & will keep the rain & snow out.
Here is a picture of the coop finished. This is the north end (facing the house) Normally the wind doesn't come from this direction. There are plastic window well covers covering the top half of this end. They are the perfect shape to keep out rain yet still allow ventilation.
****Plastic on bottom half has been removed for summer & I opened the window on the door as well. I only close it if its raining and getting into the coop but that is rare since this is not the prevailing wind side of the coop.
****05/24/13
Today I attached hardware cloth to the bottom half of coop at the south end. It is not protected by the electric netting. I used staples and zip ties
***The girls were moved into their hoop coop mid April. All is working well. Torrential rain for several days showed me what I needed to tweak to keep the interior dry. Even after some late snow in April the hens were still happy, healthy & draft free and keeping themselves toasty warm.
I might add another tarp on top of the white one next winter as more protection against the winds. But the white tarp is heavy duty that is suppose to be water & mildew proof, Arctic proof with UV protection.I may also put some hay bales around the sides for winter as extra insulation and some different roosting spaces for the hens for the winter.
**4/5/43 UPDATE
I was able to get the chicken wire around the outside perimeter of the coop
Took the chicken wire and folded it in half attaching the top part of the *L* to the cattle panels with zip ties. The bottom half is just sitting on the grass with some gutter nails to hold it to the ground.. The grass will grow up thru it. On the other side its dirt so I moved the dirt back & put the wire down then covered the wire with the dirt & then put clover, sunflowers & snap pea flowers in the dirt.
Around the pop door I just cut the chicken wire away from the opening. I also put a light covering on top of the chicken wire on the grass to protect the hens feet. Since this is a high traffic area I put grass clippings in front of the pop door. The girls like to dig through the clippings looking for bugs.
And the girls used the new nesting boxes today all on their own.
****05/10/13 I did end up moving the nesting boxes to the south end to the right of the pop door. .It's more secure against the flat wall & I don't have to stoop to stir their FF which is on the top shelf above the nesting boxes.

5/26/13 I added to my hens. 1 EE, 1 BR, & 2 BCM.
Still plenty of wing room in the coop for everyone. The tots roost on one branch & the big girls are on their roost.