Hi everyone! My wife and I purchased a home approximately 2 miles away from the downtown Atlanta Capitol in the Grant Park area. A couple friend of ours live in the same neighborhood and their house came with a chicken coop. We were completely shocked at the fact that backyard chickens is a thing! Once we visited and saw how awesome their coop is, we were immediately hooked. My wife loved the idea of having fresh local eggs, her background is public health and nutrition. With a background in mechanical engineering, my thought was how fun it would be to build a chicken coop.
May 2016, we started researching backyard chickens and began planning. There were several requirements that were "must haves" for the chicken coop.
1. Aesthetically pleasing
2. Structurally sound
3. Predator proof (dog proof)
4. Easy to clean
5. Economically friendly (I've seen some coops on BYC that could easily cost thousands)
A lot of our inspiration came from Littlefeat's coop (beautiful coop). It was harder to put together the frame, but I liked the fact that the framing was laid flat. This gave for a nice finished look, without sacrificing a large space inside of the framing. (see more below)
https://www.backyardchickens.com/a/littlefeats-the-feather-factory-chicken-coop
DESIGN
I started by drawing up the framing and roof on engineering paper that I had left over from college. We wanted plenty of space for the chickens in the run. The foot print of the coop/run is 60 sqft. The front and back, 10 ft. The sides, 6 ft. The coop has an area of approximately 24 sqft. The coop is elevated 2 ft. off of the ground.
The exact measurements are to account for the dimensions of the 2x4's. 2x4's are actually 1.5x3.5
FOUNDATION PHASE
We chose the highest point in our backyard so that the coop wouldn't get muddy when it rains. There was concern about the location being too much in the sun, because it does sit in direct sunlight around 2PM for a couple of hours. We decided it was shady a majority of the day so it will be fine.
We used 6 cinder blocks for the foundation. This part of the building process was probably the most labor intensive. Our backyard has a good amount of Georgia red clay and rocks. After digging 6 holes, I used the cinder blocks to tamp the dirt/clay down to the correct height. I don't have a large level, they are quite expensive. I used string and a small 6 inch level for the foundation. Surprisingly, it worked out pretty well.
The base of the framing is the only wood that is pressure treated. I've read mixed reviews about the concerns of pressure treated with chickens. My thought was that the base would most likely be the area to get wet and stay wet. All other wood used to build the coop was untreated.
FRAMING
I started out my cutting the pieces to plan and laying them on the ground. The frame was assembled manually with decking nails and a hammer. This part was pretty difficult. In some cases I used decking screws because I couldn't hammer without the frame moving from the force of the hammer.
PAINTING
We used white primer prior to painting the framing a similar grey to shed and our house. My wife and i totally recommend purchasing a roller. It's much faster than using an old fashioned brush. We used the cheapest exterior paint from Lowes.
HARDWARE CLOTH INSTALLATION
We used 2ft and 3ft wide 1/2 inch hardware cloth for the screen. We decided on this after reading about predators being able to chew through chicken wire. There are some possums and raccoons in our neighborhood, and there have been some rumors of coyotes.
The hardware cloth is attached using 1.25 inch lath screws and fender washers were used in some areas of the run. The lath screws work well because of the large flat head.
It's pretty difficult to install by yourself, but it is doable. Using a combination of bricks and clamps, the hardware cloth was installed pretty well. You definitely want the cloth to be as tight as possible, for the best finished look.
This finished look is what I was referring to earlier. I like the screws and washers to be hidden. So the cloth must be attached to the back of the framing. If normal framing was used, there would be a larger gap from the front to the back of the framing stud. (hope you could understand that) Doing it this way also allows you to sandwich the hardware cloth between 2 pieces of 2x4's.
We buried 2ft wide hardware cloth around the perimeter of the run. Some people like to line the inside of the run with hardware cloth, but this stuff is expensive. Therefore, putting it around the perimeter allows for less material. (depending on the size of your run)
RUN DOOR CONSTRUCTION
The run door is constructed with 2x4s. I did a lot of research before constructing the door, because I was nervous that I wouldn't be able to square up the right angles properly and the gap needed to be equal on all sides so the door closes cleanly.
I measured the width and height of the gap in the door frame. Subtracted 1/2 inch from each dimension and used those measurements to construct the door.
EX: If the height and width of the door frame is 7ft. x 3ft. The measurements I used for door construction are 6ft 11.5in. x 2ft 11.5in.
It left a perfect 1/4 inch gap between the door and frame on all 4 sides. When installing the hinges to the door and frame, I used door jam spacers. This allowed for adjustments if the frame wasn't perfectly squared.
ROOF CONSTRUCTION
The dimensions of the roof can be found above. 2x4's and 2x2's were used for the roof rafters.
The 8ft 2x4's were attached using screws and hurricane brackets. 8ft was chosen because the roof material comes in 8ft long pieces. This is great because we didn't have to cut roofing material.
The 2x2's were laid on top of the 2x4's and secured with decking nails.
Polycarbonate was chosen for the roof material. Home Depot sells roofing material called SunTuf. It's the smoke grey color to allow for 30% of light to pass through. We felt that shade was necessary especially during the hot and sunny Georgia Summers. The Suntuf roofing was fastened using loctite screws with rubber washers.
BUILDING ELEVATED COOP
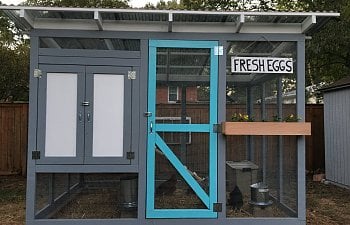
The coop was assembled after the frame was painted. The coop was designed as we went. The opening to the coop is about 16inx12in. This is probably larger than needed, but I didn't want the chickens to have to squeeze through a small opening.
The coop is supported by a hodgepodge of support rafters. I used all of the extra 2x4s left over from framing. 45 degree angles were cut using a circular saw and nailed in every way possible. The measurements are not exact, I just wanted to make sure the coop floor would be supported.
The coop floor and walls are constructed with 1/2inch non-treated plywood. This stuff is heavy. It was purchased in 4ftx4ft squares so that it could fit inside of our small SUV. It was primed and painted white prior to being cut and installed. The plywood was installed on the inside of the coop versus the outside so that it would have a trimmed look, without having to add trim. You're probably thinking, what about rain water leaking between the frame and the plywood? A bead of clear caulk was added everywhere that could possibly have water damage done.
A lot of thought went into designing the functionality of the coop.
1. ventilation
2. easy access to eggs
3. easy to clean
Hardware cloth is installed on the top portion of the coop for lots of ventilation. (shutters added later)
The 3 doors were constructed using 1/2 inch plywood, 1x4 lumber, finishing nails, and Elmer's wood glue. All pieces were painted prior to assembly. The same method used for the run door was used during construction of the coop doors. The only difference is, rather than using a 1/2inch tolerance a 1/4inch tolerance was used so this resulted in a snugger fit for the coop doors. Door jam spacer were also used to center and install the doors to the hinge and frame.
We also caulked between the 1x4 lumber and the 1/2 plywood to prevent wood rot.
The nesting boxes were constructed using 2x3 lumber and 1/2inch plywood. The boxes are approximately 1 cubic foot each. The roosts were built using 1x3 lumber.
The coop was designed with cleanliness in mind. The nesting boxes and roosts are both removable. This allows with easy cleaning when the coop gets overrun with chicken poop.
AESTHETICALLY PLEASING
Since we do live in a densely populated neighborhood, aesthetics are important. My wife wanted a flower box on the run framing. This was constructed using cedar 2x6 lumber. The reason being, is that if we wanted to plant edible plants it will be chemical/metal free. Cedar is a naturally rot resistant wood so chemicals are not needed.
This is a pretty expensive wood. An 8ft piece of 2x6 cedar is about $10. We bought 2 for this box.
It was assembled using clamps, finishing nails, and Elmer's wood glue. Screwed into the framing using 2.5 inch decking screws.
FINAL PRODUCT
We finished building the coop October 2016. We probably could have finished sooner, but there were some delays do to work and travel.
Just wanted to post lots of pictures from different angles. Enjoy!
CHICKENS!
We bought our chickens from a farmer in Douglasville, GA. We got them when they were approximately 5-6 months.
Looking from left to right:
Ameraucana
Rhode Island Red
Rhode Island Red
Black Copper Maran
Our dog is fascinated!!!
FIRST EGG!!!
We are pretty sure it was 1 of the Rhode Island Reds. Laid about 2.5 weeks after us getting them.
NEXT TIME
I definitely think we could build this thing a lot more efficiently/quick next time. If we were to work non-stop, I'd estimate it probably took about 2-3 weeks to build.
There are only a couple of things I'd do next time.
1. add more structural supports to the coop
2. paint all wood framing wood before assembling (this will ensure sealed/weatherproof wood)
3. add a small door in the run for the chickens to leave and free range (currently have a ramp leading up to the coop)
I hope everyone enjoys reading this post. BYC is a great resource and all of the great information definitely helped inspire a lot of the features in our coop. If there are any questions about the construction of the coop/run, please don't hesitate to contact me.
UPDATE
Finally able to create a coop article on BYC!
This site has been so helpful! We made some modifications to the roosts to make sure they aren't too close to the wall. There have been no more issues with poop on the walls. We are going to look into building a tarp to catch all of the poop. It's getting a bit colder here in Atlanta, so we need to come up with a remedy for icy water. Other than that, chicken owning has been going very well!
UPDATE 2/18/17
Just wanted to post some recent photos of the coop and chickens. Our dog, Shelby, can actually hang out in the yard with the chickens without terrorizing them! It took a couple of tries, but now we can leave them outside alone together. When we feed the chickens treats, Shelby's out there begging with the hens. It's very cute!
We planted some some flowers in the window style box. Here is a photo when the flowers were looking really good! They didn't make it through the Winter, but we're planning on planting some herbs this Spring.
We also constructed a homemade 5 gallon waterer with horizontal nipples and a 5 gallon feeder. Photos of those are coming soon.