Basic Backyard Coop--Keep It Simple, Make It Fast
My start in backyard chickens was completely by accident, but by gradual measures I discovered the joys of fresh eggs (yum!), the the instant composting abilities of chickens (food scraps to manure in less than 24 hours!), the tireless labor chickens provide in turning my soil (accepted form of payment--chicken feed!), and the endless fascination and charm of my little “fleurs du jardin.” I raise Belgium d’Uccles and d’Anvers with a few silkies on the side. I have a small flock, currently numbering about 25 on about 1/2 acre. When my flock first started expanding from the initial 6-ish d’Uccles, I started contemplating installing a “super-coop” with multiple interior and exterior enclosures, electricity and plumbing. Such an edifice was within our budget and building capability, but something held me back. A career shift had nudged me in the direction of working with local sustainable food folk and I began to advocate on the pleasure and utility of backyard poultry keeping. Helping people deal first-hand with the obstacles that can make starting a backyard flock intimidating changed the direction for my own backyard completely. What follows is my experimental coop design (still a work in progress) which is part of my larger simple and affordable backyard poultry-raising/keeping model.
My first coop I designed and built completely on my own (it shows). Back then I was challenged in both the design and tool use areas. I took as my inspiration a friend who liked to design items that used only 1 sheet of plywood. I tried the same idea for my first coop--and was able to come up with a design that used 1 sheet of plywood plus a bit more (Coop layouts and pictures are below). There were problems with the design mostly having to do with my tool challenges so for the Mark II design, I recruited my fiancé who has the sometimes exasperating tendency to create for you the Taj Mahal when all you asked for was a lean-to (hence his non-involvement in creation of coop Mark I). His additions included an interior frame consisting of 2 x 2’s and slightly taller coop height. This was necessary because the roof is pitched and I discovered that you can’t dictate to roosters what direction they need to stand on their roosts in order to keep from bending their their tail feathers. The Mark III coop extended the walls a bit higher and was constructed of 3/4” plywood instead of the previously used 1/2” plywood. This coop is very solid and secure, but is on the upper limit of what I can move by myself, so I consider it not quite as successful as the Mark II since my goal is a small coop that can easily be moved by one person. At some point in the near future we will be constructing a fourth coop that will be a further refinement of what we liked from the second and third coops.
What my coops are (in no particular order):
- Designed to get a potential poultry owner up and running quickly.
- A simple to modify or customize design.
- A no-frills design (no windows, venting is incorporated into the lid design, simple nesting boxes without special “egg doors”, no insulation, feeders or waterers).
- Small (designed for 3-4 large or 7-10 small chickens).
- Economical (under 50.00 in purchased materials).
- Quick to make if necessary (for unexpected chicken rescues or impulse buys).
- Designed to be kept in a larger enclosure.
- Mobile (no permanent foundation and light enough to be moved by one person).
- Able to be built with simple tools and no advanced carpentry skills.
- Consisting of a simple, clean design that won’t cause embarrassment if the neighbors see it (it is basically a well-made box).
- Useful for small flock breeding projects.
- For some poultry owners a “good enough for now” starting point until a more comprehensive coop can be built.
- Easy to clean.
- Dry and comfortable for chickens.
- A safe place my chickens seem to enjoy gathering in at night
What my coops are NOT:
- Designed to be anything other than secure nighttime housing and comfortable safe nesting for your chickens.
- Secure against large predators. A bear would probably be able to tear them open or push open the lid. But I do not have to deal with bears where I live. I rely on the sturdiness of the exterior run to provide the majority of my protection from the occasional wandering raccoon. So far the only casualties I’ve ever had are from hawks and a neighborhood Jack Russell terrier that dug into my yard. Attacks have only occurred during the day when the chickens were out.
- Warm enough for bitterly cold winters. The coops have no heat or insulation, although I imagine insulation could be added easily enough. In the 3 years I have worked with this coop design, my winter lows have been down to upper teens and my chickens have had no problems. I am well aware (from having grown up in the Midwest) of what -40 temperatures with -70 wind chill feels like and am certain that in such a climate this coop design would need some degree of retrofitting to keep the residents comfortable.
- Completely waterproof. The oversize pitched roof sheds most rain but by design I keep the coop in a larger enclosure that completely shelters it. Painting or sealing an unsheltered coop would go a long ways to protecting it, but the roof venting might still allow driving rain to get in. As an experiment I have not painted or waterproofed my coops because I am monitoring how well the design holds up with no intervention or protection. For Science!
- A labor-saving device. There is no automatic feeder (but you could add one), automatic waterer (but you could add one), automatic door (but you could add one), wheels to facilitate moving (but you could--you know), or easy-access egg door (you have to reach inside the coop to gather eggs or change the design to add one).
- The Taj Mahal.
Design Evolution: The original “one+ sheet of plywood” design looked something like this:
The lid was slightly longer and wider than the box it covered and was raised on attached wooden blocks to create venting at the ceiling. The entire bill for materials came to about $29.00. The coop was placed in a larger enclosure on 4 16” square concrete pavers. Very basic, very simple, but not an ideal structure. From that humble beginning, this layout was born:
This design uses 2 sheets of plywood (with some leftover cuts) and 3 lengths of 2”x2”x8” internal framing as shown (the framing amount includes extra for roosting bars). The coop is assembled with wood screws (1 5/8" x 8 square drive exterior screws for most of the project) and the construction only requires measuring devices, screwdrivers, drill with driver and circular saw (however cuts could be done with a hand saw). I had the lumber yard do all the initial large cuts on the plywood sheets. The bill for materials came to $47.28, including all hardware.
The following photos will fill in the blanks and provide more construction detail:
Framing cut and attached to base Door cut on front, framing attached to lower edge of front interior
Door being measured and fitted. We used Closeup of front coop interior
moulding for the sliding door’s "tracks".
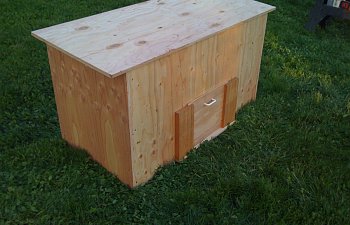
View of finished coop front exterior
Coop base (on top) being attached to coop back
Wood screws are drilled into the interior framing Coop base (on top) being attached to coop front
Interior view of front, back and base together Interior view of attached side
Finished coop body with lid Closeup of the block system of venting. Notice the upright framing in the back is shorter to accommodate the blocks
Roosting bar Placement of nesting boxes and roosting bar
Finished coop (with Sweetie and beagle) Ready for occupancy!
Finished coop in situ Finished coop being set up for future residents
The new residents (quail d’Anvers) enjoying their new digs! My current 3 coop layout
Important note about ventilation: Since I didn't get a really detailed photo showing how the ventilation is incorporated into the lid design, I am including a diagram that will show how the lid functions. To wit:
(Please note--this illustration is not to any particular scale!)
The blocks on the underside of the lid offset it by about 2" and allow air flow continuously. In the warmer weather I pull the lid slightly forward and use the block on the front of the lid to further offset it. This raises the entire lid and allows maximum air flow. The chickens are comfortable in winter because an optimum level of heat is created and maintained by their warm little bodies, but the excess moisture is vented at the roof. Summertime comfort is maintained by the extra venting at the roof. The coop door stays open all day. The system is embarrassingly simple and it works! I have never found signs of excess moisture in the coops or observed my chickens being too hot or too cold in these coops. In the morning when I let them out I frequently see little faces looking out along the gap at the roof all eager for breakfast. I have a small scale breeding program and some of my birds are shown, so having healthy, happy, beautiful little partners in my garden is very important to me. However, I am also aware that I live in a somewhat mild climate (teens to 105-ish) and can easily see that changes to this design would be necessary in climates more extreme than in Oregon.
A few extra notes, my coops are sized for bantams (door size 12" x 12" and extra 2 x 2's for the roost) obviously large breeds would need appropriate door and roost sizing. I still use just 4 concrete pavers for a foundation in order to keep the design 100% portable. For cleaning I just pull off the lid, remove roosts and nest boxes, drag the coop over to my composting area and dump it. What could be simpler?
What I am looking forward to in the next iteration: I am looking to change my nest boxes, I like the Ware design. I think the next coop will be a mix of plywood thicknesses as I do not like the 3/4" plywood lid. It is too heavy for my liking and as mentioned previously it is difficult for me to move the coop by myself. I am considering adding a lid prop for when I need to get into the coop for extended periods. Also, I am working on a possible door redesign for larger breeds as the coop is currently 27" tall in the front and a sliding door can only be lifted so far. I don't like the amount of wasted plywood in this current design, even though I've never had a problem coming up with uses for the excess. Any better layout suggestions would be gratefully accepted. Other than that, I'm happy with how well this design is working out for my backyard and for others. Also, This coop is only the beginning of a conversation. See it as a point of departure--customize it and make it yours! Always looking forward to input and suggestions!
Please understand, both design and construction here are intended to remove or reduce barriers to backyard poultry keeping. I know all the professional builders are laughing themselves silly reading this, but real concerns expressed by real people were factored into this plan. 100 years ago nearly everyone--rich or poor, country or city dwellers kept a garden, chickens and (usually) bees. It was ultimate food security and a hedge against hard times. I see great value in restoring that lost part of our heritage and the natural rhythms of our lives. I am doing my part to help others discover the joys and utility of Backyard Chickens.