Hi all,
Almost completed my first DIY incubator and am keen to share. I have made this from a gathering of information, part and materials from round the world and see it only fitting I contribute in return.
Firstly, I am Australian, so stores, prices and measurements will be in local lingo!
Basic Stats:
460mm Wide
600mm Deep
300mm High
(the size of my office filing cabinet)
Holds approx 30-35 large chicken eggs.
Current hatch rate - #1 ---7 into lock down, 7 hatch
- #2 ---5 into lock down, 5 hatch.
Build costs - approximately $120AU including freight.
Materials:
30mm foam panels $8.60 (Clark Rubber)
Polystyrene glue $12 (Clark Rubber)
Aluminum tape $0 (On the shelf)
3x5mm aluminum angle $0 (scrap I had)
assorted timber Approx $15 (Bunnings)
IncuKit DC 12 heater/thermostat $59.98US (Incubator Warehouse)
Thermometer/Hygrometer $19.99US (Incubator Warehouse)
Egg turner motor $incl with IncuKit (Incubator Warehouse)
Fluffy velcro dots $1.29
Assorted bolts, screws, nails and water based paint.
Freight $18.92US
I made this as I wanted an auto turner, and something that was s a bit more reliable than the Hova-bator I had used for my first hatch. After much research I found we could have gone a lamp style heater, but chose to pay a little more with this one as it was a 12 volt system, and could control much more than just on or off.
More detail on the controls a little later.
The case was made from flat 30mm sheet, cu with a circular saw, glued with polystyrene safe glue. I added aluminum tape to the edges for extra support and sealing.
The two windows are recessed in slightly so the sit flush, they are glued and taped into position. The lid is back cut so it locks into place, with a cut out in the rear for cables.
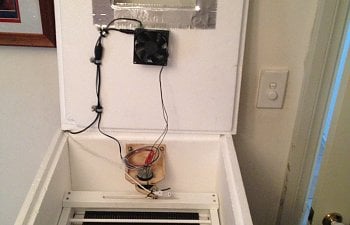
The IncuKit mounted in the lid, egg tuner on the rear wall and the to egg trays with a non slip mat. Still need to fine tune the wring and egg turner settings.
Set for testing.
The tray can accommodate variety of sized eggs, The mat softens the roll.
Day 18 the tray is removed, the second water tray is filled and the chicks hatch with more space.
The underside of the main floor, this is raised up so I can fit water trays under it.
Water trays. I now have worked out the surface area needed. These small trays Will be replaced with two larger ones, then sponges for when the humidity needs to be raised day's 18-21.
The rear of the egg turner mount is braced so the foam is supported
The underside of the egg tray has 4 velco dots, The soft fuzzy side to reduce friction of the tray sliding on the aluminum rails.
The controller during warm up. The heater (HTR)is at 100%, as the inside temp comes to 37.5 C the controller throttles back the heater to about 12%, using much less power than my old one to maintain the same temp. My Hova-bator was using 240 volts, this one a small percentage of 12 volts. Hoping it pays for itself in the long run.
Things I like about this product, Control. It manages the heat, hatch countdown, temp settings, how quickly it can get to temp, the fan power. It also drives the egg turner, how long, how fast and how often.
What I don't like about it is the presentation. As you can see in the image below it's basic. A nice plastic cover or box would really make it pop.
Finally, a quick video of the egg turner being test ran. Still working on the time and power settings to get it right but you get the idea.
What I would change if I made another one?
1. Would encase it in a timber box, the kids like to poke and play with the tape, and I am finding foam around the place. The polystyrene would last much longer if it was boxed.
2. The rack slats, I could only find rounded slats, they feel great but not the best ride for the eggs. I would use square edged material, or wire mesh. This would also improve air flow to the water trays below.
Thanks for reading, feel free to ask any questions.
Ben
EDIT:
Day one of first hatch. The egg tuner carriage jammed and rode over the top of the eggs. It took some time to find the cause. It was a combination of friction between the paints on the divider bars and the egg shells. The bars 'grabbed' the eggs and drove up over them. I filled then sanded the paint off the contact area.
In addition, the frame was made and tested with Isa Brown eggs, big and brown. We set smaller SPW eggs, the centre of the divider poles were above the center of the eggs, this is critical. It must be below the centre line of the eggs you are incubating. The egg acts as as a ramp forcing the carriage upwards and over the larger eggs. I had to remove the frame and trim the bottom edge to lower the height of the bars.
Reinstalled it and it has worked perfectly since.
EDIT II:
Before my next hatch, I removed the egg tray lat and replaced them at 90 deg, so teh eggs roll along the groove instead of over them, a minor change but I felt it's a better design.