My quest for eggs began about 7 months ago when I received an email from Lowes featuring a small chicken coop plan. The price for the materials alone was over $500 and the coop would only hold 2-3 hens. I began to look on-line for more plans and discovered a mass of information and plans galore! I called my local city planning office and asked about having hens in the city limits. They were gracious and did a search (I guess no one had asked about this before) and returned my call to explain chickens weren’t currently allowed in the city limits. So I put the idea to rest.
They a few months later I was at a neighbor’s home to find they secretly had 5 young hens! A light bulb came on! Why not change the law! Loaded with my ideas, I visited the planning department and plead my case. They first thought the idea was funny, then mentioned someone had called months earlier to ask the same thing and they had already began working on the idea to present to the City Council. That was all i needed to get started. So I went to work to build a coop.
In my research I found the Little Birdie Chicken Farm and Hatchery in Wake Forest, NC. It’s run by a 15 year old young man and his father. Pouring over the web site: http://www.littlebirdiehatchery.com
I decided that this was the place where I would buy my chicks. I also found the link to the Catawba ConvertiCoop web site with plans to build my own portable coop. I was so excited. I ordered the plans and spent many hours looking at them and finding other plans and ideas for other coops. I ran across this site and I was hooked!
The Goals
- I wanted to have five different hens that were great layers. I searched and read countless articles and bios on each type and decided on the ones I would buy.
- I wanted a nice looking coop because my wife wouldn’t allow otherwise AND who wants a crappy looking coop in the backyard anyway?
- I wanted a cost effective coop because we didn’t have bags of money sitting around this house just looking at us!
- I wanted to make sure it was safe and secure for my little ladies. I had several visits from raccoons in the garden, so I knew there was a present threat.
- Finally, I wanted this to be a wonderful experience for my 4.5 year old son who would be the chief egg collector. My wife in the meantime thought I was crazy and just laughed.
Construction Begins
As I mentioned earlier, I bought the plans, downloaded them, and printed them off. Now I had to gather all the materials. I kept looking at the plans and combined a few items to cut the amount of materials just a little. I kept going to the “culled” pile at my local lumber store. I could buy wood from there at half price. I decided to buy all treated lumber, since it would be outside in the weather and sitting on the ground! This added to the cost some and caused a bit of problem with the wood shrinking. But it was be OK. I followed the instructions step by step.
Here I began to build the man frame. The uprights are 2”x2” made from a ripped 2”x12”x16’ from the culled pile. I attached everything with glue and predrilled all holes for the screws.
.Next I cut the floor and gussets on the uprights. Then installed the floor supports. I later discovered I made a mistake with a design change in the gussets. I cut them at the wrong angle and later had to install new ones over the others
I then added the divider between the each nest box and the rest of the inside of the coop made from an old 2”x8”. The plans called for two pieces of 1” material to divide the space and hold the roost. I decided to make the whole thing out on one piece. I rounded the piece then used my router to round over the edges and make it nice and smooth. I cut a small notch for the roost to sit in and drilled a hole, slightly larger than the nail, through the roost and support. I took a 16p nail and dropped it into the roost and support to hold it. This will keep it from moving and can be removed by simply lifting the nail. I also took the roost and rounded over the edges to match and make the roost comfortable for my girls. The roost is a 2”x2” piece of treated wood about 63" long.
I read where several people added a small lip around the opening in the floor so the littler wouldn’t fall out. Here is my version of that add-on. I used 1”x3” material and rounded over the top and side edges, plus made the rounded end where the hens will be stepping on and off the ramp to the lower level. I also raised the roost height about an inch or so to allow for this lip. The roost sits on top of one side of the lip. I used a clap to hold the lip while I screwed it from the bottom. Of course, I had to make a "chicken lunch run!"
The plans called for a flat piece of 1"x 6" for the top of the roof. Water doesn’t run off a flat roof too well, so I came up with another plan. I took a piece of 2”x 8” yellow pine from the “culled” pile (this wasn’t treated). I set up my table saw at a 30 degree angle and cut the top four sides to allow for rain run off. This was pretty tricky to do, especially the ends. The cuts weren’t perfect, (there were several blade marks) but I was able to sand the problems away fairly well. Please take care with the saw if you do this! When all the cuts were made, all top edges slop down. I rounded over the bottom edge to finish the piece. The only flat part of the 2x left was about an inch or so at the .very top. I predrilled holes and screwed and glued the piece in place and sanded well
I next built the two long sides from 1”x 6” material. These were constructed in a lap fashion, glued and screwed. I also rounded over the edges of the siding as well to add to the finished look. I added a 3/4" strip (the entire length) to the back so the siding panel would sit on the handle support of the coop.
The plans called for the coop to have handles on both ends of the coop to lift and move the coop. I decided to install wheels on one end, so only one end had handles. Although, I did make these handles one foot longer than the plan design. Here are a few pictures of my modifications. The edges were rounded over and sanded well.
The ends were laid out and constructed. The plans have a cool design where the doors slide into place without hinges. I decided to add hinges to the small nest box egg doors to avoid the door from falling to the ground and breaking little toes.
The biggest change I made in the plans was to a few trim pieces. The plans called for the trim pieces over the uprights to be covered with a 1”x3”. Looking at the design, it made the whole design top heavy and I didn’t like the skinny legs for the coop. I decided to add some “weight” to the legs. I took some 1”x6” material and added it to the uprights. I rounded all exposed edges and sanded it well. Note the rounded bottoms that reflected the same curves of the handle. This worked perfectly for the coop handle end. I later had to make a change to the “wheel” end of the coop. I like the new look to the coop and it looks well proportioned. I added 1/2" hardware cloth to the back edges of the lower part of the coop and screwed small trimmer pieces over the stapled wire for added security.
Now I began to coat the whole coop with Redwood colored stain and water preserver.
I used a few pieces of left-over 2”x8” material from the “roof” to make the handles for each side of the coop. I used the same 30 degree angles and scribed the edges to fit the siding. Then I rounded all edges and sanded VERY well. I attached the handles by predrilling holes in the correct angle to the siding through the siding into the handles and secured with 3" screws.
I attached two “Raccoon” cleats to the inside of the siding and drilled a hole through the cleats and into the uprights of the frame. I simply dropped a 16p nail into the hole to hold the siding in place and keep it from coming off, unless I won’t it off!
.I built the ramp using leftover materials and glued and stapled the rungs to the board. I used small hinges to attach it to the coop
I'm almost done and my wife was not happy about being left out of the car port, but enjoyed me being out of the house building this thing!
With the help of Mike at the Little Birdie Hatchery, this is the design I used for the wheels. This coop ended up being fairly heavy. So I used metal wheels and a 2”x6” treated board, 53” long. (Note the re-cut bottom upright trim piece I talked about earlier.) I took the 2x6 and set my table saw at a 30 degree angle cutting away the top edge of the 2x6 length wise. Look at the picture showing the angle. Please take care when ripping this piece not to damage YOU or the saw! I then curved the ends (matching the same curve as the edge detail on the upright trim pieces) and rounded all edges. Drilled ½” hole in each end for the ½” 4" lag bolt to attach the wheels. I used a washer on both sides of each wheel.
These shots are with the coop flipped upside down.
This is an edge shot of how I cut the 30 degree angle in the wood.
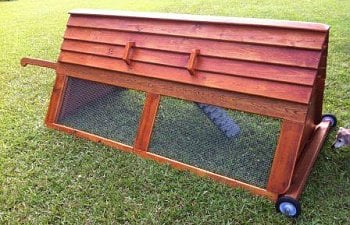
This is the "seated" or "resting" position with the coop.
This is the coop ready to move with the wheel assembly swung underneath.
This is the hardware I used for the wheels. I picked it up at Lowes.
Next I strung the metal cable and attached it to the ramp. Ran it through a pulley and out the end of the coop. I found a metal insert at Lowes to run the cable through the wood, so it won't cut the wood every time you pulled to cable to raise and lower the coop ramp. I then made/carved a knob as a "pull." I drilled two very small holes and ran the cable through it and secured it. Works great!
You may be able to tell in this last shot, there are a lot of cracks between the siding and the ends. This is to allow air to flow freely through the "upstairs" of the coop. I will be closed enough to keep warm in the winters.
With the coop almost 100% finished, we took a trip to the Little Birdie Hatchery to pick up our girls. We chose one of each: Ameraucana (Sallie Brown-after a school mate), Barred Rock (Alice-after the music director at church), Buff Orpington (Sunshine), Australorp (Night Night) and Golden Laced Wyandott (Goldie). Can you tell a 4 year old named them?

This shot is after they were about a week old in the brooder.
After I installed the wheels to the coop, there was no really good way to lift the wheel side in order to flip the wheels beneath. I was opening the lower coop door slightly to stick my hand in to lift the coop. I decided to fix that problem by building a larger version of the side handles. There is a shot of the finished product....less the redwood stain - I ran out.
The girls are alittle over 3 weeks old now and they really enjoy spending time in the coop during nice days.
Here's a boy who loves his chicks!