Staff note: We’ve been trying to find a way to restore the missing pics to this article but haven’t had any luck. Hopefully the author will be able to help us get the pics loaded back up!
Author's note (2018-08-16): I wrote this article back in 2012, and lost access to the flickr account with all the photos over two years ago. I'm not sure why there's interest all of a sudden, now, in this article, but the pictures might be gone for good - give me a couple weeks to look through backups, or figure out how to delete the article. Thanks
Building a 4-Season Tractor
I'm also building a tractor for me chickies. I played with the idea of building an A-frame, but they just don't seem big enough, and while there's a lot of people who say "you need X square feet of indoor space and X of outdoor space, and anything more than that is really not needed" I just couldn't find an A-frame design that struck my fancy. This might change in the future, of course!
So I was checking out the Garden Ark, and that's a pretty cool design, but seems mostly geared towards warm-weather environments. I borrowed from that design and came up with my own, based upon stuff I've read and feedback from some of the great people on the forums here at BYC. The thread is here: https://www.backyardchickens.com/forum/viewtopic.php?id=256643
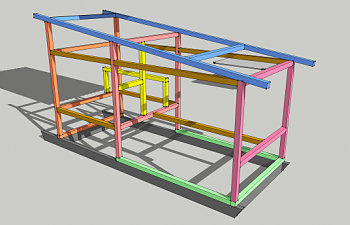
The final design looks like this:

Well, it was a matter of time, but I've optimized the basic framing a bit. Here's a colorful pic for your pleasure:
I took out that unnecessary piece along the bottom of the frame (in the back, between orange and green). It didn't exist on the opposite side due to the mesh door I have planned for there, but really, it's not needed. Also, I changed the framing for the roof, so the main two beams run the entire length of the roof for support. I'll be adding more cross-purlins as well. You might notice how colorful this is. I've separated each sub-assembly and color coded them for easier construction.
Each sub-assembly has been color-coded for easier identification, and to make it a bit easier to cut and organize all the pieces. So there are 7 sub-assemblies (well two of them are just the bits in between the other frames). If I assemble each one separately, it should be easier to take those and bring them together pretty easily and with minimal headache.
The frame is constructed entirely out of 2x2 furring strips. They're not as cheap as I had hoped, but I still think I'll be able to complete this tractor in less than $150, minus the cost of paint (I haven't figured that in yet)
Here's a parts breakdown for the frame:
In addition to the tractor, there's a couple of other items we must consider: feeders, waterers, grit & oystershell, coop heating, water reservoir heating, and weatherproofing. I will address these issues in greater detail as I complete construction of the frame, and will describe them here.
I started out with a small handful of wood: 4 pieces of redwood and some 2x2 furring strips.
The Skid
I need to build from the ground up, of course, so I decided to build the skid first, and work my way up from there. That's what the redwood is for. There is a lot of debate floating around about using redwood or pressure-treated lumber for construction. On the one hand, redwood is more expensive than pressure-treated (PT), but PT wood has more chemicals and nasty stuff in it. The bottom line for me is that eventually, I'd need to replace them both due to rotting and weathering, so I decided to go with what I felt would have the least detrimental impact on my birds and look the best. That's redwood, so that's what I chose - and these 3 8-foot 2x4s cost me $25! Ouch!!
But, the whole thing will get a coat of waterproofing/UV-proofing when it's complete (the upper frame will be white-washed and painted as well), to aid in the fight against rot and weather. So I'm not too worried. Additionally, the upper frame will not be permanently attached to the skid - I'm using brackets to tie them together for good stability and ease of disassembly should I need to replace anything. You'll see more about that later on. (EDIT: I decided it's just too much trouble to bracket the skid and the frame together, I'm just using gold screws.)
So, where were we? Oh yeah, building the skid out of redwood. Now, I don't have a lot of experience with woodworking or construction, even though I love it to death. So this will be an experiment and a learning experience for me, that I can use in future projects, such as building a fixed coop later on.
First, I decided, I'd use wood screws, and pre-drill the whole thing to prevent any cracking and other problems. I then figured I'd take it one step further and use angle brackets as well. My dad suggested using an epoxy on the ends of the cross pieces, but after making it to the orange box, I decided that would cost more money than I had, so I compromised and used screws on the ends and some basic wood glue that I had. In all it feels super secure. Here are some pics during construction:
Notice the ends are a lot longer than my design. I dunno what I was thinking, I must have designed it based on actual measurements of some studs I had laying around, which were 7'4". These redwood studs are 8'. so I just compensated and left the ends longer, which means the wheels will have more space, if they even need it. Also, those angles in the ends I cut too deep. They're cut at 2", and my design was at 1.5". No biggie, I just adjusted the work accordingly, so I still have the same interior dimensions as the design. One added advantage is that I have that extra foot of space on the skids over which I can build a shelf for the waterer and/or feeder and other stuff, without putting any extra stress on the framing itself.
The Frame
To start the frame, I took my blueprint and broke it up so that I could make the most of the 8' furring strips with as little waste as possible. As I cut the pieces, I marked one end with their size and what sub-assembly they belong to. I'm almost done cutting all the pieces, but they're all neatly stacked, waiting for the next step. The two pieces I chose for the roof have a great bow in them, which will help with the stability and rigidity of the roof during winter with snow stacked on it.
I was going to spray the skid with some waterproofing, but I decided to wait until it was all finished and do the whole thing (after which I'll paint it of course). So, at this point I started in on assembling the rest of the framing. My initial plan was to assemble each of the sub-assemblies separately, but after I got started, I figured out it was easier to start assembling them in place, working my way up. So that's what I did.
First, was the 'green' sub-assembly. This is the U-shaped frame on the bottom. I simply screwed the pieces down with gold screws: 3 screws per piece. If I need more, I'll add them later, but I think it'll be pretty sturdy. I had to prop the whole thing up off the ground so I could get my clamp in there to brace things up while screwing them down.
Then I pieced together the 'pink' frame. I built this one separately from the skid, then attached it. After that I decided it would be easier to built the sub-assemblies on the skid itself, rather than building them separately, so I did that from the next frame on.
I used the smaller angle brackets on the cross-piece since it's not a load-bearing piece - it's only there to hold up the outside perch. I'm actually considering building an access door in this upper section. We'll see... Here's some detail on the angle brackets. You can click on these pictures for a larger view.
Notice I did not add the screws in the bracket in the frame? Well, I decided that since these screws all match the size of the hardware cloth, I'll be adding the screws as I put up the cloth - with washers to hold them in place - so I'll be adding the hardware cloth to the OUTSIDE of the tractor frame, not the inside of the frame. Also note I'm still reinforcing the frame with long gold screws in the ends.
And here's with both 'pink' and 'red' frames erected:
I could probably do without using angle brackets, and it would simplify the construction logistics (for example, adding these brackets will complicate the adding of the side panels), but they're so fun to play with and look so darn cool! Notice on the red frame, I swapped positions of the large and small brackets, since the lower cross-piece will be holding up the henhouse floor, and the upper cross-piece, well, the roof but that's it. This red frame is the inner wall, so this is the one with the hardware cloth wall to be covered with a panel in the winter.
So as I was building this, I was trying to come up with a good way to add a shelf or platform above the roof on which I can keep the water bucket. I don't want to cut holes into the roofing, since I don't want even the possibility of leaks. but if I could figure something out, this would rock for the gravity-fed water system. I'll put some more thought into this and if I think of something, I'll let you know.
Well, we had a couple of days of snow, so I put the project on hold, but I'm back at it. Today, I finished off all the outside frames and added the floor to the henhouse. I couldn't fit a 4'x4' piece into my car, and I couldn't get the guys at Home Depot to cut it to 3'x3' for me, so I ended up having to build it out of 2 2'x4' pieces. This also meant, that to do it right, I'd have to add a cross-support underneath the floor and screw it all down tight as a button, which I did.
In this photo, you can see I've finished all the framing, and just set the two roof supports on top to get a good idea of how it'll all come together. I spent a few minutes eyeing this all out, making sure I wouldn't run into trouble when attaching the hardware cloth or other bits and pieces. So far, it looks good, and I think I'll be able to get everything on without having to backtrack or remove anything and re-design.
And now the henhouse floor! This step is significant to me because I consider it the halfway point in the construction of the tractor. You can see how I screwed it all down using gold screws and you can barely tell that it's two pieces. I'm actually pleased that I had to do it this way, I think the cross-piece underneath will add a lot of support.
Now, at this point, comes another session of sittin' and ponderin' and thinking up improvements for the next part of the design. And I've got a few good ideas, but also ran into a couple of issues.
First, the major issue: The henhouse door. I want to add an external handle to make opening and closing the door really easy, but it looks like I might not have the chance, so I might have to rig up something else. This is because of the position of that angle bracket under where the door is - there's just no room to fasten on a proper axle (made out of a bolt?). So I think what I'll do is this: Plan A: rig the door to swing downwards, and position the outside perch in such a way that the door, when open, rests on it, making a 'door mat' for the birds to use to get in and out of the door with greater ease; Plan B: either swing the door upwards or use a sliding door or something that can be used with a pulley and a chain to operate it from outside the cage, and screw on a 'doorstep' in front of the doorway for the birds to get a good grip when they jump up into it. This will require more thought.
Now for the ideas: I think for the removable panel on the inside wall, what I'll do is attach the hardware cloth to the OUTSIDE of that part of the frame, and will cut the panel so that it fits well INSIDE that frame, and is held in place with a pair of door latches. This can be inserted through the main access door (on the roost side), and the only modification required is slightly reducing the length of the roost to accommodate the panel ans I'm bringing it in and out of the tractor.
Another idea is that the main vent panel will be constructed using a piece of clear corrugated PVC and a lightweight frame, instead of a wood panel and roof shingles. I'm considering something similar for the nesting box roof (but still with a panel backing, so the box is dark inside).
Finally, I've decided to use a 2-gallon plastic bucket as the water supply, and will use gravity feed and the nipples (and some tubing) to supply the water to the birds. I'm leaning in the direction of putting this bucket on a little shelf positioned in the triangle-shaped wall up above, on the side of the nesting box. It will be secured with a bungie cord, and heated in the winter with a 50 watt aquarium heater.
I've added the walls, the access door, nesting box, platform for the water bucket, ventilation on the back side, and the frame for the panel underneath. I decided to put the water bucket off the back instead of the side, as you can see.
And I added the plastic mesh on the top of the run and the henhouse. Next I need to work on the henhouse door, and start adding the hardware cloth, that's gonna suck, but I'll do the best I can.
Well I had added a piece of plywood as the door but it was crappy, so I decided to build a real door for it before I went any further. Construction going slow because I've got a million and one other tasks and projects to do, too, so it's slow going right now. Anyways, here's the new door:
And since I put the hinges on the front side, it hangs crooked due to the difference center of weight. This will be a problem once I have the mesh walls up since I won't be able to reach inside and push it shut by hand, and I don't relish the thought of wrangling with it daily, so I added a spring to the back side of the door:
Just a simple spring I had laying around, and it does the trick wonderfully. It seems pretty unobtrusive with the door open so I don't think it'll be a problem for the chickens, but we'll see. I also added handles to the front for easier lifting, and used a bit of leftover hardware cloth to cover up the gap in the ceiling mesh above the pop door. Photos of those are over on my flickr page.
So tonight after work, I will attach hardware cloth to the sides and screw down the roof and construction will be complete! Then the only things remaining is adding the outside perch, roost, the winter panel, and attaching the feeder and waterer systems, and I think it'll be ready to play! Actually, I need to weatherproof the nesting box too, I'll probably just use a bit of roof shingle or something... and then waterproof all the outside wood and paint too.
Ok, finished attaching the roof, hardware cloth, and now I hung the feeder and put up the chain for the water bucket. Check it out:
Yep, those are bungie cords. At first I considered using pipe strapping, but decided that bungie cords are a better idea for now until I get a better idea how well it'll work in this configuration. It might actually not work so well, in which case I'll make a shorter pipe and pipe-strap it down here for oystershell and grit (if needed), or just patch it all up and strap the feeder pipe on the side of the run wall, where I can give it more support (more bungie cords) without drilling more holes.
Yes, I'm using the cheapy 50-cent plastic plugs to seal this stuff up tight. The top one will stay on all the time, opened when I fill it or check it, and the bottom one will be inserted only when I'm filling it.
Here's the water bucket:
Yes, another bungie strap. On the back side of the bucket is a chain, attached to the two eye hooks:
This allows a solid 'back wall' the bucket can be pushed up against without fear of having it drop into the henhouse. The bungie cord does the pushing, but truth be told, it won't be much pushing once it's filled with water, the weight of the water will keep it in place. As you can see, this still allows the nesting box to be accessed rather easily, so it all works out well. There will be a hose quick-disconnect fitting gorilla-glued onto the bottom side of the bucket with the hose running on top of the cross-piece (to the left of the bucket) seen in this picture:
...after which it will be pulled through a tee, one side heading down into a nipple that hangs halfway between the henhouse door and the nesting box door. The other outlet will continue around to the inside wall and down and out to the water nipple that will be positioned in the run. Since it's a quick disconnect, I should be able to easily remove the bucket for cleaning, unless I can come up with a better solution!
Well, that's it for now, kids. Stay tuned for more.
Well, it's been freakin cold outside but I put in the watering system tonight before it got too dark to work. In summary, I'm using a 2-gallon bucket with a gravity feed system supplying water to two nipples, one in the henhouse of my tractor and the other out in the run area. Water is fed to the nipples using vinyl tubing. The bucket will be heated in the winter to prevent freezing using a small 50-watt aquarium heater. I've tested the whole system and it works well.
Here's some pics:
This is the bucket in place and the top of the tube system. These are quick connect fittings so I can remove the tube easily should I ever need to remove the bucket.
This shows the nipple inside the henhouse and the tubing that goes to the outside nipple.
Tubing as it exits the henhouse. I put the tubing on the inside edge of this support since I'll be fitting a panel of wood against the mesh in the winter when it gets just too cold for the birds. The panel will be cut in the corner to accommodate the tubing, and the tubing on the side will help hold it in place.
Outside nipple.
My only concerns with this setup are two:
- This will fail if the chickens peck at the tubing. I don't anticipate this to happen, since they don't peck at the same type of setup in their brooder now, they just mess with the tip of the nipple, now that they know where the water comes from.
- Tube that exits to the outside nipple might freeze in the winter.
All I have remaining to complete is the heater for those freakin freezing nights, and the 'roof' over the nesting box needs shingles or something.
December Update!
Well, it's bloody cold outside, so I've been working on the tractor little by little as I can and not freeze to death. I installed teh water system, and today, filled it with water and put the heater in and got it going. At first, the whole thing was leaking all over the place because I hadn't seated the hoses well, but that's fixed and it seems to be doing well. Water flows freely through the nipples when pressed and don't when they're not depressed. I added a heat lamp for a test, here's a couple pictures:
If this survives tonight, then I'll call it a success. Last night it got down to about 8F. So it's be GREAT SUCCESS if it does well through a night like that. I might jsut leave the heat lamp there once I add the chickens, we'll see.
Also, I mounted the roost to a board, with holes, so I can bolt it down, I figure it's a much better method, which will allow for easier cleaning, and can replace the board if need be, and that's a lot easier than repairing a beat-up coop floor, eh?
I plan to fill it with about 2" of bedding at first and see how the girls do with it, then adjust accordingly.
Materials Breakdown (Updated on 2009-11-3)
So this is a running tally of the parts and cost as I buy them. I estimate I'll be in this about $200 when all is said and done (before the paint), so we'll see how close to that I actually get.
Notes on cost: I could have reduced the cost a lot by using less of those cool angle brackets, but they look awesome! If I were more skilled at wood-working, I would not have needed to rely on using these, and cut out probably $20-25 of the overall cost.
Author's note (2018-08-16): I wrote this article back in 2012, and lost access to the flickr account with all the photos over two years ago. I'm not sure why there's interest all of a sudden, now, in this article, but the pictures might be gone for good - give me a couple weeks to look through backups, or figure out how to delete the article. Thanks
Building a 4-Season Tractor
I'm also building a tractor for me chickies. I played with the idea of building an A-frame, but they just don't seem big enough, and while there's a lot of people who say "you need X square feet of indoor space and X of outdoor space, and anything more than that is really not needed" I just couldn't find an A-frame design that struck my fancy. This might change in the future, of course!
So I was checking out the Garden Ark, and that's a pretty cool design, but seems mostly geared towards warm-weather environments. I borrowed from that design and came up with my own, based upon stuff I've read and feedback from some of the great people on the forums here at BYC. The thread is here: https://www.backyardchickens.com/forum/viewtopic.php?id=256643
The final design looks like this:


Each sub-assembly has been color-coded for easier identification, and to make it a bit easier to cut and organize all the pieces. So there are 7 sub-assemblies (well two of them are just the bits in between the other frames). If I assemble each one separately, it should be easier to take those and bring them together pretty easily and with minimal headache.
The frame is constructed entirely out of 2x2 furring strips. They're not as cheap as I had hoped, but I still think I'll be able to complete this tractor in less than $150, minus the cost of paint (I haven't figured that in yet)
Here's a parts breakdown for the frame:
- Green (Run Base): 3' x2, 3'10" x1
- Pink (Run Wall): 2'10.5" x2, 2'9" x2
- Red (Inside Wall): 3'4.5" x2, 2'9" x2
- Orange (Back Wall): 3'9" x2, 3' x1, 2'9" x2
- Blue (Roof Support): 8' x2, 2'9" x2
- Brown (Sides & Perch): 3'8.5" x3, 2'9" x4
- Yellow (Innards): 3' x1, 2'3" x1, 1' x1, 10" x2
And a parts breakdown for everything else: (The following is a rough estimate which will be outlined in detail as I reach these steps in assembly)
Roof:
Roof:
- Corrugated 8' PVC Roof Panels x2
- 4' Cross-purlins x7
Henhouse:
- Coop Floor, 3'x3' plywood x1
- Coop walls, 2'x3' plywood x2
- Upper walls, 1'x3' plywood x2
- Vent wall, assembled with a frame and a piece of clear corrugated PVC for light
- Access door, 2'x3' plywood (cut) x1
Nesting Box
- Bits of plywood
- hinge for lid
- corner brackets for the lower two corners
Other Stuff
- 1" plastic hardware cloth for the run ceiling and henhouse ceiling
- assorted hardware (hinges etc)
In addition to the tractor, there's a couple of other items we must consider: feeders, waterers, grit & oystershell, coop heating, water reservoir heating, and weatherproofing. I will address these issues in greater detail as I complete construction of the frame, and will describe them here.
- Gravity-fed waterer system, with aquarium heater for those cold winter days (maybe a tape heater too, for the hoses, or some pipe insulation, if it really needs it)
- Pipe feeder (already built), with end caps.
- Interior heater for winter (constructed with a terra cotta plant pot and a 40 or 60 watt light bulb).
- Panel for the inside wall, with the possibility of external controls like the coop door (to open and shut it for the winter).
- Henhouse door controls which are outside the tractor, with the possibility of automation.
- Removable plastic 'floor' under the roost.
- Removable roof.
I started out with a small handful of wood: 4 pieces of redwood and some 2x2 furring strips.
The Skid

But, the whole thing will get a coat of waterproofing/UV-proofing when it's complete (the upper frame will be white-washed and painted as well), to aid in the fight against rot and weather. So I'm not too worried. Additionally, the upper frame will not be permanently attached to the skid - I'm using brackets to tie them together for good stability and ease of disassembly should I need to replace anything. You'll see more about that later on. (EDIT: I decided it's just too much trouble to bracket the skid and the frame together, I'm just using gold screws.)
So, where were we? Oh yeah, building the skid out of redwood. Now, I don't have a lot of experience with woodworking or construction, even though I love it to death. So this will be an experiment and a learning experience for me, that I can use in future projects, such as building a fixed coop later on.
First, I decided, I'd use wood screws, and pre-drill the whole thing to prevent any cracking and other problems. I then figured I'd take it one step further and use angle brackets as well. My dad suggested using an epoxy on the ends of the cross pieces, but after making it to the orange box, I decided that would cost more money than I had, so I compromised and used screws on the ends and some basic wood glue that I had. In all it feels super secure. Here are some pics during construction:


Notice the ends are a lot longer than my design. I dunno what I was thinking, I must have designed it based on actual measurements of some studs I had laying around, which were 7'4". These redwood studs are 8'. so I just compensated and left the ends longer, which means the wheels will have more space, if they even need it. Also, those angles in the ends I cut too deep. They're cut at 2", and my design was at 1.5". No biggie, I just adjusted the work accordingly, so I still have the same interior dimensions as the design. One added advantage is that I have that extra foot of space on the skids over which I can build a shelf for the waterer and/or feeder and other stuff, without putting any extra stress on the framing itself.
The Frame
To start the frame, I took my blueprint and broke it up so that I could make the most of the 8' furring strips with as little waste as possible. As I cut the pieces, I marked one end with their size and what sub-assembly they belong to. I'm almost done cutting all the pieces, but they're all neatly stacked, waiting for the next step. The two pieces I chose for the roof have a great bow in them, which will help with the stability and rigidity of the roof during winter with snow stacked on it.
I was going to spray the skid with some waterproofing, but I decided to wait until it was all finished and do the whole thing (after which I'll paint it of course). So, at this point I started in on assembling the rest of the framing. My initial plan was to assemble each of the sub-assemblies separately, but after I got started, I figured out it was easier to start assembling them in place, working my way up. So that's what I did.
First, was the 'green' sub-assembly. This is the U-shaped frame on the bottom. I simply screwed the pieces down with gold screws: 3 screws per piece. If I need more, I'll add them later, but I think it'll be pretty sturdy. I had to prop the whole thing up off the ground so I could get my clamp in there to brace things up while screwing them down.

Then I pieced together the 'pink' frame. I built this one separately from the skid, then attached it. After that I decided it would be easier to built the sub-assemblies on the skid itself, rather than building them separately, so I did that from the next frame on.

I used the smaller angle brackets on the cross-piece since it's not a load-bearing piece - it's only there to hold up the outside perch. I'm actually considering building an access door in this upper section. We'll see... Here's some detail on the angle brackets. You can click on these pictures for a larger view.


And here's with both 'pink' and 'red' frames erected:

I could probably do without using angle brackets, and it would simplify the construction logistics (for example, adding these brackets will complicate the adding of the side panels), but they're so fun to play with and look so darn cool! Notice on the red frame, I swapped positions of the large and small brackets, since the lower cross-piece will be holding up the henhouse floor, and the upper cross-piece, well, the roof but that's it. This red frame is the inner wall, so this is the one with the hardware cloth wall to be covered with a panel in the winter.
So as I was building this, I was trying to come up with a good way to add a shelf or platform above the roof on which I can keep the water bucket. I don't want to cut holes into the roofing, since I don't want even the possibility of leaks. but if I could figure something out, this would rock for the gravity-fed water system. I'll put some more thought into this and if I think of something, I'll let you know.
Well, we had a couple of days of snow, so I put the project on hold, but I'm back at it. Today, I finished off all the outside frames and added the floor to the henhouse. I couldn't fit a 4'x4' piece into my car, and I couldn't get the guys at Home Depot to cut it to 3'x3' for me, so I ended up having to build it out of 2 2'x4' pieces. This also meant, that to do it right, I'd have to add a cross-support underneath the floor and screw it all down tight as a button, which I did.

And now the henhouse floor! This step is significant to me because I consider it the halfway point in the construction of the tractor. You can see how I screwed it all down using gold screws and you can barely tell that it's two pieces. I'm actually pleased that I had to do it this way, I think the cross-piece underneath will add a lot of support.

First, the major issue: The henhouse door. I want to add an external handle to make opening and closing the door really easy, but it looks like I might not have the chance, so I might have to rig up something else. This is because of the position of that angle bracket under where the door is - there's just no room to fasten on a proper axle (made out of a bolt?). So I think what I'll do is this: Plan A: rig the door to swing downwards, and position the outside perch in such a way that the door, when open, rests on it, making a 'door mat' for the birds to use to get in and out of the door with greater ease; Plan B: either swing the door upwards or use a sliding door or something that can be used with a pulley and a chain to operate it from outside the cage, and screw on a 'doorstep' in front of the doorway for the birds to get a good grip when they jump up into it. This will require more thought.
Now for the ideas: I think for the removable panel on the inside wall, what I'll do is attach the hardware cloth to the OUTSIDE of that part of the frame, and will cut the panel so that it fits well INSIDE that frame, and is held in place with a pair of door latches. This can be inserted through the main access door (on the roost side), and the only modification required is slightly reducing the length of the roost to accommodate the panel ans I'm bringing it in and out of the tractor.
Another idea is that the main vent panel will be constructed using a piece of clear corrugated PVC and a lightweight frame, instead of a wood panel and roof shingles. I'm considering something similar for the nesting box roof (but still with a panel backing, so the box is dark inside).
Finally, I've decided to use a 2-gallon plastic bucket as the water supply, and will use gravity feed and the nipples (and some tubing) to supply the water to the birds. I'm leaning in the direction of putting this bucket on a little shelf positioned in the triangle-shaped wall up above, on the side of the nesting box. It will be secured with a bungie cord, and heated in the winter with a 50 watt aquarium heater.
I've added the walls, the access door, nesting box, platform for the water bucket, ventilation on the back side, and the frame for the panel underneath. I decided to put the water bucket off the back instead of the side, as you can see.


And I added the plastic mesh on the top of the run and the henhouse. Next I need to work on the henhouse door, and start adding the hardware cloth, that's gonna suck, but I'll do the best I can.
Well I had added a piece of plywood as the door but it was crappy, so I decided to build a real door for it before I went any further. Construction going slow because I've got a million and one other tasks and projects to do, too, so it's slow going right now. Anyways, here's the new door:

And since I put the hinges on the front side, it hangs crooked due to the difference center of weight. This will be a problem once I have the mesh walls up since I won't be able to reach inside and push it shut by hand, and I don't relish the thought of wrangling with it daily, so I added a spring to the back side of the door:

Just a simple spring I had laying around, and it does the trick wonderfully. It seems pretty unobtrusive with the door open so I don't think it'll be a problem for the chickens, but we'll see. I also added handles to the front for easier lifting, and used a bit of leftover hardware cloth to cover up the gap in the ceiling mesh above the pop door. Photos of those are over on my flickr page.
So tonight after work, I will attach hardware cloth to the sides and screw down the roof and construction will be complete! Then the only things remaining is adding the outside perch, roost, the winter panel, and attaching the feeder and waterer systems, and I think it'll be ready to play! Actually, I need to weatherproof the nesting box too, I'll probably just use a bit of roof shingle or something... and then waterproof all the outside wood and paint too.
Ok, finished attaching the roof, hardware cloth, and now I hung the feeder and put up the chain for the water bucket. Check it out:


Yes, I'm using the cheapy 50-cent plastic plugs to seal this stuff up tight. The top one will stay on all the time, opened when I fill it or check it, and the bottom one will be inserted only when I'm filling it.
Here's the water bucket:

Yes, another bungie strap. On the back side of the bucket is a chain, attached to the two eye hooks:


...after which it will be pulled through a tee, one side heading down into a nipple that hangs halfway between the henhouse door and the nesting box door. The other outlet will continue around to the inside wall and down and out to the water nipple that will be positioned in the run. Since it's a quick disconnect, I should be able to easily remove the bucket for cleaning, unless I can come up with a better solution!
Well, that's it for now, kids. Stay tuned for more.
Well, it's been freakin cold outside but I put in the watering system tonight before it got too dark to work. In summary, I'm using a 2-gallon bucket with a gravity feed system supplying water to two nipples, one in the henhouse of my tractor and the other out in the run area. Water is fed to the nipples using vinyl tubing. The bucket will be heated in the winter to prevent freezing using a small 50-watt aquarium heater. I've tested the whole system and it works well.
Here's some pics:

This is the bucket in place and the top of the tube system. These are quick connect fittings so I can remove the tube easily should I ever need to remove the bucket.

This shows the nipple inside the henhouse and the tubing that goes to the outside nipple.

Tubing as it exits the henhouse. I put the tubing on the inside edge of this support since I'll be fitting a panel of wood against the mesh in the winter when it gets just too cold for the birds. The panel will be cut in the corner to accommodate the tubing, and the tubing on the side will help hold it in place.

Outside nipple.
My only concerns with this setup are two:
- This will fail if the chickens peck at the tubing. I don't anticipate this to happen, since they don't peck at the same type of setup in their brooder now, they just mess with the tip of the nipple, now that they know where the water comes from.
- Tube that exits to the outside nipple might freeze in the winter.
All I have remaining to complete is the heater for those freakin freezing nights, and the 'roof' over the nesting box needs shingles or something.
December Update!
Well, it's bloody cold outside, so I've been working on the tractor little by little as I can and not freeze to death. I installed teh water system, and today, filled it with water and put the heater in and got it going. At first, the whole thing was leaking all over the place because I hadn't seated the hoses well, but that's fixed and it seems to be doing well. Water flows freely through the nipples when pressed and don't when they're not depressed. I added a heat lamp for a test, here's a couple pictures:


If this survives tonight, then I'll call it a success. Last night it got down to about 8F. So it's be GREAT SUCCESS if it does well through a night like that. I might jsut leave the heat lamp there once I add the chickens, we'll see.
Also, I mounted the roost to a board, with holes, so I can bolt it down, I figure it's a much better method, which will allow for easier cleaning, and can replace the board if need be, and that's a lot easier than repairing a beat-up coop floor, eh?

I plan to fill it with about 2" of bedding at first and see how the girls do with it, then adjust accordingly.
Materials Breakdown (Updated on 2009-11-3)
So this is a running tally of the parts and cost as I buy them. I estimate I'll be in this about $200 when all is said and done (before the paint), so we'll see how close to that I actually get.
| Redwood 2x4s (x3) | $23.04 |
| Pine 2x2s (x15) | $31.80 |
| Angle Brackets (a bunch) | $38.20 |
| Screws | $7.00 |
| Glue (not included) | $0.00 |
| Corrugated PVC Roofing (x2) | $25.60 |
| Assorted other bits of wood | $8.00 |
| Hardware Cloth | $39.98 |
| Plywood | $37.96 |
| TOTAL | $211.58 |