Here is a run down of how we built our coop. My husband did a fabulous job and we are very happy with the design. The ideas for the design were gathered from other users of this site and altered to meet our specifications. When building this chicken coop and adjacent locker / garden on top of the lockers, we were guided by principles of sustainability. We wanted to showcase what can be done with as much reclaimed materials as possible. True, it took longer to gather the materials, but it saved us thousands of dollars. We estimate that the cost of all of this was around $1000. The majority of the cost was for the roof - woven poly (~$200), the hardware cloth (~$300) and various hinges, nails, etc. Those items were just too hard to find reclaimed. Depending on your scenario, you may not need to use these specific materials and buy cheaper versions or none at all (for instance, the typical chicken wire is much much cheaper than the hardware cloth we used, but then again it would not withstand a racoon attack probably).
The wood used is almost 90% reclaimed, except some posts. The best source of 2x4's and planks we found is from Home Depot. They discard weekly large amounts of palets (skids) and typically put it near or into a container near the back of their stores. These palets are probably destined for recycling, bur reusing is preferred to recycling. We asked and were told we can take as much as we wanted. Using a small trailer, we visited home depot almost once a week to get lots of pallets (it seems they have the container picked up once a week, so go just before they empty it). These we then cut down using a reciprocal saw (best tool ever") ), using a long blade for metal. It cuts through nails like through butter. We just cut the nails off of the planks and get lots of planks and 2x4s. Home Depot also often has wood that is bent or slightly damaged they often sell for up to 70% off. We got lots of 2x4's this way. For most of the applications of using the 2x4's for this project; bent wood did not matter, as using nails and doubling up the 2x4's made the bends irrelevant. One useful trick we found: because lot of the 2x4's were too short (coming from skids), we would simply double them up and overlay the two rows, sort of like when building a wall out of bricks. Then we nailed it together. This way we could extend the length of the beams to any length. In fact the longest rafter we have done this way is 27' long! The roof rafters were all build this way. Most of them are around 15', supported only at the end. True, you cannot walk on them, but then again we would not expect to walk on our roof. It would certainly support weight of several racoons. While nailing the roof overt the rafters, we put a supporting beam from ground to the rafter in the middle of the span, and that allowed us to walk on the beam.
), using a long blade for metal. It cuts through nails like through butter. We just cut the nails off of the planks and get lots of planks and 2x4s. Home Depot also often has wood that is bent or slightly damaged they often sell for up to 70% off. We got lots of 2x4's this way. For most of the applications of using the 2x4's for this project; bent wood did not matter, as using nails and doubling up the 2x4's made the bends irrelevant. One useful trick we found: because lot of the 2x4's were too short (coming from skids), we would simply double them up and overlay the two rows, sort of like when building a wall out of bricks. Then we nailed it together. This way we could extend the length of the beams to any length. In fact the longest rafter we have done this way is 27' long! The roof rafters were all build this way. Most of them are around 15', supported only at the end. True, you cannot walk on them, but then again we would not expect to walk on our roof. It would certainly support weight of several racoons. While nailing the roof overt the rafters, we put a supporting beam from ground to the rafter in the middle of the span, and that allowed us to walk on the beam.
As for the paint, we saved, literally, hundreds of dollars by simply going to a paint recycling depot (Recycle It! here in British Columbia, Canada) and asked if we could take paint people dropped off (again, reusing is much better than recycling). Then we took a large bin, and poured in all sorts of brown colours we scavenged this way. In the end we stirred it and got some sort of a brown - we did not care exactly what shade we got as long as it was brown).
All in all, this was an ambitious project because of all the many features we built into it (roof, protection against lots of animals and rats, exterior sink, exteriror locker and garden on top). However it was well worth it. Our son is super excited to have chickens in his life and all his little friends come over to see the chickens. We have become sort of a petting zoo. It also dimissed many of the stereotypes in people's minds that visit (chickens make too much noise, they smell and it is a lot of work to care for them). Most people found the company of the chickens, while we sit next to the coop on our stone patio deck actually very relaxing. It also inspired some of our visitors to build their own.
If you have any questions, we would be more than happy to share our experience in more details or send more detailed pictures if you contact us.

Here we are framing the coop itself. We will have four chickens.
The run is very large and the coop will be housed within the run. We live on a green belt and therefore have to deal with a lot of predators. Since we were extending our yard, we had to add several yards of earth to level the lot. Before doing this, we laid hardware cloth on the ground under the entire run, then placed the fill on top so that nothing would be able to burrow their way in. All the hardware cloth was then secured with a staple gun to the framing so there were no gaps from underneath. Every inch of opening was secured with hardware cloth, even from the top of the frame to the roof overhang. We have bear, coyotes, cougars, rats, raccoons, etc so we have to be ultra diligent.
Adjacent to the coop we had space to build a storage locker for the chicken supplies, tools, and our bikes. On top of this locker we built a 6" deep garden box. We lined it with a pond liner and filled with earth. It is under the roof cover, so we did not have to slope the garden floor and have a drain for excess water. Plus with the roof few feet above, it creates a sort of a green house. We have one roof-top garden, one regular veggie patch in the ground, one cold frame, one covered dome, and several boxes for climbers on the side of the house. This is yet another. We try to maximize what little real estate we have here.
In this photo most of the framing is painted, the coop is almost complete, and the hardware cloth is covering the sides of the run.
Here is the coop before we painted the ramp. The ramp can be removed for ease of cleaning. The two flaps on the top are vents and the openings are also covered with hardware cloth. There are eye hooks to hold them open when we want. The two openings with plywood covering them will be windows but we have to buy the glass. The opening over the ramp is the entrance for the chickens which stay ajar all day. The walls of the coop are doubled with fibreglass insulation in all walls except the front (so we don't have to heat it in winter). The front opens from the middle with two doors for ease of cleaning. We built the coop at this height to maximize the run space for the chickens and so we didn't have to bend over to clean inside. It's the perfect height for us to reach in.
Also, the nest box is accessible from the back. We built a flap on the back which can be lifted so we can reach in and collect the eggs. The next box is entirely exterior to the structure.
View of the inside shows the wood chips we use for deep litter method.
The roost was built to be removeable for cleaning and maintenance. It is a rod from an old clothes closet - perfect size. We placed a litter pan under the roost. At first we had this covered with the hardward cloth with small squares but the feces did not drop through and the chickens were walking in it so we switched it out for the wider spacing mesh and now it's great because all the stool drops right into the pan. Once a week, I lift up the frame and remove the plastic trays and dump the entire contents in the compost. The trays are the seedling trays from a garden store. One bail of wood shavings lasts us about 6 months. The nest box is in the back. We have since put in a divider so there are two boxes.
Chickens came home. Our son is very excited!
We built a sink so we can wash our hands after handling and it also makes changing their water is a breeze. The little stool is so the kiddies can reach it. The sink is simply fed by a garden hose burried in the ground and the drain goes into a 15 feet long burried drainage pipe. The entire sink is made out of 100% reclaimed materials, excep the hoses. I cannot tell you just how useful this sink is!
When designing the roof, we debated several different materials. It rains a lot here and the ground would be very muddy if we didn't have constant cover. At the same time, we wanted the chickens to get maximum light. Many materials were too expensive to consider. We ended up purchasing woven poly, clear, from notherngreenhousesupply.com. It's meant for greenhouses so it lets all the UV light though but it's very durable, much more so than a tarp, and mold/mildew resistent. We didn't want it to frey so we placed it over the rafters laying down some strips of pond liner we had left over from another project so that the sharp edges from the wood wouldn't chafe it. Then we used wood strips which were sanded down to secure the material along the rafters. It was a three person job to be able to pull the material tight like a drum while stapling it on. It had to be really tight with no wrinkles. The next job is to attach a gutter to the lower end (to collect water into rain barrels to water our gardens using a pump on a timer) and we need to run an electric fence around the perimeter to keep racoons and cats off. We painted the rafters white so as to reflect the light. This was recommended by the manufacturer as dark coloured paint might melt the material when it heats.
Here is a view from a distance of the completed project. We just have to plant grass seeds on the right and then we are done!
A view inside the coop. We have since added an apparatus of branches hanging by ropes for the chickens to climb on so they can be up high when they want and have some entertainment.
First egg today! Chickens are 4.5 months, ISA browns. Sorry, can't figure out how to rotate in this program!
The wood used is almost 90% reclaimed, except some posts. The best source of 2x4's and planks we found is from Home Depot. They discard weekly large amounts of palets (skids) and typically put it near or into a container near the back of their stores. These palets are probably destined for recycling, bur reusing is preferred to recycling. We asked and were told we can take as much as we wanted. Using a small trailer, we visited home depot almost once a week to get lots of pallets (it seems they have the container picked up once a week, so go just before they empty it). These we then cut down using a reciprocal saw (best tool ever
), using a long blade for metal. It cuts through nails like through butter. We just cut the nails off of the planks and get lots of planks and 2x4s. Home Depot also often has wood that is bent or slightly damaged they often sell for up to 70% off. We got lots of 2x4's this way. For most of the applications of using the 2x4's for this project; bent wood did not matter, as using nails and doubling up the 2x4's made the bends irrelevant. One useful trick we found: because lot of the 2x4's were too short (coming from skids), we would simply double them up and overlay the two rows, sort of like when building a wall out of bricks. Then we nailed it together. This way we could extend the length of the beams to any length. In fact the longest rafter we have done this way is 27' long! The roof rafters were all build this way. Most of them are around 15', supported only at the end. True, you cannot walk on them, but then again we would not expect to walk on our roof. It would certainly support weight of several racoons. While nailing the roof overt the rafters, we put a supporting beam from ground to the rafter in the middle of the span, and that allowed us to walk on the beam.As for the paint, we saved, literally, hundreds of dollars by simply going to a paint recycling depot (Recycle It! here in British Columbia, Canada) and asked if we could take paint people dropped off (again, reusing is much better than recycling). Then we took a large bin, and poured in all sorts of brown colours we scavenged this way. In the end we stirred it and got some sort of a brown - we did not care exactly what shade we got as long as it was brown).
All in all, this was an ambitious project because of all the many features we built into it (roof, protection against lots of animals and rats, exterior sink, exteriror locker and garden on top). However it was well worth it. Our son is super excited to have chickens in his life and all his little friends come over to see the chickens. We have become sort of a petting zoo. It also dimissed many of the stereotypes in people's minds that visit (chickens make too much noise, they smell and it is a lot of work to care for them). Most people found the company of the chickens, while we sit next to the coop on our stone patio deck actually very relaxing. It also inspired some of our visitors to build their own.
If you have any questions, we would be more than happy to share our experience in more details or send more detailed pictures if you contact us.

Here we are framing the coop itself. We will have four chickens.

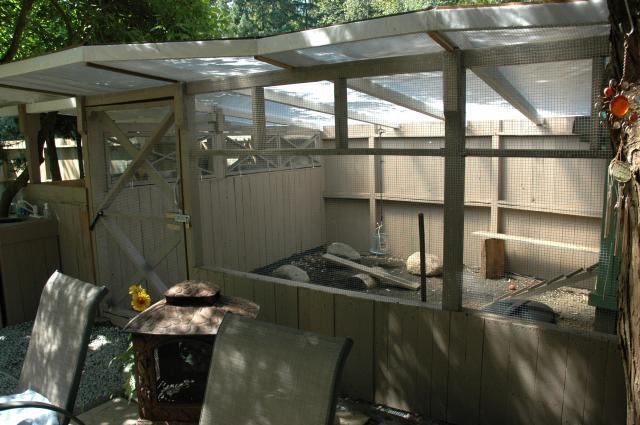
The run is very large and the coop will be housed within the run. We live on a green belt and therefore have to deal with a lot of predators. Since we were extending our yard, we had to add several yards of earth to level the lot. Before doing this, we laid hardware cloth on the ground under the entire run, then placed the fill on top so that nothing would be able to burrow their way in. All the hardware cloth was then secured with a staple gun to the framing so there were no gaps from underneath. Every inch of opening was secured with hardware cloth, even from the top of the frame to the roof overhang. We have bear, coyotes, cougars, rats, raccoons, etc so we have to be ultra diligent.

Adjacent to the coop we had space to build a storage locker for the chicken supplies, tools, and our bikes. On top of this locker we built a 6" deep garden box. We lined it with a pond liner and filled with earth. It is under the roof cover, so we did not have to slope the garden floor and have a drain for excess water. Plus with the roof few feet above, it creates a sort of a green house. We have one roof-top garden, one regular veggie patch in the ground, one cold frame, one covered dome, and several boxes for climbers on the side of the house. This is yet another. We try to maximize what little real estate we have here.
In this photo most of the framing is painted, the coop is almost complete, and the hardware cloth is covering the sides of the run.

Here is the coop before we painted the ramp. The ramp can be removed for ease of cleaning. The two flaps on the top are vents and the openings are also covered with hardware cloth. There are eye hooks to hold them open when we want. The two openings with plywood covering them will be windows but we have to buy the glass. The opening over the ramp is the entrance for the chickens which stay ajar all day. The walls of the coop are doubled with fibreglass insulation in all walls except the front (so we don't have to heat it in winter). The front opens from the middle with two doors for ease of cleaning. We built the coop at this height to maximize the run space for the chickens and so we didn't have to bend over to clean inside. It's the perfect height for us to reach in.
Also, the nest box is accessible from the back. We built a flap on the back which can be lifted so we can reach in and collect the eggs. The next box is entirely exterior to the structure.

View of the inside shows the wood chips we use for deep litter method.

The roost was built to be removeable for cleaning and maintenance. It is a rod from an old clothes closet - perfect size. We placed a litter pan under the roost. At first we had this covered with the hardward cloth with small squares but the feces did not drop through and the chickens were walking in it so we switched it out for the wider spacing mesh and now it's great because all the stool drops right into the pan. Once a week, I lift up the frame and remove the plastic trays and dump the entire contents in the compost. The trays are the seedling trays from a garden store. One bail of wood shavings lasts us about 6 months. The nest box is in the back. We have since put in a divider so there are two boxes.

Chickens came home. Our son is very excited!

We built a sink so we can wash our hands after handling and it also makes changing their water is a breeze. The little stool is so the kiddies can reach it. The sink is simply fed by a garden hose burried in the ground and the drain goes into a 15 feet long burried drainage pipe. The entire sink is made out of 100% reclaimed materials, excep the hoses. I cannot tell you just how useful this sink is!

When designing the roof, we debated several different materials. It rains a lot here and the ground would be very muddy if we didn't have constant cover. At the same time, we wanted the chickens to get maximum light. Many materials were too expensive to consider. We ended up purchasing woven poly, clear, from notherngreenhousesupply.com. It's meant for greenhouses so it lets all the UV light though but it's very durable, much more so than a tarp, and mold/mildew resistent. We didn't want it to frey so we placed it over the rafters laying down some strips of pond liner we had left over from another project so that the sharp edges from the wood wouldn't chafe it. Then we used wood strips which were sanded down to secure the material along the rafters. It was a three person job to be able to pull the material tight like a drum while stapling it on. It had to be really tight with no wrinkles. The next job is to attach a gutter to the lower end (to collect water into rain barrels to water our gardens using a pump on a timer) and we need to run an electric fence around the perimeter to keep racoons and cats off. We painted the rafters white so as to reflect the light. This was recommended by the manufacturer as dark coloured paint might melt the material when it heats.

Here is a view from a distance of the completed project. We just have to plant grass seeds on the right and then we are done!
A view inside the coop. We have since added an apparatus of branches hanging by ropes for the chickens to climb on so they can be up high when they want and have some entertainment.

First egg today! Chickens are 4.5 months, ISA browns. Sorry, can't figure out how to rotate in this program!
