CoopaCabana at Caju Cottage
With little money, no experience, few tools, and a spirit of cooperation, we set out to build a henhouse and run for the chooks we will get when it's all done. Much as I wanted to use salvaged and scrounged materials, I didn't know how to find that much wood of the same size and didn't have the skills to make do with what I could find. After puzzling over a stack of free--but old and wet and heavy--pallets, we went to our Big Box Home Construction Store and bought some stuff.
Materials (so far!)
--3 pieces of plywood. It was the cheapest stuff that was actually wood. It's called sheathing, which I hoped meant it was suitable for outdoors, and it's 3/8" thick. It was about $12 each.
--2 8' lengths of 2"x2". For the others of you inexperienced in building, these are actually 1.75"x1.75". We used these for the upright parts of the frame.
--I forget how many pieces of 1"X2" we got. It was called "furring" and was the cheapest wood we could find in the store! It also came in 8' lengths.
--We also got some hinges and some screws.
Building the house
We had the good folks at the store cut most of the wood for us (I had it all figured out ahead of time, or so I thought). However, I had initially imagined building it all out of plywood, without the framing, and my calculations on the plywood were based on that. Then we decided to do framing and I calculated those lengths assuming the frame would be the size I'd planned for the house to be. What that meant was that the plywood covers the frame, but doesn't meet on the edges, as I didn't account for the thickness of the plywood.

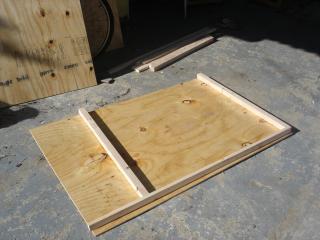
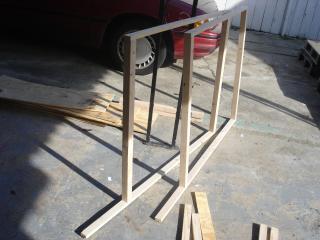
The first wall frame (minus top piece) laid out on the floor plywood. There are two uprights of 2x2 and a long bottom piece of 1x2.
The complete frames of the two long walls. The bottom pieces stick out further because they will support the nest boxes.
The basic frame attached to the floor.
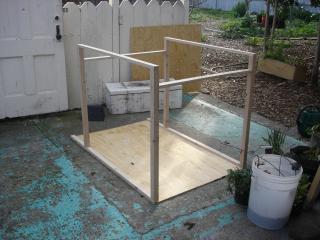
We added three walls and moved it into the garage as it looked like it was going to start raining in the night. The far wall has the popdoor for the chooks to go out. I don't know if it is too high off the floor. We might have to add a step. A ladder will lead down from the outside. Opposite the popdoor is the opening through which I will reach in to change food and water, clean out the coop, grab the droppings board, etc. The side without any wall yet is where the nest boxes will go.
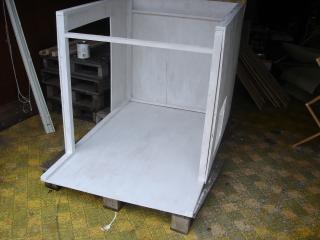
I painted what we'd done so far with white primer. I thought it would be easier to get the inside done while it's still pretty open. Also, it was rainy and I couldn't really do much else by myself!
Update!
Once we put the walls for the run together (see separate "the run" page), we realized that the house wasn't going to fit right, so we disassembled it. We got a new, sturdier piece of plywood for the floor and cut it to fit into two adjacent walls of the run.
I got some free linoleum from someone on freecycle.org and I cut the pieces to cover the floor of the house. I have not yet attached them or done anything further on the henhouse.
Here you can see the floor of the house attached to the walls in the corner of the run. You can also see the linoleum that I was patching together from someone else's free scraps!
March update!
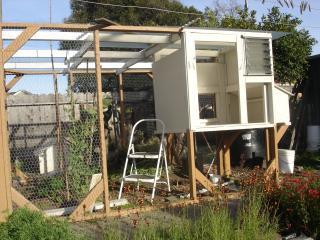
The henhouse is almost done now.
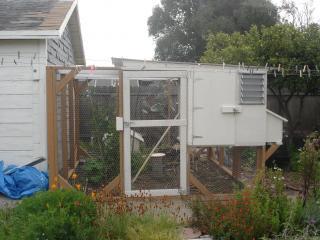
You can see how the henhouse sits in the corner of the run.
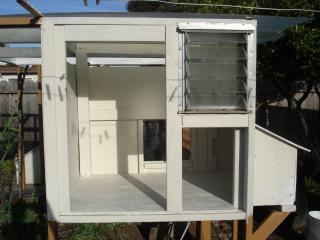
Here's a close-up of the house. The big space in front will have a door on it and the space under the louvered window will be covered.
April Update:
This is how the house looks from the garden.
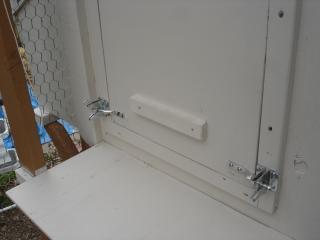
Here is the back (pop) door closed.
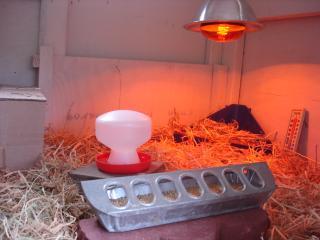
The henhouse is set up as a brooder right now.
And here are the four chooklets: Finally here!
With little money, no experience, few tools, and a spirit of cooperation, we set out to build a henhouse and run for the chooks we will get when it's all done. Much as I wanted to use salvaged and scrounged materials, I didn't know how to find that much wood of the same size and didn't have the skills to make do with what I could find. After puzzling over a stack of free--but old and wet and heavy--pallets, we went to our Big Box Home Construction Store and bought some stuff.
Materials (so far!)
--3 pieces of plywood. It was the cheapest stuff that was actually wood. It's called sheathing, which I hoped meant it was suitable for outdoors, and it's 3/8" thick. It was about $12 each.
--2 8' lengths of 2"x2". For the others of you inexperienced in building, these are actually 1.75"x1.75". We used these for the upright parts of the frame.
--I forget how many pieces of 1"X2" we got. It was called "furring" and was the cheapest wood we could find in the store! It also came in 8' lengths.
--We also got some hinges and some screws.
Building the house
We had the good folks at the store cut most of the wood for us (I had it all figured out ahead of time, or so I thought). However, I had initially imagined building it all out of plywood, without the framing, and my calculations on the plywood were based on that. Then we decided to do framing and I calculated those lengths assuming the frame would be the size I'd planned for the house to be. What that meant was that the plywood covers the frame, but doesn't meet on the edges, as I didn't account for the thickness of the plywood.
The first wall frame (minus top piece) laid out on the floor plywood. There are two uprights of 2x2 and a long bottom piece of 1x2.
The complete frames of the two long walls. The bottom pieces stick out further because they will support the nest boxes.
The basic frame attached to the floor.

We added three walls and moved it into the garage as it looked like it was going to start raining in the night. The far wall has the popdoor for the chooks to go out. I don't know if it is too high off the floor. We might have to add a step. A ladder will lead down from the outside. Opposite the popdoor is the opening through which I will reach in to change food and water, clean out the coop, grab the droppings board, etc. The side without any wall yet is where the nest boxes will go.
I painted what we'd done so far with white primer. I thought it would be easier to get the inside done while it's still pretty open. Also, it was rainy and I couldn't really do much else by myself!
Update!
Once we put the walls for the run together (see separate "the run" page), we realized that the house wasn't going to fit right, so we disassembled it. We got a new, sturdier piece of plywood for the floor and cut it to fit into two adjacent walls of the run.
I got some free linoleum from someone on freecycle.org and I cut the pieces to cover the floor of the house. I have not yet attached them or done anything further on the henhouse.

Here you can see the floor of the house attached to the walls in the corner of the run. You can also see the linoleum that I was patching together from someone else's free scraps!
March update!
The henhouse is almost done now.

April Update: