***Coop as of December 2014
In the beginning...
Once the city of Richmond passed the ordinance allowing "urban" chickens in 2013 we immediately jumped on board and began our design phase for what we wanted to incorporate. The city allows up to 4 hens and no roosters. So we knew we wanted a smaller coop. My wife was dead set on having a chicken tractor so we could move the coop around our yard. Our first two designs started out like this:
Started with a 5'x5'x3' run with a chalet style coop on top with a planter box on the side loosely based on the Williams Sonoma ridiculously priced coop.
After a little web browsing and design consideration, I scrapped the original design and moved to a more traditional roof line closer to the original WS design:
Now we build...
Construction began with the base/run. I opted for pressure treated 2"x 2"s, which I still regret:
Immediately we discovered this was not going to be sturdy enough so I had to start reinforcing:
Ah crap...
Right about this time we were approved for our permit and quickly realized that a chicken tractor was out of the question. We have a smaller yard and neighbors in close proximity. The City only allows for coops to be fixed and in the back portion of your yard. So the chicken tractor was scrapped and a new "fixed" design began to take form:
I had scrapped the planter box and decided on a storage bin on the back so we could incorporate a hidden feeder. I also added a screened in porch and moved the ramp down over to a side rather than running through the middle.
This is really happening...
In August our Peeps arrived:
Construction resumes...
Top construction began after I put up the chicken wire to strengthen the run. I used mostly pressure treated 2" x 4" for the frame work. The biggest question was what sort of siding did we want to go with. The original thought was to have either cedar siding or plank board siding, but it just wasn't available. We opted for T1-11 which I was skeptical about at first.
The next debate was about roofing. I once again wanted to go with cedar for the shingles, but it just wasn't available to us. We opted for a basic roofing shingle.
Nesting boxes were added with privacy walls.
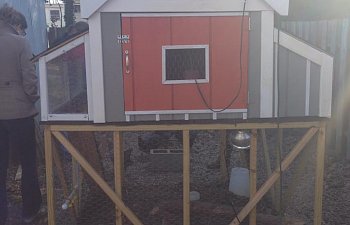
At last we started painting and trimming the coop and it really started to take shape.
One of the last parts assembled was the side porch which was a headache in itself.
The planter box came back in the final cut! Right now it's just storing odds and ends. You can also see that I build a bucket waterer. There's a hole in the bottom that feeds a rubber tube to a PVC pipe with a few chicken nipples. The chickens took to it immediately.
I think we're done. 2013...
I finished off the roof on the porch and then we moved them in! Things got cold here in Virginia immediately and unexpectedly, so we were worried our ladies weren't able to acclimate to the weather as quickly as we wanted them too as they were only a few months old. So we've had to run some red heat lamps in the coop on the really cold nights.
Our two Speckled Sussex (Eeny and Meenie) and our two Barred Rock (Miny and Moe) are loving life with their cabbage tether ball:
Baby it's cold outside...
***Winter 2013: The temperature dropped even more a few weeks later and we were down in the single digits at night time temps. This is really rare for the area so we really didn't plan on this with our coop design. The chicken waterer in the run completely was completely frozen and our ladies were without water. We started putting an automatic cat waterer in the top of the coop under the heat lamp, but even that started freezing. Sure enough, my solution was on BYC:
It's not pretty but it serves it's purpose and was assembled for under $10 worth of parts. Funny enough, it's January 2014, below freezing and our ladies have decided to start laying their first eggs.
***update Winter 2014/2015: I've since purchased a thermostatically controlled outlet that kicks on if the temperature falls below 34 degrees . This controls the heat lamp and a heated water bowl. I wasn't crazy about having an electrical source that I put together sitting underneath water and in a coop filled with hay.
Things I would have done differently:
- As I stated before, I should have built the original run with pressure treated 2" x 4", but at the time we were still planning on making a light(er) weight chicken tractor. I've reinforced the base since we have quite a bit more weight to the top, so all is holding well, but I would feel better about it.
- I also would have liked to put a foundation down rather than just have the pressure treated lumber on the ground. We don't have issues with predators digging through that I need to block, but I would have liked to know the base was sitting on something solid rather just than dirt. ***Late Spring 2014 I ended up lifting the entire coop and putting pavers around the entire base. This eliminated my fear of rotting wood and leveled out everything.
Wait, i'm not done. Must build more...
- Not pictured, I've built a couple roosts for our ladies. Inside the coop there are roosts going across the roof line and another roost going diagonal about mid level to give them a hop point to reach the top. Trolling the alleys I also managed to find some great natural wood and built a sturdy roost in the run.
- Once the weather cooperates, the next big project is an extended run off the back of the coop. It will be open air and mirror the dimensions of the original coop, but give the ladies an extra area to flap their wings and forage. Attached to that I've drawn up plans for a closed in compost bin that will let us fill from the top and let our ladies scratch and pick at whatever we dump in there.
-
Along the sides of the extended run, I plan on building some raised planter boxes so we can have some tasty treats just in reach of the ladies, but not close enough that they can eat the entire plant.
New year! Time to compost...
***February 2014 Update
I completed the compost bin which is phase II of the overall plan. The idea is to now connect the bin and the coop by a fenced in section so the ladies can stretch their wings during the day and then turn over some compost for some tasty treats.
After I built the frame, I quickly scrapped the idea of just using chicken wire or wire mesh for the sides. It was going to be too flimsy and I wanted to be back to effectively keep out the raccoons and other city critters. So I went for the all pressure treated sides and then chicken wire on the top with latches. The open front will tie directly into the chicken coop run that's going to connect to the original coop.
Death from above...
I finally got around to attaching the compost bin and the chicken coop into one big run. More so because we usually let our girls free range in our yard when we're home, but we've had a lot of hawks (yes in the city!) stalking and swooping. So we were in need of a safe space for them to spend their days. However, now that i'm actively composting, I naturally started gardening and growing vegetables as well. After months of debating, I decided I wanted to incorporate a vertical garden into my coop design so the girls can snack as needed and we can harvest as well.
A room with a view...
I went sturdy on the corners with 4x4's and used pressure treated 2x4's for the frame.
I then ran pressure treated 1x6's the length of the coop for the hanging planters. I then attached leftover pet-safe screen (non-metallic so it won't rust) to the bottoms so the planters can drip water down to the next level.
From there I attached the other sides, added reinforcement and closed off the bottom with the pet safe screen.
I then added chicken wire to keep the girls in and the other critters out.
From there I added compost, chicken manure and dirt and began planting some fall crops of Spinach, lettuce, beets and collards.
I'm in the process of adding clear plastic corrugated roofing at an angle as a roof. I'll then collect the runoff into a gutter and then into a rain barrel for the ladies and irrigation. I'll also be adding a swing and a few perches for the girls. Pictures to be added as I finish!
This is the end. For now...
***Updates winter 2014/2015. I think i'm finally finished. Ha.
So a couple things to note. It's winter now and temperatures drop to the 20-30's at night time. I cut out some Plexiglas for my "screened in porch" to cut down on the wind blowing into the coop. I didn't realize how large my extension was going to be until I started building it. The plan was always to connect the coop to the compost bin that's sitting against the fence. The coop isn't mobile so I said, alright, let's span the gap. It ended up being about a 7 foot expansion with a 7 foot roof. I think it turned out pretty well.
One of my main requirements was to add a dutch door. Sometimes you just want to toss some scraps in and not let everyone out. I have the same option to drop scraps into the compost bin that's connected, but it's also nice to be able to open just the top of the door.
Final touches were adding some natural wood perches for the girls to hang out on and be able to pick at whatever we happen to be growing at the time. Also in the picture is the waterer attached at the front of the compost bin. I'm not convinced this is a great idea, especially since we'll probably have a chicken jump on the hose and empty the water bucket into the pin, but it's my current solution.
Back view of the coop. As you can see we are butted right up to the alley and are urban chicken'ing in the space we have. I opted last minute to use clear corrugated plastic for the roofing and i'm glad I did. The coop sits between two garages in the alley and there is only so much daylight to go around. The clear plastic let's the sun get to the vertical planters. If I had had gone with metal or the composite roofing, we'd lose the plants. Plan for the spring will be to add a gutter/rain collection system and add a rain barrel. The planters are set up with screen on the bottom to allow for drainage, so a simple drip irrigation system should make for easy watering. Just a finishing addition i'll be adding in the spring, I'm going to use chalk paint on the vertical planters. We plant various greens and then forgot what was what, so that will help the confusion. Ha.
**Update March 2015
Now that the snow has abated it's time to plant some greens! The chalkboard paint idea turned nicely. I also updated the perches in the coop to for more space and they are natural wood instead of a 2x4's.
Thanks for looking!
Adam