Here are some photos of the coops through the years:
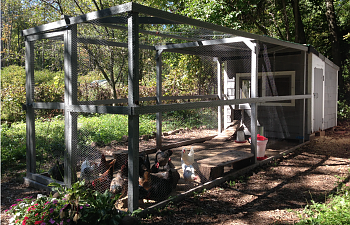
And here it is today:
As you can see, we have changed the run. We have actually had about four different run systems over the years. Due to the large population of hawks in our yard, we had to fully enclose it. We added on the new run this spring.
Some other changes that we made was to make the inside of the coop more functional. My absolute biggest tip to anyone building a coop is to think about where you will be walking or moving around in the coop. Are the nest boxes easily accessible? Do you have to twist & shuffle around feeders? We changed the configuration of our interior based on previous years of tripping or straining to reach things.
Here are the roosts when they first moved into the coop. Three different levels which made it easier for them to get to the top when they were small.
As you can see in the interior of the coop, the roosts are along the back wall (they were always there), but the nest boxes used to be along the wall to the right of the door. It made the inside feel very crowded. The feeder and waterer used to be right in the center of the coop, which you had to shimmy around to get to the nest boxes. Now, it is very easy to walk straight inside.
Here is an example of our nest boxes (although they are not finished in this photo, but you can get the idea):
We painted our nestboxes with spare paint for easier cleaning. The lip on the front is also larger than in the photo to prevent eggs from rolling out. The top is slanted as well.
We also added nest box curtains from some old fabric we had to give them some more privacy & shade. After cutting down a few trees the sun shines right into the nest boxes.
Plans:
One of the great things about these coops is that they are square. So you can copy this coop in whatever dimensions you need. 6x6, 8x8. 10x10, etc, to fit your flock size. The roof is slanted for better drainage.
Exterior photos/details:
The coop is raised about 1.5 feet off the ground, resting on cinder blocks. We re-leveled it this spring because a few of them had sunk a bit over the years. We did this by jacking the coop off the ground using a high lift jack, using a level to see when it was level & adjusting the cinder blocks accordingly.
For siding, we have cedar shakes that have been painted. The shakes that were painted have held up amazingly well over the last 45 years. The back of the coop was never painted, and we had to replace those. So I would recommend that you paint your shakes if you want them to last a long time. There is plywood for the walls, then tar paper, then the shakes.
The windows are frames we have made ourselves (just square) with hardwire attached.
Here is our door to the coop.
We have lots of extra wood chips so we put those around the coop to keep weeds down & to have a neat walking area.
The run is fully enclosed with chicken wire, as well as under the ground surrounding the run. We used wood posts with the post spikes on the bottom, similar to these at home depot. We already had the posts & spikes, which we took from the runs that used to be used for raising baby cows & goats. To run the chicken wire, it is much easier with two people. One to hold the wire & unroll it as you go, and one person to use the staple gun. First we attached all the wire using just a staple gun, then went back after & used poultry nails to make it stronger.
As lastly, for my birthday my husband bought me a game cam! So we can keep an eye on anything sneaking around the coop at night,
I have to mention that these coops are extremely sturdy. It was able to withstand this tree falling on it back during the October snowstorm.. and it only caused damage to the roof shingles (which you can see in our photos where they were replaced).
We also added about 6 or so wood logs for them to stand on. It's been especially helpful because we've gotten quite a lot of rain lately.. and no one likes a wet run!
Updates:
- September 24 2013: We finally painted all the coops the same color! It was driving me crazy to have one grey and the others red! We also added more sand to the run. We had some naturally sandy soil in one area of the run already and they loved it for dust bathing, so we just added more in the rest of the run. They love it!
- October 2013: We noticed that we were catching trespassers on our game cam, so we put up fence a long a large area of the property surrounding the chicken coop and barn area. We have plans to fence in about half of the property in the spring.
Things We Are Planning to Change:
- Building similar runs on the other two coops & doing all the same changes on the other two.
- We are adding wall mounted, home made feeders. I don't care too much for the hanging ones inside the coop. We have the materials, just need to get around to installing them.
- We used to have a run system where each coop had it's own run, then a larger run surrounding all the coops. You could open the door to each run & let them out into the larger area. I'd like to do something similar again, but the larger part wouldn't be fully covered on top.
- A step outside the door. Our coop is elevated on cinderblocks, so it is a pretty good step up into the coop. If you're not paying attention it's easy to trip.
Summary of my tips to anyone building a coop:
- Build it bigger than you think you need. If you think you'll only get 5 chickens, build it to fit 10.
- Think of how you will clean the coop or access nest boxes. Make enough room to move comfortably through the coop.
- If you know you have a predator problem in you area, plan that into your coop. It's devastating to loose chickens to predators.
- Plan ahead where you will place waterers & feeders.. don't make them an after thought.
- Make sure to have enough roost space per bird.
- Ventilation!
- Make sure your chickens have an area of shade.