It started out as a winter project in the garage. I have never built anything like this before but I do have a decent understanding of construction and how things are suppose to work thanks to my dad... I knew I wanted an A-Frame design that was portable.

Thanks to internet research and skimming through hundreds if not thousands of other peoples photos -I was able to develop a brain child. My girlfriend and I picked about a dozen designs we liked most, and pulled the things we liked off of them. I chose to put the 2x4 flat on top here (rather than sandwiched sideways between the top of the "A's") to add an extra layer of weather resistance.
My gf was a trooper about it and sat in the garage and helped me for DAYS worth of research and development. How high/long/short/slanted do we want this piece of wood? Why? Are we sure its best for the chickens? Are we sure its easily accessible for us? DAYS worth of this mid build... Here we have the final top screwed down to the 2x4 from earlier, it is a 1x8, in the pic you can see two 1x8's, the bottom one is the finished piece to be attached to the coop, the top one just got set there for a second. We also knew that we wanted one of the walls to open, hence the frame on hinges. You will also notice the roosting bar in this pic. I wanted it removable for cleaning and access purposes so I built the mounts on the side out of wood and the roosting bar gets sandwiched in the mount.
Here is a better picture of the roosting bar. I wanted to do as much wood as possible, I used 100% cedar on the entire coop, screwed together by Grip Rite High Performance Exterior screws -which have a lifetime guarantee against rust!
Here you can see I started putting the overlapping boards on. I chose to overlap and have the tiny spaces on each end where one shingle overlaps the next because I would rather have a heating problem than a cooling problem. I will touch on this again in a later photo. As the coop started to take shape, the garage started getting a little cramped...
Here is the opening side semi-completed. I used rubber base board to cover the hinges, it folds up and down nicely with the side and retains its shape once closed again. Now that it has been in the sun it lays even and flat against the coop. For the bottom fence I built a frame to fit the space and used hardware cloth tacked down from the inside with lots of hammer-in staples and some screws with washers on them for strength.
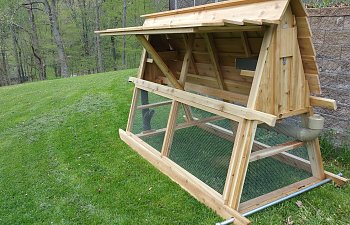
Here is the side view. Notice the small gaps between the shingles where they overlap, they allow for good ventilation in the summer. Worst case scenario, Ill have to hang a heat lamp inside for the worst parts of winter. Youll also notice that the frame the shingles attach to are the same on both sides, this is personal preference, only the right side opens in this picture. I wanted both sides to look the same while adding another inch or so for the birds on the inside, so I used the same frame on each side. Technically the left side could have been attached to "A" supports from the first picture. Here you can also see the side walls in place, 1x8 cedar boards side by side.
Here are a couple of the girls trying the coop out for size. For the nesting boxes, I spaced them high enough above the roosting bar so a chicken could roost under them, but low enough to leave some good space at the peak of the "A" so as not to bake them while they were laying in the hot months. Around 12" of space from roosting bar to bottom of nesting boxes, and about 18" of space from nesting box floor to the peak of the "A".
Coop has been moved into the breezeway now. This view from the roosting bar looking at the nesting box on other side. I made the nesting boxes removable, they slide in and out on a snug fitting wooden mounting system. I used leftover rubber baseboard for the sides, and a strip of cedar for the front. They are tight and require a good bit of wiggling to get them out -I didn't want to birds to be able to knock them loose should they come in too hot")
Here is how the finished ends came out. I cut those strips to cover the seams between the boards while also sandwiching the egg door between them for added predator protection. The clasp folds down over the loop and a carabiner is attached to make it just about impossible to open for anything other than a human -sometimes even hard for humans You will also notice the mounting system for the pvc feeder towards the bottom.
Here is the finished product. I coated all exterior surfaces with multiple coats of Thompsons Water Sealer. I cut a brace for the side wall out of a single piece of 1x8. I made a pvc waterer and feeder that are both fill-able from the outside of the coop. I also ran a galvanized metal pipe through one end of the runners to be able to easily pull it with the tractor, it allows me to easily move it long distances. I ended up painting everything that wasnt wood either brown or tan to give it a nice natural look.
This side shows the feeder.
The girls (and guys) love it. The jump from the ground to the middle brace seen below, then to the roosting bar, and to the nesting boxes if needed. Everything came out right in the end, spacing all around was perfect. Enough room for all the birds to do what they need to do without hurting themselves. I used the metal strapping on one side of the water feeder to allow it to sway and be adjusted when the coop is sitting on a hill.
Here is a chicken door that I later added. It slides up and down, I again used all cedar to sandwich it together on a track. The door is tight fitting and requires a good bit of effort to open and close, but makes all the difference when trying to get everyone out, or back in, the coop! You can also see I added a little pvc elbow to hold some extra grit if needed. They dont go through much at all being moved so often.
I designed it so all the bottom runners and pieces are independent and can be removed and replaced without much effort when damaged. I also made it to accept a run attachment, which I will later make. The run will attach to the side with the door and will line up with the stud running across the top of the door, making it about 2' tall. This will still allow the door to be opened without having to remove the run attachment. The run will give them a bit more room in the winter when I'm not able to move the coop as much. The dimensions are 8' long and 4' wide of living space on the inside. It stands a few inches under 6' tall.
Thanks to internet research and skimming through hundreds if not thousands of other peoples photos -I was able to develop a brain child. My girlfriend and I picked about a dozen designs we liked most, and pulled the things we liked off of them. I chose to put the 2x4 flat on top here (rather than sandwiched sideways between the top of the "A's") to add an extra layer of weather resistance.
My gf was a trooper about it and sat in the garage and helped me for DAYS worth of research and development. How high/long/short/slanted do we want this piece of wood? Why? Are we sure its best for the chickens? Are we sure its easily accessible for us? DAYS worth of this mid build... Here we have the final top screwed down to the 2x4 from earlier, it is a 1x8, in the pic you can see two 1x8's, the bottom one is the finished piece to be attached to the coop, the top one just got set there for a second. We also knew that we wanted one of the walls to open, hence the frame on hinges. You will also notice the roosting bar in this pic. I wanted it removable for cleaning and access purposes so I built the mounts on the side out of wood and the roosting bar gets sandwiched in the mount.
Here is a better picture of the roosting bar. I wanted to do as much wood as possible, I used 100% cedar on the entire coop, screwed together by Grip Rite High Performance Exterior screws -which have a lifetime guarantee against rust!
Here you can see I started putting the overlapping boards on. I chose to overlap and have the tiny spaces on each end where one shingle overlaps the next because I would rather have a heating problem than a cooling problem. I will touch on this again in a later photo. As the coop started to take shape, the garage started getting a little cramped...
Here is the opening side semi-completed. I used rubber base board to cover the hinges, it folds up and down nicely with the side and retains its shape once closed again. Now that it has been in the sun it lays even and flat against the coop. For the bottom fence I built a frame to fit the space and used hardware cloth tacked down from the inside with lots of hammer-in staples and some screws with washers on them for strength.
Here is the side view. Notice the small gaps between the shingles where they overlap, they allow for good ventilation in the summer. Worst case scenario, Ill have to hang a heat lamp inside for the worst parts of winter. Youll also notice that the frame the shingles attach to are the same on both sides, this is personal preference, only the right side opens in this picture. I wanted both sides to look the same while adding another inch or so for the birds on the inside, so I used the same frame on each side. Technically the left side could have been attached to "A" supports from the first picture. Here you can also see the side walls in place, 1x8 cedar boards side by side.
Here are a couple of the girls trying the coop out for size. For the nesting boxes, I spaced them high enough above the roosting bar so a chicken could roost under them, but low enough to leave some good space at the peak of the "A" so as not to bake them while they were laying in the hot months. Around 12" of space from roosting bar to bottom of nesting boxes, and about 18" of space from nesting box floor to the peak of the "A".
Coop has been moved into the breezeway now. This view from the roosting bar looking at the nesting box on other side. I made the nesting boxes removable, they slide in and out on a snug fitting wooden mounting system. I used leftover rubber baseboard for the sides, and a strip of cedar for the front. They are tight and require a good bit of wiggling to get them out -I didn't want to birds to be able to knock them loose should they come in too hot
Here is how the finished ends came out. I cut those strips to cover the seams between the boards while also sandwiching the egg door between them for added predator protection. The clasp folds down over the loop and a carabiner is attached to make it just about impossible to open for anything other than a human -sometimes even hard for humans
You will also notice the mounting system for the pvc feeder towards the bottom.
Here is the finished product. I coated all exterior surfaces with multiple coats of Thompsons Water Sealer. I cut a brace for the side wall out of a single piece of 1x8. I made a pvc waterer and feeder that are both fill-able from the outside of the coop. I also ran a galvanized metal pipe through one end of the runners to be able to easily pull it with the tractor, it allows me to easily move it long distances. I ended up painting everything that wasnt wood either brown or tan to give it a nice natural look.
This side shows the feeder.
The girls (and guys) love it. The jump from the ground to the middle brace seen below, then to the roosting bar, and to the nesting boxes if needed. Everything came out right in the end, spacing all around was perfect. Enough room for all the birds to do what they need to do without hurting themselves. I used the metal strapping on one side of the water feeder to allow it to sway and be adjusted when the coop is sitting on a hill.
Here is a chicken door that I later added. It slides up and down, I again used all cedar to sandwich it together on a track. The door is tight fitting and requires a good bit of effort to open and close, but makes all the difference when trying to get everyone out, or back in, the coop! You can also see I added a little pvc elbow to hold some extra grit if needed. They dont go through much at all being moved so often.
I designed it so all the bottom runners and pieces are independent and can be removed and replaced without much effort when damaged. I also made it to accept a run attachment, which I will later make. The run will attach to the side with the door and will line up with the stud running across the top of the door, making it about 2' tall. This will still allow the door to be opened without having to remove the run attachment. The run will give them a bit more room in the winter when I'm not able to move the coop as much. The dimensions are 8' long and 4' wide of living space on the inside. It stands a few inches under 6' tall.