I used mostly discarded packing pallets that I found in an industrial park. True, I had to disassemble and clean all the wood of nails, etc, but it really wasn't that bad.
Also I had 4 toilet seats that I didn't know what to do with and thought they might be handy.
So...using some ideas from other BYC coops (thanks), some hammering, sawing and swearing, and three day's later, my coop was done.
It still needs exterior painting, but I'm working on that inspiration.**
I needed to add 1 sheet of 1/2" CDX plywood and the metal roof, which if I looked longer I could have found, and the plexiglass for the windows and one electrical outlet. Other than that, it's all from "trash".
Total cost...under a Ben Franklin.
**Update: as you can see from the above pics, I did find the inspiration to use some left over house paint and paint 'er up. Now it looks middle class

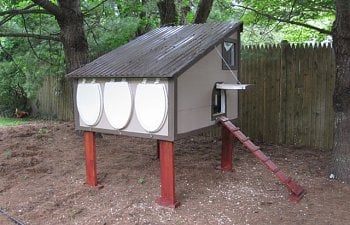
Construction particulars:
4 ft x 5 ft footprint framed on 15" centers with 2x4's and plywood floor.
2 ft in front, 4 ft in back
some 2 1/2 ft off the ground (I think I'll fence the basement in and raise some roasters under there next spring)
2x2 framing - just rip the pallet frames pieces in half, they go a long way!
2x6 legs (some pallets are beefy)
sheathing under metal roof - just pallet pieces lapped in. Alot of these are hardwood BTW - Good stuff.
Here's a neat trick: I nailed a board over the slightly extended rafters in the back (high side) to provide weather proof ventilation. The space is like 1 or so inches wide and the board extends about 3" below the open rafter ends. The front of the rafters (low side) also extend out some 3" and are left open with a small facer. No weather can come in there either due to the slope of the roof and the 1" facer. I used some spray foam for the edges of the metal roofing to seal them up. We had a some major rain here recently, and the inside stayed dryer than toast.
Toilet seat gaps are sealed too with a strip of round foam weather stripping. The front door seat and lid are screwed together and sealed. I also had to cut a bit off of this one so it would close right over the ramp. The laying box door seats are screwed and sealed against the plywood, and only the lid part opens. This provides a nice lip to keep the bedding in when you open it.
Also, I placed a flat piece of 2x4 under each leg. That way they can rot out over a few years, and you just replace it with another old hunk of 2x4 when that happens.
It has electric, buried for the 30 ft run to the real house, with an outlet for a water heater, and a CFL on a timer. Burying the wire was a cinch with a hand spade. Only down about 3".
All doors have a zinc plated hook and eye latch.
The rear access door has 2 slide bolt type latches. Easy to work. When it is open, there's a home made 1.5" x 1.5" x 4" toggle on a 3/8" x 3.5" lag bolt with washers to separate and provide smooth operation without loosening. This just laps over the raised access door to hold it open for cleaning/feeding, etc. The access door is hung on a couple of gate hinges.
Well, hope that's enough to get you started. Most Important - Be Creative, and HAVE FUN!!
Here's the framing plan. I framed sections flat, then sheathed/plywooded, then stood walls on platform and joined. Rafters were added after, and then roof sheathed and roofed. Rough trim was added also.
My helper - Reily