~The Chick'n Shak~

*This adventure started in late June of 2007*
I would first off like to thank Monica for posting up her coop design!!!
*This adventure started in late June of 2007*
I based my coop off of her idea but as my Husband Dave tells everyone he gave it steroids. As you will see we did change it up. The main idea I loved so much on Monica's was the covered attached run. For us the covered run will work great where we live in the SF Bay Area. It is like an "All Season Porch" for our hens. I also LOVE how "clean" the whole coop looks.
Some of our changes include.....
- setting the whole coop/run into the ground
- raising roof/door height for easy access into the run
- House is MUCH larger, I want at least seven hens I have five now
- Nesting boxes are inside house
- Windows on house
This coop believe it or not is being built on a "beer budget" and is made from scrounging leftovers from our friend's construcion yard. It does help that our friend owns a construction company AND that Dave worked for years framing multi-million dollar custom homes here in CA.
So far with all of our building materials I think we might have bought about $200.00 worth of stuff we were not able to get from the construction yard.
In the picutes one of the framed wall photos, the coop does not look level. It really is I was just exhausted by then!
Tonight, Aug. 23rd we just put in the nesting box drawer. I have to get some photos of it in the daytime. We had a slow down here on our build due to a mini heat wave. Upper 90's yeah, yeah, not that hot for some of you but for us it was toasty. Sorry, we are spoiled with our ocean fog every morning but it did not reach us the last few days so we warmed up!
OK, got the "Nesting Drawer" photos today. We made a drawer because of our two little ones who are always interested in what the chickens are doing. A drawer would be easier for them to deal with while checking out the nesting boxes. They would not have to remember to latch it open so NO head bumps!!!! SCROLL down to see the new photos of it installed into the hen house!!!
They moved into their new house last night August 26th!!!
We still have some things to do, like adding the wire run, finishing up the roofing on it, there are some latches missing, I have to clean up my painting mistakes and also spray the underside of the run roof. BUT, other then that it is looking pretty good!!
You will see on the photos that the roof line blocks off part of the windows. We did that on purpose.
First off we wanted to block the wind and the winter the rain will blow against the one window/clean out wall. The other reason was because we built the house under a HUGE Sweet Almond tree. We have a LARGE population of raccoons , opossums, and roof rats in our area so with the lower roof line these critters will never be able to get to the windows on the house to bother our hens. That is the reason why we raised the house off the ground as well. So added below are my newest photos of my coop.
Coop Base
Here is the base of the and soon to be floor of the coop. Floor has been added, painted, and walls are being framed.
Here is a view of the window on this side and the clean out door. The back shows the nesting box hole framed out.
Covered run and coop all framed up!
Primered to
Siding started. Side view
Front View .
Here are just a few more pictures.
Front view
Side View
Back view... nesting box hole
Siding up and painted and roof added to covered run
Another picture
Side View
Nesting box drawer.
We put this on a heavy duty drawer track once it was painted and installed.
Nesting Drawer Front
Front of coop.
Painted and I got the window installed...
the window is actually a picture frame I bought!
Door closed.
Opening windows are done. With shutters.
Clean out door is hinged to.
Other side and Nesting box drawer is installed!
Windows and Shutters, clean out door closed...
Since these pictures paint has all been touched up")
Shutters closed...
Nesting Box Drawer Pictures...
View inside the coop looking at the drawer...
Pulling the drawer out...
Outside views...
Pulled out all the way, shingles being installed to....
Roosts installed... These have been changed out since these pictures to 2x4's.
Adding walls to the covered Run..
Door on...
Wire added.
We used chicken wire for our run which I do not recommend due to how easily it can be
broken.
However, since we live in town and our dogs have access to the backyard 24/7 via their doggie
doors I do not have problems.
Just a few more pictures of this part completed...
Almond Tree in Bloom...
So in the summer of 2008 we added onto the coop.
I added more chickens and the run became to small if I had to keep them locked up.
At my parent's ranch they were replacing all their white rail wooden fences with vinyl fencing
so we went dumpster diving up there for our new addition.
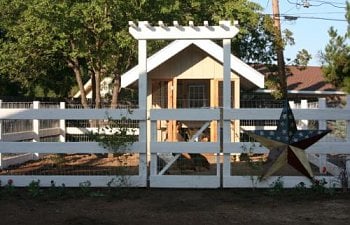
Here is The Chick'n Shak's 16' x 14' corral addition.
We added anti~climb wire so they can not sneak between the rails.
Corral got painted!
So there it is the ~Chick'n Shak~
Hope you enjoyed the pictures!

Here is the base of the and soon to be floor of the coop. Floor has been added, painted, and walls are being framed.

Here is a view of the window on this side and the clean out door. The back shows the nesting box hole framed out.

Covered run and coop all framed up!
Primered to

Siding started. Side view

Front View .

Here are just a few more pictures.
Front view

Side View

Back view... nesting box hole

Siding up and painted and roof added to covered run

Another picture

Side View

Nesting box drawer.
We put this on a heavy duty drawer track once it was painted and installed.

Nesting Drawer Front

Front of coop.
Painted and I got the window installed...
the window is actually a picture frame I bought!

Door closed.

Opening windows are done. With shutters.
Clean out door is hinged to.

Other side and Nesting box drawer is installed!

Windows and Shutters, clean out door closed...
Since these pictures paint has all been touched up

Shutters closed...

Nesting Box Drawer Pictures...

View inside the coop looking at the drawer...

Pulling the drawer out...

Outside views...


Pulled out all the way, shingles being installed to....

Roosts installed... These have been changed out since these pictures to 2x4's.

Adding walls to the covered Run..

Door on...

Wire added.
We used chicken wire for our run which I do not recommend due to how easily it can be
broken.
However, since we live in town and our dogs have access to the backyard 24/7 via their doggie
doors I do not have problems.

Just a few more pictures of this part completed...


Almond Tree in Bloom...

So in the summer of 2008 we added onto the coop.
I added more chickens and the run became to small if I had to keep them locked up.
At my parent's ranch they were replacing all their white rail wooden fences with vinyl fencing
so we went dumpster diving up there for our new addition.
Here is The Chick'n Shak's 16' x 14' corral addition.

We added anti~climb wire so they can not sneak between the rails.

Corral got painted!


So there it is the ~Chick'n Shak~
Hope you enjoyed the pictures!