April 2014
I had reached the point in my life when I felt a need to get some chickens. A colleague of mine offered to lend me a few chickens for the summer so I could give it a try. This was in March and I immediately started building my very first chicken coop. I browsed this site and found inspiration in above all the coops Country Acers and Chad76's chicken coop, but in many other lovely and cleverly made coops too. I made my own design - I didn't have an exact plan though, instead I winged it...
First, a frame. I predrilled holes and screwed it together.

Next - a floor, made of a sheet of plywood. I sawed notches for the corners and it fit beautifully!
I wanted to paint the frame before I continued, so I did. In retrospect, it was a mistake to paint it outdoors at night when it was damp and a bit chilly. In the morning some of the paint had dripped off, but I just filled it in. Eventually, it dried and looked really nice.
I realized that once I had added the walls and floor, the construction would start becoming a bit heavy so I moved it to the spot in my yard where I planned on putting it. I made an opening for the chickens and a big front door.
The opening on the right hand side is for the nest.
I built the nest from leftover plywood, put it together using brackets and fastened it to the wall with even more brackets. The nest is resting on a beam (actually I made a whole frame of beams around it) since I wasn't sure that it would be enough to just screw it to the plywood. And then some more white paint on the inside. By now it was warmer and not so damp so the whole thing dried more easily after each coating of paint.
A ramp made from leftover plywood and some branches. Reddish paint of Swedish fashion (Falu rödfärg) and the roosts now fixed to the walls.
And now you can also see the run. It is detachable from the coop and made pretty much the same way as the frame for the coop was.
Plywood roof. Chicken wire attached with staple gun. Probably not strong enough in the long run since the chickens tend to bump against the wire more than I expected. Leaning against the run is the frame for the door of the run.
Katten Jansson (Jansson the cat) is inspecting the coop which has now had its roof covered with tar paper.
A small window. It does not open, but is merely there to give the chickens some light. I happened to have a small piece of window glass which I used. The frame is made from plywood - again I winged it (as you can problably tell...)
Four days ago my summer guests moved in - three lovely hens of unknown breed.
The first egg. Not in the nest, but nevertheless - an egg. Amazing!
The first night
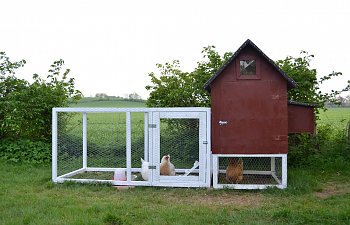
Ta da!
Thank you for checking out my chicken coop! Next time I will build a bigger one that can house a few chickens during the winter too. But so far this will do just fine!
December 2015 - Swedish chicken coop update
Even before it was time to return my summer chickens to their owner, I realized there was no turning back - I simply had to get some chickens of my own. It was also obvious that my charming coop would be a bit on the small side for a flock during the winter. My summer chickens were three bantams, and I now had my eye on a different and larger breed - Skånsk Blommehöna (in the US called Swedish Flower Hen) which is a native landrace breed from the part of Sweden where I live. There was only one thing to do - start building a second coop.
What I learned from my first project was that it would be a lot easier if I could walk upright in the coop - and even more so in the run - than to crawl around when fixing something. I remembered the amount of wood and plywood that I used just for my small coop and run, and decided on buying a small prefabricated shed. Found this one.
Said and done. This is what it looked like when it was delivered.
So, here we go. First, a foundation. I thought the one that was included seemed a bit week, so I made my own.
Some paint. Summer chickens supervising the process.
And then the floor. The girls are still very interested.
Starting to look good!
In the basement of my house I found an old door to a closet. Well, to most people it was a door for a closet. For a chicken enthusiast it was of course...
... a poop board!
Bits of scrap wood were turned into a nest with detachable roof.
Some more scrap wood became a transport cage.
Solar cell lamp that I bought at Amazon.
Dustbath in IKEA baby bath tub. I've removed this since none of them ever used it.
Whatever happened to the first coop then? Is it all empty and deserted? Of course not! It's the perfect nursery! The two runs are connected with a small door so that I can choose if I want my flock to be able to use both coops and runs or if I want to separate them.
I had reached the point in my life when I felt a need to get some chickens. A colleague of mine offered to lend me a few chickens for the summer so I could give it a try. This was in March and I immediately started building my very first chicken coop. I browsed this site and found inspiration in above all the coops Country Acers and Chad76's chicken coop, but in many other lovely and cleverly made coops too. I made my own design - I didn't have an exact plan though, instead I winged it...
First, a frame. I predrilled holes and screwed it together.
Next - a floor, made of a sheet of plywood. I sawed notches for the corners and it fit beautifully!
I wanted to paint the frame before I continued, so I did. In retrospect, it was a mistake to paint it outdoors at night when it was damp and a bit chilly. In the morning some of the paint had dripped off, but I just filled it in. Eventually, it dried and looked really nice.
I realized that once I had added the walls and floor, the construction would start becoming a bit heavy so I moved it to the spot in my yard where I planned on putting it. I made an opening for the chickens and a big front door.
The opening on the right hand side is for the nest.
I built the nest from leftover plywood, put it together using brackets and fastened it to the wall with even more brackets. The nest is resting on a beam (actually I made a whole frame of beams around it) since I wasn't sure that it would be enough to just screw it to the plywood. And then some more white paint on the inside. By now it was warmer and not so damp so the whole thing dried more easily after each coating of paint.
A ramp made from leftover plywood and some branches. Reddish paint of Swedish fashion (Falu rödfärg) and the roosts now fixed to the walls.
And now you can also see the run. It is detachable from the coop and made pretty much the same way as the frame for the coop was.
Plywood roof. Chicken wire attached with staple gun. Probably not strong enough in the long run since the chickens tend to bump against the wire more than I expected. Leaning against the run is the frame for the door of the run.
Katten Jansson (Jansson the cat) is inspecting the coop which has now had its roof covered with tar paper.
A small window. It does not open, but is merely there to give the chickens some light. I happened to have a small piece of window glass which I used. The frame is made from plywood - again I winged it (as you can problably tell...)
Four days ago my summer guests moved in - three lovely hens of unknown breed.
The first egg. Not in the nest, but nevertheless - an egg. Amazing!
The first night
Ta da!
Thank you for checking out my chicken coop! Next time I will build a bigger one that can house a few chickens during the winter too. But so far this will do just fine!
December 2015 - Swedish chicken coop update
Even before it was time to return my summer chickens to their owner, I realized there was no turning back - I simply had to get some chickens of my own. It was also obvious that my charming coop would be a bit on the small side for a flock during the winter. My summer chickens were three bantams, and I now had my eye on a different and larger breed - Skånsk Blommehöna (in the US called Swedish Flower Hen) which is a native landrace breed from the part of Sweden where I live. There was only one thing to do - start building a second coop.
What I learned from my first project was that it would be a lot easier if I could walk upright in the coop - and even more so in the run - than to crawl around when fixing something. I remembered the amount of wood and plywood that I used just for my small coop and run, and decided on buying a small prefabricated shed. Found this one.
Said and done. This is what it looked like when it was delivered.
So, here we go. First, a foundation. I thought the one that was included seemed a bit week, so I made my own.
Some paint. Summer chickens supervising the process.
And then the floor. The girls are still very interested.
Starting to look good!
In the basement of my house I found an old door to a closet. Well, to most people it was a door for a closet. For a chicken enthusiast it was of course...
... a poop board!
Bits of scrap wood were turned into a nest with detachable roof.
Some more scrap wood became a transport cage.
Solar cell lamp that I bought at Amazon.
Dustbath in IKEA baby bath tub. I've removed this since none of them ever used it.
Whatever happened to the first coop then? Is it all empty and deserted? Of course not! It's the perfect nursery! The two runs are connected with a small door so that I can choose if I want my flock to be able to use both coops and runs or if I want to separate them.