Hello! Here is my adventure to obtain a chicken coop. The coop was bought pre-made so this page is mostly about the run construction, which I did myself (with help).
I had been thinking about chickens for years and finally made off with some chicks from the feed store in late March. I had 4 to start with and planned to get a couple more in a few weeks when the breeds I was after were coming in. Here's the first batch (2 Australorps, an EE, and GLW) under the watchful eye of my dog. Luckily she has been a gem with the chickens this whole journey--I feel very fortunate!
I looked at several of the small, build-at-home type coops you see at hardware stores and such but was displeased with their flimsy construction. Probably fine if you live somewhere warm. Here on the wind-swept plains I needed something substantial! I found a local shed company that built nice stuff and ponied up for a 4' x 6' coop with a little detachable, 4' x 4' run. Prior to it's arrival I brooded the chicks in the house first in a 40 gal terrarium, then a stock tank, and then upgraded them to a sweet pen in the garage. But I was ready for them to move out!
In May, finally the coop arrives! It's about 6 and half feet tall at the peak.
It came fully assembled so we had to pull down a fence panel to get it in the yard. I made some minor modifications--changed the roost design (it came with 3 bars that were too close together so I removed one) and added some removable boards at the doors to keep bedding in. Also installed hooks for feeders and waterers and painted. The awesome decor is a metal wall tack from a local art store.
Here's everyone inside plus the 3 new girls. As you can see, one Australorp had made himself known as a male (whoops!) but I decided to keep him, having no specific rules here against roosters. So far he's behaving himself ;-) I picked up the extra buff orpington because I had wanted 6 hens and also thought the rooster could use an extra lady to spread the love around. It's one more chicken than I planned for my 4' x 6' coop based on space recommendations, but since they free-range the large yard almost all the time, figured I could get away with it. The run is really just for when I need to lock them up/at night.
You can see the three roosts here before I removed one.
Not long after setup I noticed a couple of the 2 x 4s on the run starting to warp rather badly. I kind of already had it in my head that I wanted a bigger run for when I had to shut in the birds, and after seeing everyone's amazing work here on BYC, decided surely I could build just a little run (lol!). Turned out to take a while but was definitely fun. I settled on a 4' x 8' run and rounded up a good friend for help. We worked on it over 3 or 4 weekends.
We used redwood 2 x 4 x 8's for the frame and 4 x 4s for the corner posts with 3" screws. Maybe overkill on the posts but they sure are sturdy.
Then we framed in the roof with 2 x 4s for rafters and 2 x 2s for purlins. Cutting the angles for the rafters was definitely tricky! The space engineer friend did all the math. I decided on the polycarbonate panels so we designed the rafter/purlin setup according to those recommendations.
Feeling pretty proud of ourselves at this point, having never really constructed anything of this magnitude before! This sentiment seemed peculiar coming from my rocket scientist friend who builds space thrusters for a living, lol.
Time for roof panels. They didn't really screw down as flat as we had hoped but not too bad. I don't think the chickens will notice. The polycarbonate (SunTuf) cut easily with a pair of tin snips. We planned it so our not-so-perfect cuts were hidden under the ridge cap and the factory edges were the only ones visible, since we didn't have an appropriate saw blade handy. I was a little concerned about wind--70 mile an hour gusts are not uncommon in winter--but we put a fastener on every ridge on the outer edges and it holds down pretty darn tight. We'll see how it looks next spring!
When we got to the eastern edge, the bottom ridge didn't quite line up with the end of the last rafter; we ripped a 2 x 2 in half and tacked it on to extend the rafter enough that we could properly fasten down the last ridge of the roof panel. Actually looks pretty good, kind of like a piece of trim on that side. The western edge sits flush against the side of the coop.
Next we built a door and framed it into the run. We had 2 x 2's handy so used those. It's not overly sturdy but is very cute
") Since my coop/run is inside a 6' privacy fence in the yard that already has some buried 1/4" wire for digging guards around it, I'm hoping it'll be okay. No predators have attempted access yet. Not a ton of climbing predators like raccoons here on the prairie but there are lots of hawks/badgers/foxes. The rooster is earning his keep so far on hawk patrol!
Since my coop/run is inside a 6' privacy fence in the yard that already has some buried 1/4" wire for digging guards around it, I'm hoping it'll be okay. No predators have attempted access yet. Not a ton of climbing predators like raccoons here on the prairie but there are lots of hawks/badgers/foxes. The rooster is earning his keep so far on hawk patrol!Also attached an outdoor roost.
Ladies testing out the new roost. They're getting big!
Inside view of the door.
Went with 1/2", 48" high, 19 ga hardware cloth all around. Used galvanized fence staples and #8 screws with #12 washers to secure it (stainless steel where I could get them...as insisted on by rocket science friend...very nice but not cheap). Took me a bit to figure out how to attach it in the configuration I wanted. It wraps on the outside of the corner posts, then inside the middle supports, and inside the cross supports (because the cross beams are attached on the outside of the corner posts, the corner posts are inside the rest of the frame by the width of a 2 x 4, not flush). This is achieved easily, it turns out, by cutting a little square out of the corners, so you can attach it to the outside of the post, but the inside of the top and bottom 2 x 4 cross-supports. Haha took me forever to figure that out!
Last thing was to attach some cute brackets to hang feed and water on. I'm hoping they're spiky enough they will not be tempting to sit on. They're actually decorative plant brackets, $10 a piece from Home Depot, but installed upside-down.
Final step was to move it next to the coop and level it! This took some digging. Also, I'm sure the ground we built it on wasn't level, so when we moved it, the door stuck a little once it WAS level, lol. A little sanding fixed this but the door is not quite square. One final touch was to install an emergency pulley-release for the door latch, once we realized you could lock yourself inside! Lol. It's just at/under 5 feet high at the peak. Which works for me to move around in (I'm 5'1" but no one taller, lol). I wanted to keep it somewhat low-profile.
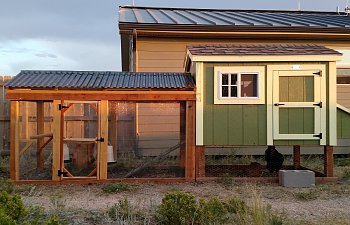
All done and looking lovely!
Things I learned:
If you build on uneven ground and then move it, things don't line up the same.
I might have liked the roof to overhang a little farther.
Hardware cloth is very tedious to cut with tin snips.
Not related to run construction, but the coop gets hot inside. I thought I was doing well by adding two vents at the roof peak opposite each other and the opening front window, but it could really use another vent/window on the west side. No one is kidding when they say add extra ventilation!
Overall I'm super pleased! Now we wait for eggs
The girls are approaching 5 months, so any day now!