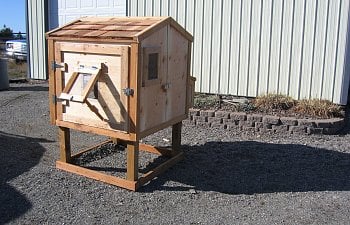
Several coop builds ago I got started trying to document the process from start to finish and my camera battery gave up the ghost. So with one of my last builds I took the time to make sure I got lotsa pictures and even took some notes. This is a 4'x4' coop with a lot of cedar so it will look ok in just about any backyard. Figure about 200-300 dollars for materials. You could save quite a bit by using something other than cedar, or even deleting most of the trim all together. This coop can be stretched to a 4x8 with very little in changes to the design, but I can't move 4x8's by myself so I don't build and sell those very often.
For tools you are going to need some way of cutting things, I typically use a skill saw, jig saw, and miter saw. I suppose you could do all the cuts with a hand saw if you had the time however. You're also going to need a drill/driver for the boat load of screws we're going to use. Again you could use a hand screwdriver, but I wouldn't recommend that. Last but not least I REALLY like to use a pneumatic finish nailer for attaching the trim etc. Hand nailing is obviously not a big deal, but if you don't have a finish nailer I'd just use screws.
Lets gets started with a quick list of materials. First a warning, this list is not necessarily complete. You may find you need one or two additional 2x2 for example or maybe even a half a sheet of additional plywood. The reason being you may either make a mistake, or perhaps your scrap pieces won’t be quite enough. With that said keep all of your scraps until you are completely done with the coop, you never know. The only reason I don’t give you a 100% complete materials list is that I’d hate you have you stuck with leftover pieces you just won’t need.
For the Coop you will need:
1- Sheet of ½ OSB (oriented strandboard)
2- Sheets of ½” exterior grade plywood
1- Sheet of ¾” exterior grade plywood
18- pine 2x2’s 8’ long
18- 1x3x8’ cedar boards
2 packs of cedar (under-coarse) shingles
Enough tar paper to cover the roof and the top of the nest box
Fasteners- Screws, finish nails, and staples.
Hinges- two for each opening window, two for the pop door, and two strap type hinges for the people door.
.
Lets get started, by cutting the OSB into a panel that is 47 1/4”X 45 5/8”. Then cut some 2x2’s down to size, you’ll need 2 at 45 5/8, and three at 44 7/16”. The two longer ones go along the sides with the same dimension, and the three smaller ones go between at the end of the panel and in the middle. Secure them with some screws through the OSB, and through the longer 2x2’s into the ends of the shorter ones. You may have to pre-drill those to keep from splitting the ends of the 2x2’s.
You should have something that looks like this when you are done.
Gable ends are next up on our agenda. First rip a sheet of the plywood as closely as you can in half. Don’t worry too much about the straightness of the rip but accuracy is always good.
This is how I like to rip large panels by myself. Put some scrap down to either side of the Now take the panels and stack them so the three factory edges are all in alignment with the edge you just cut at the top. Once everything is aligned and to your satisfaction, drive a couple screws through both panels in the corners closest to the edge you just cut. Measure up from the bottom (factory) edge 40” and make a mark on both sides of the panel. Make a mark at the exact center of the top panel, and draw lines intersecting the three marks. Set your saw to a depth that will cut through both panels and cut the corners off. SAVE THE CORNER SCRAPS!
Same basic procedure for the side panels. Rip a sheet of the 1/2” plywood in half, align the factory edges put a couple screws into the parts your are going to cut off and make two panels that are 40” x 45 5/8”
Now it’s time for some more assembly. Attach the side panels to the base with the longer side down and on the side of the base that is the same size (45 5/8’)
Note how things are kind of wobbly and out of shape at this point? Don’t sweat it.
Frame up the side panels with some 2x2’s starting with the top first again these should be 45 5/8”. Then fill with 2x2’s down the sides these should end up being roughly 36 1/2” or there about.
At this point things should be getting a little more stable and square.
Take a gable end and attach it to the sides by screwing into 2x’2 on the sides. The gable ends should run all the way out to the outside edge of the side panels. If a side panel isn’t quite lining up with the gable end, yank it into place, this is your chance to get everything squared up.
Same goes for the other gable end.
Add some framing to the gable ends don’t worry about mitering these cuts, just cut them square. These 2x2’s should be cut at about 21”.
Cut two more 2x2’s at 45 5/8” and attach them to the gable ends with some screws through the ends of the 2x2’s.
If you can get a screw in through these pieces and into the 21” pieces we added earlier do so, but it’s not critical.
Cut a piece of the 1x3 cedar in half, set it up against the gable end and mark it for the angle. We’re going to use this angle over and over again so if you have a miter saw, set it to this angle and leave it there. Once you’ve gotten the angle where you want it, cut 4 pieces and attach them to the sides like this.
Cut the 3/4” plywood in half keep the factory edges to the sides and bottom of the roof. Attach with screws into the 2x2 roof framing. When doing so align the panel to the outside edges of the corner trim. You may also want to temporarily add some trim towards the peak just to make sure everything is squared up.
A couple of clamps to hold the roof panel to the framing at the peak make a good substitute for a helper. Once the panel is secure cut off the excess on the eave side leaving an 1 1/2 or so of overhang.
Using the same angle we cut before, but in the opposite plane cut the other corner trim boards and attach them so that they overlap the gable side trim boards.
Go ahead and trim out along all the bottoms of all the panels at this point, take the time to caulk everything especially under where the nest box is going to be because getting a caulking gun in there later is going to be next to impossible.
Rip some cedar down to the same angle (or a close approximation) and trim out the top of the eave sides, also rip down a piece of cedar at around 1 1/2” and attach it to the end grain of the 3/4” roof panel with some glue and finish nails.
Tar paper the roof, leaving a good amount hanging off the gable ends for now. Where the tar paper crosses over the peak cut through it so it lays flat on both sides.
Cut the tar paper flush with the eave edge and start the build up on the gable end. Typically I use two layers of the 1x3 cedar ripped down to 1 1/2”. Secure these pieces with screws from the bottom of the roof panel going up. Where these pieces meet at the peak they will have to be mitered, play with some scraps until you get it just right, make sure you use a good exterior rated glue on that joint.
Cut the tar paper so it comes down the gable end about 1/2”, then miter cut the gable trim, and attach it to the built up pieces we just added to the roof, and get started on the roofing. First a starter course. Try and find pieces that come close to fitting with a minimal amount of trimming.
Put another layer of shakes down right on top of the starter course, taking care to keep any joints between shakes from lining up with any of the joints on the course below.
As you move up the roof panel you will have to cut the shakes to length. Try and keep them as close to the peak as you can. When you get to the last course you will find that they are pretty small. These will have a tendency to split if you try and nail them with a roofing nail, so secure them with a good amount of exterior rated glue and some finish nails as high up the shake as you can get them.
Take another piece of tar paper and cover the gap between the shakes at the top. Rip two pieces of the 1/3 cedar down with an angle so that you have a nice tight joint, again play with some scraps until it’s just right. Secure these with some finish nails one at a time using lots of glue between the built up layer of cedar at the gable end, and between the two pieces at the miter.
Nest boxes are next. On one of the side (eave) panels, measure up from the bottom 8” and 20”. Mark a level line across the panel at both of these points. Find the center of the panel and mark over 3/4” on either side of this point, draw a line down from the 20” line to the 8” line on both sides of the center point. Measure over 12” from these lines towards the gable ends and repeat the vertical line between the 20” and 8” line. Cut out along the lines as in the below picture and start framing up the opening.
The bottom 2x2 is mounted so that it is 17 1/4” as measured from the top of the upper 2x2 to the bottom of the lower 2x2. All of these pieces are secured with screws from the inside.
Take the scrap 3/4” piece from roof and screw them together with as good an alignment as you can get. Keep the screws towards the center of the panel as we have several operations to go through before we want to separate them. Cut the scraps down until you have a panel that is 14” wide and at least 20” long. With at least three sides aligning well, take one of the scraps from cutting the gable panels and put the top of this scrap 18” from the bottom of this panel. Mark along the angle and cut.
Separate the two panels, and attach them to the nest box framing.
Hold the bottom of these panels even with the bottom of the 2x2’s they should go just a touch past the upper 2x2. If they don’t, move the bottom 2x2 (shortening the middle upright 2x2 as well) until it does.
Take another scrap of the 3/4” plywood and cut it the same width as the upper and lower 2x2’s previously mounted to the coop for the nest box. Cut it to the same height as the low side of the end panels of the nest box. It should be right around 13 7/8 or so. Frame up around the perimeter of this panel with 2x2.
Attach this panel to the nest box so that it goes inside the two end panels.
Now fill in with some 2x2 framing at the bottom of the nest box between he coop, and front panel of the box itself.
At this point you’re probably running short of decent scrap pieces so you may have to piece together some of the 1/2” plywood to make up the bottom of the nest box.
For the nest box roof you should still have a scrap of 3/4” that’s the perfect fit. Make sure that the panels is just a touch bigger than the nest box in the side to side dimension so the trim will clear the trim on the nest box. Make it 2-3” longer than it needs to be in the top to bottom direction. Other wise it’s the same as the coop roof, but you can skip the built up layers on the sides of the roof because there won’t be any gaps between the courses of shakes, due the fact that there’s only going to be a couple courses. Top it off with a piece of 1x3 cedar. You will want to trim out both the eave edge, and the side edges with some cedar to hide the end grain of the plywood.
Cut an angle through ALL of the roof that matches the angle between the coop wall and the nest box, so that the nest box roof matches up as closely as possible. Again play with some scraps until you get it dead on.
Cut a piece of 1x3 cedar so that it fits between the trim on the corners of the coop just above the nest box. Rip of an angle of about 45 degrees or so.
Mount this piece to the side of the coop with the short face facing the coop so that it’s just above the roof panel for the nest box. Use some finish nails until you can get inside the coop and secure it properly with some screws.
Secure the hinges to both the roof panel, and to the piece above it. Note you will want to use some screws that are long enough to get all the way into and through the side wall of the coop. You can remove the screws later (one hinge at a time) and with a helper you can add some blocks for strength inside the coop where the screws come through.
Ok now for the big dog cut. Unlike on the nest box where you could pick at the cutouts, in the case of the people door, we’re going to be reusing the panel we cut out as our door panel. The best way to insure you have straightish cuts is to use the trim boards as your guide. Plunge cut with a jig saw keeping the foot of the saw tight against the trim and use the trim as your guide. This should leave you with a touch over an inch of plywood inside the trim. If you have to turn your saw over at any point make sure that the distance between the blade and the outside of the foot is the same, if they’re not you will have to draw a level line and cut along that.
Cut the bottom, and sides first. Drive a screw temporarily into the center of the panel so you have something to hold on to while you cut the top out.
Once you have your panel cut out. Cut 1/2” off of all four sides so that you have better clearance with the coop side. This is best done with a table saw, but it can be done with a skill saw or even your jig saw. Then frame it up like so with 2x2’s.
Yes your are screwing from the outside in this case but the trim will hide them later.
Add some blocking for the straps on your hinges.
Doesn’t have to be anywhere in particular just make sure they’re symmetrical.
Add the trim to the hinge side of the panel, leaving a 1” or so of overhang on the ends. Make sure that this distance is smaller than the piece of coop wall we left inside the trim when we cut out the door panel by a 1/4” or so. Cut some small blocks of cedar for the hinges and attach them to the outside with a couple screws, make sure they don’t land where the screws from hinges will.
Add the hinges.
Mount the door. You might want to use a small scrap of cedar shake to help hold the door up and get everything squared away inside the opening.
Finish trimming out the door, and add your latch.
Windows,
You have two choices here. You can either buy/scrounge some windows or, you can make your own. I tend to make my own because I’m cheap that way. I got some glass out of some old single pane windows that I scored off of Craigslist for free. They measured just about 8x12” which is perfect. To start with you’ll need to cut a kerf down the bits that actually make up the window frame. One pass should be just about perfect.
Dry fit everything to make sure you are good to go.
Once you are happy with the fit, put some good quality clear caulk in the kerf being careful to keep it out of the area where you are going to be applying the glue. Apply the glue on the top and bottom panels and start assembly.
Typically I toe nail the sides into the top and bottom with my finish nailer, set everything aside to dry and then add another 1/4” piece or so down the sides again with glue and small nails for additional strength.
For any windows that are going to open, you’ll want to cover the opening with some 1/2” hardware cloth then attach them like this.
I like to add some props to the door. The one on the left side has a short and long side, the one on the right is a full length prop.
Partially open.
Completely open
For the fixed windows it can’t be any easier. Measure out for the inside dimensions of the window frame, cut out the opening and secure with some screws from inside the coop.
Pop Door
Next thing is the “Pop” door. This is the door that the chickens will use to get in and out of the coop. It’s important that the bottom of this door is at least 6-8” above the floor so that the chickens aren’t dragging a bunch of your litter out the door every time they leave.
Cut a 12”x12” hole and just like the people door do it so you can reuse this piece. You may have to scrounge around and use some smaller scraps of 1/2” to get it thick enough to use. Trim out along the sides with some cedar and roof it. Attach it like so. You’ll want to keep the hinges as close to the back edge of the door as possible so that it closes under it’s own weight. Drill a hole through the gable ends and run a piece of string through to the other side. Secure it with a screw on the pop door.
On the other side of the coop. Attach a couple small scraps of cedar and cut another piece for the handle.
To close the door all you have to do is pull the handle out and let the door down.
Coop Furniture
Roost Bars are the last of the 2x2’s we’re going to need. Cut them to length and attach them with screws from the outside of the coop into their ends. If they are rolling at all, drive a finish nail in from outside to stop that.
The next piece coop furniture is the litter dam. You can use some of the 1/2 sheet of OSB you have left for this, or you can scrounge some. Either way I’m betting you don’t have any scraps big enough left over.
Add some scraps to the side of the coop with some finish nails so that the gap between the scraps and the 2x2 in the corner is just a touch bigger than whatever material you are going to use for the dam board.
Also keep these scraps from going all the way to the floor.
Cut your dam board so that it’s 1/2” or so smaller than the inside to inside dimensions of the coop and about 8” high, then cut the bottom corner off so it looks like this.
The dam board then just drops in between the 2x2 and the cleat we made out of scraps.
This will keep the litter from falling out every time you open the door, and the notch at the bottom means that when you clean the coop out you can get away with a little bit of litter in the corner and not have problems getting the dam board in.
The last bit of coop furniture will be the food and water hangers. I’d tell EXACTLY you how to do this, but everyone has different food and water dispensers so this can be problematic. The best way to do it is to take your empty dispensers, attach some string or wire to them and mock up the best place for them to hang in the coop right in front of the people door. Once you have a good idea where they need to go, fabricate up some blocks with some small eye hooks in them and secure them to the bottom of the roof panel with some screws.
Optional Raised base
You will need 1 8’ pressure treated 4x4 and 4-8’ pressure treated 2x4’s for this.
Cut the 4x4 into 24” sections. Cut four pieces of the 2x4 at 44 1/2” and four more at 45 3/4”
Attach two of the shorter lengths to two of the 4x4’s leaving 1 1/2” inches of the 4x4 protruding at the top so that it can make full contact with the bottom panel
Take the longer 2x4’s and making sure they run past the outside end of the shorter 2x4’s secure them to the 4x4’s. Now round up some help and drop the coop onto the frame. Secure it with some screws from inside the coop down into the tops of the 4x4’s and through the sides of the coop into the 4x4’s.
Done