Coos Bay Backyard Chicken Dreams
By Godzilla1916 (Bryan Duggan)
Here at the Coos Watershed Sustainables, we are committed to building our capacity to grow our own food, and part of that process is the symbiotic relationship we are developing with a fine group of avian hens........
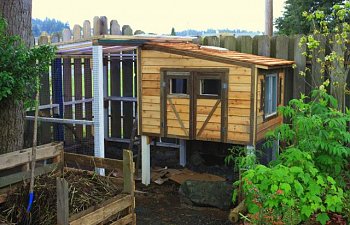
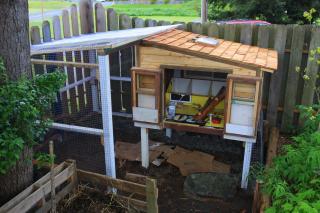
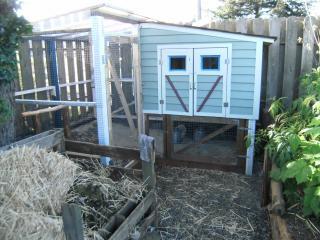
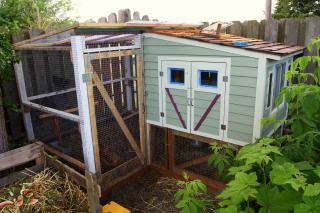
Here is the finished chicken coop:

But first, the beginning of another backyard project:
2009-04-27
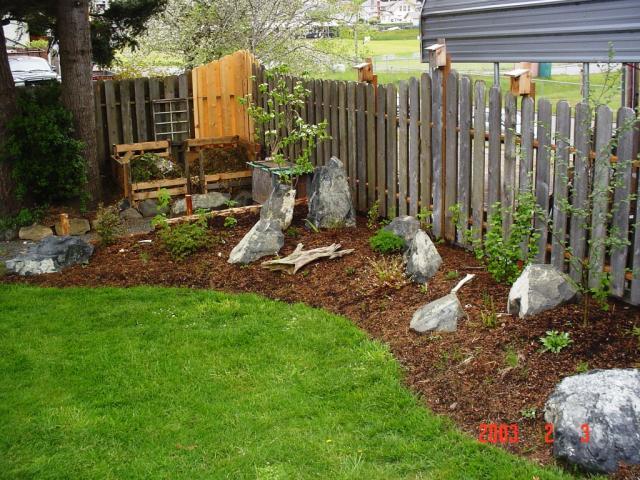
My backyard before the chicken craze. Notice the location of the two rear compost bins, I realized that this corner of the yard was the only place I could keep chickens (far enough away from neighbors windows and dwellings, as per code).
As of 2008 the new native plant rock garden on the right was developed.
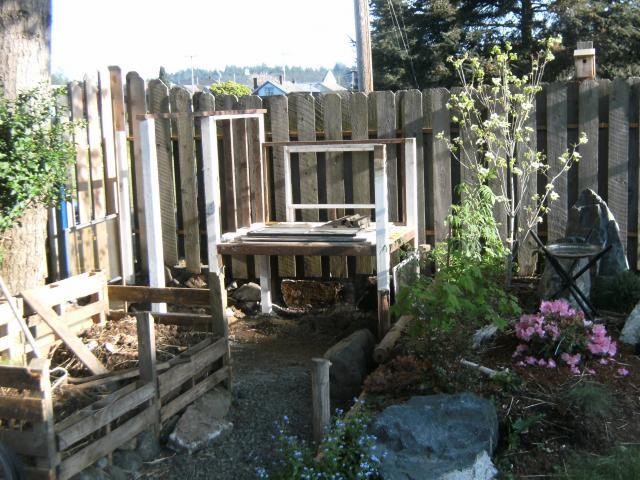
Jump to April 2009 and I am well on my way to building the coop. I sunk eight 10' 4x4's into the ground to use as my "foundation." Only four of the post will support the actual coop, while the rest of the post shall provide support for a 8x8 "L" shaped run (these plans may change as work progresses). Notice the new home for the compost bins.
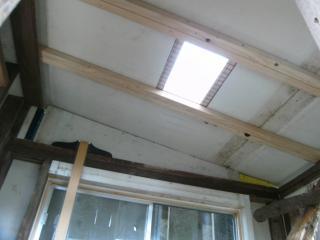
April 26th: I finished the interior of the coop today by building the nest boxes and a roost ladder. For the most part I do minimal planning before I build, I conceptualize, and image a final layout, but then plan as I build. Although it can lead to some mistakes and regrets occassionally, it works well with my creative process. This is my first time ever building a chicken coop, and after some research (thanks BYC) I built the nest boxes as a solid unit so I can move them around the coop as necessary; I also screwed in the roost ladder so I can re-arrange that in the future as well. The roost lumber came from the doug firs on my property which were recently trimmed. Notice The approximately 4-5" bulwarks against the interior walls, I figured this will help when it comes time to clean the bedding.
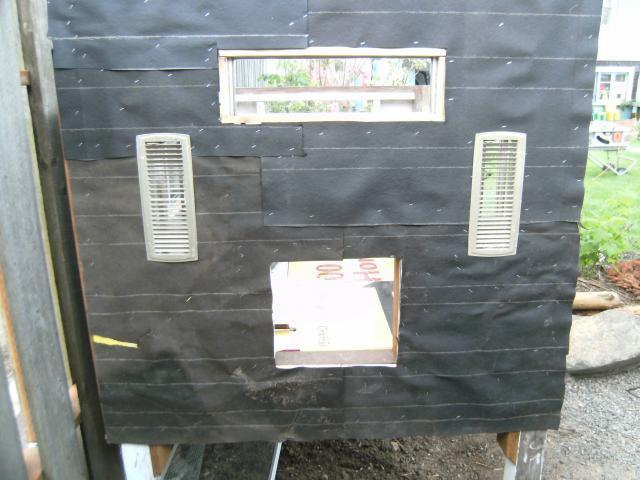
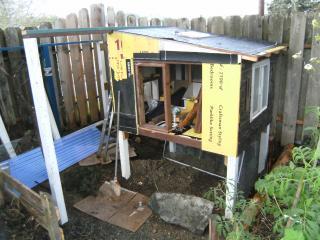
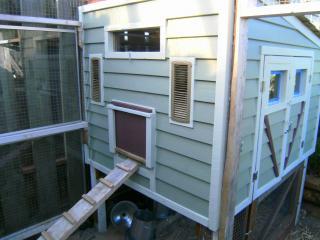
The west face of the coop with a chicken door, vents and a small window. After reading on BYC forum for "more ventilation than you think," I went ahead and picked up used interior metal vents at our local "re-store." I still need to trim and side the exterior. So far all that I have spent on the project is $150 for a roll of hardware cloth (was cheaper to buy 100' than by the foot, anyone in Oregon need some cheap hardware cloth?). Everything else is recycled and reused from salvaged and donated wood, windows, tar paper and plywood.
May 1 - 3, 2009
I returned to the project this past Friday after another crazy week at work. I quickly put up the south wall and a roof; utilizing the old skylight from my VW Vanagon, I created a skylight for the coop; I still don't know how I'll work the skylight (for it will open and close, VENTILATION!) without the mechanical parts. I then started collecting every last bit of scrap tar paper I had around my place from my home siding project 2 years ago................
As you can see I almost had enough tar paper to cover the whole thing. Notice that I also completed the "barn doors," more on this later, as at this point they were untested. I then started to add the final trim to the coop utilizing left over fencing from last year's re-fencing project. The fencing boards are similar to the old 1" thick cedar plankings that you see behind the coop, most of which are in various stages of decay. I ripped these fencing boards into 2" strips and chose the most solid among them for my trim. I trimmed everything from the vents to the windows and doors........
Ah, the doors. When I went to place the hinges on the doors, I discovered my design, or lack of design flaw...they would not open on such a tight fit! So I had to take the doors down and saw, grind, and sand the door widths down at least a half inch a piece. As you can see on the right, I am left with a 1/2" + gap between on the finished doors. I quess when making doors of this design you need to NOT make them so thick as they fail to open simutaneously. So as the doors work now, you need to open the left door first to get the right door open. Oh well, it's a chicken coop, and I'm not a master carpenter; however, you can see where my lack of pre-project design planning can lead me into wasted time and effort territory. At this point I framed in two 10" X 12" clear glass panes for the door windows, these I purchased, as I did have some other "patterned" glass to place in there; but I opted to be able to peek in and see what the birds were up to over the light only diffuse glass.
To date this is how much I've spent so far:
Hardware cloth..............................$150.00
Gravel.................................................$15.00
Lumber..............................................$22.68
glass.....................................................$6.20
Hardware..........................................$21.82
TOTAL....................$215.70
Hmmmmm, what else can I do here? The creative musings of the aspiring chiken friend.
May 9-10, 2009
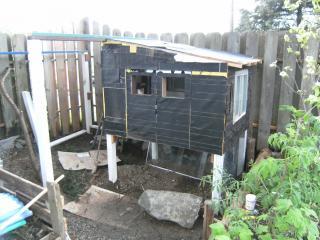
I only had two days to work on the coop this weekend; but, by golly I made the most of them. As you can see here I was able to get the roofing and siding on; and started on the run.
I ended up purchasing the 2nd or 3rd quality cedar shingles for about $12 a bundle (2 bundles total); I opted for this so the coop would match the garden shed I built last year and the main house. As for the siding I was able to utilize left over boards, again from last year's garden shed and the main house repairs. This also took the longest to do, about 7 hours total on Saturday; alot of cutting in and fitting of pieces around the vents and windows. I'm still so thrilled that I'm using my old VW Vanagon skylight!
After the roofing and siding were done I was for the most part complete with the coop, Whoooo Hooooo! Now, I was able to divert my attention to the run............I believe I am going to stick to my "L" shaped run plans for backyard asthetic reasons, and just to move along with the project. I will explore the possibility of the chickens running "free range" throughout the unfenced backyard; although I feel anxious that they will leave the property and be attractive to the neighborhood cat population. When complete the run will be the 8' X 5' white framed area with an additional 6' X 4' run underneath the coop. I still need to build two run access human doors on the left and underneath the coop.
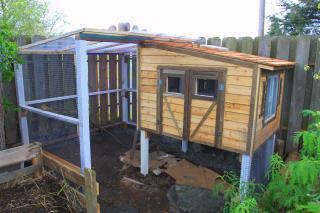
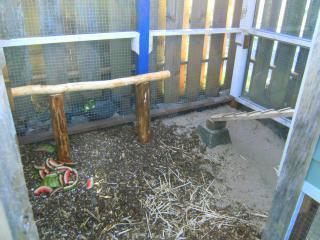
Here are pics of the completed works within the chicken run, the run area is 40 sq.ft. (not including the 24sqft area below the coop). I placed some opaque corragated plastic over 2/3 of the run roof, considering we are on the Oregon coast; I found this opaque roofing within the local hardware store for $14 a sheet, expensive but I love the atmosphere it creates (filtered sunlight reminds me of the sunlight experienced through a forest fire); I also placed two large recycled window panes on the north (right) wall of the coop to act as an additional wind block. The toughest part of the run job was placing all of the hardware cloth on the outside of the run post; I had very little room between the run and yard fence to hammer my staples in; at one point I tried pulling the fencing planks off, but realized the added work, and resorted to some creative stretching and hammering. As you can also see, I buried my hardware cloth and fully rocked the bottom of the run; I also came up with the practical idea of turning all of my hardware cloth scraps into twisted "barbed wire," by twisting and cutting them into irregular shapes and tossing them into the space between the run and the fence, a simple and practical way of deterring predator access to that area.
Well, as I said, I need to finish enclosing my run; build a chicken door; ramp; run roosts; and paint, and then give it up to the birds! I have a little under three weeks until I get my first 4 birds (2, 1 year old hens and 2, 3 month old hen chicks).
Costs to Date:
Pass Through................................$215.70
Cedar Roofing...............................$23.75
Run Roofing..................................$44.85
Fencing Staples..............................$7.90
To Date.......................................$292.20
Can I keep it under $300, let's see....................
May 15- June 2, 2009
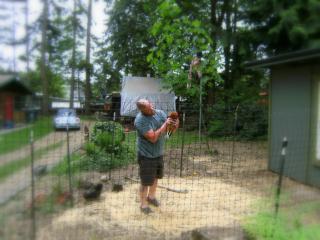
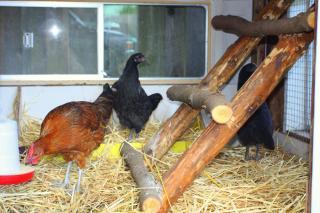
Well, I've finished the coop last night, putting the last of the protective netting over the last possible predator entry holes. All this while my 4 new hens and one teenage rooster spent their first hour in the coop after a 7 hour ride in cardboard from Seattle. After the long ride the chickens quickly started foraging for treats and exploring the new crib, by 9PM they found their way into the coop and began squabbling for roosting rights (thats when I began to worry if I had built enough).
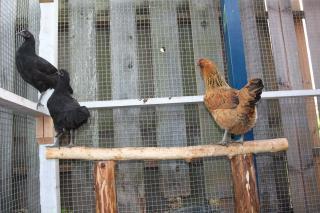
Sorry for the washed out appearance of these photos but I was using a miserable little point and shoot camera. Tonight I will take some photos with the avian gang inside.
But here is one of the rooster pre-ride on May 31, 2009:
I was so anxious the whole ride south about the early summer heat (89 F Portland, OR) and whether or not I put in enough cardboard box ventelation holes, food, water and how I was going to keep the rooster quiet enough for my neighbors. Sure enough by 7 am this morning the rooster was letting everyone in the neighborhood know about hisself. I also found several neighborhood cats parked outside the run this morning. So here starts my chicken reality...roosters, hens, food, predators and worry; ain't life grand!
More tomorrow hopefully with better photos....
PS: What have I gotten myself into????????
The chickens Have Come Home to Roost!
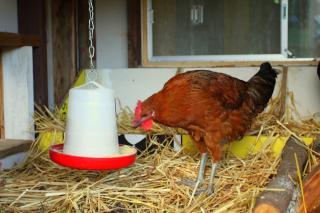
Well the coop is done (for under $300, not including my labor) but for some minor paint and stain jobs; I boxed up 2 mature hens, 2 immature hens, and 1 rooster and drove them down from Seattle. Now they live in their new chicken "crib" on the Oregon coast. The first two mature hens are named Jenna (golden) and Rosie, still no name for the rooster and the immature hens....
Jenna and Rosie being the mature birds have the upper hand in the new chicken coop hierarchy, will this change as the others mature? Jenna and Rosie certainly get the choice of grub scratch, as limited as it is in this run, I have not yet ventured to let them out, I am a bit anxious about that as I do not have a fully enclosed yard. Jenna and Rosie continued to lay eggs even after the 7 hour drive from Seattle, however, now one of them is losing thier consistency, the brown egg layer. Anyone have any thoughts to why this may be? I have been adding egg shells and crush oyster shells for calcium supplements.
By Godzilla1916 (Bryan Duggan)
Here at the Coos Watershed Sustainables, we are committed to building our capacity to grow our own food, and part of that process is the symbiotic relationship we are developing with a fine group of avian hens........
Here is the finished chicken coop:

But first, the beginning of another backyard project:
2009-04-27
My backyard before the chicken craze. Notice the location of the two rear compost bins, I realized that this corner of the yard was the only place I could keep chickens (far enough away from neighbors windows and dwellings, as per code).
As of 2008 the new native plant rock garden on the right was developed.
Jump to April 2009 and I am well on my way to building the coop. I sunk eight 10' 4x4's into the ground to use as my "foundation." Only four of the post will support the actual coop, while the rest of the post shall provide support for a 8x8 "L" shaped run (these plans may change as work progresses). Notice the new home for the compost bins.

April 26th: I finished the interior of the coop today by building the nest boxes and a roost ladder. For the most part I do minimal planning before I build, I conceptualize, and image a final layout, but then plan as I build. Although it can lead to some mistakes and regrets occassionally, it works well with my creative process. This is my first time ever building a chicken coop, and after some research (thanks BYC) I built the nest boxes as a solid unit so I can move them around the coop as necessary; I also screwed in the roost ladder so I can re-arrange that in the future as well. The roost lumber came from the doug firs on my property which were recently trimmed. Notice The approximately 4-5" bulwarks against the interior walls, I figured this will help when it comes time to clean the bedding.
The west face of the coop with a chicken door, vents and a small window. After reading on BYC forum for "more ventilation than you think," I went ahead and picked up used interior metal vents at our local "re-store." I still need to trim and side the exterior. So far all that I have spent on the project is $150 for a roll of hardware cloth (was cheaper to buy 100' than by the foot, anyone in Oregon need some cheap hardware cloth?). Everything else is recycled and reused from salvaged and donated wood, windows, tar paper and plywood.
May 1 - 3, 2009
I returned to the project this past Friday after another crazy week at work. I quickly put up the south wall and a roof; utilizing the old skylight from my VW Vanagon, I created a skylight for the coop; I still don't know how I'll work the skylight (for it will open and close, VENTILATION!) without the mechanical parts. I then started collecting every last bit of scrap tar paper I had around my place from my home siding project 2 years ago................

As you can see I almost had enough tar paper to cover the whole thing. Notice that I also completed the "barn doors," more on this later, as at this point they were untested. I then started to add the final trim to the coop utilizing left over fencing from last year's re-fencing project. The fencing boards are similar to the old 1" thick cedar plankings that you see behind the coop, most of which are in various stages of decay. I ripped these fencing boards into 2" strips and chose the most solid among them for my trim. I trimmed everything from the vents to the windows and doors........

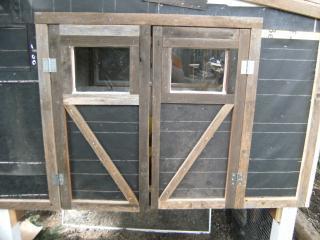
Ah, the doors. When I went to place the hinges on the doors, I discovered my design, or lack of design flaw...they would not open on such a tight fit! So I had to take the doors down and saw, grind, and sand the door widths down at least a half inch a piece. As you can see on the right, I am left with a 1/2" + gap between on the finished doors. I quess when making doors of this design you need to NOT make them so thick as they fail to open simutaneously. So as the doors work now, you need to open the left door first to get the right door open. Oh well, it's a chicken coop, and I'm not a master carpenter; however, you can see where my lack of pre-project design planning can lead me into wasted time and effort territory. At this point I framed in two 10" X 12" clear glass panes for the door windows, these I purchased, as I did have some other "patterned" glass to place in there; but I opted to be able to peek in and see what the birds were up to over the light only diffuse glass.
To date this is how much I've spent so far:
Hardware cloth..............................$150.00
Gravel.................................................$15.00
Lumber..............................................$22.68
glass.....................................................$6.20
Hardware..........................................$21.82
TOTAL....................$215.70
Hmmmmm, what else can I do here? The creative musings of the aspiring chiken friend.
May 9-10, 2009

I only had two days to work on the coop this weekend; but, by golly I made the most of them. As you can see here I was able to get the roofing and siding on; and started on the run.

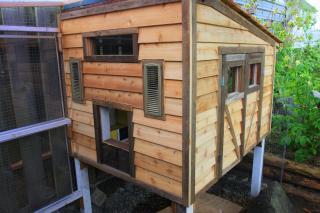
I ended up purchasing the 2nd or 3rd quality cedar shingles for about $12 a bundle (2 bundles total); I opted for this so the coop would match the garden shed I built last year and the main house. As for the siding I was able to utilize left over boards, again from last year's garden shed and the main house repairs. This also took the longest to do, about 7 hours total on Saturday; alot of cutting in and fitting of pieces around the vents and windows. I'm still so thrilled that I'm using my old VW Vanagon skylight!
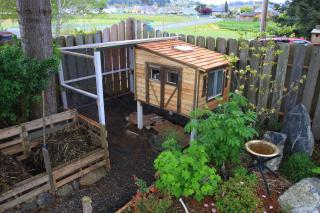
After the roofing and siding were done I was for the most part complete with the coop, Whoooo Hooooo! Now, I was able to divert my attention to the run............I believe I am going to stick to my "L" shaped run plans for backyard asthetic reasons, and just to move along with the project. I will explore the possibility of the chickens running "free range" throughout the unfenced backyard; although I feel anxious that they will leave the property and be attractive to the neighborhood cat population. When complete the run will be the 8' X 5' white framed area with an additional 6' X 4' run underneath the coop. I still need to build two run access human doors on the left and underneath the coop.
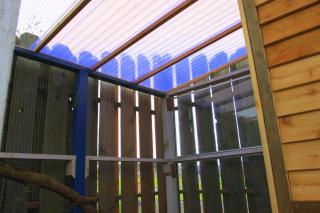
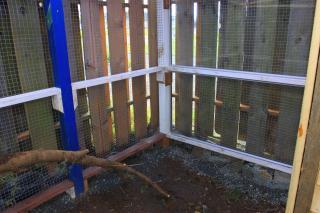
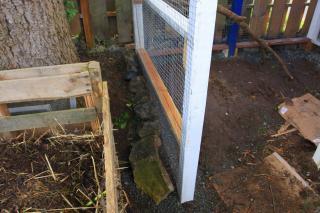
Here are pics of the completed works within the chicken run, the run area is 40 sq.ft. (not including the 24sqft area below the coop). I placed some opaque corragated plastic over 2/3 of the run roof, considering we are on the Oregon coast; I found this opaque roofing within the local hardware store for $14 a sheet, expensive but I love the atmosphere it creates (filtered sunlight reminds me of the sunlight experienced through a forest fire); I also placed two large recycled window panes on the north (right) wall of the coop to act as an additional wind block. The toughest part of the run job was placing all of the hardware cloth on the outside of the run post; I had very little room between the run and yard fence to hammer my staples in; at one point I tried pulling the fencing planks off, but realized the added work, and resorted to some creative stretching and hammering. As you can also see, I buried my hardware cloth and fully rocked the bottom of the run; I also came up with the practical idea of turning all of my hardware cloth scraps into twisted "barbed wire," by twisting and cutting them into irregular shapes and tossing them into the space between the run and the fence, a simple and practical way of deterring predator access to that area.
Well, as I said, I need to finish enclosing my run; build a chicken door; ramp; run roosts; and paint, and then give it up to the birds! I have a little under three weeks until I get my first 4 birds (2, 1 year old hens and 2, 3 month old hen chicks).
Costs to Date:
Pass Through................................$215.70
Cedar Roofing...............................$23.75
Run Roofing..................................$44.85
Fencing Staples..............................$7.90
To Date.......................................$292.20
Can I keep it under $300, let's see....................
May 15- June 2, 2009
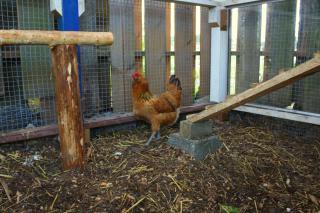
Well, I've finished the coop last night, putting the last of the protective netting over the last possible predator entry holes. All this while my 4 new hens and one teenage rooster spent their first hour in the coop after a 7 hour ride in cardboard from Seattle. After the long ride the chickens quickly started foraging for treats and exploring the new crib, by 9PM they found their way into the coop and began squabbling for roosting rights (thats when I began to worry if I had built enough).
Sorry for the washed out appearance of these photos but I was using a miserable little point and shoot camera. Tonight I will take some photos with the avian gang inside.
But here is one of the rooster pre-ride on May 31, 2009:
I was so anxious the whole ride south about the early summer heat (89 F Portland, OR) and whether or not I put in enough cardboard box ventelation holes, food, water and how I was going to keep the rooster quiet enough for my neighbors. Sure enough by 7 am this morning the rooster was letting everyone in the neighborhood know about hisself. I also found several neighborhood cats parked outside the run this morning. So here starts my chicken reality...roosters, hens, food, predators and worry; ain't life grand!
More tomorrow hopefully with better photos....
PS: What have I gotten myself into????????
The chickens Have Come Home to Roost!
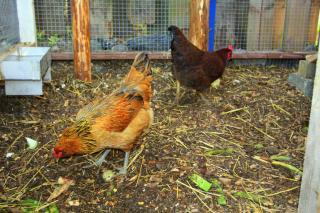
Well the coop is done (for under $300, not including my labor) but for some minor paint and stain jobs; I boxed up 2 mature hens, 2 immature hens, and 1 rooster and drove them down from Seattle. Now they live in their new chicken "crib" on the Oregon coast. The first two mature hens are named Jenna (golden) and Rosie, still no name for the rooster and the immature hens....
Jenna and Rosie being the mature birds have the upper hand in the new chicken coop hierarchy, will this change as the others mature? Jenna and Rosie certainly get the choice of grub scratch, as limited as it is in this run, I have not yet ventured to let them out, I am a bit anxious about that as I do not have a fully enclosed yard. Jenna and Rosie continued to lay eggs even after the 7 hour drive from Seattle, however, now one of them is losing thier consistency, the brown egg layer. Anyone have any thoughts to why this may be? I have been adding egg shells and crush oyster shells for calcium supplements.