Finally convinced the husband that I should have chickens. Yes, I wore him down. So, knowing how disappointed my dad would be if I bought a coop, I set about making one. I wanted something with lots of room since I work fulltime and they won't be able to free range every day. After perusing many free designs, I picked an A-frame that I could change to suit my needs (read: whims).
Some dimensions:
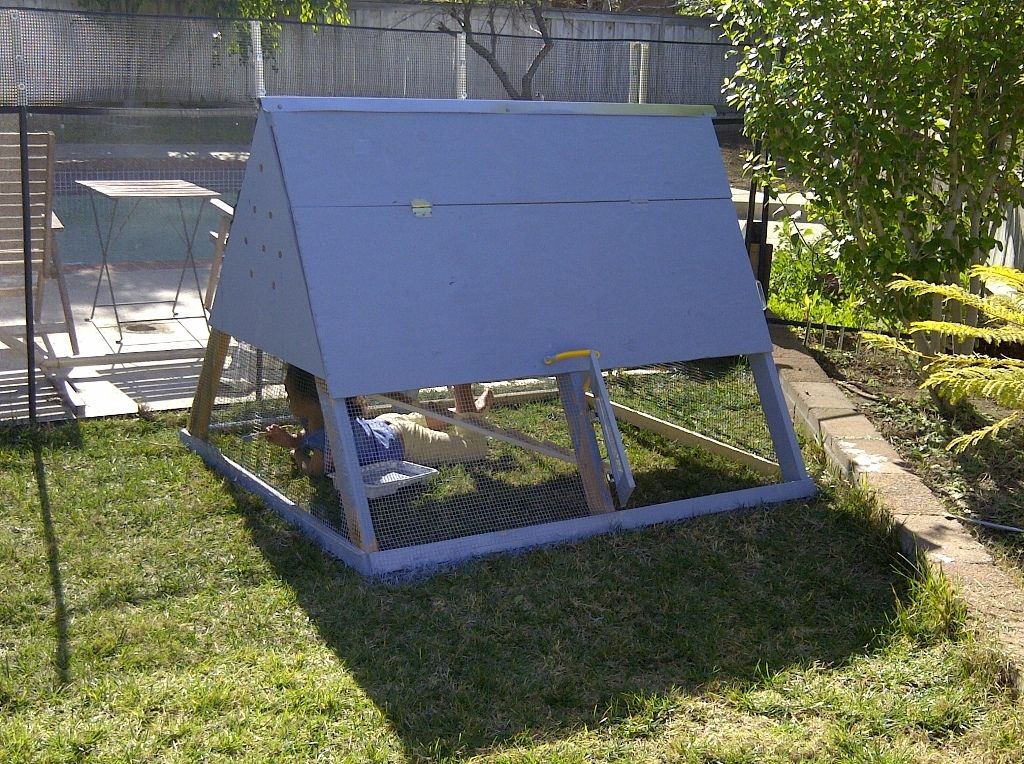
The coop is 4.5ft tall, 5ft wide at the base and 6ft long, giving about 16sf upstairs, and 30 down. Each side of the frame is 5ft. I'll think about other dimensions along the way.
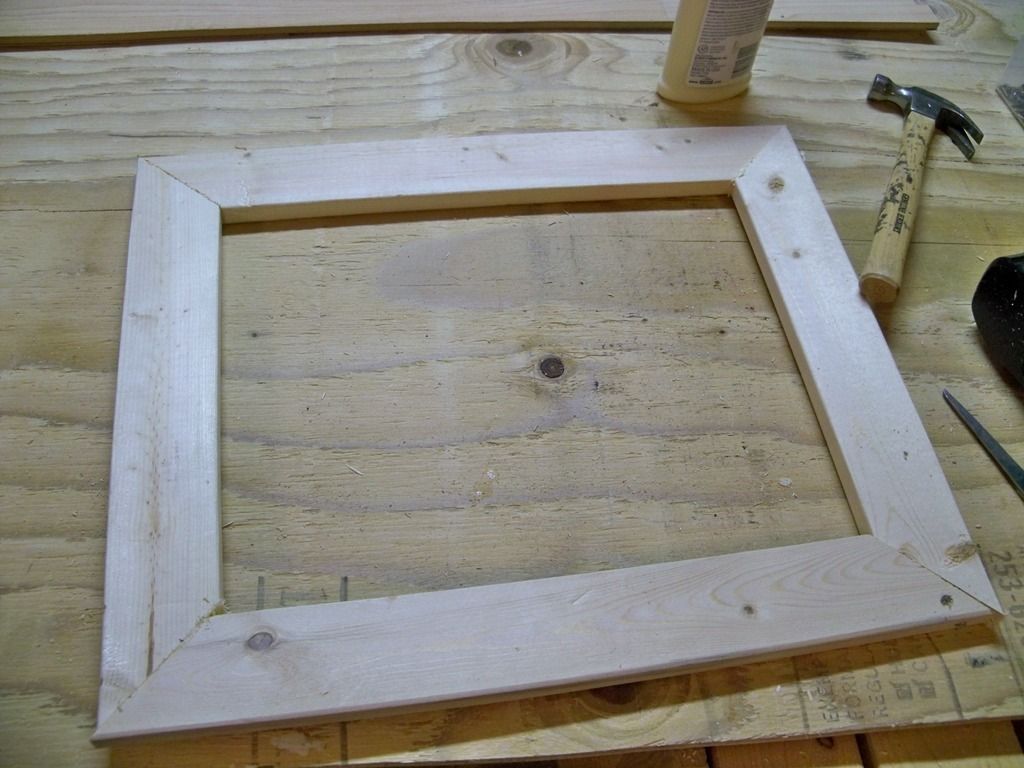
First, I started with this plan. Using some information and a lot of guesswork, I started cutting. The good thing about this plan is that they provided a good list of materials to purchase/obtain

First I started with the frame. This took considerable brain power since I am NOT mathematically minded. I had to figure out the angles without a protractor, and the angles in another similar plan were incorrect. The angle at the top is 60 degrees and 30 degrees at the bottom. I made three frames like this.
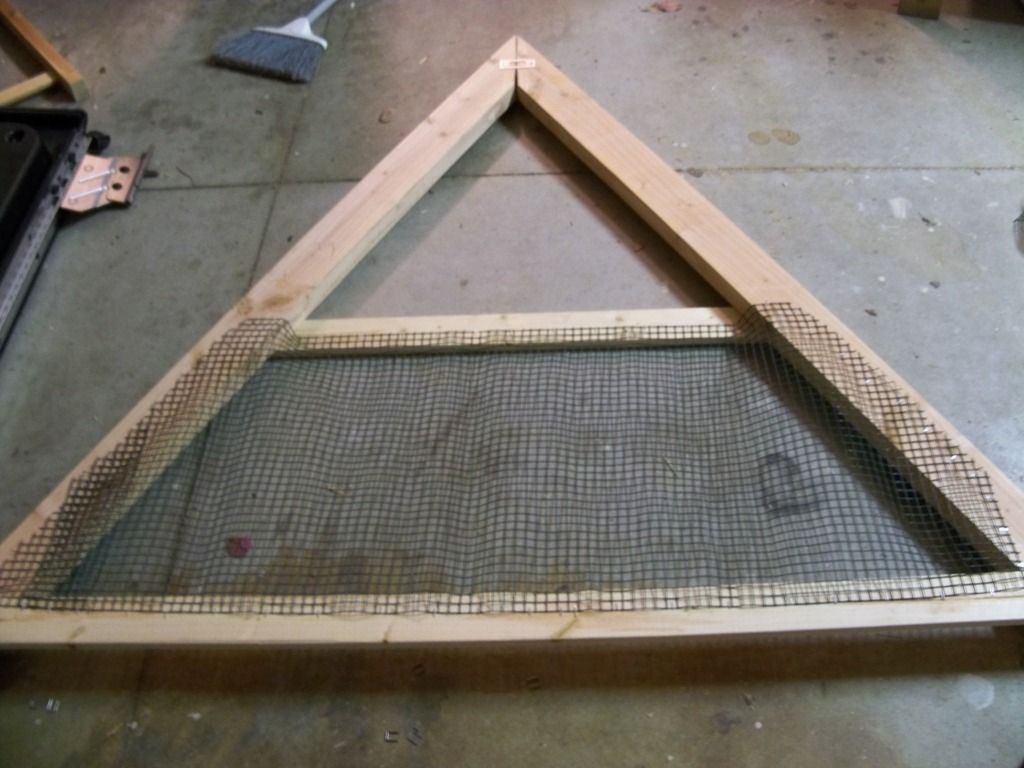
I figured I needed some extra support at each apex, given that I had to cut the angles with a jigsaw (too long for my drop saw) and accuracy is not my forte. My dad (a builder) suggested gang nails or repair thingies - the pieces of galvanized metal with lots of spikes to join to bits of wood. Instead, I used leftover door tongue plates. Figured they'd do the same job, or near enough. Next, I added a horizonal bar on each (two on the middle A-frame to support the floor), guessing what height it should be (ended up with 2ft 10 inches from the ground) and stapled on hardware mesh (leftover from house bunnies who now live in an entirely separate luxury condo complex outside). And herein lies my first mistake. I was rushing since I had agreed to get the chickens on Saturday. This photo is taken on Wednesday night. Lots of work to do, so I figured build now, paint later. Um, it's hard to paint through mesh. Enough said.
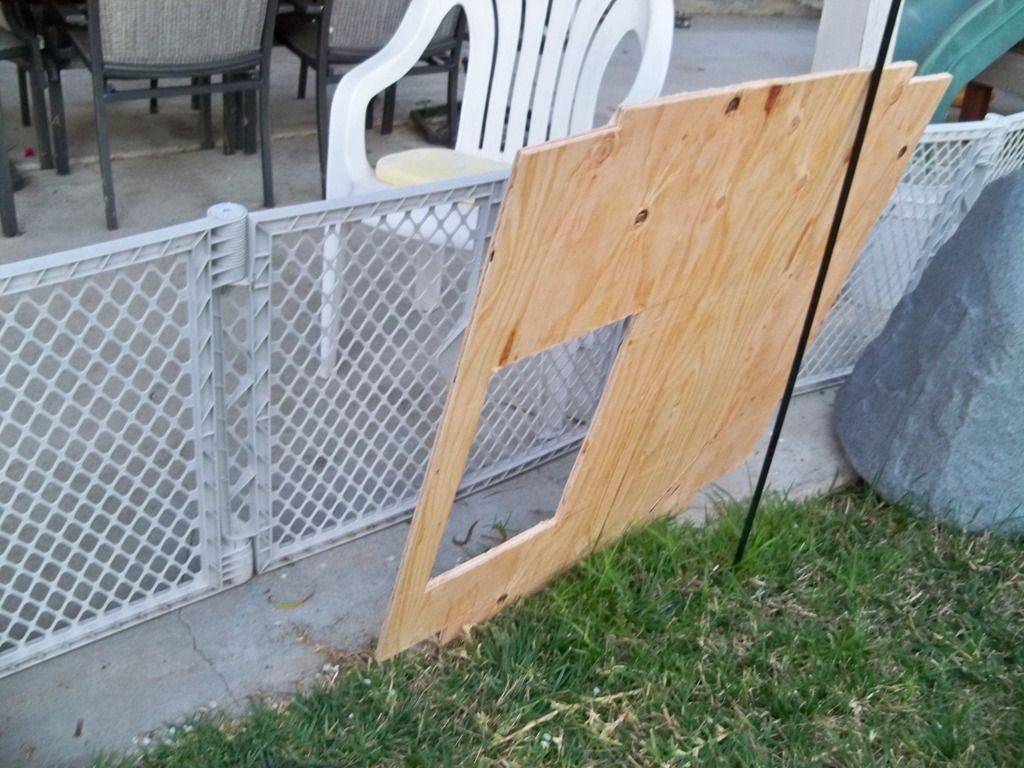
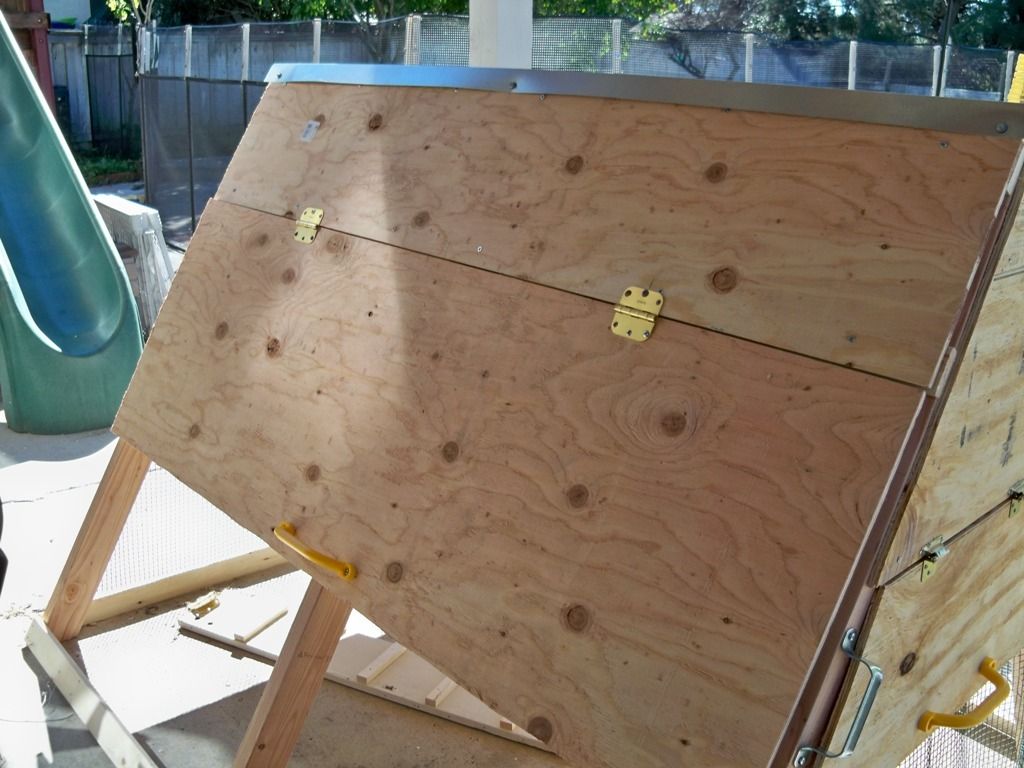
Anyway, so then I started cutting plywood to make the ends and sides. I live in suburbia, so was trying to get my cutting done by 8ish so I wasn't waking every kid within hearing distance, and then do the quieter work later in the evenings. I had a ton of leftover cabinet hinges, so that's what I used for the egg door. Oh, and again you can see my mathematical genius at work - I copied the door off the end ply above, forgetting that it would of course be narrower. No matter, it still was wide enough and gave me space to put a lock.
The original plan didn't include a door in the lower part of the coop, so I added one...
Using much brainpower, I cut the floor in two halves so I could fit them in once the coop was semi-assembled. I took each cut piece of a-frame, flooring and wall into the backyard since I would otherwise have to lift it over our side gate, which sounded about as much fun as a broken arm.
As you can see, I'm now racing against the clock. It's now late at night and I'm working in poor lighting. I screwed the flooring in first to hold it together, then added the bottom rails of 1x3 (not in the original plan, but a vital modification). I had some leftover climbing gym handles which are kind of overkill for the egg door, but there you have it. The ramp is a garage shelf that fell down about a year ago, and I added some scrap split 1x3s for traction. A door hinge attaches it to the floor. Make these mistakes 2 & 3. The yellow handles I'll tell you about later, but the ladder I'll enlighten you on now. The original design was flawed in that it doesn't allow enough overhead room between the ramp and the foor. In its current state, there is only 7 inches clearance. I'll show you how I fixed that in a few photos...
Next I added 1x3 braces - 2 on each side. I had to guess where they should go , and they are different on each side due to the size of my side door. I also had leftover linoleum tiles from the bunny hutch project, so figured that would help for an easy clean surface. You can see a small hole (drilled with a 1 inch speed bore) in the flooring so I can use a rope system to lift and close the ramp, locking them in the top section. I also bored holes for ventilation in the end wall.
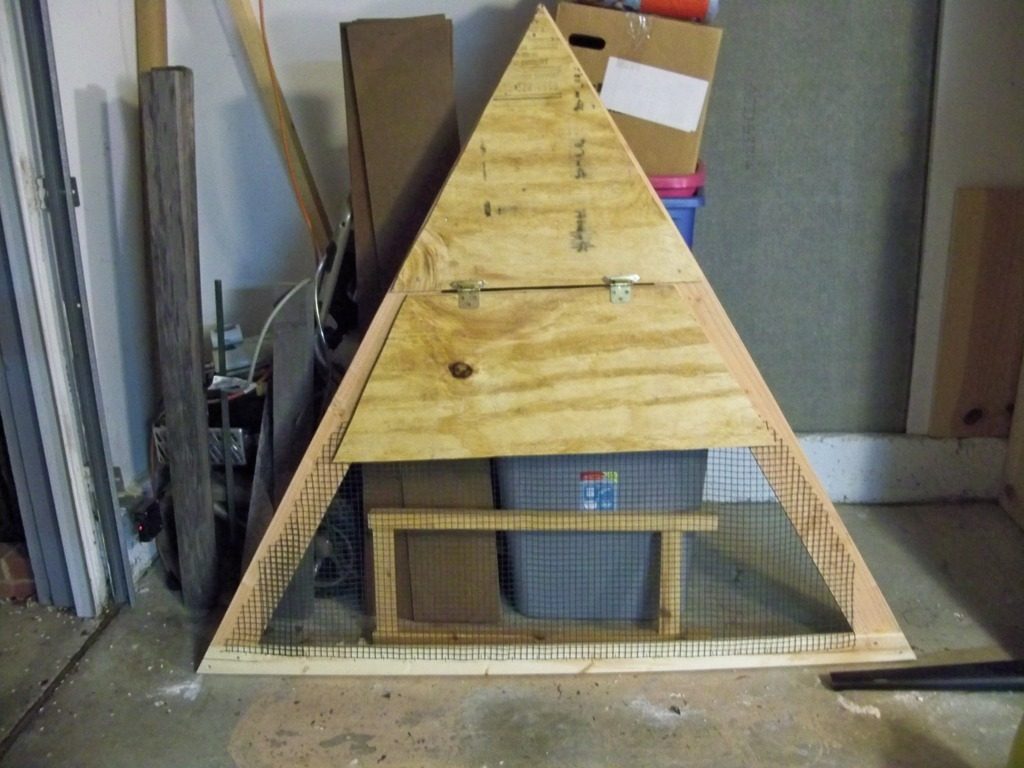
Next I added the roofing - ply on the side where the door will be, and corrogated roofing on the other side because...well, let's just say that my mathematical skills once again let me down. Fortunately, I had some leftover ply to use on the bottom portion of the far wall, so it kind of looked meant to be. I added some kind of roofing corner thing at the top, fixing it with leftover roofing screws.
I added handles to use for moving the coop, since it would be so lightweight and mobile, right? Um, this beast will be moved in emergencies only. However, this does give me the opportunity to explain mistake #2 - handles. I should have used the comfortable yellow handles on the sides to pick it up and move and the smaller metal handles for the egg and side doors. I might change them over at some point, or I might just talk about how I should have done it. I put the mesh all around the bottom (again, paint first!).
Attached the side door. Actually bought these hinges because I didn't think what I had was heavy duty enough, but then I tend to over-engineer (probably to make up for my lack of skill).
And here's how I fixed mistake #3. I used a piece of 2x4 and attached it underneath the foor, then attached the ramp to it. My dad had suggested that I attach the ramp behind the opening, but I didn't have room to do that. This gives a 10 inch clearance, which I hope will be enough, but if not, I can shorten the ramp since it's pretty gradual.
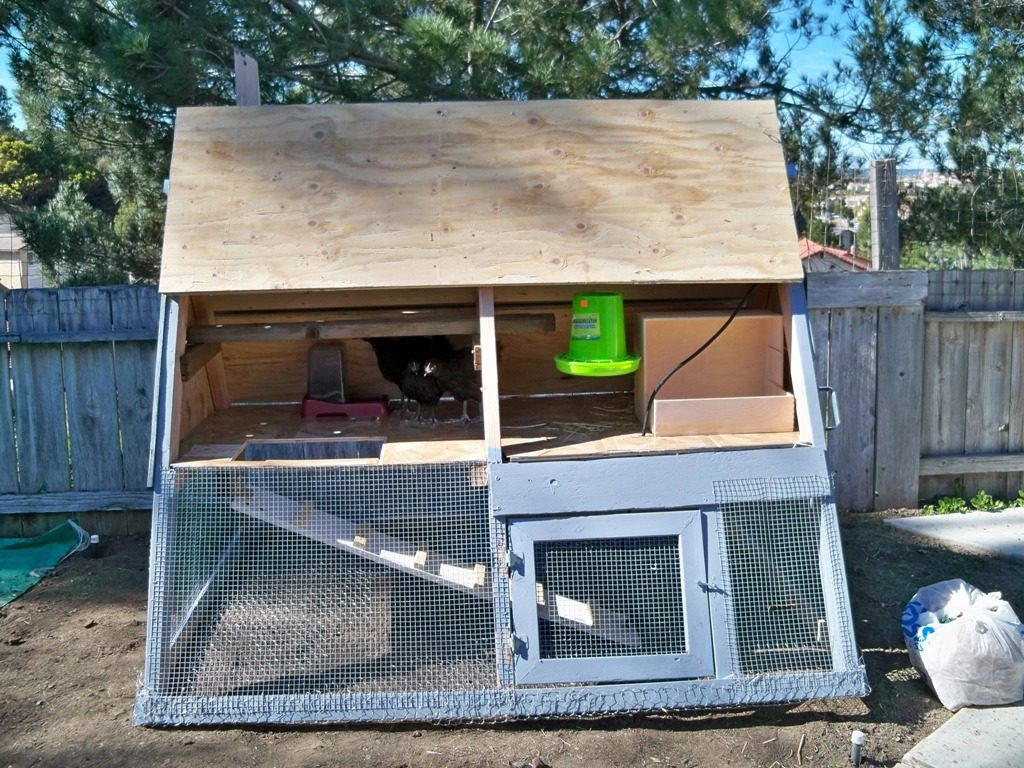
The girls (PLEASE let them all be girls! Anyone care to guess? They're 9.5 weeks old) patiently await their new digs. The green box you can see in the background is a garage sale find that I cut the legs off and made into a nesting box. They're also kitted out with an Ikea nesting box (bet you didn't know Ikea made nexting boxes - they're called Chuk. Haha!)...details to follow. Anyway, so we painted. Note the use of child labor. Used leftover house paint, so at least it's not pink. You can also sort of see theopen door on the bottom that I'm yet to make a frame for.
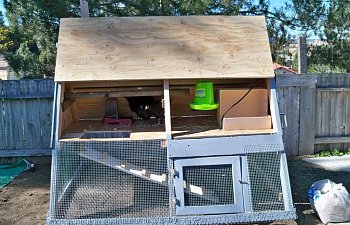
I added another two crossbars to the middle and one end and put a piece of 2x4 on top for a roost. In the right of the photo you can see my Ikea nesting box - another garage sale find that I think I paid a dollar for - it's one of the mini drawer sets. I removed the drawers and the dividers, turned it on its side and attached the large drawer to make the nest. I need to cut one side away for access still. I'm working on a treadle feeder next weekend, but in the meantime, my $7 feeder is hanging from a hook inside. You can also see the rope to lift the ramp, but not sure if I'll use it since I added poultry netting to the bottom to help keep them safe. Anyway, you can also see that the girls are a little camera shy.
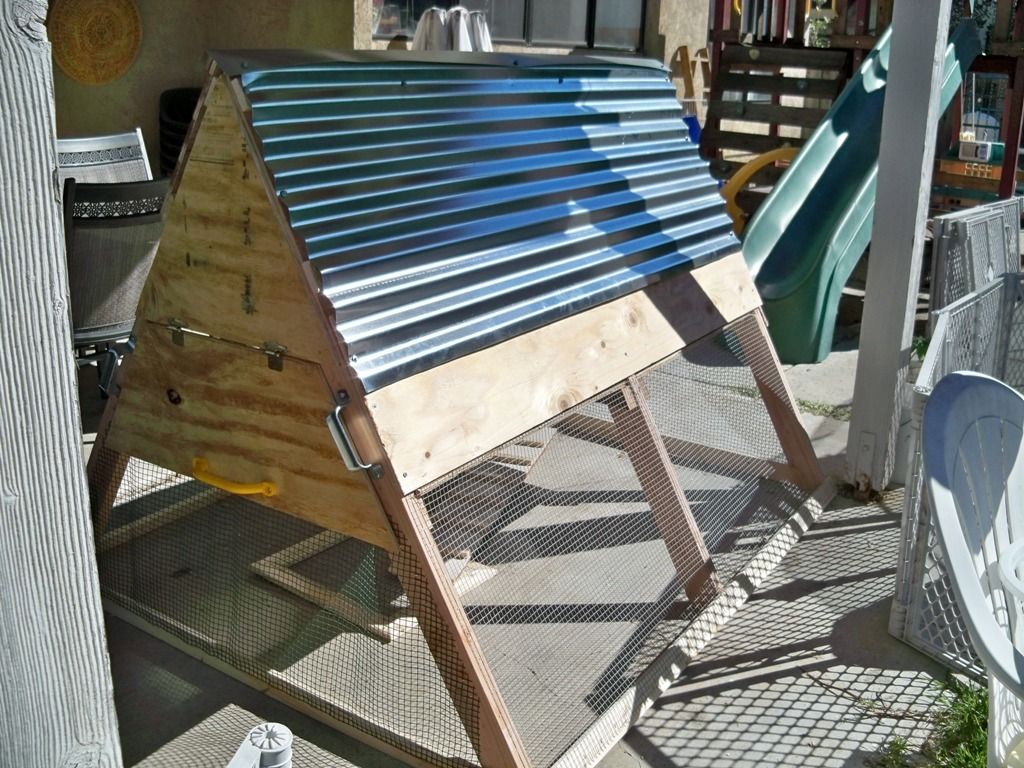
Here's the finished product with the door open. I must point out that despite my mathematical failings, that's the ground that's sloped down, not the coop sloping up. I'll add a nipple waterer, but otherwise, I think it's complete. Total cost was about $120, and I used as much leftover/recycled material as I could. The girls have already pooped all over it, which I take to mean that they like it and feel so much at home that they no longer need to mind their manners.
Some dimensions:
The coop is 4.5ft tall, 5ft wide at the base and 6ft long, giving about 16sf upstairs, and 30 down. Each side of the frame is 5ft. I'll think about other dimensions along the way.
First, I started with this plan. Using some information and a lot of guesswork, I started cutting. The good thing about this plan is that they provided a good list of materials to purchase/obtain

First I started with the frame. This took considerable brain power since I am NOT mathematically minded. I had to figure out the angles without a protractor, and the angles in another similar plan were incorrect. The angle at the top is 60 degrees and 30 degrees at the bottom. I made three frames like this.
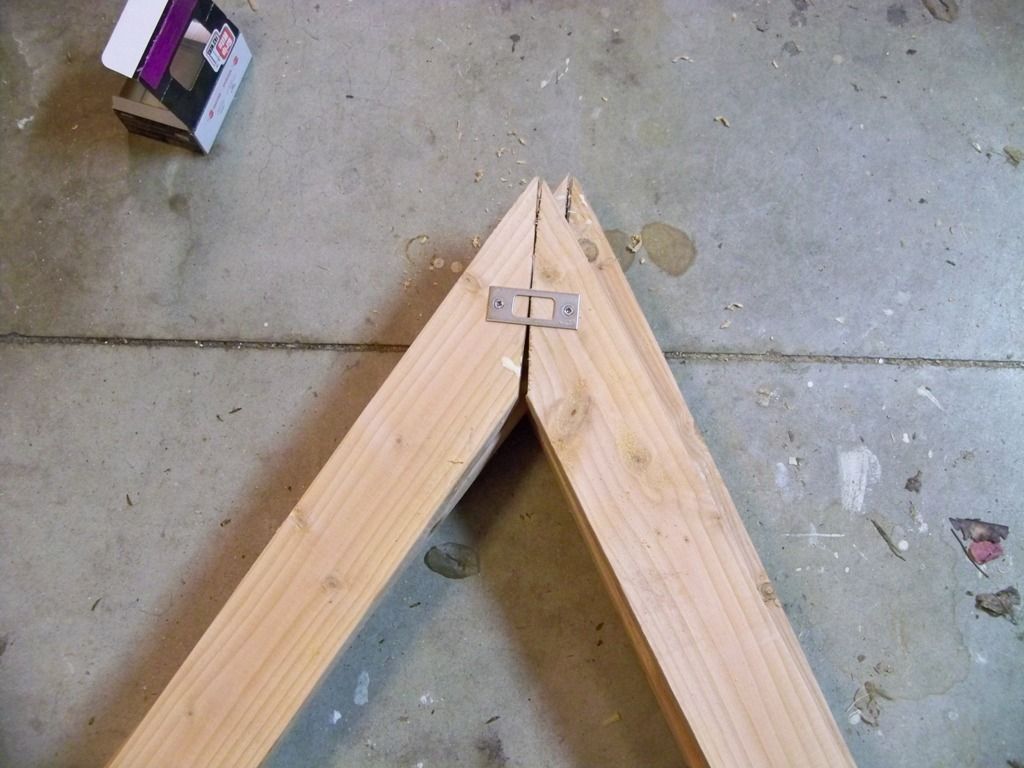
I figured I needed some extra support at each apex, given that I had to cut the angles with a jigsaw (too long for my drop saw) and accuracy is not my forte. My dad (a builder) suggested gang nails or repair thingies - the pieces of galvanized metal with lots of spikes to join to bits of wood. Instead, I used leftover door tongue plates. Figured they'd do the same job, or near enough. Next, I added a horizonal bar on each (two on the middle A-frame to support the floor), guessing what height it should be (ended up with 2ft 10 inches from the ground) and stapled on hardware mesh (leftover from house bunnies who now live in an entirely separate luxury condo complex outside). And herein lies my first mistake. I was rushing since I had agreed to get the chickens on Saturday. This photo is taken on Wednesday night. Lots of work to do, so I figured build now, paint later. Um, it's hard to paint through mesh. Enough said.
Anyway, so then I started cutting plywood to make the ends and sides. I live in suburbia, so was trying to get my cutting done by 8ish so I wasn't waking every kid within hearing distance, and then do the quieter work later in the evenings. I had a ton of leftover cabinet hinges, so that's what I used for the egg door. Oh, and again you can see my mathematical genius at work - I copied the door off the end ply above, forgetting that it would of course be narrower. No matter, it still was wide enough and gave me space to put a lock.
The original plan didn't include a door in the lower part of the coop, so I added one...
Using much brainpower, I cut the floor in two halves so I could fit them in once the coop was semi-assembled. I took each cut piece of a-frame, flooring and wall into the backyard since I would otherwise have to lift it over our side gate, which sounded about as much fun as a broken arm.
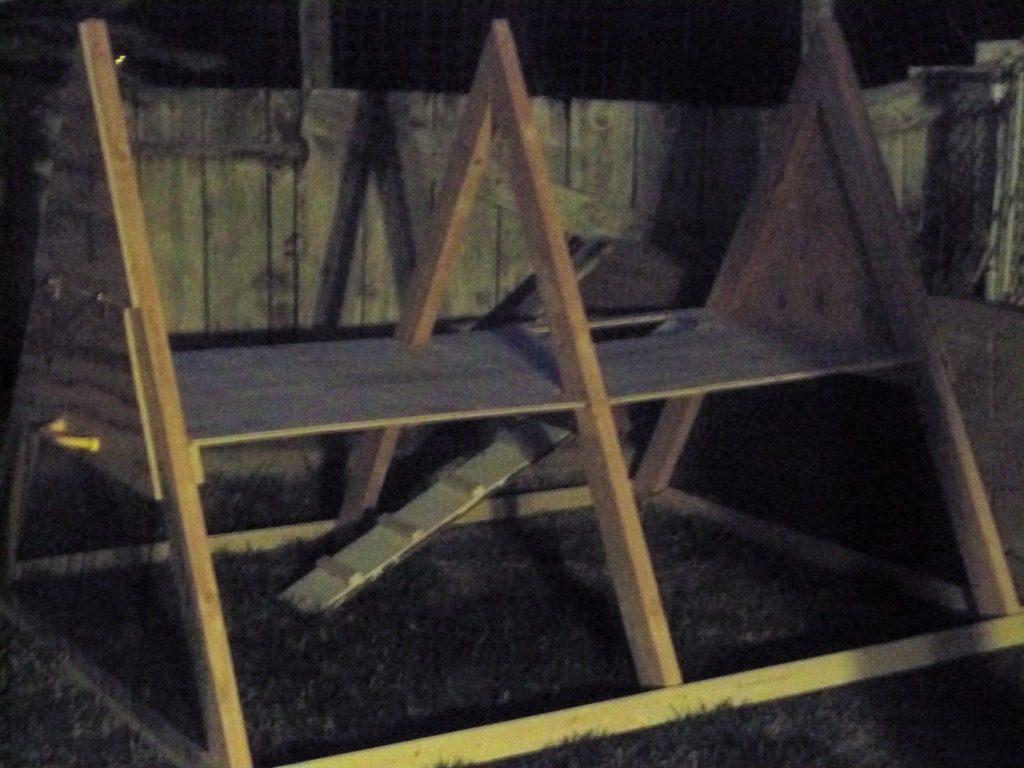
As you can see, I'm now racing against the clock. It's now late at night and I'm working in poor lighting. I screwed the flooring in first to hold it together, then added the bottom rails of 1x3 (not in the original plan, but a vital modification). I had some leftover climbing gym handles which are kind of overkill for the egg door, but there you have it. The ramp is a garage shelf that fell down about a year ago, and I added some scrap split 1x3s for traction. A door hinge attaches it to the floor. Make these mistakes 2 & 3. The yellow handles I'll tell you about later, but the ladder I'll enlighten you on now. The original design was flawed in that it doesn't allow enough overhead room between the ramp and the foor. In its current state, there is only 7 inches clearance. I'll show you how I fixed that in a few photos...
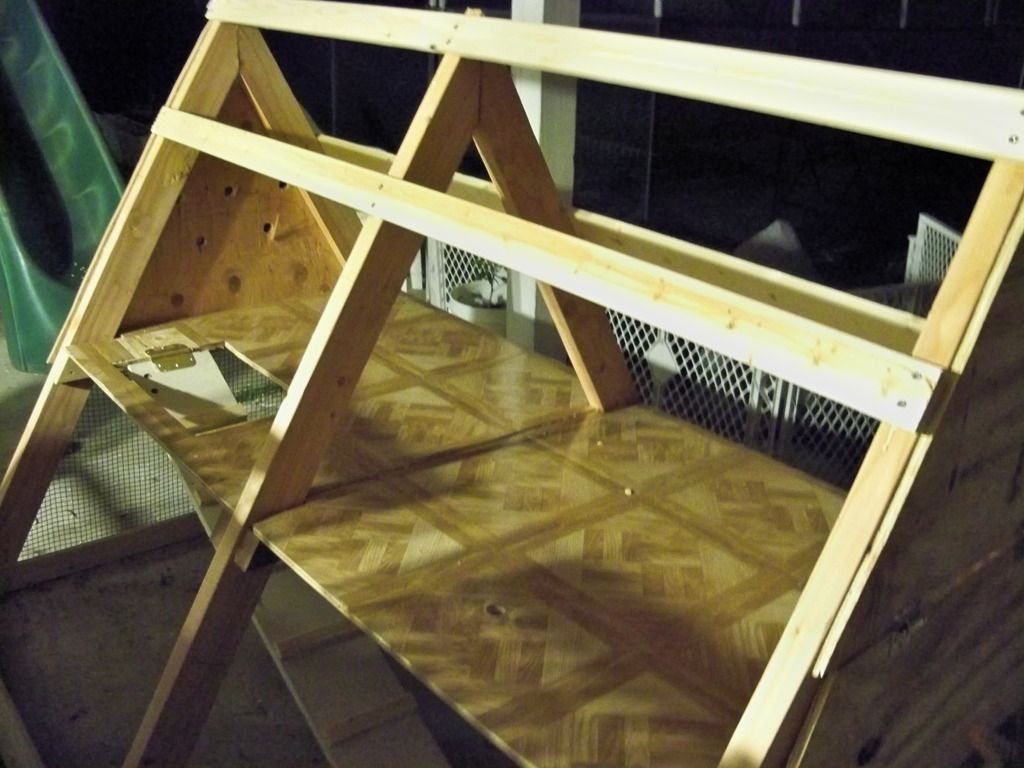
Next I added 1x3 braces - 2 on each side. I had to guess where they should go , and they are different on each side due to the size of my side door. I also had leftover linoleum tiles from the bunny hutch project, so figured that would help for an easy clean surface. You can see a small hole (drilled with a 1 inch speed bore) in the flooring so I can use a rope system to lift and close the ramp, locking them in the top section. I also bored holes for ventilation in the end wall.
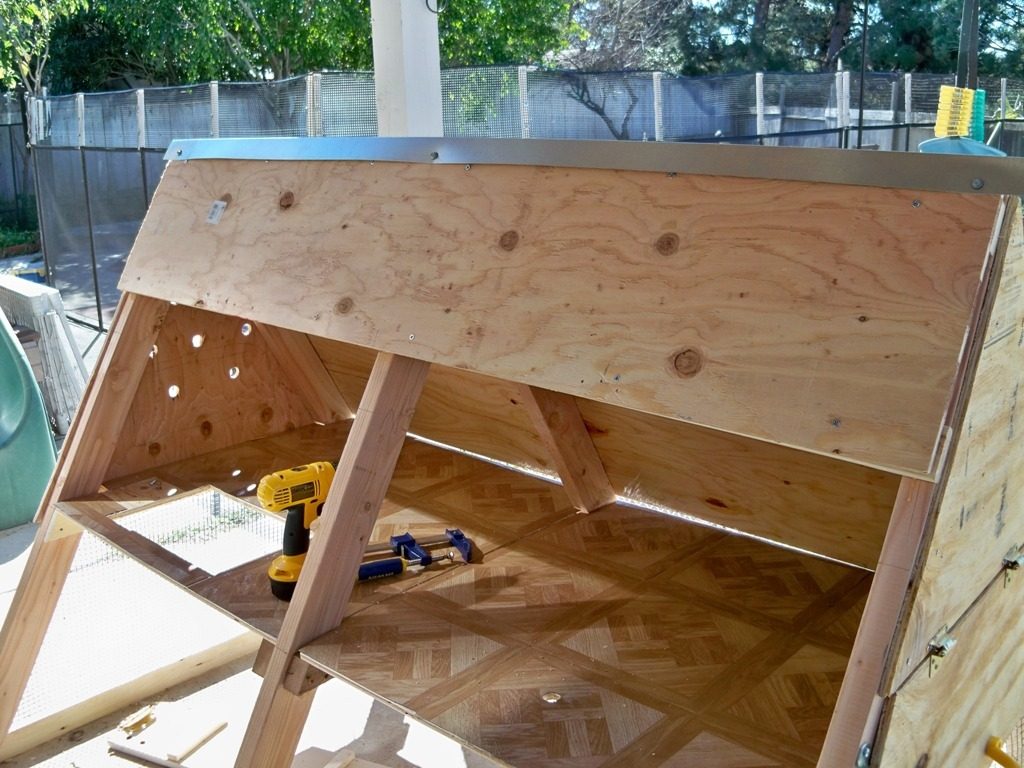
Next I added the roofing - ply on the side where the door will be, and corrogated roofing on the other side because...well, let's just say that my mathematical skills once again let me down. Fortunately, I had some leftover ply to use on the bottom portion of the far wall, so it kind of looked meant to be. I added some kind of roofing corner thing at the top, fixing it with leftover roofing screws.
I added handles to use for moving the coop, since it would be so lightweight and mobile, right? Um, this beast will be moved in emergencies only. However, this does give me the opportunity to explain mistake #2 - handles. I should have used the comfortable yellow handles on the sides to pick it up and move and the smaller metal handles for the egg and side doors. I might change them over at some point, or I might just talk about how I should have done it. I put the mesh all around the bottom (again, paint first!).
Attached the side door. Actually bought these hinges because I didn't think what I had was heavy duty enough, but then I tend to over-engineer (probably to make up for my lack of skill).
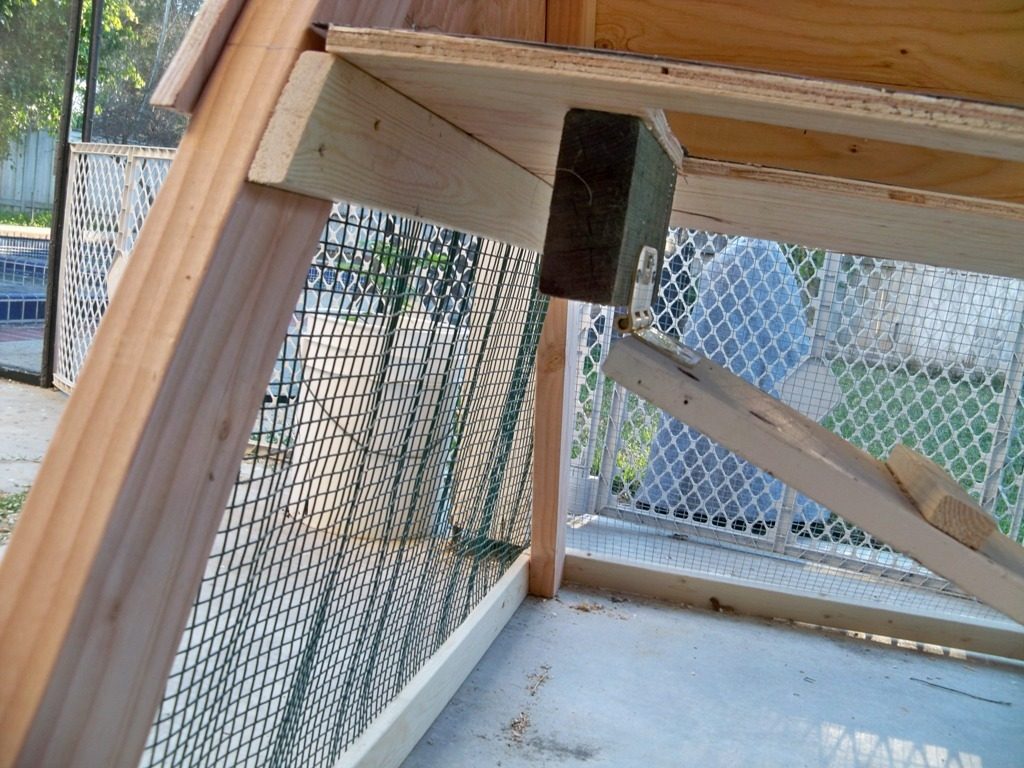
And here's how I fixed mistake #3. I used a piece of 2x4 and attached it underneath the foor, then attached the ramp to it. My dad had suggested that I attach the ramp behind the opening, but I didn't have room to do that. This gives a 10 inch clearance, which I hope will be enough, but if not, I can shorten the ramp since it's pretty gradual.
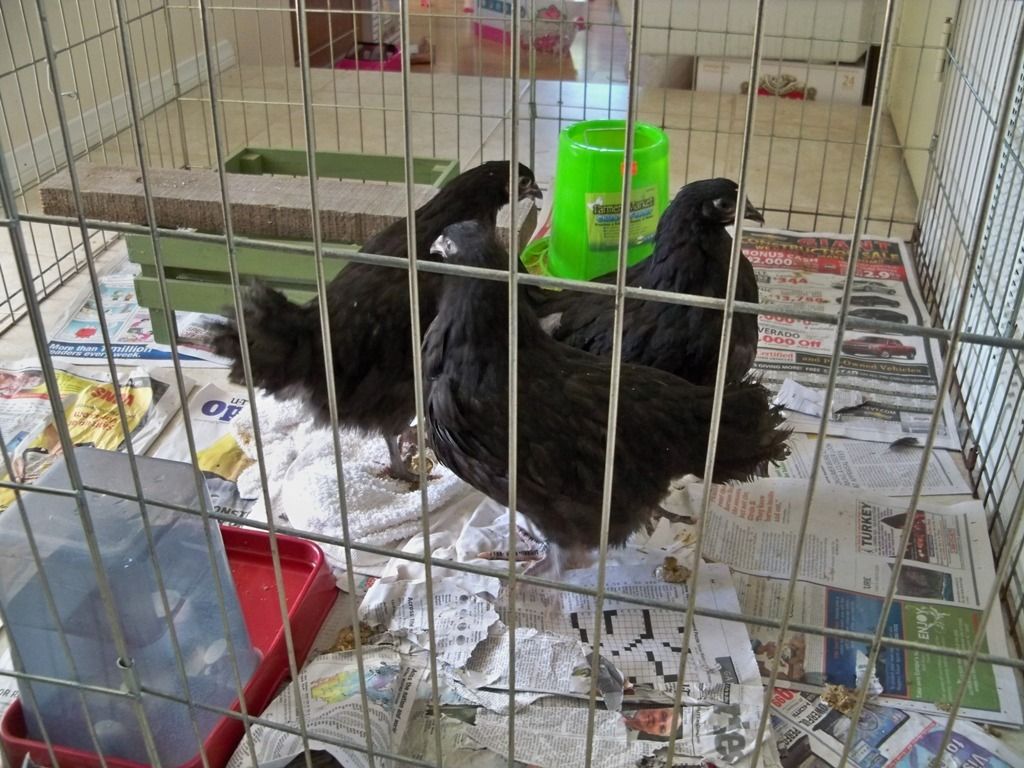
The girls (PLEASE let them all be girls! Anyone care to guess? They're 9.5 weeks old) patiently await their new digs. The green box you can see in the background is a garage sale find that I cut the legs off and made into a nesting box. They're also kitted out with an Ikea nesting box (bet you didn't know Ikea made nexting boxes - they're called Chuk. Haha!)...details to follow. Anyway, so we painted. Note the use of child labor. Used leftover house paint, so at least it's not pink. You can also sort of see theopen door on the bottom that I'm yet to make a frame for.
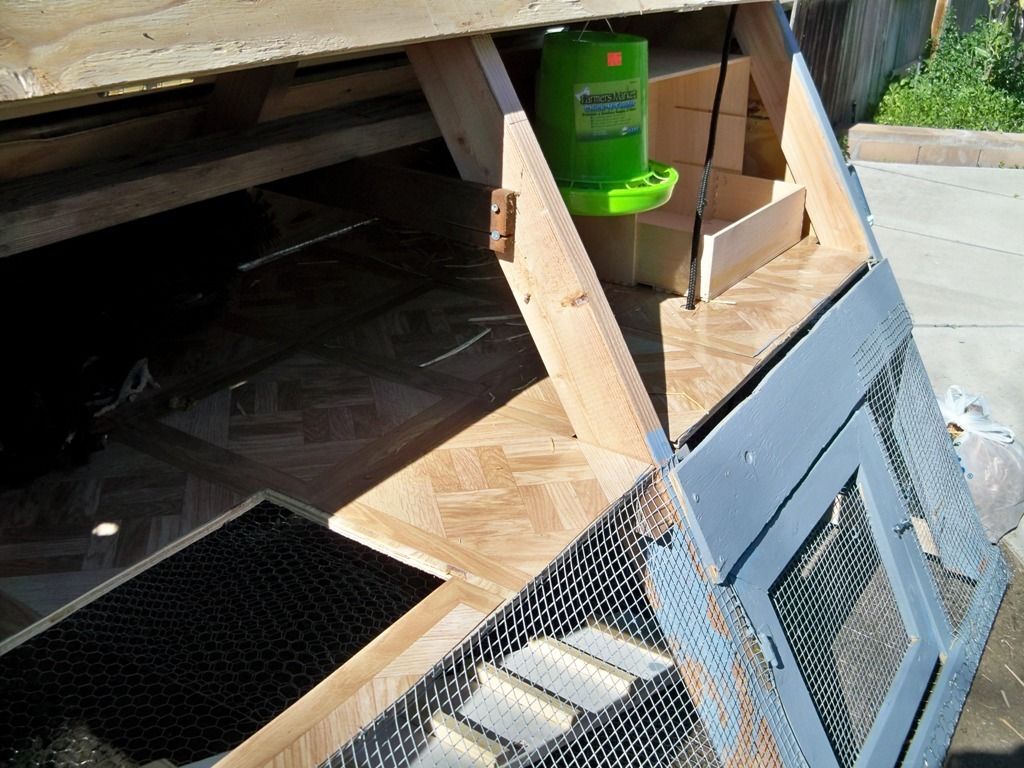
I added another two crossbars to the middle and one end and put a piece of 2x4 on top for a roost. In the right of the photo you can see my Ikea nesting box - another garage sale find that I think I paid a dollar for - it's one of the mini drawer sets. I removed the drawers and the dividers, turned it on its side and attached the large drawer to make the nest. I need to cut one side away for access still. I'm working on a treadle feeder next weekend, but in the meantime, my $7 feeder is hanging from a hook inside. You can also see the rope to lift the ramp, but not sure if I'll use it since I added poultry netting to the bottom to help keep them safe. Anyway, you can also see that the girls are a little camera shy.
Here's the finished product with the door open. I must point out that despite my mathematical failings, that's the ground that's sloped down, not the coop sloping up. I'll add a nipple waterer, but otherwise, I think it's complete. Total cost was about $120, and I used as much leftover/recycled material as I could. The girls have already pooped all over it, which I take to mean that they like it and feel so much at home that they no longer need to mind their manners.