Welcome to My Homemade Cabinet Incubator and Automatic Egg Turner
First thing you have to know about me is I am NOT going to spend any big money on anything. I can always make it myself, with a little help from my husband and eldest son. We are remodeling so I just so happened to have cabinets laying around taking up room. I also just happened to get addicted to chickens about the same time. So now that i have my bigger chickens settled into their new coops/pens I just had to start a new project. So first things first the cabinet. It is a 30" base cabinet that had sliding trays we are using for the egg turner trays. I took out the drawers in the top and replaced the back wall with plywood just to make it stronger.

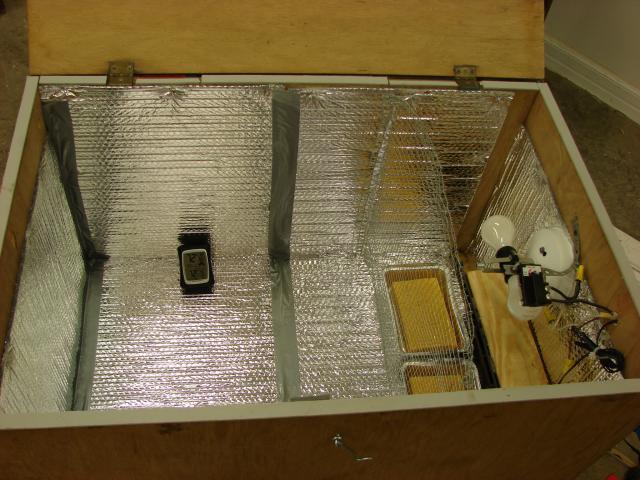
The next thing we did was add the insulation. One roll of this was $13 (Home Depot and Lowes carry this) and was plenty to do the whole thing.
You just cut it and staple it. I taped the seams for extra insurance. (Granddaughter and Son)
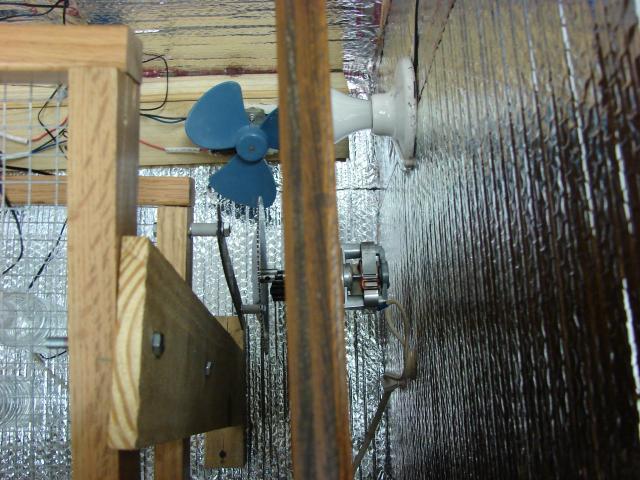
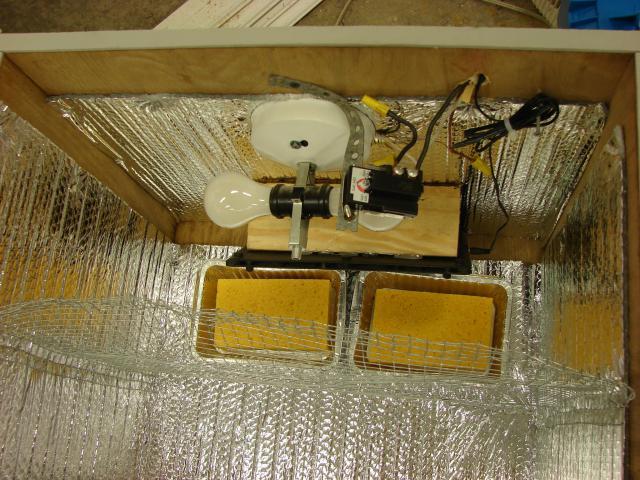
Next the electrical stuff. That was my son's job so I can't explain that but it is the same as most incubators on here. This is what I know. It plugs into the wall. From there it goes to a light switch (he wanted that not me, but it has come in handy in testing). The switch controls an outlet that is mounted in the incubator. The water heater thermostate is hard wired in the outlet so it can control the lights. The fans (old window fan with two small fans controled by a switch, just took off the cover really) are plugged into the outlet along with the egg turner. It looks more complicated than it is really.
Ok so, from what I learned on the website is you have to put the thermostat really close to the light. Mine is less than an inch maybe 1/2 inch. You also have to put the fan close to the light/thermostat. It circulates the heat from the light and cools the thermostat off so it will cycle sooner so you don't have big swings in temps. I have also added three vent holes as was suggested since my temps where only a little too high and I think that has worked. I am only using one the other two have tape over them. So so far I have spent $13. I had everything else. Oh yeah I forgot... I bought some weather stripping to put around the doors and the top. Someone said the doors would warp and that would stop it. So now I am up to $18 cuz I bought two sizes. Now to get the temps right. I used every watt light and combination there of... but what worked for me is 2 75 watts bulbs. It seemed to heat the thermostat up enough to cut it off at the right time and the other one just added more heat and leveled the temps too. I ran it for a few hours at a time and adjusted the thermostat several times. At almost the lowest setting seemed to work on the thermostat and temps are running about 100.9ish. (too high but hopefully the vent holes have changed that by a degree now)
So while that is warming up on to the egg turner....
First it IS rocket seince!!! Ok not really but it is close! GOOD LUCK TO YOU!! I will show you everything, EVERYTHING we did to get this to work. If you have questions PM me and I will try to get you an answer or a picture.
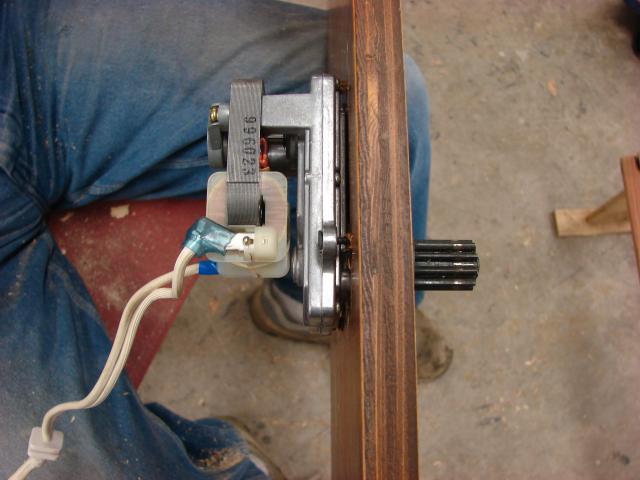
One thing kept coming up when I would search for homemade egg turner... a rotisserie...So off the Goodwill store hoping to find a table top version. I found a Showtime for $15. My son took out the motor and we were off to the launch pad....
We drilled a hole through and old cabinet door (yeah we do a lot of remodeling) and mounted the motor so that the gear was clear of the wood so it could turn the other gears. I can't tell you where to drill the whole you will have to mount it for your needs.
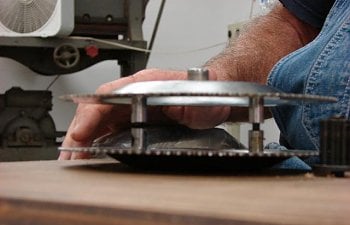
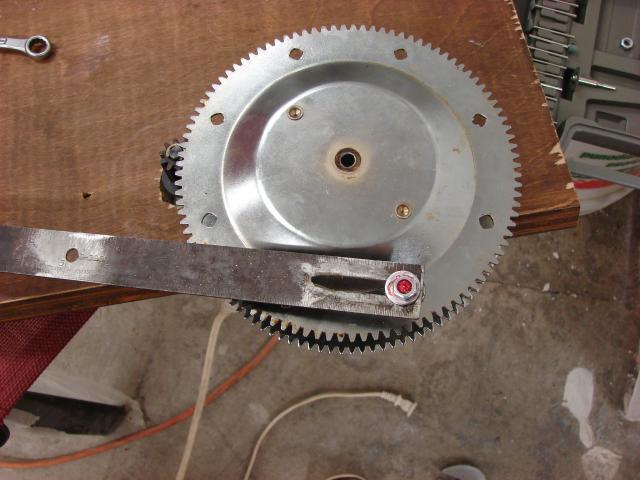
So the motor turned a bigger gear in the rotisserie (one at each end and you spear the chicken between the gears...kinda ironic it is going to now give life to chickens) We used both gears but only one is actually touching the motor's gear. We had to drill out the nubs on the gears and we put a bolt trough the one that is being turned by the motor gear, not to tight it has to turn and we put loctight on the bolt so it would not move, we hope.
We also cut the rod the held the chicken on the turner to hold the two gears together with loctight.
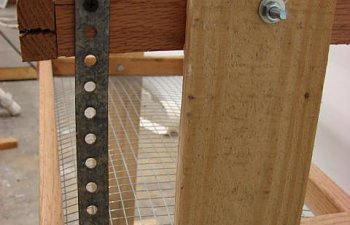
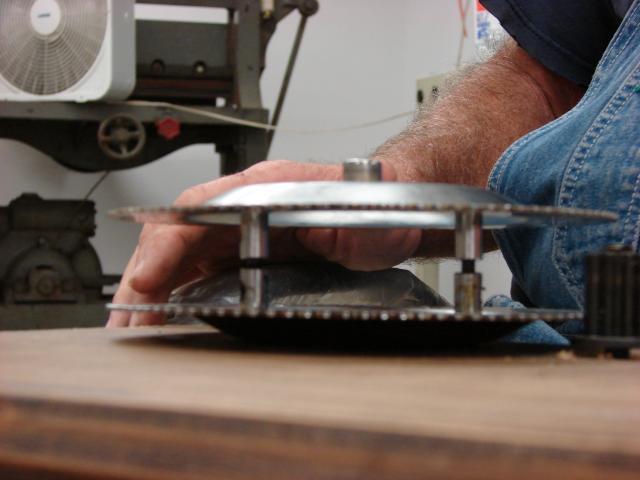
After much talk, looking and trying things we finally found the rod to turn the trays. I had an old metal ruler so that is what we used. We bolted the ruler to one of the existing holes on the big gears with spacers to clear the hump on the gear. Then we attached the ruler to a tray. Hum... need to show you the trays....
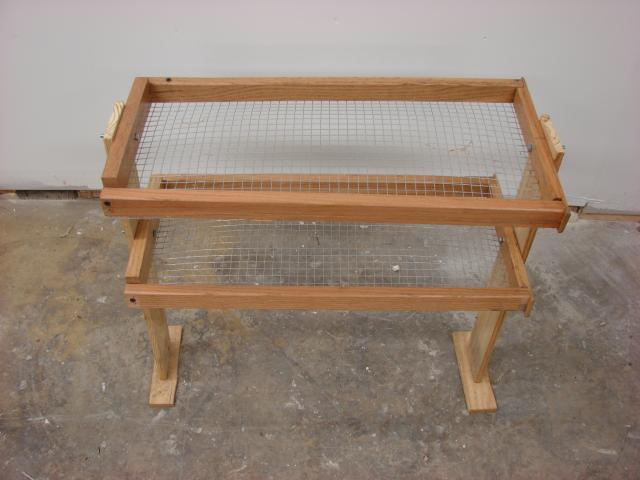
These where not rocket science. The trays came out of the cabinet (we did have to cut them to fit with the motor in the incubator). I took the bottom off and added hardware cloth. They are bolted on the legs. We added strapping so when one moved they both moved. The feet just added stability and we had to make it taller when we added the motor and got it working.
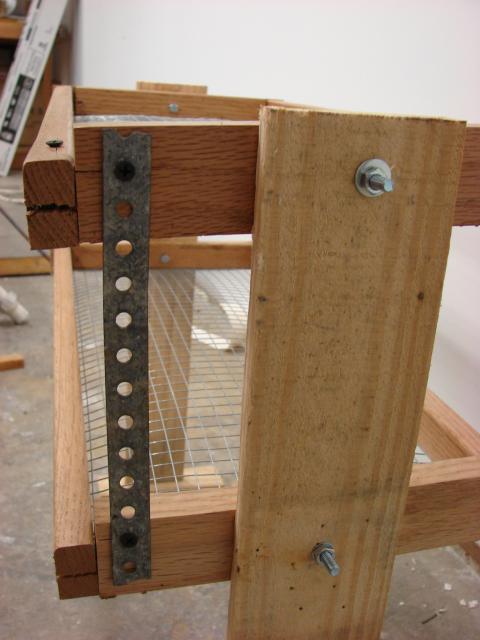
Back to the motor part...we attached the ruler to the bottom tray and it did not work. So we ended up drilling out a slot in the ruler so that the bolts could move the trays without binding anything up. We just could not make it work anyother way. We did this at the top and bottom. You will have to adjust the length of the slot to your needs. The hole in the middle was a first attempt but it did not work.
So now we mounted it in the incubator to check fit added braces and srewed it to the incubator. You need to make sure the mount for the motor is straight to not bind the ruler. This will take several tries unless you are a rocket scientist!
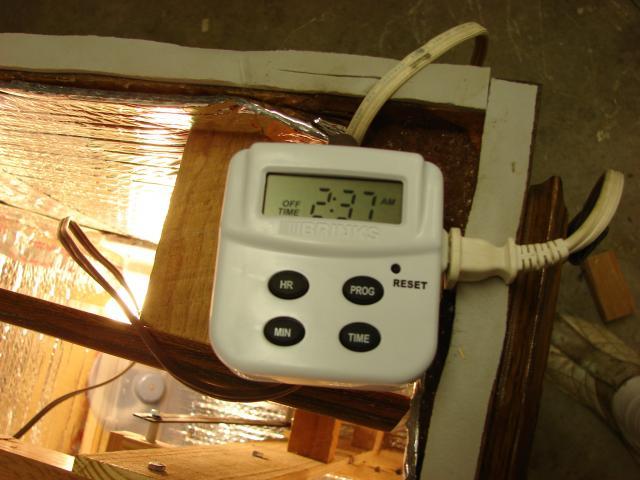
We added some bracing to keep it in place. We used the wiring that came with the motor and added an on/off controler. It is plugged into a timer that works on one minute intervals and runs 6 times a day. I have it set to run for 2 mins (it stops at 1/3 of the way each stop, so every 5th time it is back where it started) that may not work for you. You will just have to play with it to get what you want. This is the timer from Walmart $13.
I added a wooden top and insulated the underside. Then I cut a hole out for glass (tempered glass from something, it was a door) weatherstrip the top of the cabinet for more insulating and it runs great so far!
The lock thing on the front is non functioning it is only to keep the doors closed tight to keep heat from escaping. I will paint this one day but that is no big deal now. Really if I forgot something or you don't understand let me know. This was a real project and if I can keep you from hitting a brick wall I am more than willing to help!
Cost less than $50 for me. I forgot the thermostates they were about $25. Now go build your own incubator with automatic egg turner!!!!
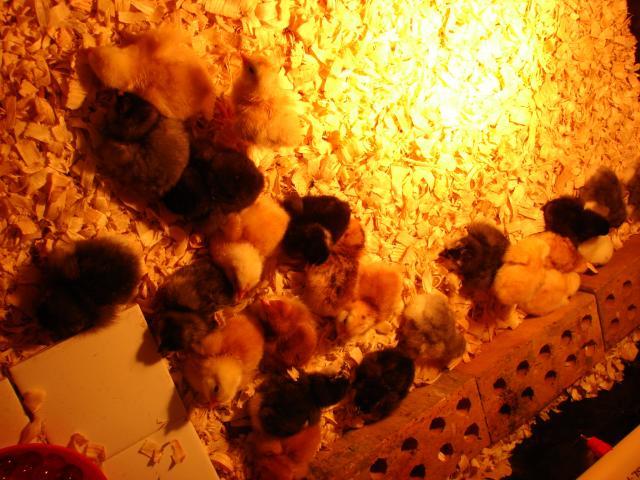
I had 57 eggs but so far only 32 have been viable but everything is going well.
I scored a free plywood box a week or so ago so it is now my hatcher!!!! So I can have staggered hatches!!!!!! I only had to buy mor insulation, WHT and thermometers so maybe $30 bucks. Same lighting and wireing setup.... simple simple.
Side view of the hardware parts.
31 egg went into lockdown... 28 hatched!!!! 3 are not pipping but are still in the hatcher. I have Split lav Ameraucanas, EE, Barred EE, RIRxNH, NH, Olive Eggers, Blue and Black Barred Rocks quite the collection of colors!
Second hatch complet 13/14 hatched! I only set 14 eggs! This was BRxEE (4) and BRx Blue and Splash Rocks.
Third hatch has started 9 Marans (Blue and Black Copper) 7 Lavender Ameraucanas, RIRxNH and more Rocks! About 40 eggs!
More Marans Eggs to come and Heritage BR coming too! I need Heritage NH too, but I have not found them close yet!

The next thing we did was add the insulation. One roll of this was $13 (Home Depot and Lowes carry this) and was plenty to do the whole thing.
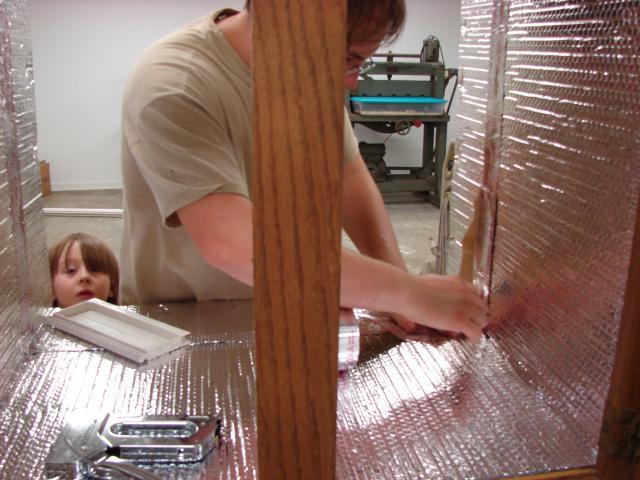
You just cut it and staple it. I taped the seams for extra insurance. (Granddaughter and Son)
Next the electrical stuff. That was my son's job so I can't explain that but it is the same as most incubators on here. This is what I know. It plugs into the wall. From there it goes to a light switch (he wanted that not me, but it has come in handy in testing). The switch controls an outlet that is mounted in the incubator. The water heater thermostate is hard wired in the outlet so it can control the lights. The fans (old window fan with two small fans controled by a switch, just took off the cover really) are plugged into the outlet along with the egg turner. It looks more complicated than it is really.
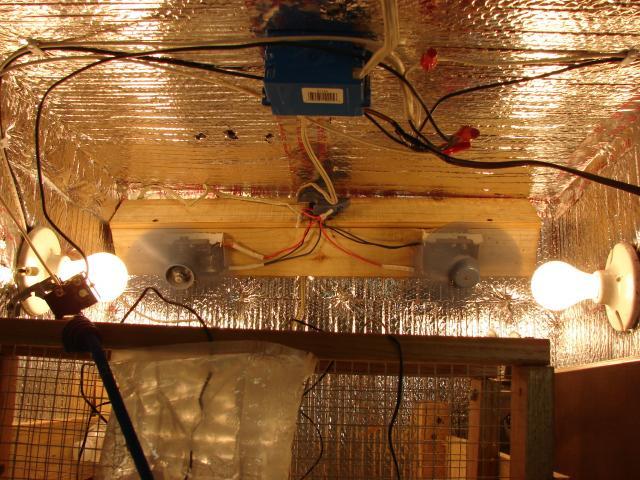
Ok so, from what I learned on the website is you have to put the thermostat really close to the light. Mine is less than an inch maybe 1/2 inch. You also have to put the fan close to the light/thermostat. It circulates the heat from the light and cools the thermostat off so it will cycle sooner so you don't have big swings in temps. I have also added three vent holes as was suggested since my temps where only a little too high and I think that has worked. I am only using one the other two have tape over them. So so far I have spent $13. I had everything else. Oh yeah I forgot... I bought some weather stripping to put around the doors and the top. Someone said the doors would warp and that would stop it. So now I am up to $18 cuz I bought two sizes. Now to get the temps right. I used every watt light and combination there of... but what worked for me is 2 75 watts bulbs. It seemed to heat the thermostat up enough to cut it off at the right time and the other one just added more heat and leveled the temps too. I ran it for a few hours at a time and adjusted the thermostat several times. At almost the lowest setting seemed to work on the thermostat and temps are running about 100.9ish. (too high but hopefully the vent holes have changed that by a degree now)
So while that is warming up on to the egg turner....
First it IS rocket seince!!! Ok not really but it is close! GOOD LUCK TO YOU!! I will show you everything, EVERYTHING we did to get this to work. If you have questions PM me and I will try to get you an answer or a picture.
One thing kept coming up when I would search for homemade egg turner... a rotisserie...So off the Goodwill store hoping to find a table top version. I found a Showtime for $15. My son took out the motor and we were off to the launch pad....
We drilled a hole through and old cabinet door (yeah we do a lot of remodeling) and mounted the motor so that the gear was clear of the wood so it could turn the other gears. I can't tell you where to drill the whole you will have to mount it for your needs.
So the motor turned a bigger gear in the rotisserie (one at each end and you spear the chicken between the gears...kinda ironic it is going to now give life to chickens) We used both gears but only one is actually touching the motor's gear. We had to drill out the nubs on the gears and we put a bolt trough the one that is being turned by the motor gear, not to tight it has to turn and we put loctight on the bolt so it would not move, we hope.
We also cut the rod the held the chicken on the turner to hold the two gears together with loctight.
After much talk, looking and trying things we finally found the rod to turn the trays. I had an old metal ruler so that is what we used. We bolted the ruler to one of the existing holes on the big gears with spacers to clear the hump on the gear. Then we attached the ruler to a tray. Hum... need to show you the trays....
These where not rocket science. The trays came out of the cabinet (we did have to cut them to fit with the motor in the incubator). I took the bottom off and added hardware cloth. They are bolted on the legs. We added strapping so when one moved they both moved. The feet just added stability and we had to make it taller when we added the motor and got it working.
Back to the motor part...we attached the ruler to the bottom tray and it did not work. So we ended up drilling out a slot in the ruler so that the bolts could move the trays without binding anything up. We just could not make it work anyother way. We did this at the top and bottom. You will have to adjust the length of the slot to your needs. The hole in the middle was a first attempt but it did not work.
So now we mounted it in the incubator to check fit added braces and srewed it to the incubator. You need to make sure the mount for the motor is straight to not bind the ruler. This will take several tries unless you are a rocket scientist!
We added some bracing to keep it in place. We used the wiring that came with the motor and added an on/off controler. It is plugged into a timer that works on one minute intervals and runs 6 times a day. I have it set to run for 2 mins (it stops at 1/3 of the way each stop, so every 5th time it is back where it started) that may not work for you. You will just have to play with it to get what you want. This is the timer from Walmart $13.
I added a wooden top and insulated the underside. Then I cut a hole out for glass (tempered glass from something, it was a door) weatherstrip the top of the cabinet for more insulating and it runs great so far!

The lock thing on the front is non functioning it is only to keep the doors closed tight to keep heat from escaping. I will paint this one day but that is no big deal now. Really if I forgot something or you don't understand let me know. This was a real project and if I can keep you from hitting a brick wall I am more than willing to help!
Cost less than $50 for me. I forgot the thermostates they were about $25. Now go build your own incubator with automatic egg turner!!!!
I had 57 eggs but so far only 32 have been viable but everything is going well.
I scored a free plywood box a week or so ago so it is now my hatcher!!!! So I can have staggered hatches!!!!!! I only had to buy mor insulation, WHT and thermometers so maybe $30 bucks. Same lighting and wireing setup.... simple simple.
Side view of the hardware parts.
31 egg went into lockdown... 28 hatched!!!! 3 are not pipping but are still in the hatcher. I have Split lav Ameraucanas, EE, Barred EE, RIRxNH, NH, Olive Eggers, Blue and Black Barred Rocks quite the collection of colors!
Second hatch complet 13/14 hatched! I only set 14 eggs! This was BRxEE (4) and BRx Blue and Splash Rocks.
Third hatch has started 9 Marans (Blue and Black Copper) 7 Lavender Ameraucanas, RIRxNH and more Rocks! About 40 eggs!
More Marans Eggs to come and Heritage BR coming too! I need Heritage NH too, but I have not found them close yet!
Check out my MEGA incubator too https://www.backyardchickens.com/t/632379/my-mega-homemade-incubator-build#post_8470092