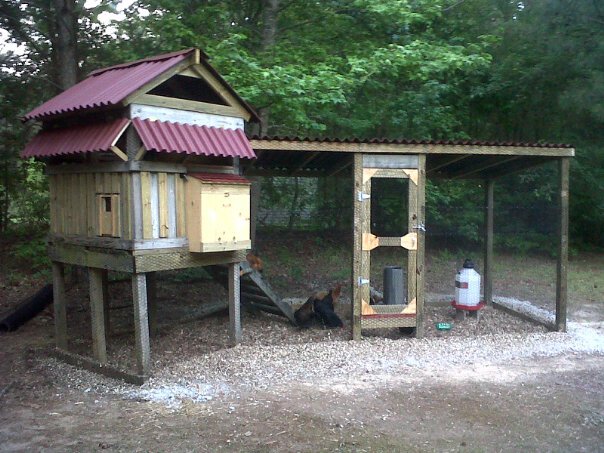
Steadfast's Chicken Coop Condo!
Total project cost: $1000.00
Made by modifying my teen-age daughter's outgrown Wooden "Swing-N-Slide" swing set...
The entries for this construction are posted in REAL CONSTRUCTION TIME!
-Enjoy!
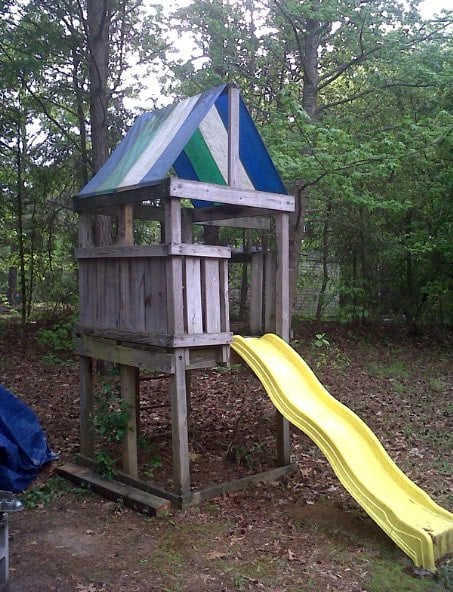
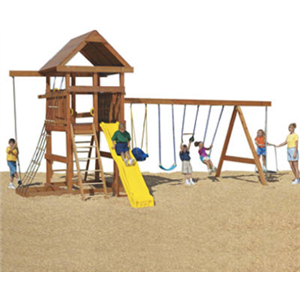
From This:

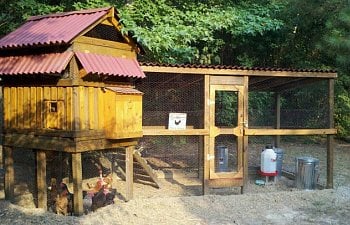
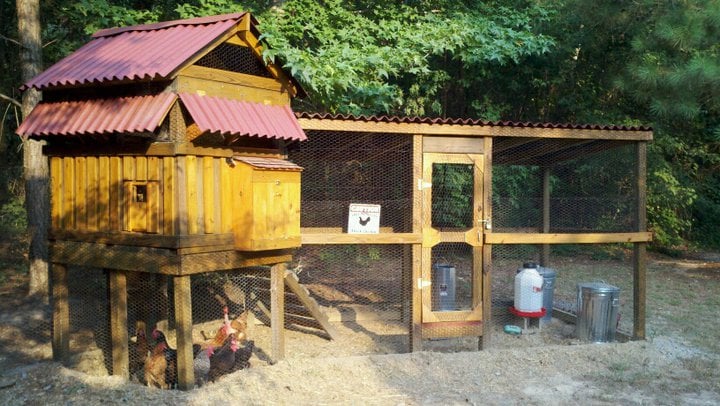
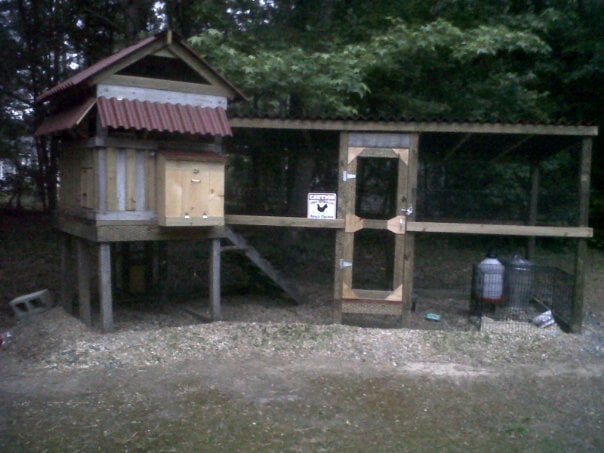
To This:
Here is a Tour Video of the finished Coop:
Here is the tour after I installed the solar and Wind turbine power.
yes, this coop got all kinds of ridiculous oppulant!!!
And now, How I built it all:
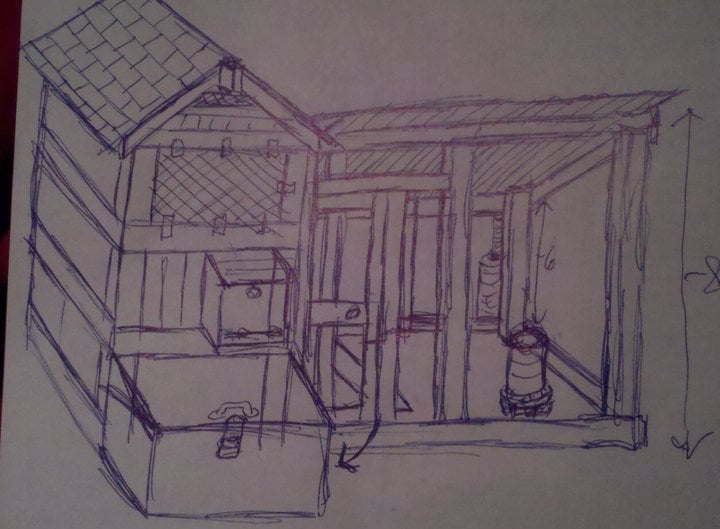
To begin with, Yah Gotta have a PLAN!
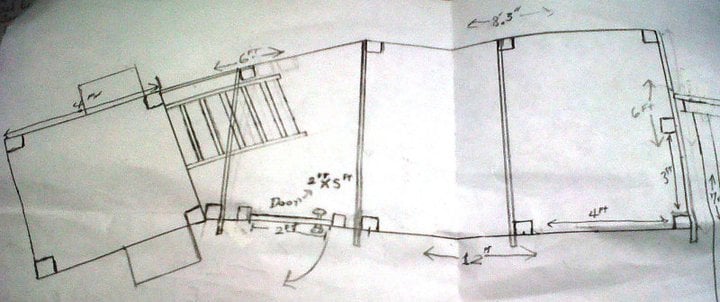
Here is a copy of my Chicken Coop's, "Chicken Run", floor plans... Scaled out...
The manufacturer's photo of the wood swing set tower...
Here is a copy of my 1st rough conceptual drawing:
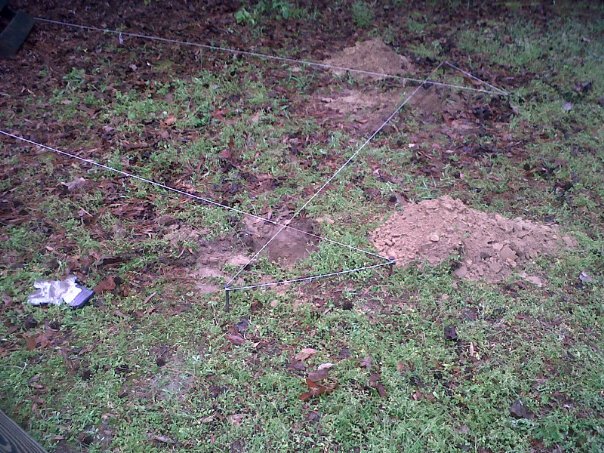
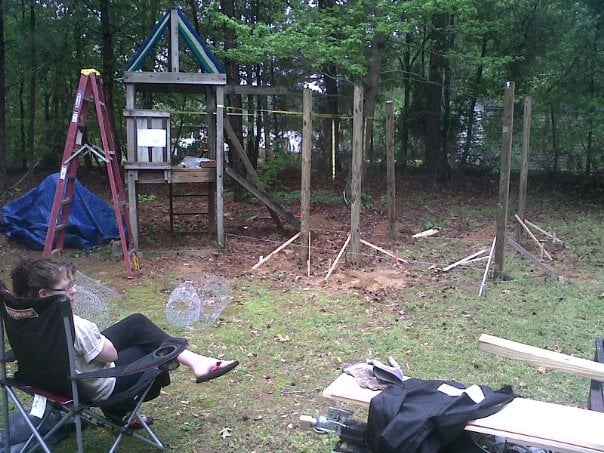
Friday:
First, I went shopping, hauled it home, set up for construction morning....
then... IT RAINED ALL DAY.... uuuuugh! :doh:
All I got done was staking out the construction lines...Then the Sky FELL!
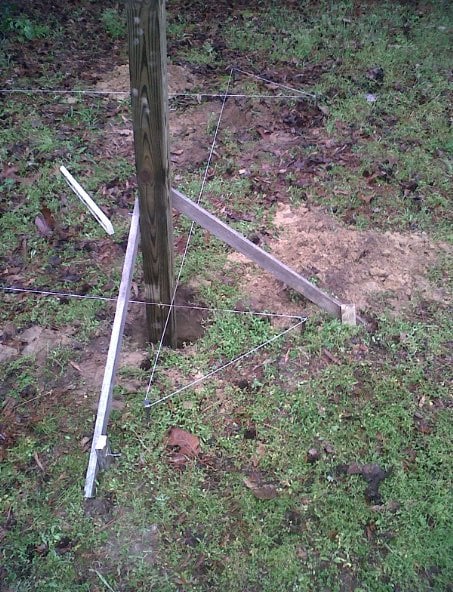
Saturday morning:
:
took off the slide and gave it to a neighborhood kid...
Dug holes, to pour concrete to set the posts.
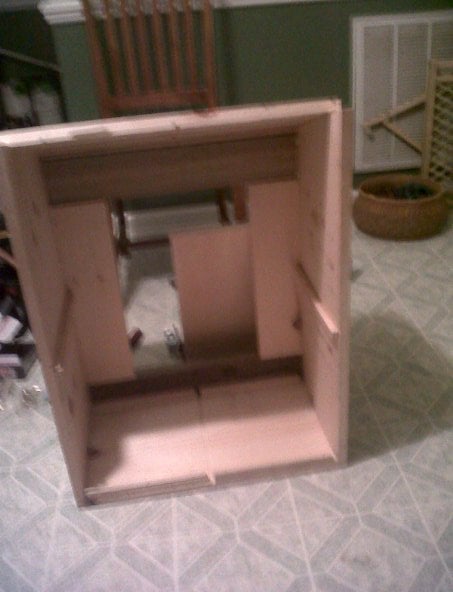
We poored the concrete (24 hour dry time) So, we cut all the peices to make the nesting boxes which I worked on at night for 4 more hours after it wad dark out...
This is the inside, WITHOUT the cross walls installed yet. (sorry for the Fuzzy Photo)
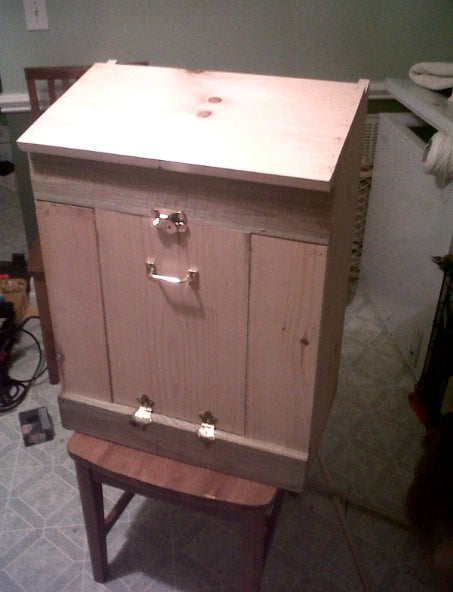
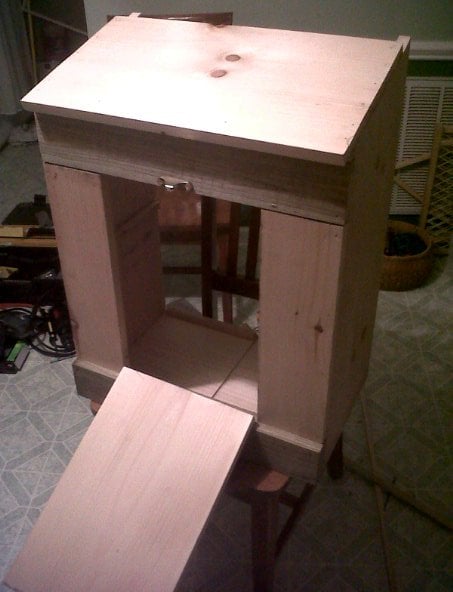
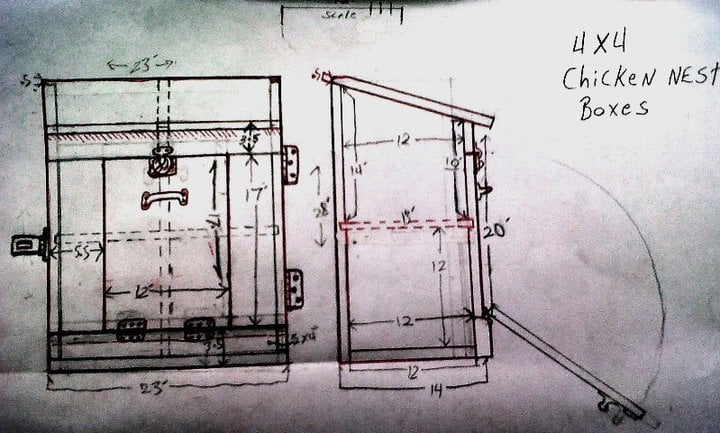
The Schematics for the nesting boxes for the coop.
The door opens from the outsidefor egg grabbing.
The big flat side is open and faces the inside of the coop.
There are 4 nesting cubies in each box. (2 on top of 2)
The entire box also opens like a door for easy "hoseing down" cleaning access to the inside of the coop itself.
Easter Sunday:
I would normally have taken this day off..... and gone to CHURCH!
I LOVE EASTER!
BUT thanks to FRIDAY'S RAIN...
So, where to start.....
Uuuuum, cover the gaps in the tower's fence...
cut off the nasty vynle roof:
ok, this one is just....scary...
Still Sunday:
moving on:
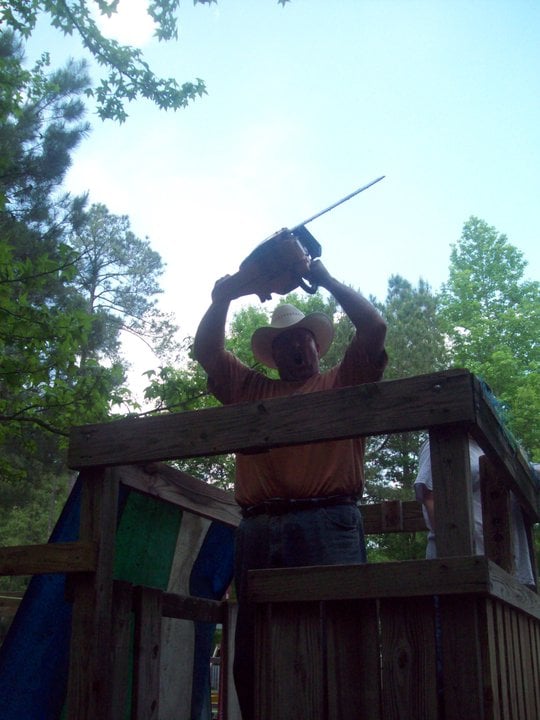
Chainsaw off the post in the back that are too long.
what happens when it is hot and you don't take breaks:
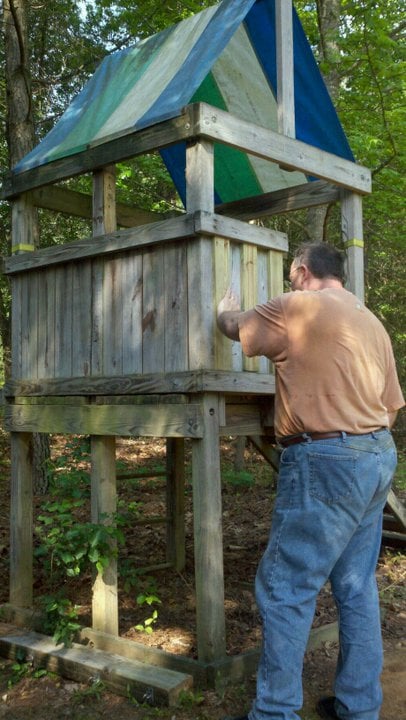
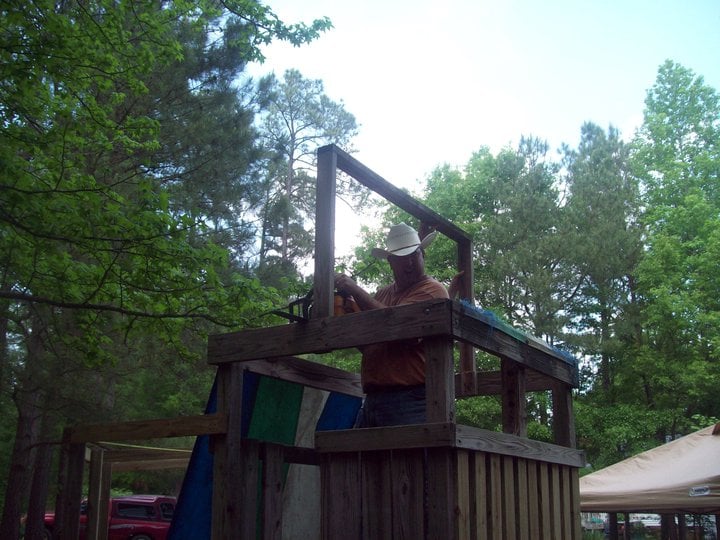
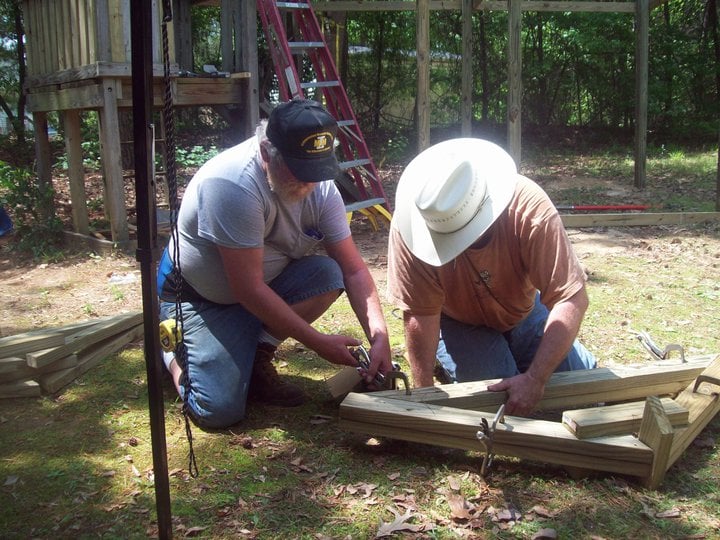
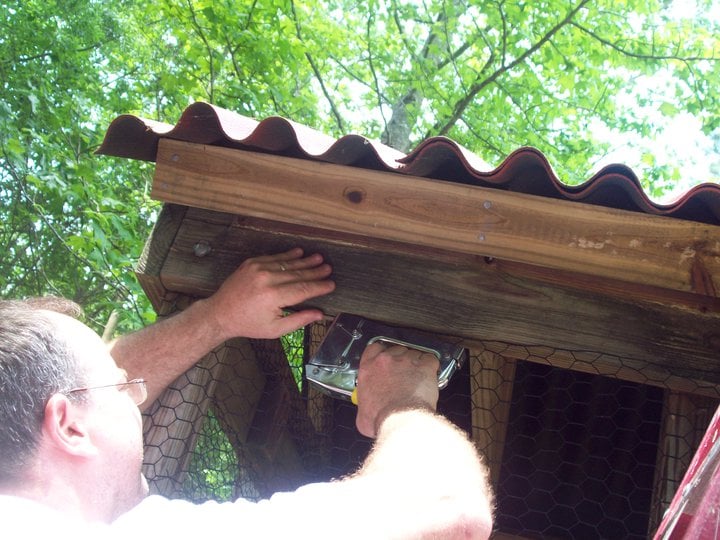
My "Father in Law" and I, working on the new roof frames:
you must make one that is perfect and then copy the parts off that original.
then you must litterally clamp the copy's parts too the original before you nail it together or you NOTHING will match when you install it.
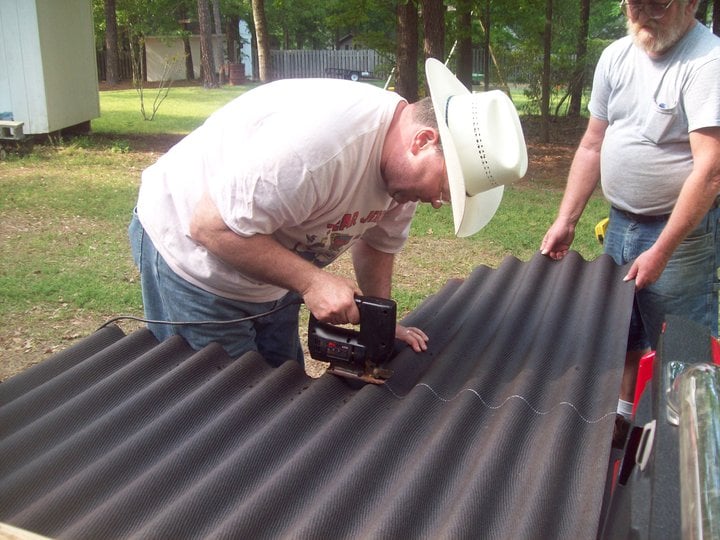
Cutting the "Ondura" roof panels
Still Sunday:
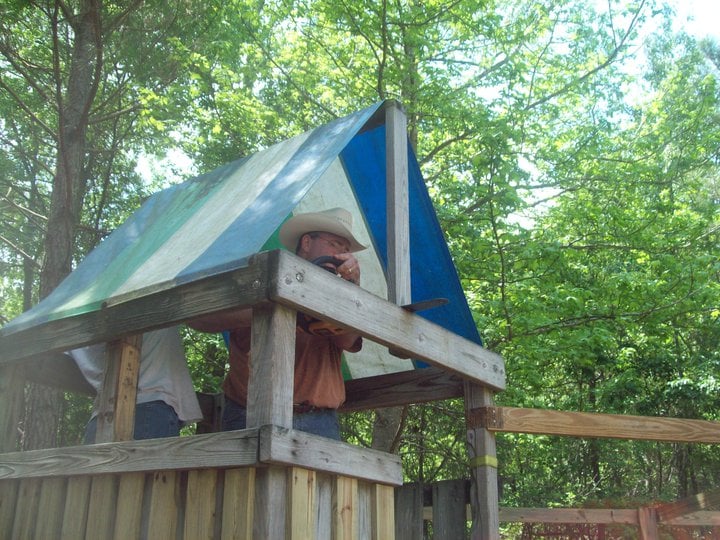
roof continued:
This is my daughter "holding things togeather" as I set the roof frams to be under the lower part of the Ondra materal's wave so the nails will work.
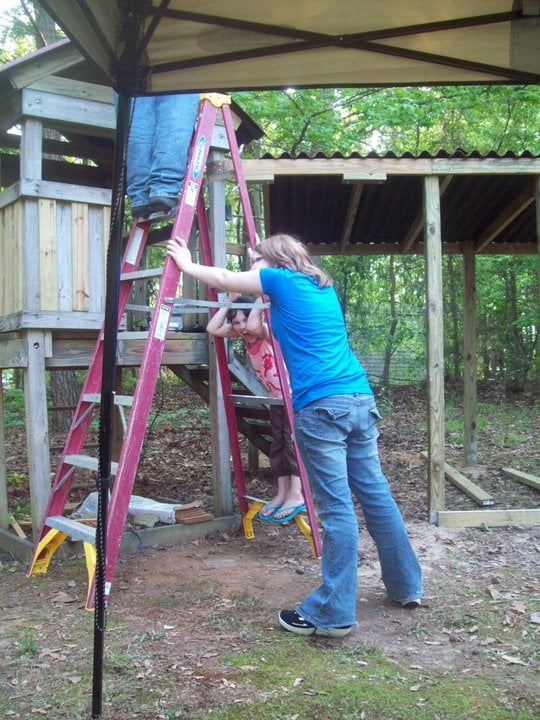
Nailing on the roof with a little ladder safty.
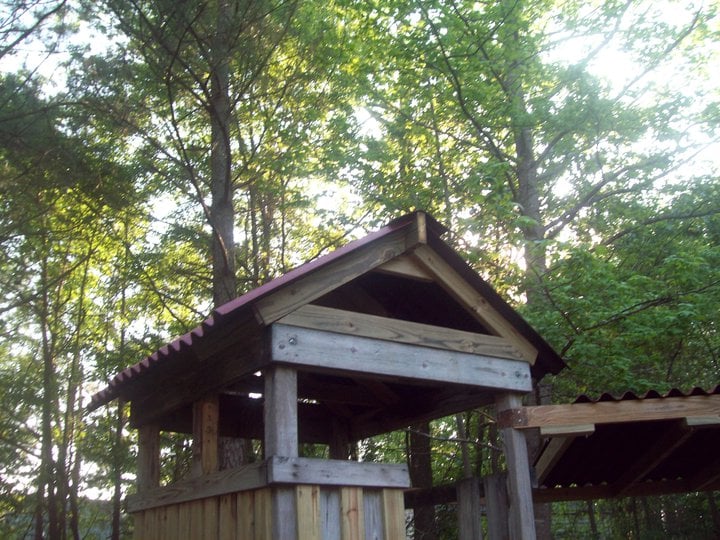
New basic roof:
Sunset falls on Sunday:
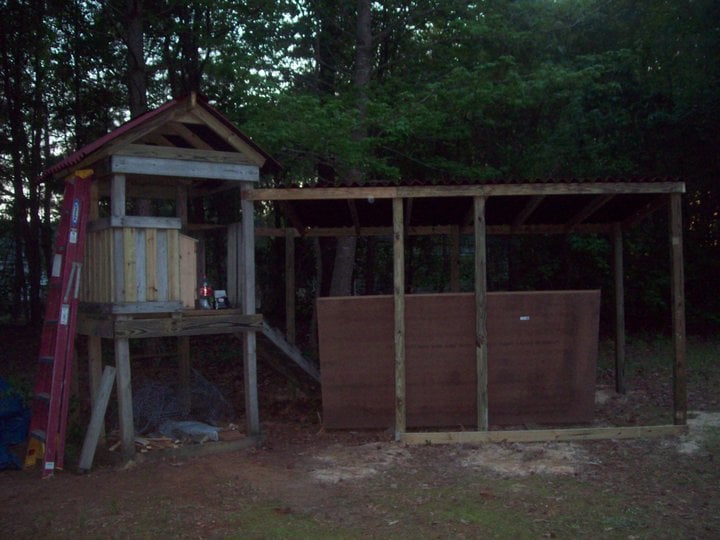
end of work, for that day:
Night fall: Sunday!
Friday
Today I did a lot of detail construction...
After reading the ventilation articles on this site,
I was worried about ventilation, especially when I board up most of the vents when it freezes.
I didn't want my 9 chickens to humidify and potentially mold up the coop in winter, but I also don’t want them to freeze.
I also happen to own a vintage custom painted 1940 teardrop camper.
Which uses an adapted "pet-cool" A/C and heating system.
When we go camping we have the pet-cool" A/C rigged through hoses attached to the "pet-cool" and attached to a nifty adapter,
which is custom fit into our campers ceiling fan so that cold ac flows in from that roof vent.
We do not camp in the winter!
And the pet-cool has a heating function with an adjustable out put...
Sooooo I figured, If we fit a small window in the chicken coop to also incorporate out camper's Pet-cool adapter,
then during the winter freezes we could blow slightly warm DRY out air through the adapter into the lower side of the coop.
The air would warm the chicken blow softly up through the coop and out the roof vents of the coop taking the nasty coop gases and humidity with it.
Here is my detail work photos:
This one Is of the sliding panel to the window/pet-cool intake, half done.
window open: notice the cut surrounding the window. That cut is there for a reason. check out my next photo.
Window with our teardrop camper pet-cool adapter custom fit to chicken window. Now our chickens won't freeze in winter.
I completed several other changes too, but my phone ran out of power and my wife took the recharge cord to work with her. Thus, you will have to wait for tomorrow’s light before I can take pictures of them.
If you think that is cool.... JUST WAIT until you see how I plan to incorporate all the other venting features into this project...
Saturday
the second weekend of this endeavor
The first change I tackled was to make and install the "cross" shelving
into my chicken coop nesting boxes.
here is some photos of me finishing the removable chicken boxes:
I hand cut out, and shaped the shingles on the nesting boxes, from an "ondura" roof cap strip.
Just like the one on the top of my coop's tower roof...
next we worked on finishing the angle of "the run's" roof.
Here is a photo of the roofs new under structure.
Also, we needed to address the HUGE kid sized hole comming off the old climbing ramp. (You can see the hole in the next photo)
here is that kid's payset hole reduced to Chicken Size.
Here is a photo of the chicken run's people door instalation.
Sunday
Yes, I skipped church for this project AGAIN!
My sister in law dropped by on Sunday and took some pictures of the laborious chicken wire installation.
here they are:
Here is a photo of the chicken run's people door instalation.
A picture of the inside of the "Pergo floored" coop.
Bringing in the food and water dispensors and laying down the Diatomacious Earth, pine chips and hay.
Finished enough to go pick up the chickens, but not yet done.
Just WAIT to see what we do NEXT to compete this project!
putten in the chickens.
and with in 1 hour we had our first egg!
SHAAAZAM!
It was actually still warm when we took this photo!
outside so far
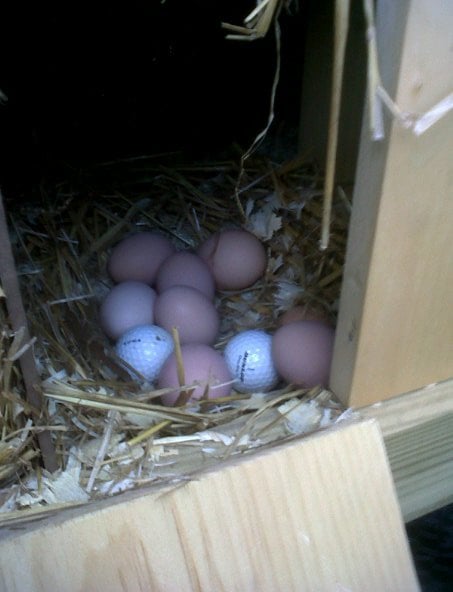
The next morning's haul!
Counting yeasterday's egg... That's 3 eggs, so far...
My father and law and I worked a total of 6 days of hard labor, and I spent over $1000 to build it...
That makes my eggs worth over $333.00... PLUS two days of hard labor, for 2 men... each egg!
OUCH!
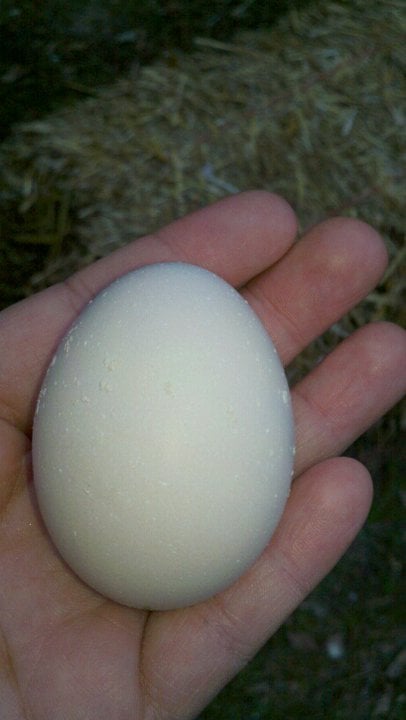
The white one is a store bought "large grade A". The brown ones are our chicken's eggs.
Gee... which one is store bought?
You know that omelet cost me $800.00 to make?
$1000 for the coop, divided by 5 eggs so far, 4 eggs used in the process.
It was such an "oppulant moment"
that I cut it in half and gave my wife the other
so she too could eat a $400 breakfast this morning!
I finished the tower's shutters!
The wooden pegs holding up the shutters are simply this... nothing more.
That way, if there is a heavy wind, storm, or critter rattling the shutters,
The pegs will simply fall out onto the ground and the shutters will drop flat and closed,
Provinding protection, warmth, and a dry coop automatically!
Next, I install a 2X4 "leaning rail" around the chicken run at a 4ft hight, for better structure and chicken wire reinforcement.
After that, wood stain, carpenter's clothe over the roof triangle, and then a small slidding door to secure the inner coop chicken entrance to protect agaist winter weather and night time animal assualts... THEN I should be "DONE"...
Here are some more photos of the Coop's latest upgrades!
Our new door which opens to the "outside Playground"...
The new "Outside Playground Area" with 6 foot high reinforced chicken wire walls.
This area is far from "preditor secure", but it keeps them in, and gives them 4X the space to move around.
The girls only get to play in it when we are home, in the backyard, directly supervising them.
Once we installed the new "Playground" our daily egg haul has gone up from 4 eggs per day.. to 8 eggs!!!
Happy Chicken bring BIGGER yeilds!
I noticed that grown up guests where unconsciously moving their bodies to lean on my coop wall
and then jerking back when they realized what they were doing..
or worse the local kids where actually grabbing my wire when looking in...
not cool!
So, I built a leaning bar, so they could do so with out damaging my coop.
Here is the Coop with the wood leaning bar installed around it's paremiter.
Here is a close up of that sign...
I just got it in the Mail today!
One good thing about the sumer heat, the wood dryed out much faster!
So, I finally had my chance to deck stain it! Here are some more "After Staining" photos!
Wood stain by morning light Shaded "playground" area with hot weather pool!
Put down the Camera and FEED US!
The back door leading to the "Play Ground"!
Mmmmmmm, Honeydew mellon.... fresh from the garden!
I added a new shed attachment to the exsisting run.
It features a new set of Holding pens big enough for any chicken waiting to join the flock, for ant quarintine chickens or a slew of 6 week old babies.
Notice the back offers the penned chickens a view of the rest of the flock down in the run. This helps acclimation.
Recently, I built my own axial wind turbine and solar array to power the workshop in my shed.
I found I am making far to much power and my load dump is having to waste A LOT of it to preserve my batteries. So, I figuired my Birdy Ladies could enjoy the power more than my load dump does. So, I hooked up our Coop to our shed.
HERE is the Process:
Ya gotta have a plan
1st. Bury the electric line from power plant to coop. (AC travels better than DC) I used a tiller to loosen up the ground. And laid out my 50ft pvc incased 12awg wire.
Dig out the 18" trench, bury the pvc sheathed wire, star covering it up.
I discovered that ditch diggers are REAL MEN... Unlike me... but that's fine by me too.
As I was hooking up the electrical outlet boxes inside the chicken coop's shed, I noticed I had spectators staring at me from the pens.
And now the Video of the final electrical improvements...
(Hey, I was tired and got sick of taking pictures)
https://youtube.com/watch?v=jWKfFfnWYJY
OK… our Bantams where getting their little fluffy butts kicked by our bigger chickens.
So, we are going to separate out the bantams and let them form their own flock.
But THAT means I gotta build a separate coop and run… Oh God, Save me!
Here are the latest changes to our hopefully no longer expanding Chicken coop.
This is where we left off the last time you saw it:
Let’s start by looking at the inside changes:
As you may remember, we built two chicken pens inside the shed part of the coop. we tore out the separator wall and expanded the top up into the rafters which turned the two pens into one big space, which will become the bantam’s new coop.
So, how do these little guys get to their separate run?
The answer: Think of a “Hamster Habi-Trail”!
That’s right, we added a hallway coming out of the new coop running across the old self of the shed through the opposite wall to access the run.
Here is the new sliding door at the end of the hallway that opens to give our bantams access to the run.
Looking down the bantam hallway from their run towards their pens/coop.
Check out our Golden Sebright in the hall… how cute is THAT!
Next, lets discuss the bantams New, out door, filtered, watering fountain.
Here is the fountain with a single nipple, cut from the big bird’s fountain:
Now, fallow the water pipe passing through the coop’s shed:
And Walla, it connects into the Big Chicken’s filtered water fountain line:
Finally, the bantam’s new outdoor run construction.
Placing and concreting in the beams:
Fast forward in time a day of construction, filled with blood, sweat, and tears:
Notice the Totally Cool stairway going up to the hallway door?
This is a photo of 1 out 3 baby Bantam Chickens.
For whom all these goings on and hair pulling is for.
You have heard of chickens being “underfoot”.
While working on the run, this one became "under arm".
Teaching the new baby bantam how to use the new water fountain.
With the “experienced” Golden Neck Bantam looking on in approval.
Here is the new Bantam run with it new roof installed.
Normally,
I would have installed a thinner roost,
but these adolescent (previously pen-bound) bantams are not so good at their acrobatics yet.
We hung their feeder from a swing set chain so that they would not kick stuff into it,
and be forced to "go outside" to eat.
Bantam coop’s new sleeping roost latter.
Remember, I have the chicken coop powered by my solar/wind array?
I can manually turn on the coop, but I also have to manually turn it off again too.
Well, when working with batteries, which I am, if the power gets used up past a certain point you do extreme damage to them.
So, Leaving the house with the coop on could be very BAD if the it became overcast while I was away with no ability to turn off the coop and over drew the power in the batteries.
So I’ve been thinking about a solution to this for a while now and came up with THIS Idea:
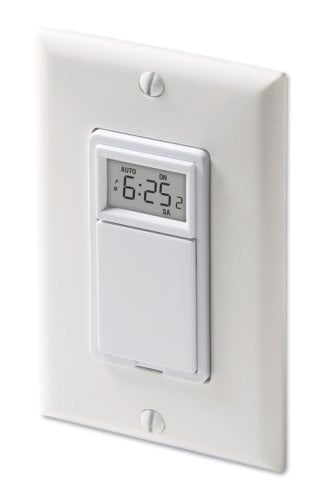
I bought a high quality timer switch on Amazon that would switch off long before I lost to much power...
I removed the old standard power switch and installed this one in it’s place:
$25.00
Product Write Up:
Programmable timer switch turns lights on and off in up to 7 different sequences . Don't come home to a dark house. Program your lights to turn on automatically at specific times with the Aube 7-Day, 40-500W Timer, an attractive Decora-style timer switch that can control incandescent, halogen or fluorescent lighting. Easily record up to seven separate on and off sequences, which can be programmed daily or weekly. Need to find something quickly late at night? No problem: The Aube 7-Day, 40-500W Timer offers a manual override, which enables the load to be turned on and off without affecting the programming. A Decora-style wall plate is sold separately. Mount the Aube 7-Day, 40-500W Timer onto a standard single or multi-gang electrical box. The timer may be used for a single pole, an existing 3-way switch or a new 3-way switch installation. Program the date and time and then your seven on and off sequences, and the Aube 7-Day, 40-500W Timer will make sure your lights are on when you get home after dark. Programs are protected against a power failure by a pre-installed rechargeable battery. Additional features include an LCD that shows the time, day and load status. Sleek design mounts flush with standard decorative wall plate (not included) (Switch also available in Almond)Two-operating modes: manual (conventional on and off switch), automatic Programming: up to 7-programs (7-on and off times) per week. A program can apply to a single day or repeat every day (a program that repeats every day is still considered one-program)Connection: Single pole (2-wire) or multi switch (3-way) (500-Watt maximum and 40-Watt minimum)Dimensions (height by width by depth): 2.7-Inch by 1.8-Inch by 1.6-Inch
Yesterday, I installed the new timer switch...
I set it to start up the coop fans from 11am - 3pm
and then again from 5pm-6pm
I was inside my Teardrop Camper installing some new electrical options (something I could NEVER understand how to do before finishing The wind Turbine Project) and I heard the coop as the auto-switch started up the fans. I thought my wife had come out and turned them on...
She told me "I didn't start them up, they just started up on their own."
I looked at my watch and it was just after 5pm... Excellent!
It should be running automatically, as of 10 minutes ago, as I type...
It is a clear sunny day today.
I will update you guys how it worked out when I get home...
Total project cost: $1000.00
Made by modifying my teen-age daughter's outgrown Wooden "Swing-N-Slide" swing set...
The entries for this construction are posted in REAL CONSTRUCTION TIME!
-Enjoy!
From This:
To This:
Here is a Tour Video of the finished Coop:
Here is the tour after I installed the solar and Wind turbine power.
yes, this coop got all kinds of ridiculous oppulant!!!
And now, How I built it all:
To begin with, Yah Gotta have a PLAN!
Here is a copy of my Chicken Coop's, "Chicken Run", floor plans... Scaled out...
The manufacturer's photo of the wood swing set tower...
Here is a copy of my 1st rough conceptual drawing:
Friday:
First, I went shopping, hauled it home, set up for construction morning....
then... IT RAINED ALL DAY.... uuuuugh! :doh:
All I got done was staking out the construction lines...Then the Sky FELL!

Saturday morning:

took off the slide and gave it to a neighborhood kid...
Dug holes, to pour concrete to set the posts.
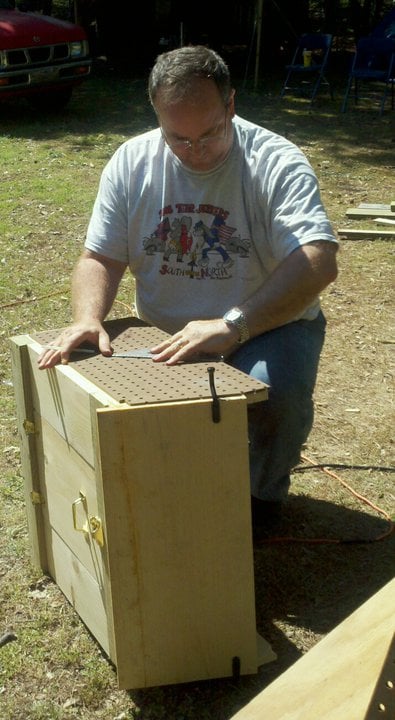
We poored the concrete (24 hour dry time) So, we cut all the peices to make the nesting boxes which I worked on at night for 4 more hours after it wad dark out...
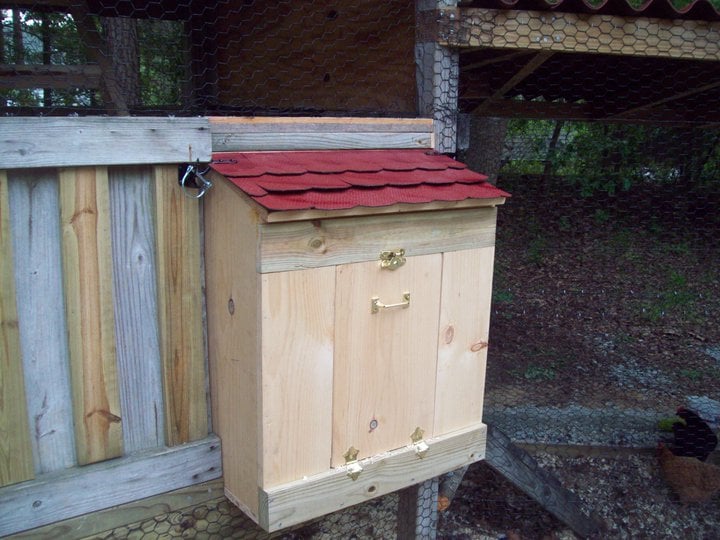
This is the inside, WITHOUT the cross walls installed yet. (sorry for the Fuzzy Photo)
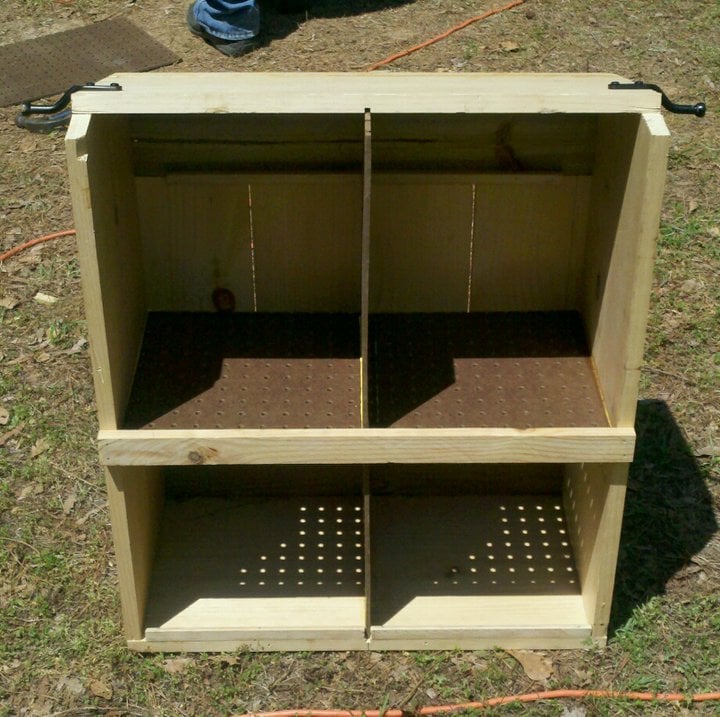
The Schematics for the nesting boxes for the coop.
The door opens from the outsidefor egg grabbing.
The big flat side is open and faces the inside of the coop.
There are 4 nesting cubies in each box. (2 on top of 2)
The entire box also opens like a door for easy "hoseing down" cleaning access to the inside of the coop itself.
Easter Sunday:
I would normally have taken this day off..... and gone to CHURCH!
I LOVE EASTER!


BUT thanks to FRIDAY'S RAIN...

So, where to start.....
Uuuuum, cover the gaps in the tower's fence...
cut off the nasty vynle roof:
ok, this one is just....scary...
Still Sunday:
moving on:
Chainsaw off the post in the back that are too long.

what happens when it is hot and you don't take breaks:

My "Father in Law" and I, working on the new roof frames:
you must make one that is perfect and then copy the parts off that original.
then you must litterally clamp the copy's parts too the original before you nail it together or you NOTHING will match when you install it.
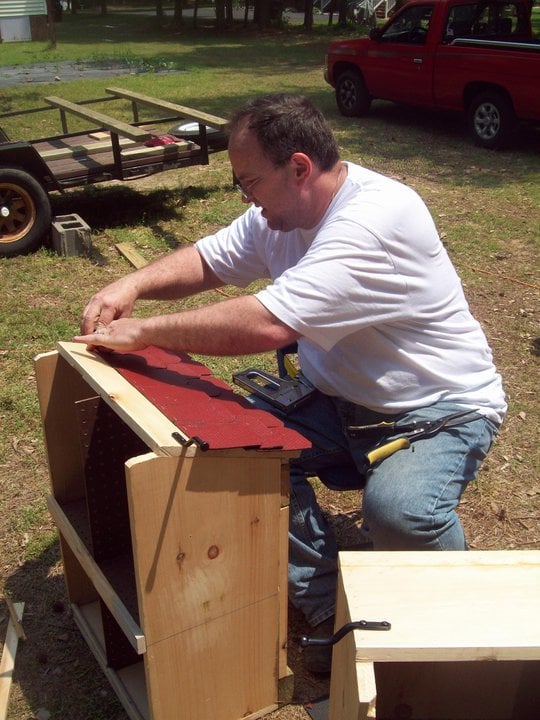
Cutting the "Ondura" roof panels
Still Sunday:
roof continued:
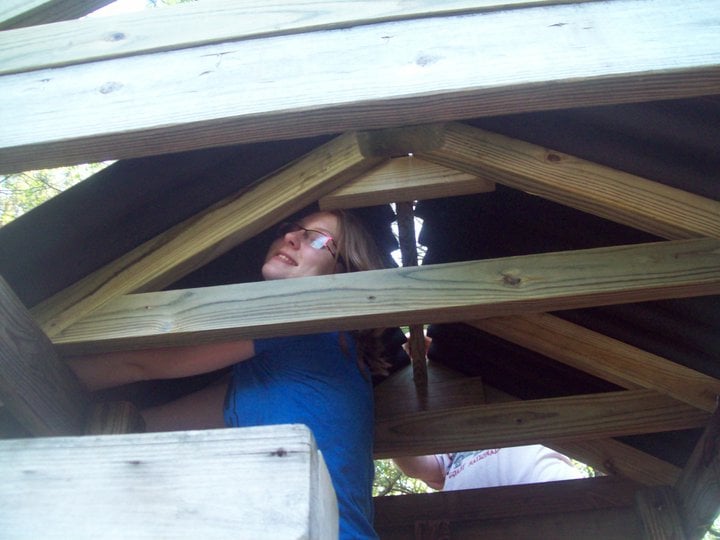
This is my daughter "holding things togeather" as I set the roof frams to be under the lower part of the Ondra materal's wave so the nails will work.
Nailing on the roof with a little ladder safty.
New basic roof:
Sunset falls on Sunday:
end of work, for that day:

Night fall: Sunday!
Friday
Today I did a lot of detail construction...
After reading the ventilation articles on this site,
I was worried about ventilation, especially when I board up most of the vents when it freezes.
I didn't want my 9 chickens to humidify and potentially mold up the coop in winter, but I also don’t want them to freeze.
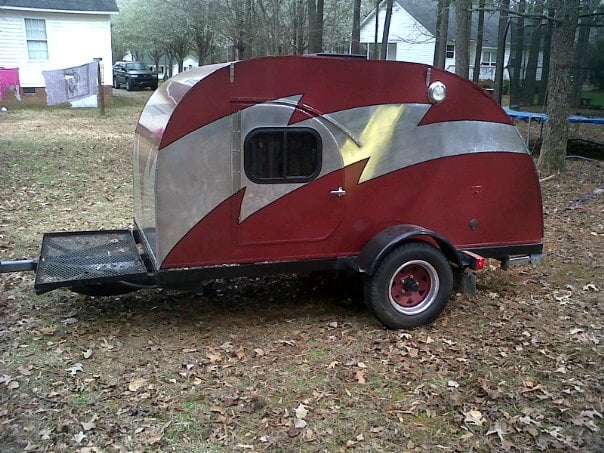
I also happen to own a vintage custom painted 1940 teardrop camper.
Which uses an adapted "pet-cool" A/C and heating system.
When we go camping we have the pet-cool" A/C rigged through hoses attached to the "pet-cool" and attached to a nifty adapter,
which is custom fit into our campers ceiling fan so that cold ac flows in from that roof vent.
We do not camp in the winter!
And the pet-cool has a heating function with an adjustable out put...
Sooooo I figured, If we fit a small window in the chicken coop to also incorporate out camper's Pet-cool adapter,
then during the winter freezes we could blow slightly warm DRY out air through the adapter into the lower side of the coop.
The air would warm the chicken blow softly up through the coop and out the roof vents of the coop taking the nasty coop gases and humidity with it.
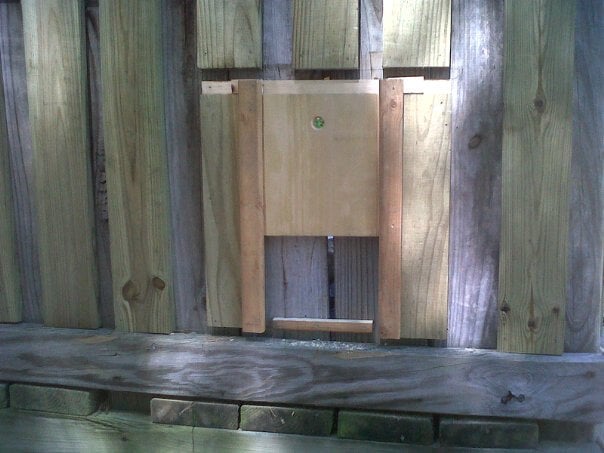
Here is my detail work photos:
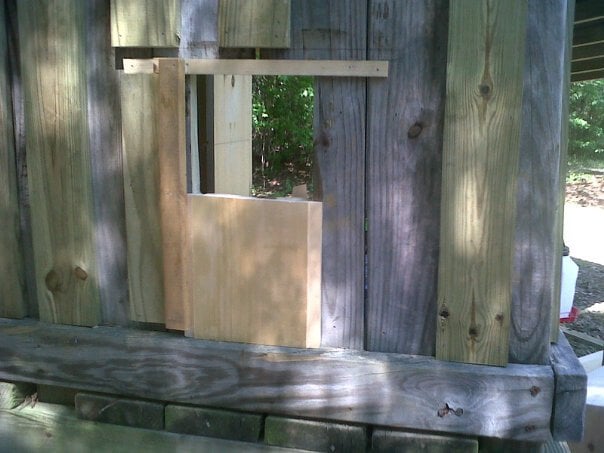
This one Is of the sliding panel to the window/pet-cool intake, half done.
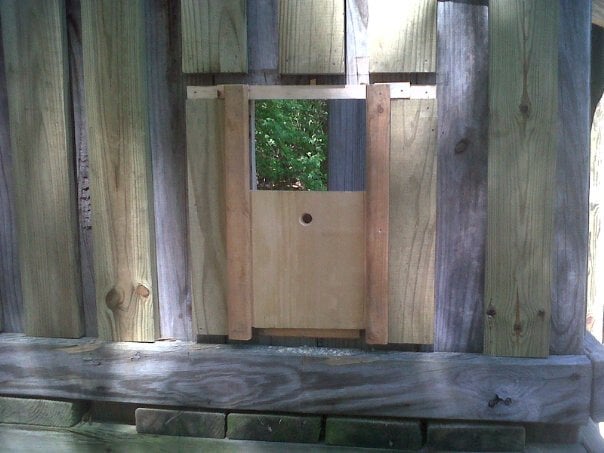
window open: notice the cut surrounding the window. That cut is there for a reason. check out my next photo.
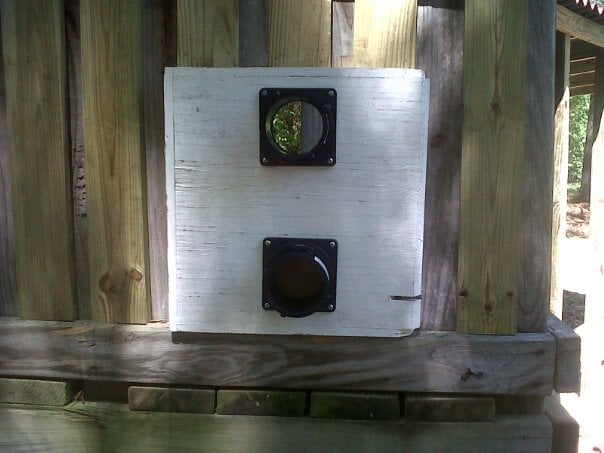
Window with our teardrop camper pet-cool adapter custom fit to chicken window. Now our chickens won't freeze in winter.
I completed several other changes too, but my phone ran out of power and my wife took the recharge cord to work with her. Thus, you will have to wait for tomorrow’s light before I can take pictures of them.
If you think that is cool.... JUST WAIT until you see how I plan to incorporate all the other venting features into this project...
Saturday
the second weekend of this endeavor
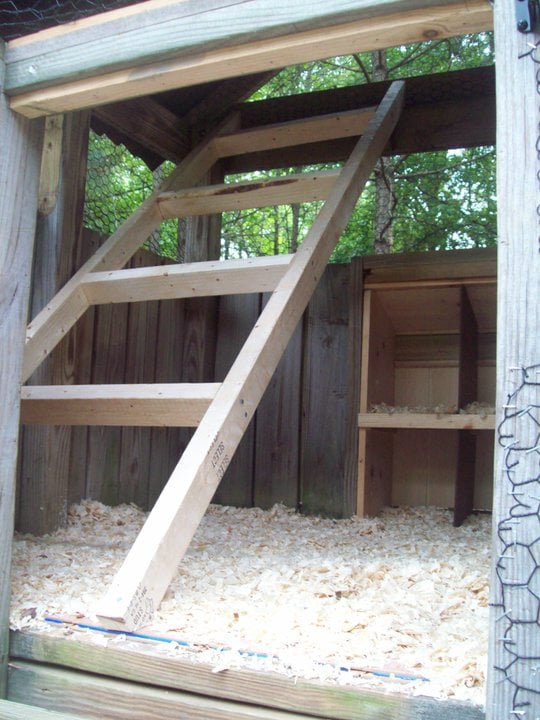
The first change I tackled was to make and install the "cross" shelving
into my chicken coop nesting boxes.
here is some photos of me finishing the removable chicken boxes:
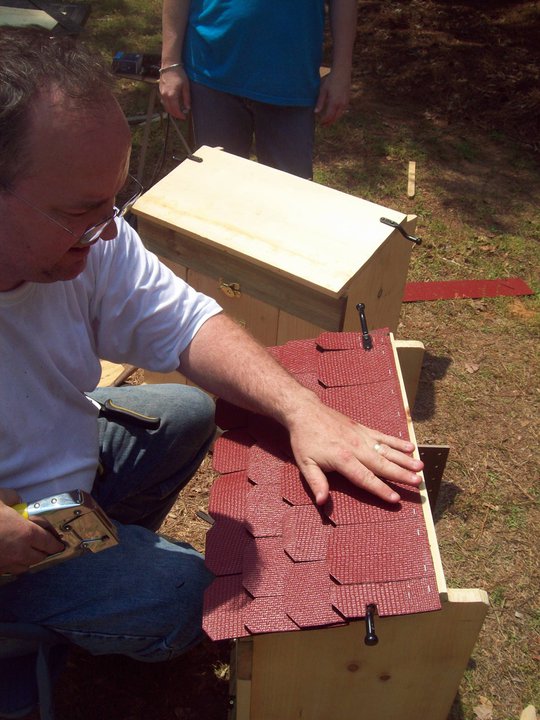
I hand cut out, and shaped the shingles on the nesting boxes, from an "ondura" roof cap strip.
Just like the one on the top of my coop's tower roof...
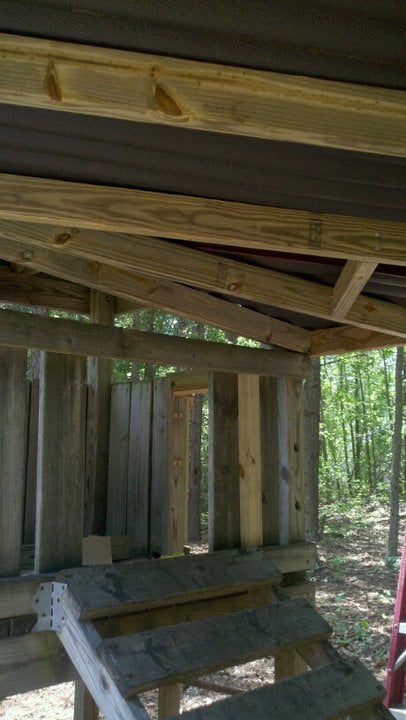
next we worked on finishing the angle of "the run's" roof.
Here is a photo of the roofs new under structure.
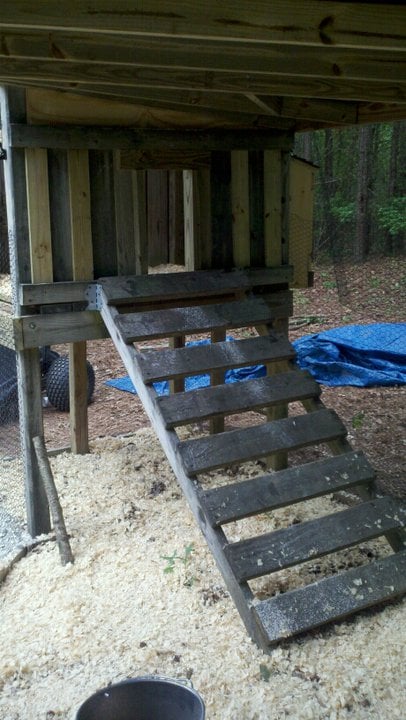
Also, we needed to address the HUGE kid sized hole comming off the old climbing ramp. (You can see the hole in the next photo)
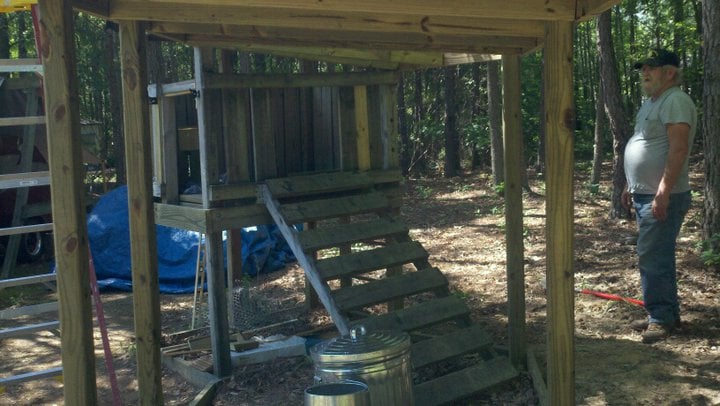
here is that kid's payset hole reduced to Chicken Size.
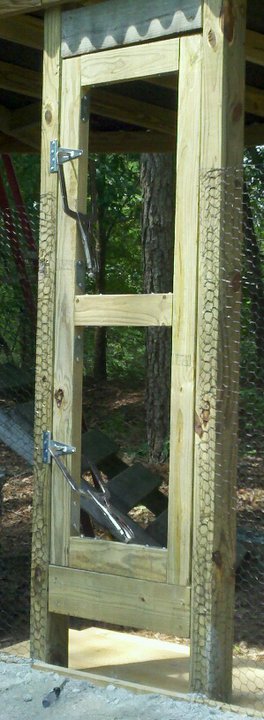
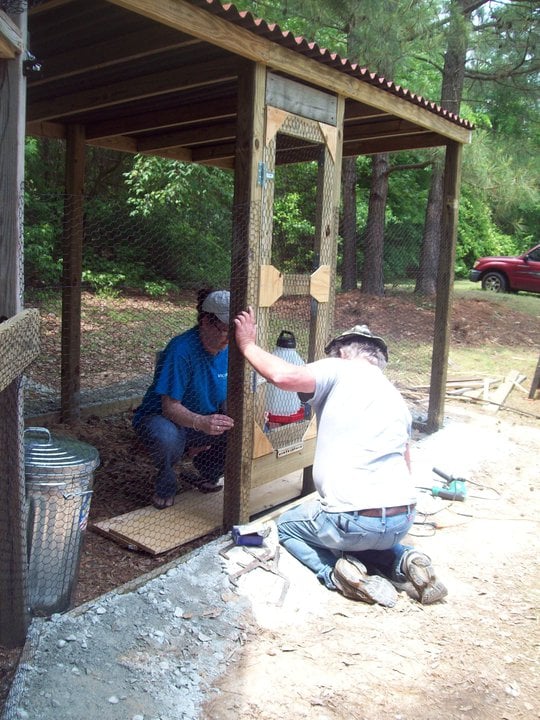
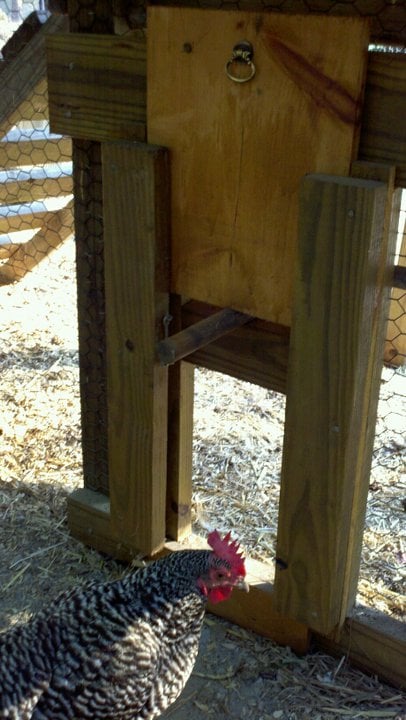
Here is a photo of the chicken run's people door instalation.
Sunday
Yes, I skipped church for this project AGAIN!

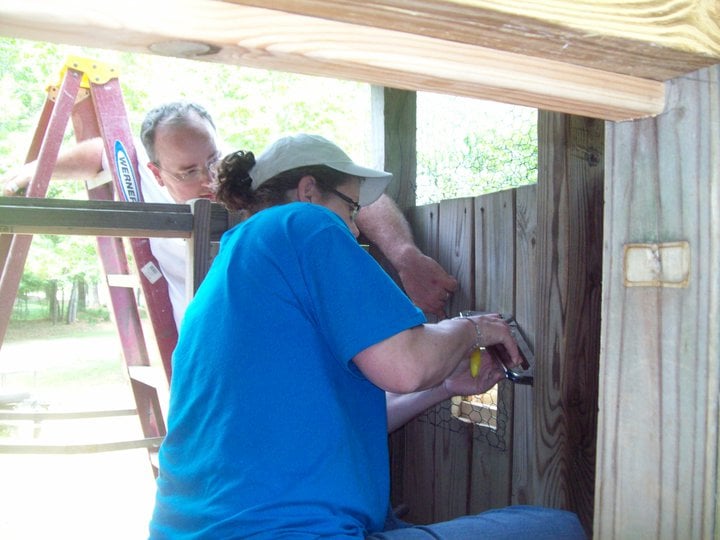
My sister in law dropped by on Sunday and took some pictures of the laborious chicken wire installation.
here they are:
Here is a photo of the chicken run's people door instalation.
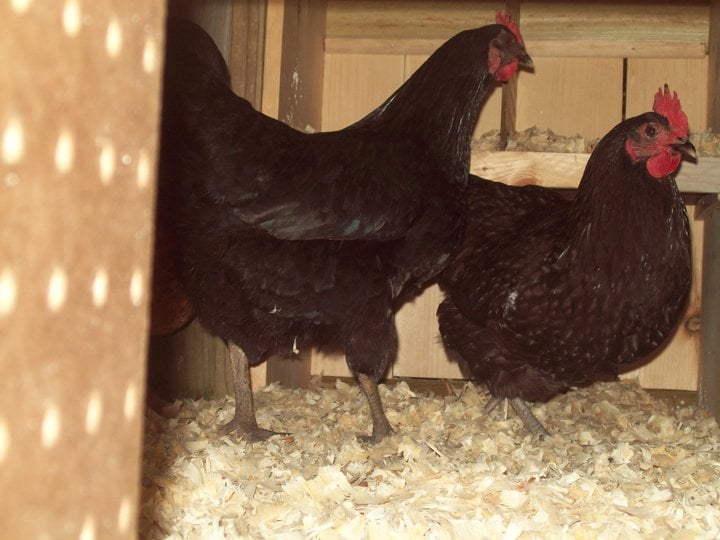
A picture of the inside of the "Pergo floored" coop.
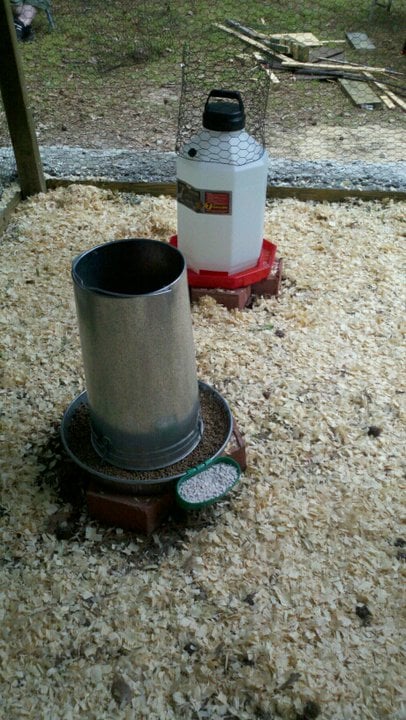
Bringing in the food and water dispensors and laying down the Diatomacious Earth, pine chips and hay.
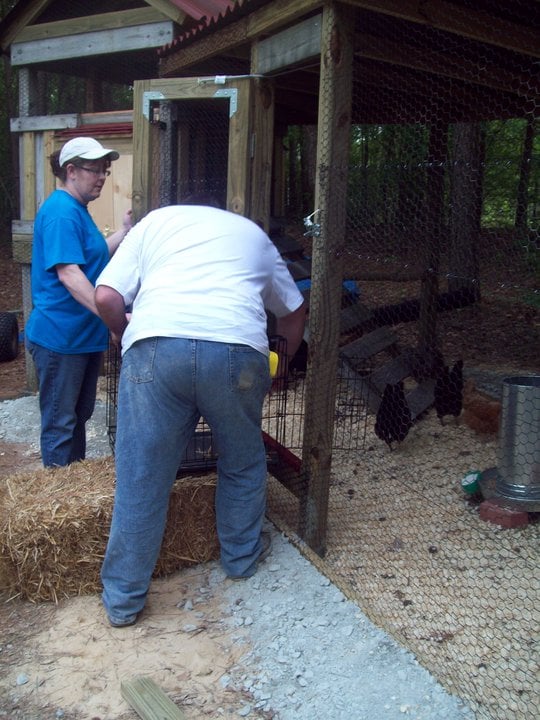
Finished enough to go pick up the chickens, but not yet done.
Just WAIT to see what we do NEXT to compete this project!

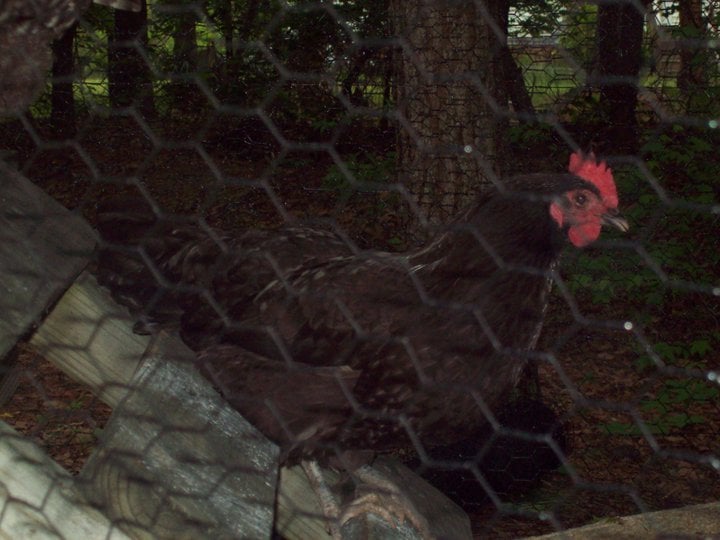
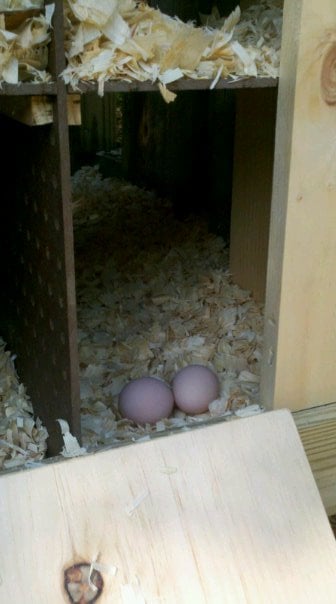
putten in the chickens.
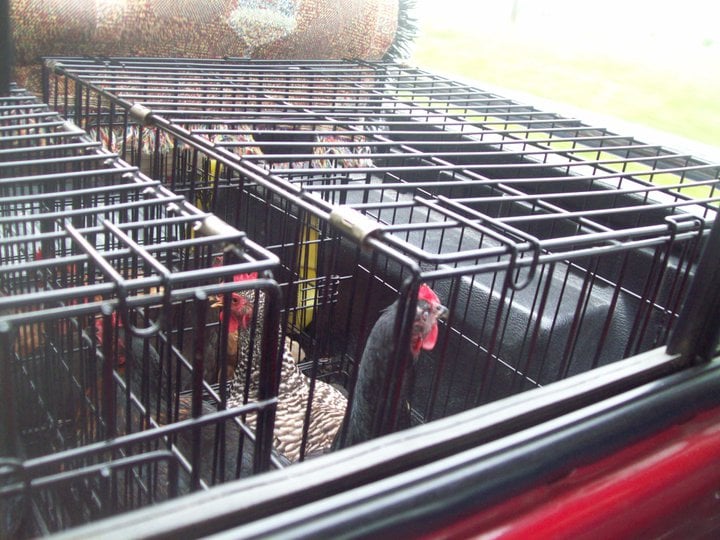
and with in 1 hour we had our first egg!
SHAAAZAM!
It was actually still warm when we took this photo!
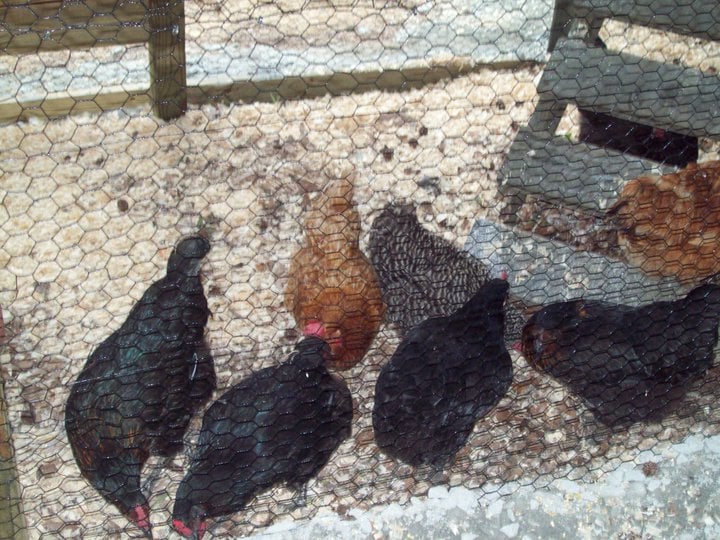
outside so far
The next morning's haul!
Counting yeasterday's egg... That's 3 eggs, so far...
My father and law and I worked a total of 6 days of hard labor, and I spent over $1000 to build it...
That makes my eggs worth over $333.00... PLUS two days of hard labor, for 2 men... each egg!
OUCH!
The white one is a store bought "large grade A". The brown ones are our chicken's eggs.
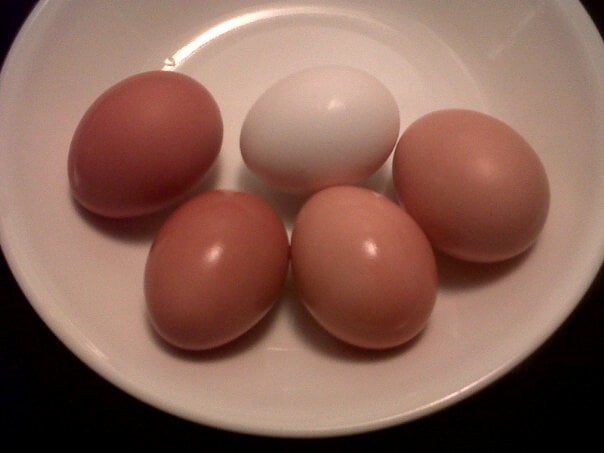
Gee... which one is store bought?
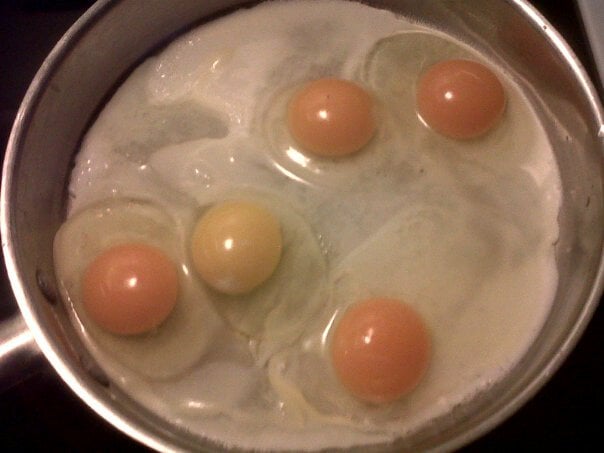
You know that omelet cost me $800.00 to make?
$1000 for the coop, divided by 5 eggs so far, 4 eggs used in the process.
It was such an "oppulant moment"
that I cut it in half and gave my wife the other
so she too could eat a $400 breakfast this morning!
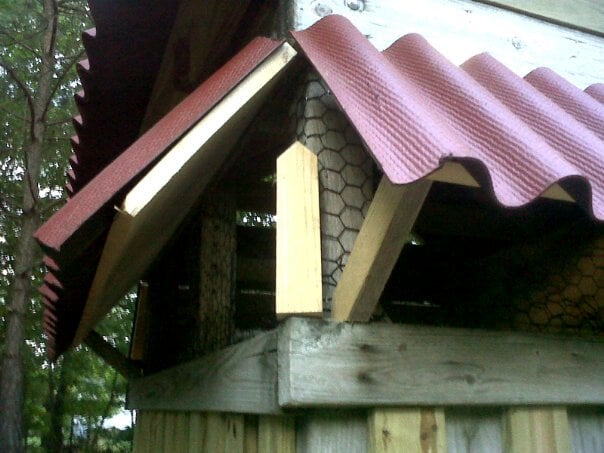
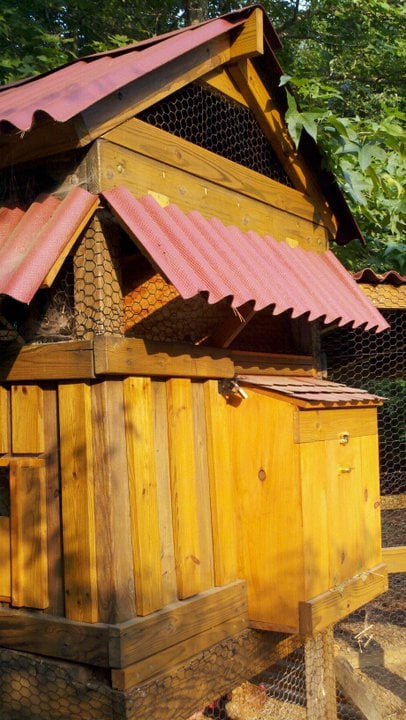
I finished the tower's shutters!

The wooden pegs holding up the shutters are simply this... nothing more.
That way, if there is a heavy wind, storm, or critter rattling the shutters,
The pegs will simply fall out onto the ground and the shutters will drop flat and closed,
Provinding protection, warmth, and a dry coop automatically!
Next, I install a 2X4 "leaning rail" around the chicken run at a 4ft hight, for better structure and chicken wire reinforcement.
After that, wood stain, carpenter's clothe over the roof triangle, and then a small slidding door to secure the inner coop chicken entrance to protect agaist winter weather and night time animal assualts... THEN I should be "DONE"...
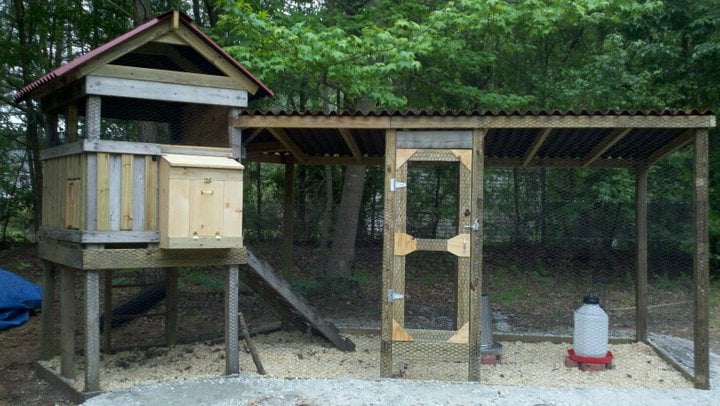
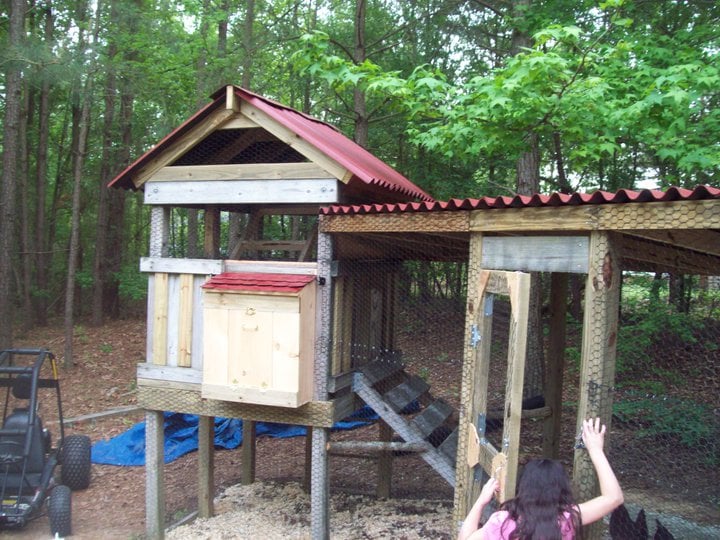
Here are some more photos of the Coop's latest upgrades!
Our new door which opens to the "outside Playground"...

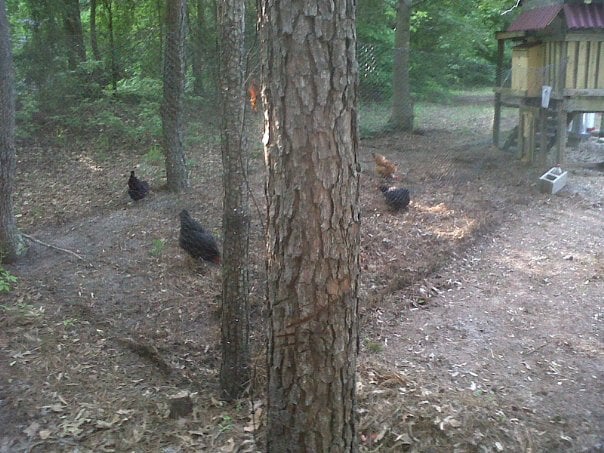
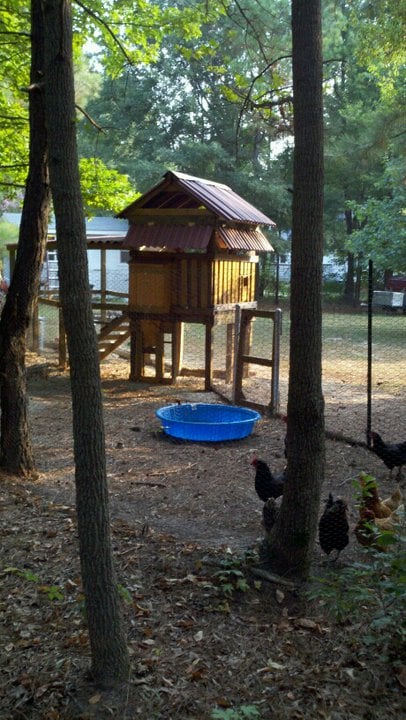
The new "Outside Playground Area" with 6 foot high reinforced chicken wire walls.
This area is far from "preditor secure", but it keeps them in, and gives them 4X the space to move around.
The girls only get to play in it when we are home, in the backyard, directly supervising them.
Once we installed the new "Playground" our daily egg haul has gone up from 4 eggs per day.. to 8 eggs!!!
Happy Chicken bring BIGGER yeilds!
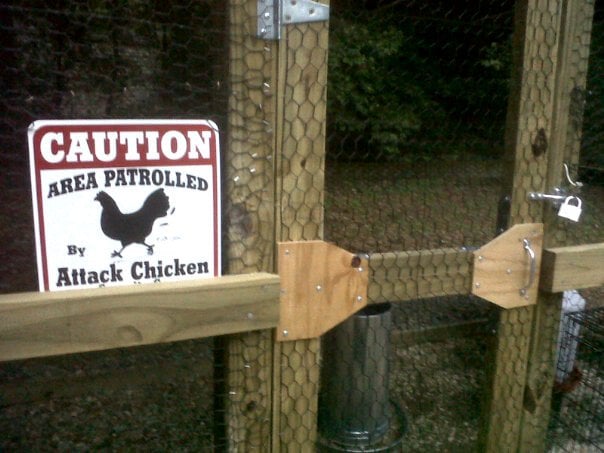
I noticed that grown up guests where unconsciously moving their bodies to lean on my coop wall
and then jerking back when they realized what they were doing..
or worse the local kids where actually grabbing my wire when looking in...
not cool!

So, I built a leaning bar, so they could do so with out damaging my coop.
Here is the Coop with the wood leaning bar installed around it's paremiter.
Here is a close up of that sign...


I just got it in the Mail today!
One good thing about the sumer heat, the wood dryed out much faster!
So, I finally had my chance to deck stain it! Here are some more "After Staining" photos!


Mmmmmmm, Honeydew mellon.... fresh from the garden!
I added a new shed attachment to the exsisting run.
It features a new set of Holding pens big enough for any chicken waiting to join the flock, for ant quarintine chickens or a slew of 6 week old babies.
Notice the back offers the penned chickens a view of the rest of the flock down in the run. This helps acclimation.
Recently, I built my own axial wind turbine and solar array to power the workshop in my shed.
I found I am making far to much power and my load dump is having to waste A LOT of it to preserve my batteries. So, I figuired my Birdy Ladies could enjoy the power more than my load dump does. So, I hooked up our Coop to our shed.
HERE is the Process:
Ya gotta have a plan
1st. Bury the electric line from power plant to coop. (AC travels better than DC) I used a tiller to loosen up the ground. And laid out my 50ft pvc incased 12awg wire.
Dig out the 18" trench, bury the pvc sheathed wire, star covering it up.
I discovered that ditch diggers are REAL MEN... Unlike me... but that's fine by me too.
As I was hooking up the electrical outlet boxes inside the chicken coop's shed, I noticed I had spectators staring at me from the pens.
And now the Video of the final electrical improvements...
(Hey, I was tired and got sick of taking pictures)
https://youtube.com/watch?v=jWKfFfnWYJY
OK… our Bantams where getting their little fluffy butts kicked by our bigger chickens.
So, we are going to separate out the bantams and let them form their own flock.
But THAT means I gotta build a separate coop and run… Oh God, Save me!
Here are the latest changes to our hopefully no longer expanding Chicken coop.
This is where we left off the last time you saw it:

Let’s start by looking at the inside changes:
As you may remember, we built two chicken pens inside the shed part of the coop. we tore out the separator wall and expanded the top up into the rafters which turned the two pens into one big space, which will become the bantam’s new coop.

So, how do these little guys get to their separate run?
The answer: Think of a “Hamster Habi-Trail”!
That’s right, we added a hallway coming out of the new coop running across the old self of the shed through the opposite wall to access the run.

Here is the new sliding door at the end of the hallway that opens to give our bantams access to the run.

Looking down the bantam hallway from their run towards their pens/coop.

Check out our Golden Sebright in the hall… how cute is THAT!

Next, lets discuss the bantams New, out door, filtered, watering fountain.
Here is the fountain with a single nipple, cut from the big bird’s fountain:

Now, fallow the water pipe passing through the coop’s shed:

And Walla, it connects into the Big Chicken’s filtered water fountain line:

Finally, the bantam’s new outdoor run construction.
Placing and concreting in the beams:


Fast forward in time a day of construction, filled with blood, sweat, and tears:

Notice the Totally Cool stairway going up to the hallway door?


This is a photo of 1 out 3 baby Bantam Chickens.
For whom all these goings on and hair pulling is for.
You have heard of chickens being “underfoot”.
While working on the run, this one became "under arm".

Teaching the new baby bantam how to use the new water fountain.
With the “experienced” Golden Neck Bantam looking on in approval.


Here is the new Bantam run with it new roof installed.

Normally,
I would have installed a thinner roost,
but these adolescent (previously pen-bound) bantams are not so good at their acrobatics yet.

We hung their feeder from a swing set chain so that they would not kick stuff into it,
and be forced to "go outside" to eat.
Bantam coop’s new sleeping roost latter.
Remember, I have the chicken coop powered by my solar/wind array?
I can manually turn on the coop, but I also have to manually turn it off again too.
Well, when working with batteries, which I am, if the power gets used up past a certain point you do extreme damage to them.
So, Leaving the house with the coop on could be very BAD if the it became overcast while I was away with no ability to turn off the coop and over drew the power in the batteries.
So I’ve been thinking about a solution to this for a while now and came up with THIS Idea:
I bought a high quality timer switch on Amazon that would switch off long before I lost to much power...
I removed the old standard power switch and installed this one in it’s place:
$25.00
Product Write Up:
Programmable timer switch turns lights on and off in up to 7 different sequences . Don't come home to a dark house. Program your lights to turn on automatically at specific times with the Aube 7-Day, 40-500W Timer, an attractive Decora-style timer switch that can control incandescent, halogen or fluorescent lighting. Easily record up to seven separate on and off sequences, which can be programmed daily or weekly. Need to find something quickly late at night? No problem: The Aube 7-Day, 40-500W Timer offers a manual override, which enables the load to be turned on and off without affecting the programming. A Decora-style wall plate is sold separately. Mount the Aube 7-Day, 40-500W Timer onto a standard single or multi-gang electrical box. The timer may be used for a single pole, an existing 3-way switch or a new 3-way switch installation. Program the date and time and then your seven on and off sequences, and the Aube 7-Day, 40-500W Timer will make sure your lights are on when you get home after dark. Programs are protected against a power failure by a pre-installed rechargeable battery. Additional features include an LCD that shows the time, day and load status. Sleek design mounts flush with standard decorative wall plate (not included) (Switch also available in Almond)Two-operating modes: manual (conventional on and off switch), automatic Programming: up to 7-programs (7-on and off times) per week. A program can apply to a single day or repeat every day (a program that repeats every day is still considered one-program)Connection: Single pole (2-wire) or multi switch (3-way) (500-Watt maximum and 40-Watt minimum)Dimensions (height by width by depth): 2.7-Inch by 1.8-Inch by 1.6-Inch
Yesterday, I installed the new timer switch...
I set it to start up the coop fans from 11am - 3pm
and then again from 5pm-6pm
I was inside my Teardrop Camper installing some new electrical options (something I could NEVER understand how to do before finishing The wind Turbine Project) and I heard the coop as the auto-switch started up the fans. I thought my wife had come out and turned them on...
She told me "I didn't start them up, they just started up on their own."
I looked at my watch and it was just after 5pm... Excellent!
It should be running automatically, as of 10 minutes ago, as I type...
It is a clear sunny day today.
I will update you guys how it worked out when I get home...