This is my large chick/duck/guinea coop. My wife refers to it as our Aviary because of how it is designed. I build this in two stages as two sections. The entire size of the Avery is 40ft x 40ft and 7ft tall.. The chicken coop inside one section is 8x6ft and 8 feet tall from the floor, however it is 2 feet off the ground.
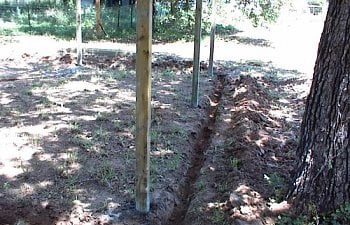
To understand how I build this. I started with 8ft pressure treated posts cemented in 10ft apart from each other. Then ran 10ft boards across the bottom base, mid section and top based on the netting height I purchased. I managed to find 72inch by 50ft rolls so it made it easier to wrap around the bottom section and bury 6-8 inches of it under the ground. I then dug a trench all the way around the parameter and buried the fence netting to help keep things from digging under. for the top portion I just used 36inch by 50 foot rolls.

The rooftop of the whole avery I ran 3/4 inch metal conduit across for strength as well being lighter than wood, plus it can last forever. Then I ran the fence netting over the top using the conduit as guides. For each stretch of netting that overlapped to another, I used small galvanized wire to stitch them together like you would stitch clothing. This ensures no predators will find a way between the seams.
The right section is for all our wonderful chickens. It is a 20x20 with the coop build inside.
Here is an image from afar looking at the whole Aviary build under our large Oak trees. I selected this location because it is shaded 95% of the day. The only time a great deal of sun hits this area is early morning and evening end. In the winter all these trees with lose their leaves so the shade will disappear allowing for the sun to provide more heat.

Here is a corner view image that also shows you the front of the chicken coop.

Here are some pictures of our chickens.
We build the front with two openings. Each has its own ramp so the chickens can go in and out through either as they please. In the center we put a planter hook so we could hang the food under the front roof awning to keep it dry during rains. On the right side of the coop we hang the water can.
Here is the inside of the coop. On the right I have three rows of nesting boxes at 5 across giving me 15 boxes. The bottom set is 2 feet off the ground. Running on the front of the next boxes I put in 2x2 strips of board for perches.
On the left side I build a mini cage so that we can keep any baby chicks in there under light and security until they are ready to come out.
I layed down the stick linoleum tile for easy floor cleaning. I also put a pitch on the floor that slopes down towards the two chicken doors. This will make it easy when it comes time to spray it out as the water will natrually run out the chicken doors.
Then on the other 20x20 section for our Ducks and Guineas I dug a ditch and dropped a 300 gallon rubbermaid watering tub. On one side at the bottom is has a drain plug that I connected pipe to and ran down to our watering hole on the back end slope. This was so I could drain the pond easily.
Here I used 2 inch PVC pipe with a big turning valve.
Here is the end going out to our currently dry watering hole. In the Fall and Spring it fills up by the rainstorms so the watering hold is only completely full 6 months out of the year. Still the drain is high enough that it will still drain down.
Here you can see how the ground slops. If you look close you can see the end of the drainpipe.
Here is the finished product of the pond. I put nice sand stone around the top edge and egg rock around the back end This is to help keep the mound up around the edged supported so it doesn't wash away. It also looks nice. on the back end I have a auto filler so when I drain the pond, it will auto fill as well keep the pond full.
Well that is my Aviary for Chickens, Ducks and Guineas.
To understand how I build this. I started with 8ft pressure treated posts cemented in 10ft apart from each other. Then ran 10ft boards across the bottom base, mid section and top based on the netting height I purchased. I managed to find 72inch by 50ft rolls so it made it easier to wrap around the bottom section and bury 6-8 inches of it under the ground. I then dug a trench all the way around the parameter and buried the fence netting to help keep things from digging under. for the top portion I just used 36inch by 50 foot rolls.
The rooftop of the whole avery I ran 3/4 inch metal conduit across for strength as well being lighter than wood, plus it can last forever. Then I ran the fence netting over the top using the conduit as guides. For each stretch of netting that overlapped to another, I used small galvanized wire to stitch them together like you would stitch clothing. This ensures no predators will find a way between the seams.
The right section is for all our wonderful chickens. It is a 20x20 with the coop build inside.
Here is an image from afar looking at the whole Aviary build under our large Oak trees. I selected this location because it is shaded 95% of the day. The only time a great deal of sun hits this area is early morning and evening end. In the winter all these trees with lose their leaves so the shade will disappear allowing for the sun to provide more heat.
Here is a corner view image that also shows you the front of the chicken coop.
Here are some pictures of our chickens.
We build the front with two openings. Each has its own ramp so the chickens can go in and out through either as they please. In the center we put a planter hook so we could hang the food under the front roof awning to keep it dry during rains. On the right side of the coop we hang the water can.
Here is the inside of the coop. On the right I have three rows of nesting boxes at 5 across giving me 15 boxes. The bottom set is 2 feet off the ground. Running on the front of the next boxes I put in 2x2 strips of board for perches.
On the left side I build a mini cage so that we can keep any baby chicks in there under light and security until they are ready to come out.
I layed down the stick linoleum tile for easy floor cleaning. I also put a pitch on the floor that slopes down towards the two chicken doors. This will make it easy when it comes time to spray it out as the water will natrually run out the chicken doors.
Then on the other 20x20 section for our Ducks and Guineas I dug a ditch and dropped a 300 gallon rubbermaid watering tub. On one side at the bottom is has a drain plug that I connected pipe to and ran down to our watering hole on the back end slope. This was so I could drain the pond easily.
Here I used 2 inch PVC pipe with a big turning valve.
Here is the end going out to our currently dry watering hole. In the Fall and Spring it fills up by the rainstorms so the watering hold is only completely full 6 months out of the year. Still the drain is high enough that it will still drain down.
Here you can see how the ground slops. If you look close you can see the end of the drainpipe.
Here is the finished product of the pond. I put nice sand stone around the top edge and egg rock around the back end This is to help keep the mound up around the edged supported so it doesn't wash away. It also looks nice. on the back end I have a auto filler so when I drain the pond, it will auto fill as well keep the pond full.
Well that is my Aviary for Chickens, Ducks and Guineas.