What came first....the chicken or the egg? Or in this case, the shell. Well, it was the chicken. We'd been talking about chickens ever since we first bought the property. So this year, we just did it. Now what do we do with them? For my Dear Sainted Wife, nothing fancy, just make it work. For me, when I build something I want it to last. I don't like patchin' things up. I don't mind routine maintenance, or additions or the like, but the basic structure is here to stay. Soooooo, add in the requirements for our new family members, & with plenty of help from the folks at BYC, it wasn't hard to come up with a design we all could live with, enjoy, & afford. I put the plans together on AutoCAD, where I could play to my hearts content before we ever got started building so there'd be no Change Orders on this construction project. And if you believe that one, I want to sell you a bridge.

Being in construction & woodworking for more years than I care to admit, I have stockpiled a variety of construction materials & we got to finally put some of them to good use. Ok, yes, I’m a pack rat. But so’s my dear sainted wife. While it may appear that we’ve really put some big cash in the coop, all real costs were for dimensional lumbers, etc. to fill in the gaps.
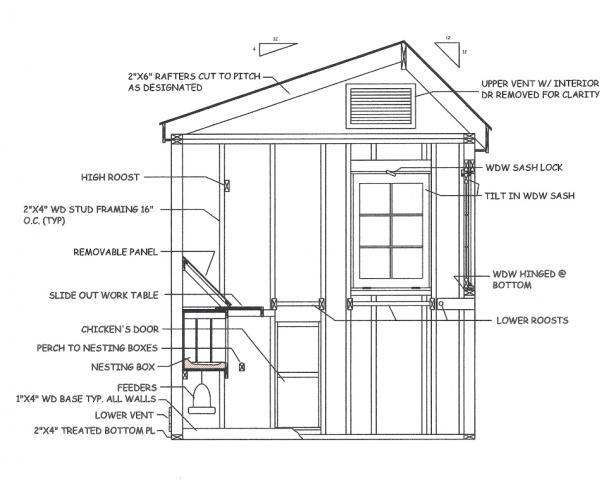
Not much new in the design department here, except the slide out work top. With an 8'x8' box, I just couldn't find enough space for a work surface. I was originally going to incorporate a drop down 30" wide formica top that I have, but just couldn't find the space. I wasn't giving up any roost, so this just worked out great & wasn't really difficult to build in. And it will stay clean 'til we two leggeds need it!! A lot of the materials used were left overs from various construction jobs I've had over the years including our log home we built. It was fun finding a place to use all that "stuff". I'll point out some as we go along. Just remember when you see the pictures that we really didn't go out & buy some of these materials just for the coop, though we love our little winged ones & know they are worth it.
Location, location, location. It's either uphill or downhill. We're going downhill as far as we can so the chics can have the flat ground by the creek. They'll get a lot of good company down there from chicadees to blue heron. They all came by at one time or another to keep us company while we were building.
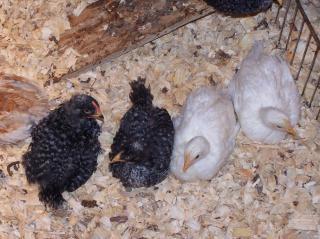
My wife wanted all to know that her chicks were waiting patiently for their new home to be built. Read on to see just how much help these folks were!
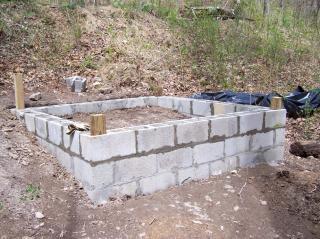
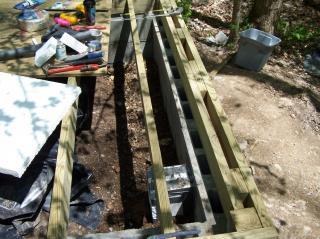
We had extra cmu (concrete blocks)just laying around, so we laid those up on a shallow footing of mortar to control dampness & predators. Notice we set up 4x4 posts in the corners that will carry the building load. Floor joist (had to buy those) were laid 16”o.c. as all the rest of the framing. All framing material from block to lower wall plate are pressure treated, but covered inside & out so the chicks can’t peck out of curiosity.
Since our water main is only 25’ away we’ve prepped for water. What little plumbing was run above grade is triple insulated, including the frost free hose bib, which is one of those leftover items I mentioned before.

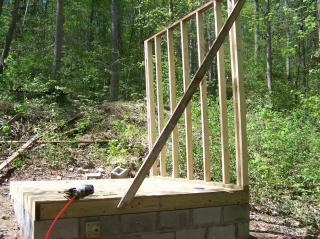
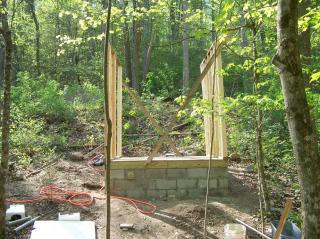
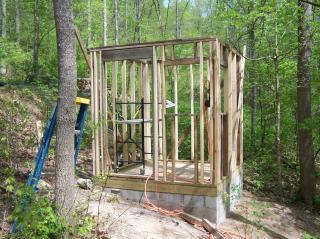
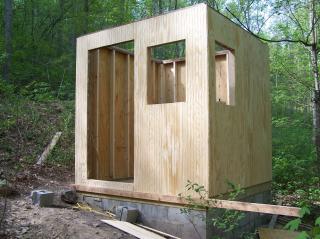
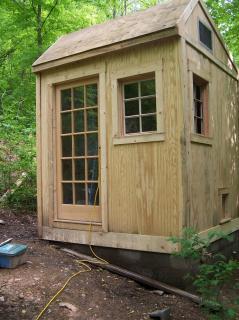
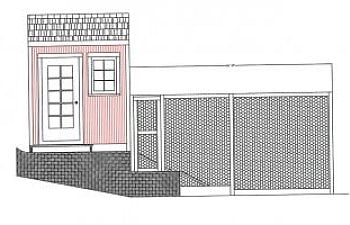
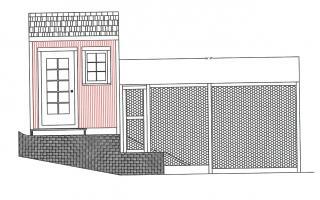
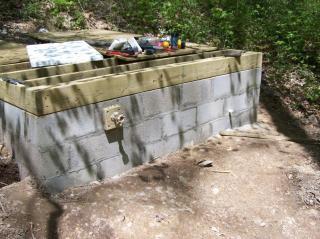
Framing was fairly easy since the walls were only 8' long. I kept the wall height at 8' on all four sides, with an open rafter system. With the ceiling height we've created, & the large gable vents used, air flow is no problem. Oh, the vents were actually fire dampers in a previous life. I used the aluminum grilles for the extior, made screen panel inserts to set behind them & added a plywood door that's hinged at the top & is opened & closed by a cord so we don't have to climb up to operate it. The siding is a bead & batten style that blends in with the log home. Just wish I'd had enough left over exterior siding from the home to do the coop. The roof pitch 4:12 on the backside & 12:12 on the front. I wanted to be able to add more winter time lighting if necessary, & this gives us that option since the front is facing south.
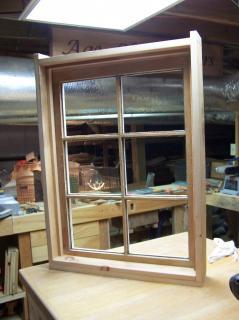
We had a 15 lite entry door that has been stored in the basement for 2 years, so that was covered. But we didn't have any windows. How could a pack rat not have any ol' windows laying around? I must be slippin'. We got lucky at Habitat for Humanity & found 2 old wood sash windows.......cheap....real cheap. Maybe because there wasn't a frame just the sash. These were originally a pair of side hinged windows, but we reworked them to use seperately so we could hinge them at the bottom. I had gotten the idea here BYC from someone that suggested opening the windows at the top & it sounded like a great idea. Thanks to you know who you are!! We're starting out using a small 1/4" cord to set the windows to open only a few inches, but we may convert to a system like we have on the gable vent doors. We stripped the paint on the exterior so we could stain them to match. I took some left over interior siding that came with our log package & made the frames. I really like this clear pine stock. It's a full 7/8" thick & great to work with. I beveled the sill for water runoff & added a drip edge to the bottom of the window sash to keep rain water from soaking the base of the frame & bottom side of the window. We've been having the worse rains this month that we've experienced since we've bought the property, so I'm pleased to say that the rain is moving in the direction we want it to. And we know a lot about rain. We dug our footer in April 2004 & couldn't pour the concrete until the end of October 2004.
Like I said, we had the entry door covered. But we didn't have a door jamb. I wasn't going to pay big bucks for a finger joint jamb, so I bought 3 straight, clean 2x6's at Lowe's, cut out the rabits & away we went. We had some old oak window stools from another job from long ago, so I cut the door jamb legs at a 5 degree pitch & added a threshold for a tight fit to keep the rain out.
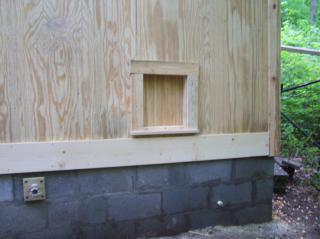
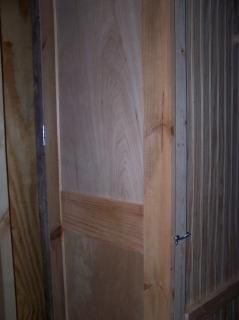
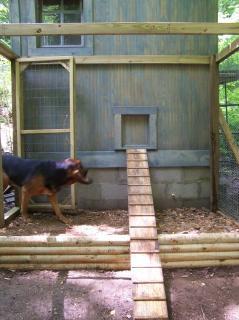
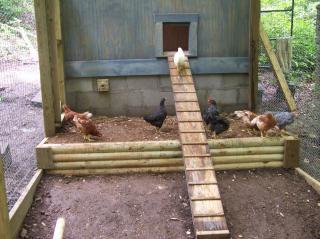
For the chicks, we just made a simple slider from left over siding. I wanted something that I could lock down from the inside & this just worked for us. The lower vent is nothing more than another piece of that 7/8" stock with a series of 1" holes & wire fab between it & the siding. We've been running a T'stat & so far the temps have been good so we believe we've got a decent ventalation system. Here in our hollow, we rarely have used the a/c in the house. So the chicks should do fine, too.
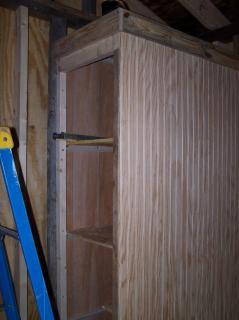
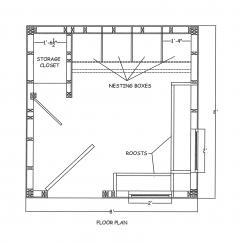
Had to have storage so here it is. My better half wants everything close at hand & I do, too. Inside is lined with left over paneling & the outside face is left over siding from this very job. I made the storage closet door from more of that 7/8" stock & scrap luan. We thought this would be plenty of storage for feed, etc. but the way these kids eat, I think we're going to need a sillo.
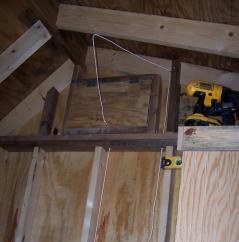
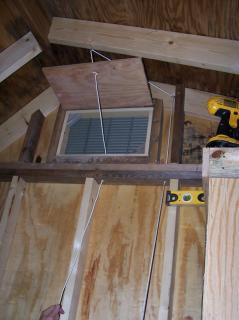
Here's the interior view of the gable vents. We added a rope cleat & simply lash the cord to set the door in position.
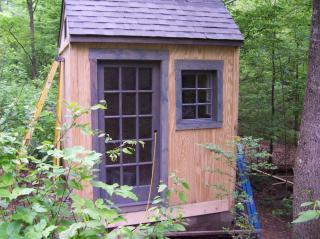
Outside after some staining and roof is on. We wanted to do a metal roof like the house, but we had these shingles left over from another construction job (I say that a lot
") & decided to use what we have. It's been raining here so much this month that we've not been able to put the finish on. Guess we could, but we're not going to seal this much moisture in the wood. But we had to do a few stops just to keep going. So with the help of a trusty fan & a space heater, we dried what we needed to keep trying to get 'er done.
& decided to use what we have. It's been raining here so much this month that we've not been able to put the finish on. Guess we could, but we're not going to seal this much moisture in the wood. But we had to do a few stops just to keep going. So with the help of a trusty fan & a space heater, we dried what we needed to keep trying to get 'er done.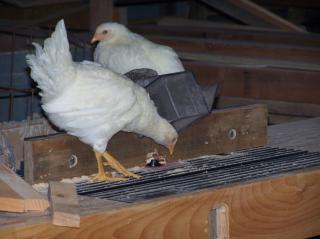
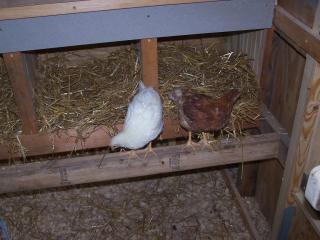
Dad says we need to get the coop finished quick since we have figured out how to get out of our brooder and are trying to help him with the woodworking. Remember those patience lil' chicks? They really don't care if it's rained for 40 days & 40 nights, they're going to keep growing......and growing. They shared my woodshop with me & I have to admit it was a lot of fun having them around. They didn't mind any of the tools running except that router that Ms White is checking out. I turn out my lights when I'd leave the shop & they'd head back to their pen just behind the bench there. As soon as I'd come back & hit the lights, here they'd come & we'd start another project.
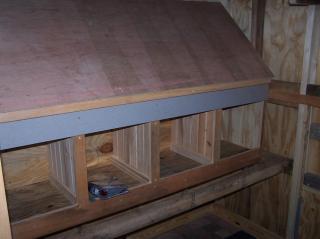
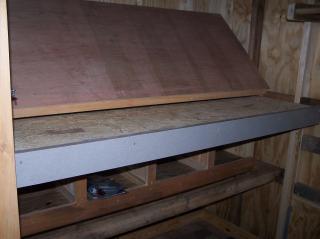
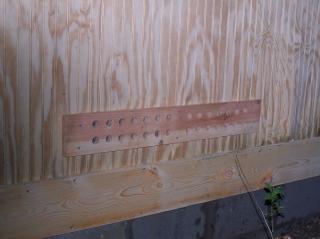
Here's another job I really had fun building. I was starting to run low on scrap plywood & was poking around in my wood stash in the woodshop when I found some door rails (that's the outside frame of a raised panel door) that I'd saved from another job. And there beside them were some short scraps of 6" tongue & groove bead & batten from our ceilings. So the divider panels between the nest boxes turned out to be pretty classy stuff...for left overs. But they're worth it! We ran a roost above the boxes so we added the 45o degree panel. When it's finished it will be covered in plastic laminated (yelp, leftovers) for ease cleanup. Originally, it was just going to be removable so we could take it out to wash it off. But another BYC'r suggested hinging it & adding storage. Thanks, guy! We're going to keep that option open in case we see that we're running short on closet space. The slide out work top will also get a plam top (it's a leftover, too). It pulls out 16" (same as the depth on the nesting boxes) & should give us plenty of workspace.
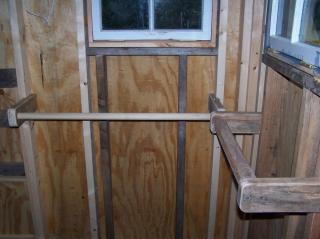
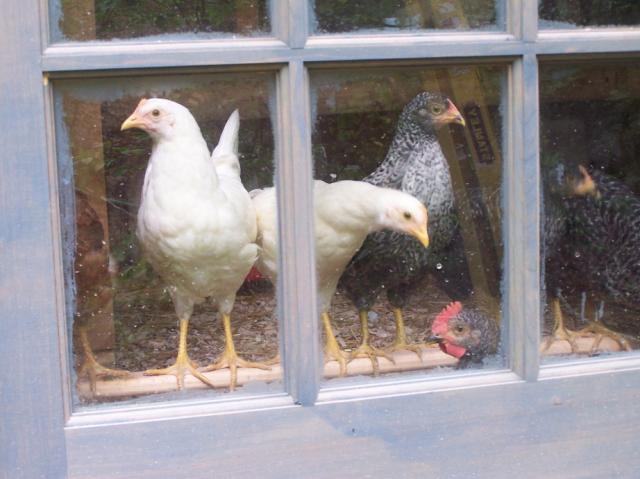
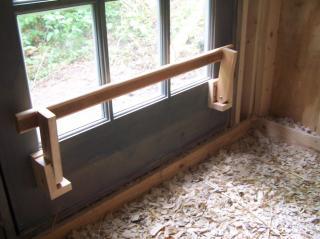
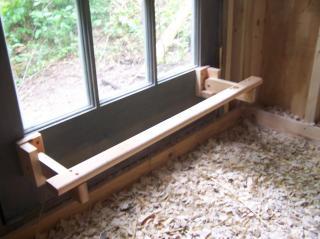
We set the roost around the windows to give them a view. I had leftover closet rod pieces & the worked out nice. When I ran out of those I had a few other options, so they have several perches to chose from. We're curious as to which will be the favorites.
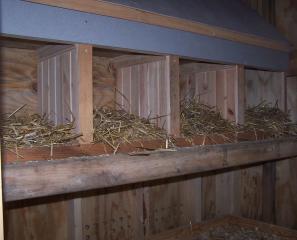
Now if we can just figure out what we're supposed to do in these things...............
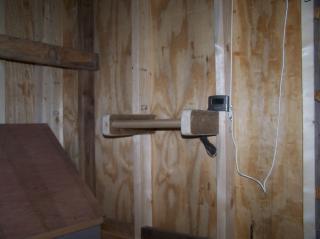
As to what we'd do differently, just don't know. Maybe a little larger, for future growth or expansion. But our thinking is if we need more space in the future, what we have can easily be added on to. That goes for the run as well. I do plan on adding rope cleats to the windows so we have more open/close options, recest pulls on the sliding work table, but first & foremost is the roost on the door! And we got that done this weekend! It's just for fun so I set it up to raise & lower as needed. As soon as we got it up there were peeps peepin out the window!
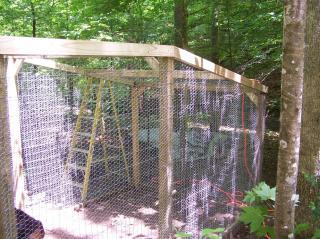
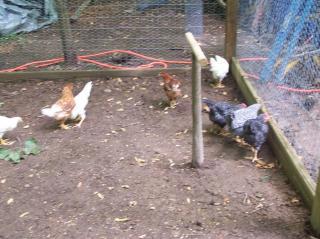
We got to spend a little time on the run this past weekend & now have it secured for the peeps to play outdoors. Our building inspector had to check it out prior to us letting the youngins out to play. He had issues, but we threw him a couple of biscuits and.........never mind. We didn't bribe him. Anyway, the peeps are now getting a regular taste of the great outdoors.
Building on the slope has it's problems. The only really flat ground is at the far end of the run away from the coop. Since we have the water connections at the coop as well as wanting to put in a gate on somewhat level ground convenient to the coop, we decide to level off a spot at the run end of the coop. This will also help with ground insulation for the underground plumbing. We backfilled with creek gravel & sand mix. The peeps love it & it works good for us, too. We're going to try sewing grass seed /or bird seed in the run before they get tooooo used to being outside. We had to cut down a small hickory that was just inside the run, so rather than waste it completely, I took a section of the trunk & made a perch for them. We've got several good size limbs that have come down lately & we have one ready to go in the run so they'll have more roost comin' soon.
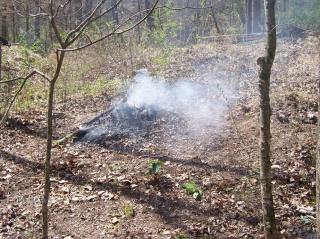
And as with any labor of love project, this will be an on going affair. Heck, we haven't even started on the landscaping. Remember that burn pile up the page? Well......now we have a Coop deVille at t he edge of the woods With a newly beaten path to the front door. We are going to be adding a stoop @ the door with a small planter (Mom's 'maters or peppers). And we'll be reworking the ground to the west (left on the frontview photo) for the herb garden.