My coop took quite a while to build really. About a month. It was not the actual building that took so much time, it was the designing while building, and having to re-think and re-measure, re-cut, etc.
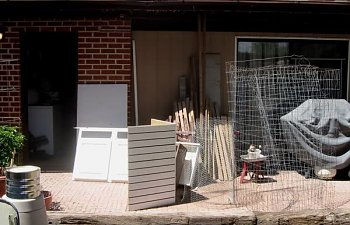
I began with discarded lumber, concrete blocks, wire fencing, and a broken set of cabinets. All gathered up from the local "Bulky and Brush Pick-Up" the city has three times a year. All of us "re-cyclers/trash-pickers" are out in force, driving up and down the neighboring streets to see what can be scrounged for our latest projects.
Here is all the fun stuff I was able to collect in just two days!! Lots of tall 2 X 4's that you can't see leaning up against the house. You do see lots of smaller 1 X 2's and some other smaller pieces of wood.
I got some 6 ft wire fencing and some chicken wire too!!
 I
I
Our Local Post Net was moving and gave me lots of fun stuff to begin my project.
I didn't take many pictures as I was working, I wish I had taken more photos now.
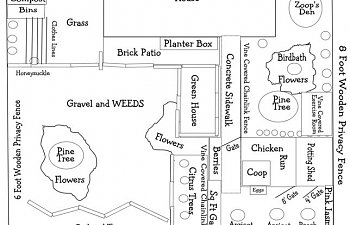
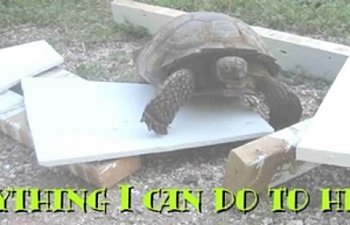
Here is the layout of my backyard as I was planning where the chicken coop and run would go. It is not to scale by any means. Zoop is a Desert Tortoise (just in case you may wonder what lives in Zoop's Den. )
I never really did make any formal "plans" for the chicken coop, It sort of just evolved as I was building it. I did a few sketches just to get the measurements of how much hardware cloth I would need for the open areas, etc. And most of those I threw away once I didn't need them any more.
Here are the first photos of the coop.
Starting to get the walls up. The floor is counter top from the Post Net Store. They moved to a smaller space and didn't have room for the counter. It is a grey formica type of countertop. It will be very easy to clean. And it was like brand new.
One of my neighbors gave me some concrete blocks, there were the perfect amount to go under the floor of the coop and to go along the sidewalk where the chicken run is!! That way if/when it rains I don't have to worry about the chickens getting wet.
Here is the front of the coop.
My first idea for a pop door was to have it slide open on a track. And the hole for the door was cut with that idea in mind. But, later I decided to just put hinges on it and hold it closed with a hook and eye. There is of a porch on the front since making the sides an even 48 inches helped make things easier when it came to using plywood.
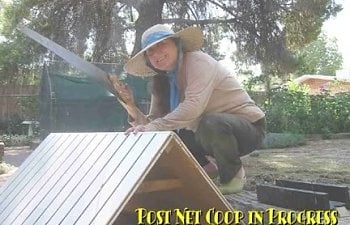
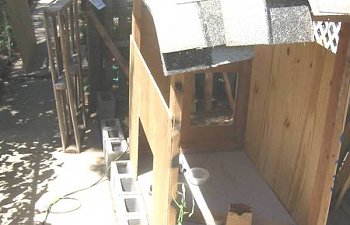
I started to put a shingle roof on the coop, then changed my mind when couldn't find any roofing nails short enough to not poke through the plywood I had under the shingles. Here are a couple of photos of the coop with the shingles on it. I was just trying to see if I had enough shingles to cover the roof. We had some leftover from the new roof we had put on a couple of years ago.
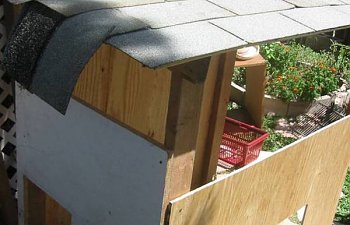
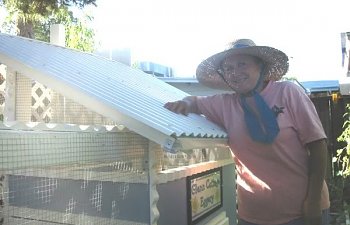
I am glad I found the corregated PVC roofing, it is lightweight, and very easy to install.
It is screwed together rather than using nails. Using screws is so much easier!! Well, if you have a good drill and power screwdriver that is!
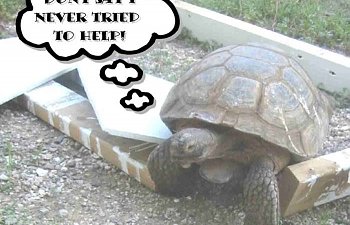
It was easier to paint before putting it together. I set the pieces to be painted on 2 X 4s and was able to put two to three coats of paint on each piece in one day. I had some help with my painting from Zoop, our Desert Tortoise. He could go anywhere in the whole backyard! But, he had to investigate what I was doing!
Here are a couple of photos of the coop with the two longer sides on, but without a roof.
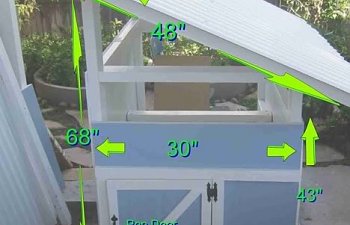
Looking to the south (I added the dimensions)
Looking to the north
As you can see, the pitch of the roof is a lot different from the photos with the shingles on the roof . My husband is a Design Engineer, he came out to look at my building project one day, and told me for a shingle roof, I needed a 30 degree pitch for proper drainage. NEATO!! Ever try to get a certain degree pitch on a roof when you are severely "numerically" challenged?
But I managed with the help of my "good eyes" and a small protrator to get the roof at a 30 degree pitch. Probably I didn't need it that steep for the roof I finally put on it.
Since most of the year we are trying to stay cool rather than warm. And there was so much I read about the importance of "ventilation" for chicken coops, I left the entire top of the coop open. I may regret this on the days that it does get cool here. Or when it is a rainy day with wind. But.... I have only to cover one open area to prevent rain from going into the coop. The other three sides are all protected from any rain.
Tomorrow I will go out and get some measurements and sort of reverse engineer a "plan" for the coop. And add some more photos of the process of building.
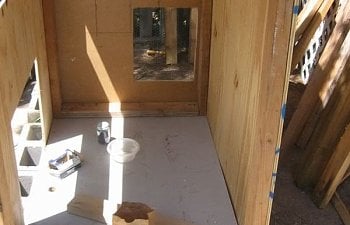
Here is the interior,
Here I have the front panel on with the door closed
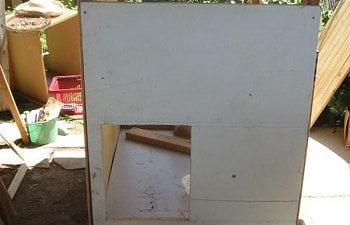
One project that was not so easy to figure out for me was the nest box. Since the coop is small, I wanted it to be on the exterior of the coop. One of my great "finds" was a broken section of kitchen cabinets, with two really nice doors. I used one for the clean out door on the side of the coop and the other for the lid of the nest box.
Here are the dimensions of the nest box, I had to make it fit the size of the cabinet door.
Here is the nest box with the lid on
Here is a photo of me with the nest box, taken before I added the "Eggs" sign above the box.
Here it is all installed, I made it so it goes through the back wall about an inch or. Here is a photo of the nest box from the inside. The opening is covered to keep the chicks out until they begin to lay eggs.
Here is the sign above the nest box.
Here is the back side of the coop with the Egg Sign.
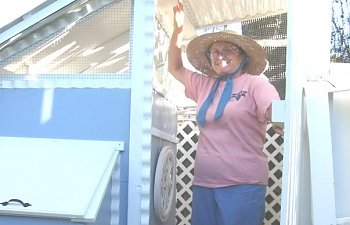
My daughter lives in CO and had a hard time visulizing how big/small the coop was just from the dimensions. So I took these photos for her so she could get a better idea of the size of the coop.
Here is the lower side that runs along the sidewalk to the back garden. ( I am a short person, only 5'2".)
And here I am standing in the gateway to the chicken run so you can see how tall the other side of the coop is.
From the leftover piece of roofing I covered part of the run area. That will keep rain from coming in the windows at the top of the coop on that side whenever it rains (which is very seldom here in the desert.) The run is sand and is about 6" below the grade of the garden area. I may regret this when we have the heavy rains in the summer. It could flood the chicken run. But, my thought was that as the years go by I would be adding more sand and it would eventually be the same height as the garden.
One idea I had was to use the wavy wood molding that goes under the plastic roofing as a trim for the coop and run area. It was very inexpensive, $2.62 for 8 feet of it. Much less than any of the decorative trims I was thinking of using. It worked great to cover the edges of the hardware cloth, and to tidy up the look of the edges of the coop. I think it helps with cutting down on any drafts. I used several tubes of caulking on the coop and one whole tube on the nest box!! There were many crevices where bugs could hide that are now gone and all nicely filled in and painted over.
Next I will give you some pictures of the Gate to the Chicken run and my modifications to make the run more secure.
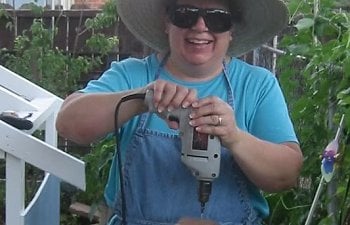
The Gate was not fun!! The gate was made from a section of fencing someone was throwing away. It was found by my helper and good friend Corinne. She was here for the beginning of the coop, but, left to visit her kids in WA. I couldn't have done it without her help!!
Here she is drilling the hole for the decorative wooden ball on the gate.
I figured out how to set the hinges and got the door up...by myself.
But, It wouldn't close due to the roof!!
So... rather than cut the door shorter, I cut a notch in the board so the gate would close. I wanted a tall gate, and didn't want to have to redesign the doorway to the run area.
Here is a picture of the notch I cut in the gate.
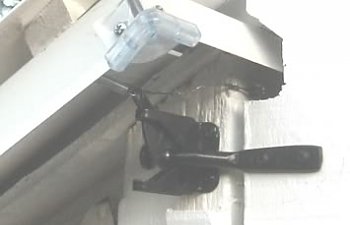
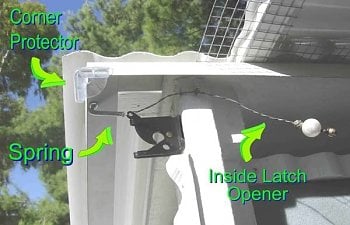
My next problem was how to open the gate from the inside of the coop. I used a piece of wire and put a big pearl and some other beads on the end. That worked sort of ok... but was hard to get it closed from inside. I had my husband look at it. He said "You need a spring on the latch."
So off the Ace Hardware again. And I found the perfect spring! Here is a photo of the finished latch and spring. I even put on plastic corner protectors on the roof edging to keep myself and other from getting hurt on the sharp edges.
Next I will show you some of the Preditor proofing I did for the coop and run.
Here in the city of Tucson, we don't have many preditors. Not that we don't have them, they are just not abundant in the inner city where I live. Since we do have the occasional stray cat, coyote, and a few Red Tail Hawks in the neighborhood I wanted to make sure my chicken area was safe from such preditors.
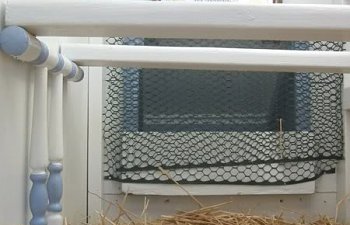
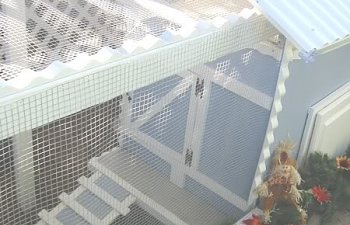
The entire chicken run is covered with Hardware Cloth.
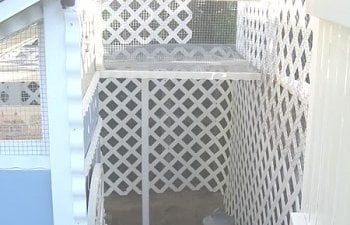
Then two walls of the run are also covered with white PVC Lattice work, with chicken wire on outer side of the lattice work.
One the wall that is shared by my potting shed, the lower half of the potting shed wall is also covered completely with a black rigid corregated plastic that is about 1/4" thick. (it was from some old signs.) It will be very hard for even large bugs to get into the chicken run area.
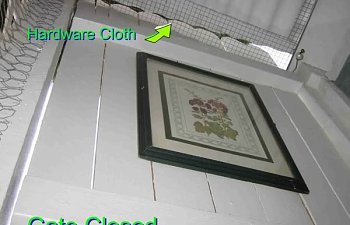
The one weak spot I found was where the gate, the roof of the coop and the partial roof over the run all came together. There was a gap where a wild bird could probably get in the run, but, it would have a real problem getting back out. So I put a strip of hardware cloth to cover the gap. Here is a photo of the area I am talking about.
I did have to put a hook and eye at the bottom of the gate, just to secure it better. But if we had raccoons or any other clever preditors I would have to find a more complex way to keep the bottom of the gate securely closed. One of my neighbors gave me that water color of Hollyhocks for the chickens. She thought they needed some artwork.
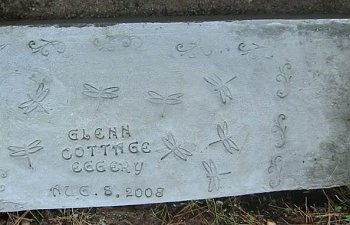
When I put in the post for the gate, I put in a concrete threshold, so it would be quite impossible for any animal to dig under the gate. I used some concrete stamps to put the date and "Glenn Cottage Eggery" on the concrete. It is about 8"thick and the door is centerd on the threshold. I am thinking of putting a door strip on the bottom of the gate, something that has bristles so it will brush the sand off the threshold when the door is opened, and it will keep any smaller than 1/2"critters from coming under the gate.
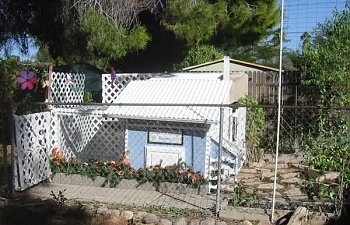
Now that it is fall, and I am "between vines" on the chainlink fence that divides my back yard. It is possible to see the coop, which all summer I had not been able to see due to the Morning Glories and Scarlett Runner Beans. In the winter the fence is covered with Sugar Snap Peas and Oregon Giant Pea Pods.
This is what the neighbor behind me sees when he looks over the fence.
I think it makes a nice addition to the backyard. I can hardly wait until spring when my chicks will be laying eggs, hopefully in the nest box!
I began with discarded lumber, concrete blocks, wire fencing, and a broken set of cabinets. All gathered up from the local "Bulky and Brush Pick-Up" the city has three times a year. All of us "re-cyclers/trash-pickers" are out in force, driving up and down the neighboring streets to see what can be scrounged for our latest projects.
Here is all the fun stuff I was able to collect in just two days!! Lots of tall 2 X 4's that you can't see leaning up against the house. You do see lots of smaller 1 X 2's and some other smaller pieces of wood.
I got some 6 ft wire fencing and some chicken wire too!!
 I
IOur Local Post Net was moving and gave me lots of fun stuff to begin my project.

I didn't take many pictures as I was working, I wish I had taken more photos now.
Here is the layout of my backyard as I was planning where the chicken coop and run would go. It is not to scale by any means. Zoop is a Desert Tortoise (just in case you may wonder what lives in Zoop's Den. )

I never really did make any formal "plans" for the chicken coop, It sort of just evolved as I was building it. I did a few sketches just to get the measurements of how much hardware cloth I would need for the open areas, etc. And most of those I threw away once I didn't need them any more.
Here are the first photos of the coop.
Starting to get the walls up. The floor is counter top from the Post Net Store. They moved to a smaller space and didn't have room for the counter. It is a grey formica type of countertop. It will be very easy to clean. And it was like brand new.

One of my neighbors gave me some concrete blocks, there were the perfect amount to go under the floor of the coop and to go along the sidewalk where the chicken run is!! That way if/when it rains I don't have to worry about the chickens getting wet.
Here is the front of the coop.

My first idea for a pop door was to have it slide open on a track. And the hole for the door was cut with that idea in mind. But, later I decided to just put hinges on it and hold it closed with a hook and eye. There is of a porch on the front since making the sides an even 48 inches helped make things easier when it came to using plywood.
I started to put a shingle roof on the coop, then changed my mind when couldn't find any roofing nails short enough to not poke through the plywood I had under the shingles. Here are a couple of photos of the coop with the shingles on it. I was just trying to see if I had enough shingles to cover the roof. We had some leftover from the new roof we had put on a couple of years ago.


I am glad I found the corregated PVC roofing, it is lightweight, and very easy to install.
It is screwed together rather than using nails. Using screws is so much easier!! Well, if you have a good drill and power screwdriver that is!
It was easier to paint before putting it together. I set the pieces to be painted on 2 X 4s and was able to put two to three coats of paint on each piece in one day. I had some help with my painting from Zoop, our Desert Tortoise. He could go anywhere in the whole backyard! But, he had to investigate what I was doing!


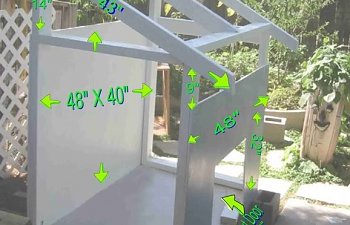
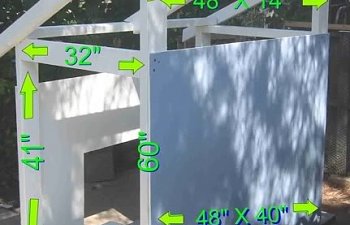
Here are a couple of photos of the coop with the two longer sides on, but without a roof.
Looking to the south (I added the dimensions)

Looking to the north

As you can see, the pitch of the roof is a lot different from the photos with the shingles on the roof . My husband is a Design Engineer, he came out to look at my building project one day, and told me for a shingle roof, I needed a 30 degree pitch for proper drainage. NEATO!! Ever try to get a certain degree pitch on a roof when you are severely "numerically" challenged?
But I managed with the help of my "good eyes" and a small protrator to get the roof at a 30 degree pitch. Probably I didn't need it that steep for the roof I finally put on it.
Since most of the year we are trying to stay cool rather than warm. And there was so much I read about the importance of "ventilation" for chicken coops, I left the entire top of the coop open. I may regret this on the days that it does get cool here. Or when it is a rainy day with wind. But.... I have only to cover one open area to prevent rain from going into the coop. The other three sides are all protected from any rain.
Tomorrow I will go out and get some measurements and sort of reverse engineer a "plan" for the coop. And add some more photos of the process of building.
Here is the interior,

Here I have the front panel on with the door closed

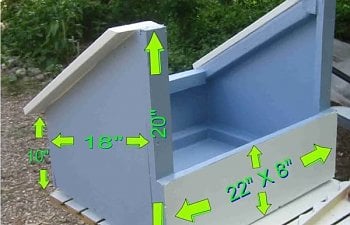
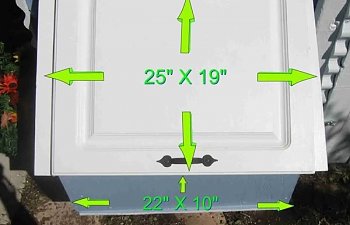
One project that was not so easy to figure out for me was the nest box. Since the coop is small, I wanted it to be on the exterior of the coop. One of my great "finds" was a broken section of kitchen cabinets, with two really nice doors. I used one for the clean out door on the side of the coop and the other for the lid of the nest box.
Here are the dimensions of the nest box, I had to make it fit the size of the cabinet door.

Here is the nest box with the lid on

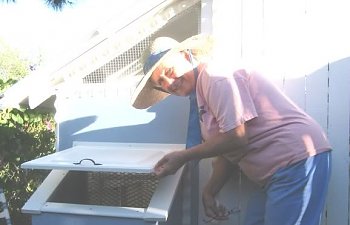
Here is a photo of me with the nest box, taken before I added the "Eggs" sign above the box.

Here it is all installed, I made it so it goes through the back wall about an inch or. Here is a photo of the nest box from the inside. The opening is covered to keep the chicks out until they begin to lay eggs.

Here is the sign above the nest box.

Here is the back side of the coop with the Egg Sign.

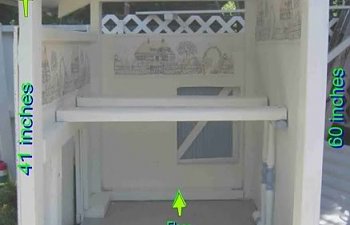
My daughter lives in CO and had a hard time visulizing how big/small the coop was just from the dimensions. So I took these photos for her so she could get a better idea of the size of the coop.
Here is the lower side that runs along the sidewalk to the back garden. ( I am a short person, only 5'2".)

And here I am standing in the gateway to the chicken run so you can see how tall the other side of the coop is.

From the leftover piece of roofing I covered part of the run area. That will keep rain from coming in the windows at the top of the coop on that side whenever it rains (which is very seldom here in the desert.) The run is sand and is about 6" below the grade of the garden area. I may regret this when we have the heavy rains in the summer. It could flood the chicken run. But, my thought was that as the years go by I would be adding more sand and it would eventually be the same height as the garden.
One idea I had was to use the wavy wood molding that goes under the plastic roofing as a trim for the coop and run area. It was very inexpensive, $2.62 for 8 feet of it. Much less than any of the decorative trims I was thinking of using. It worked great to cover the edges of the hardware cloth, and to tidy up the look of the edges of the coop. I think it helps with cutting down on any drafts. I used several tubes of caulking on the coop and one whole tube on the nest box!! There were many crevices where bugs could hide that are now gone and all nicely filled in and painted over.
Next I will give you some pictures of the Gate to the Chicken run and my modifications to make the run more secure.
The Gate was not fun!! The gate was made from a section of fencing someone was throwing away. It was found by my helper and good friend Corinne. She was here for the beginning of the coop, but, left to visit her kids in WA. I couldn't have done it without her help!!
Here she is drilling the hole for the decorative wooden ball on the gate.

I figured out how to set the hinges and got the door up...by myself.
But, It wouldn't close due to the roof!!
So... rather than cut the door shorter, I cut a notch in the board so the gate would close. I wanted a tall gate, and didn't want to have to redesign the doorway to the run area.
Here is a picture of the notch I cut in the gate.

My next problem was how to open the gate from the inside of the coop. I used a piece of wire and put a big pearl and some other beads on the end. That worked sort of ok... but was hard to get it closed from inside. I had my husband look at it. He said "You need a spring on the latch."
So off the Ace Hardware again. And I found the perfect spring! Here is a photo of the finished latch and spring. I even put on plastic corner protectors on the roof edging to keep myself and other from getting hurt on the sharp edges.

Next I will show you some of the Preditor proofing I did for the coop and run.
Here in the city of Tucson, we don't have many preditors. Not that we don't have them, they are just not abundant in the inner city where I live. Since we do have the occasional stray cat, coyote, and a few Red Tail Hawks in the neighborhood I wanted to make sure my chicken area was safe from such preditors.
The entire chicken run is covered with Hardware Cloth.

Then two walls of the run are also covered with white PVC Lattice work, with chicken wire on outer side of the lattice work.

One the wall that is shared by my potting shed, the lower half of the potting shed wall is also covered completely with a black rigid corregated plastic that is about 1/4" thick. (it was from some old signs.) It will be very hard for even large bugs to get into the chicken run area.
The one weak spot I found was where the gate, the roof of the coop and the partial roof over the run all came together. There was a gap where a wild bird could probably get in the run, but, it would have a real problem getting back out. So I put a strip of hardware cloth to cover the gap. Here is a photo of the area I am talking about.

I did have to put a hook and eye at the bottom of the gate, just to secure it better. But if we had raccoons or any other clever preditors I would have to find a more complex way to keep the bottom of the gate securely closed. One of my neighbors gave me that water color of Hollyhocks for the chickens. She thought they needed some artwork.
When I put in the post for the gate, I put in a concrete threshold, so it would be quite impossible for any animal to dig under the gate. I used some concrete stamps to put the date and "Glenn Cottage Eggery" on the concrete. It is about 8"thick and the door is centerd on the threshold. I am thinking of putting a door strip on the bottom of the gate, something that has bristles so it will brush the sand off the threshold when the door is opened, and it will keep any smaller than 1/2"critters from coming under the gate.

Now that it is fall, and I am "between vines" on the chainlink fence that divides my back yard. It is possible to see the coop, which all summer I had not been able to see due to the Morning Glories and Scarlett Runner Beans. In the winter the fence is covered with Sugar Snap Peas and Oregon Giant Pea Pods.

This is what the neighbor behind me sees when he looks over the fence.

I think it makes a nice addition to the backyard. I can hardly wait until spring when my chicks will be laying eggs, hopefully in the nest box!